

App Registration - PowerShell
Microsoft recently discontinued the legacy API that iMIS for Outlook used to access attachments. The replacement API requires that a domain administrator create and link an Entra App Registration for iMIS for Outlook. Follow this guide to set up Entra app registration for iMIS for Outlook using Microsoft PowerShell.
To follow this guide, a basic familiarity with PowerShell is needed. Users can also follow the Entra Console setup guide instead.
In order to complete these steps, you must be a Microsoft Entra Administrator or Global Administrator in the target tenant.
Prerequisites
The machine running the script must have access to the internet, and must have an account or credentials to log in to the tenant where the app will be configured.
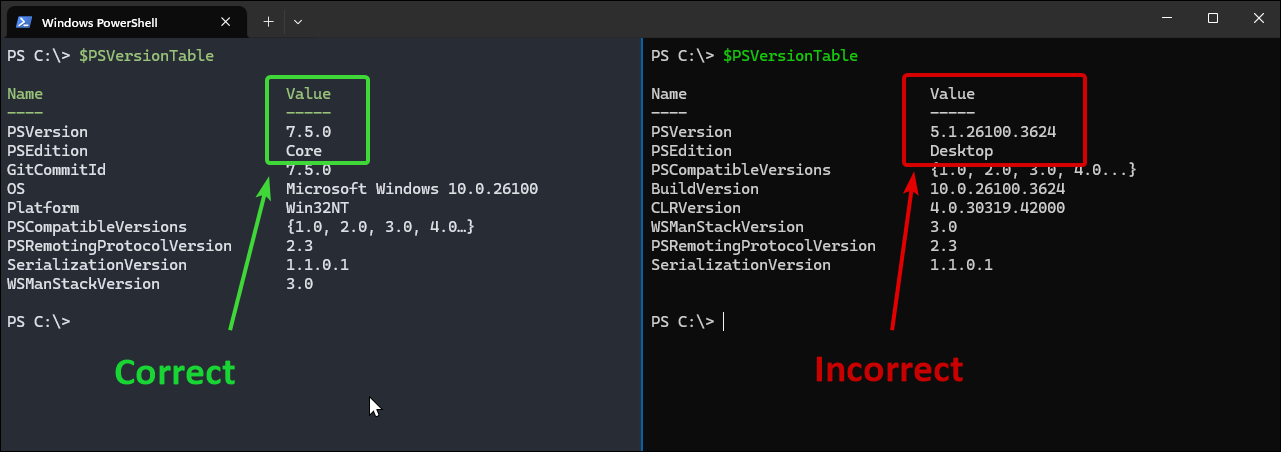
The machine must be running PowerShell v7.x. Verify which version of PowerShell you are running by opening the Windows Terminal and entering $PSVersionTable. If the table displays a version number starting with 7.x, you are running the correct version.
Running the script
Do the following to run the script:
- From the Start menu, search for Windows Powershell.
- Right-click Windows Powershell and select Run as Administrator.
- Copy and paste each of the following lines, then press Enter on your keyboard to run each line:
Note: If you get any security errors when running scripts, it is possible you may need to contact your IT department or MSP to have them temporarily lift security restrictions on your computer in order to complete these steps.
- Set execution policy:
Set-ExecutionPolicy Unrestricted -Scope Process -Force- Download the script to a temporary folder:
cd $env:TEMP; (Invoke-WebRequest -Method GET -Uri https://cdn.us.imisapps.com/outlook/iemail-entra-install-script -UseBasicParsing).Content > install-iemail.ps1Warning: Always review scripts downloaded from the internet before running them, to ensure they do not contain malicious code. Click here to review the install script..
- Run the script:
. .\install-iemail.ps1- After running the script, log in with your Microsoft account. Be sure to select the correct account that is 1) an administrator or user with Entra permissions, and 2) is a member of the correct tenant.
- After logging in and returning to the PowerShell window, the output shows the Application ID.
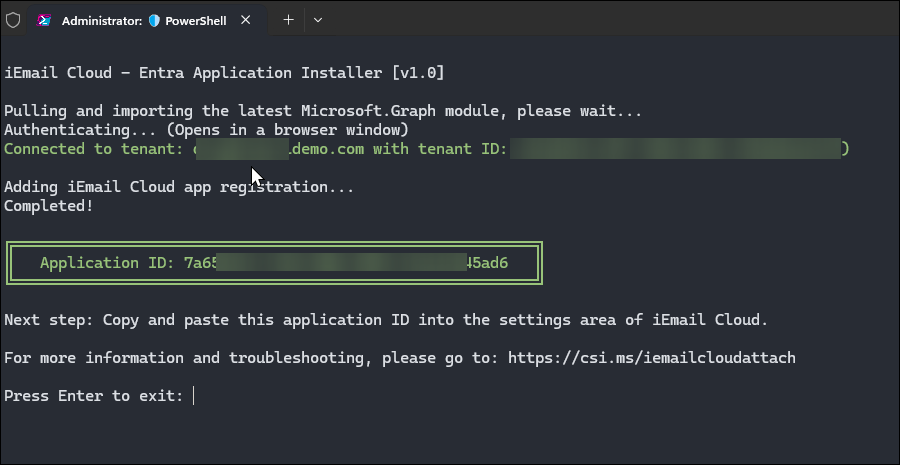
- Copy the Application ID in the output and save it in a temporary location, such as a Notepad window.
Note: If you lose the Application ID, you can get it again from the Entra admin console.
- Close the console window.
Configuring iMIS for Outlook
Return to the iMIS for Outlook Attachment Configuration page to finish the setup.
Updated 18 days ago