

Installation and Deployment
Migrating to Power Suite?Instructions to migrate from the previous CSI manifest to the new Power Suite manifest can be found below.
Before users can begin using iMIS for Outlook, the Outlook add-in must be installed and made available in Microsoft Outlook. Organizations can install the integration using one of the following methods:
- Central deployment by a Microsoft 365 administrator
- Individual installation performed by an individual user
The method you choose depends on how your organization manages Microsoft 365 applications and how broadly the integration should be deployed.
This article provides an overview of the available installation methods and the requirements to review before beginning installation.
Before installing
Before installing iMIS for Outlook, review the following requirements to ensure your environment is prepared.
NoteThe exact requirements may vary depending on how the integration is deployed in your environment.
Licensing
iMIS for Outlook requires a valid license as part of the iMIS Power Suite. Contact your AiSP or CPIL if you are unsure whether your organization has access to this feature.
Microsoft Outlook environment
The Outlook Integration is designed to work within Microsoft Outlook environments, and is compatible with the web, desktop, and mobile Outlook.
NoteThere are some restrictions on mobile. See iMIS for Outlook Mobile Setup for details.
Cloud Dashboard access
You must already have access to your Cloud ID and Cloud Dashboard. From the Cloud Dashboard, assign users that can log into the Outlook Integration. See Managing access to the Cloud Dashboard.
Installation methods
iMIS for Outlook can be installed using either centralized deployment or individual installation. Organizations typically choose the installation method based on their IT policies and how widely the integration should be available to users.
| Method | Description | When to use | Next steps |
|---|---|---|---|
| Central Deployment | Central deployment allows a Microsoft 365 administrator to deploy the Outlook add-in to multiple users at once using the Microsoft 365 Admin Center. | Central deployment is generally recommended for organizations that want the Outlook Integration available to multiple staff members, for example:
| Central deployment for multiple users |
| Individual Installation | Individual installation allows a single user to install the Outlook add-in for their own Outlook environment. | Useful for the following scenarios:
For individual installation, the IT administrator must ensure the following:
| Individual user installation |
After installation
After the Outlook Integration has been installed, additional configuration may be required before users can begin using the integration. This configuration may include:
- Authentication setup
- Activity type configuration
- Field mapping between Outlook and iMIS
- Attachment configuration
See the following articles for additional setup steps:
Power Suite migration
If your organization is migrating from the previous CSI manifest to the new Power Suite manifest, follow these steps:
- Remove the old CSI manifest from all user environments.
- For per-user installations, each user will need to remove the old add-in.
- For centralized deployments, the Microsoft 365 administrator will need to remove the old add-in for all users.
- Deploy the new Power Suite manifest using either centralized deployment or individual installation. (See above instructions for details.)
- Wait for the deployment to complete and the add-in to become available inside Outlook.
- If you are using Single Sign-On (SSO), update the redirect URL on the Client Application record in iMIS to one of the following values, replacing
[CloudID]with your Cloud ID:-
 US —
US — https://iemail.us.imisapps.com/ ClientApplication/Token/[CloudID] -
 CA —
CA — https://iemail.ca.imisapps.com/ ClientApplication/Token/[CloudID] -
 AP —
AP — https://iemail.ap.imisapps.com/ ClientApplication/Token/[CloudID] -
 UK —
UK — https://iemail.uk.imisapps.com/ ClientApplication/Token/[CloudID] - If you are not currently using Single Sign-On (SSO), we strongly advise that you set it up. Instructions can be found here: Configuring Single Sign-On with iMIS
-
- If you have already previously configured attachment support, you will need to update the list of redirect URIs in the Microsoft Entra admin console, under App Registrations, to include the new redirect URLs:
- For Single-page application URIs, update the redirect list to:
brk-multihub://iemail.imisapps.combrk-multihub://iemail.ap.imisapps.combrk-multihub://iemail.ca.imisapps.combrk-multihub://iemail.uk.imisapps.combrk-multihub://iemail.us.imisapps.com
- For Web URIs, update the redirect list to:
https://iemail.imisapps.comhttps://iemail.ap.imisapps.comhttps://iemail.ca.imisapps.comhttps://iemail.uk.imisapps.comhttps://iemail.us.imisapps.com
- For Single-page application URIs, update the redirect list to:
- Verify that users can sign in to the new add-in.
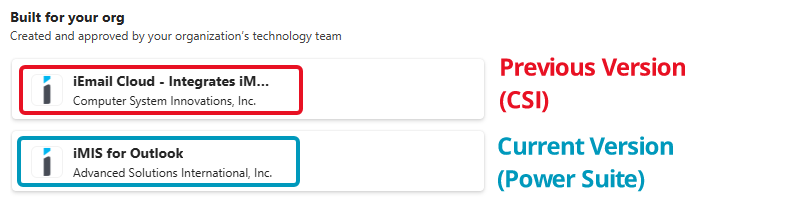
How to tell the add-ins apart
❌ The previous add-in (from CSI) that should be removed/uninstalled is identified as:
iEmail Cloud - Integrates iMIS and Outlook
Computer System Innovations, Inc.
✅ The current add-in (Power Suite) that should be installed and used going forward is identified as:
iMIS for Outlook
Advanced Solutions International, Inc.
Updated 16 days ago