

Configuring Single Sign-On with iMIS
Single sign-on (SSO) authentication between iMIS and iMIS for Outlook relies on OpenID Connect (OIDC) to authenticate users through iMIS or an external identity provider. When configured, users can sign in using their existing credentials, with support for multi-factor authentication (MFA) enforced by the identity provider.
The authentication flow includes automatic redirection to the appropriate identity provider, respects existing MFA sessions, and grants access based on configured security policies. Administrators can also test the SSO configuration and review authentication results to confirm successful sign-in or troubleshoot failures.
Section 1: Create the client application in iMIS
To get started, you must first create a new SSO client application in iMIS, then add the application to a content record.
Complete the following required steps:
- Add the client application entry in iMIS
- Enter the following value for the redirect URL, selecting the correct URL that matches the region of your Cloud ID, and replacing
[CloudID]with your Cloud ID:-
 US —
US — https://iemail.us.imisapps.com/ClientApplication/Token/[CloudID] -
 CA —
CA — https://iemail.ca.imisapps.com/ClientApplication/Token/[CloudID] -
 AP —
AP — https://iemail.ap.imisapps.com/ClientApplication/Token/[CloudID] -
 UK —
UK — https://iemail.uk.imisapps.com/ClientApplication/Token/[CloudID] -
Example: If your home region is CA, and your Cloud ID is
XYZIMIS, then your redirect URL would be:https://iemail.ca.imisapps.com/ClientApplication/Token/XYZIMIS
-
- Create a Client ID. It can be anything that iMIS accepts. (Recommended value:
iMIS-for-Outlook) - Create a Client Secret. Use a password manager or trusted website to generate a random alphanumeric password. (Recommended length: between 16 and 24 characters)
- Enter the desired refresh lifetime value, in minutes. This is the maximum (not guaranteed) length of time that users can come back to iMIS for Outlook without needing to re-authenticate. (Recommended value:
60)
- Enter the following value for the redirect URL, selecting the correct URL that matches the region of your Cloud ID, and replacing
- Add the client application SSO iPart to a RiSE page
- The page's access security must be set to: Authenticated Users Read
- Include only the Single sign-on iPart on the page, with the client application selected that you created above in Step 1.
- Publish the page and make note of the full, published URL beginning with
https://.
Section 2: Configure iMIS for Outlook with your SSO settings
-
Open Outlook.
-
From the Home menu bar, click More apps.
-
Choose iMIS for Outlook.
-
Click Sign In Now.
-
Enter your iMIS Username, iMIS Password, and Cloud ID.
-
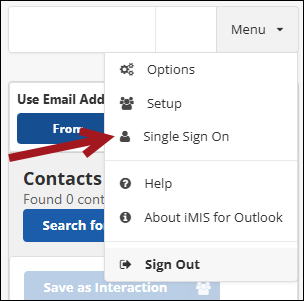
Click Menu > Single Sign On.
-
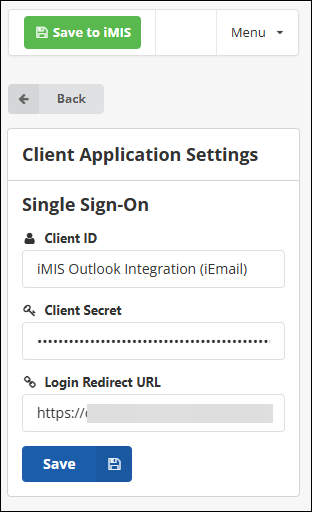
Enter the same Client ID and Client Secret that was entered into iMIS.
-
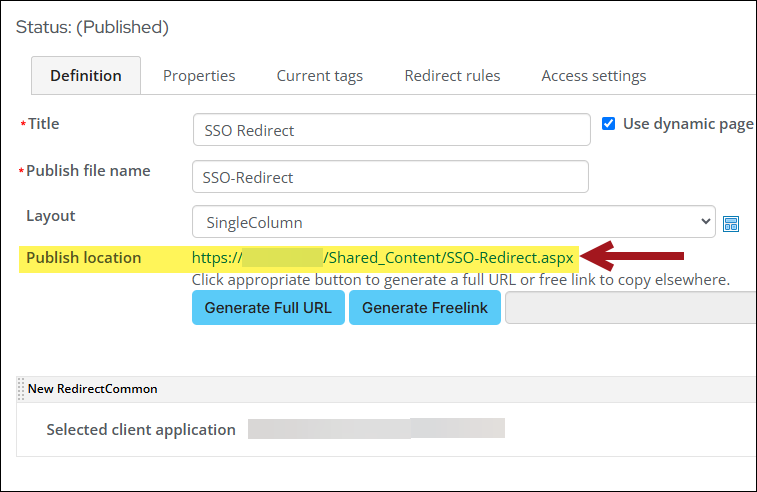
The Login Redirect URL will be the Publish location URL on the corresponding iMIS content record. Do the following to locate the URL:
-
Open the content record that has the client application redirect content item on it.
-
Copy the Publish location URL.
-
Paste the URL into the Login Redirect URL field.
-
-
Click Save.
Testing the new SSO connection
To validate and test that the new SSO connection is working, do the following:
-
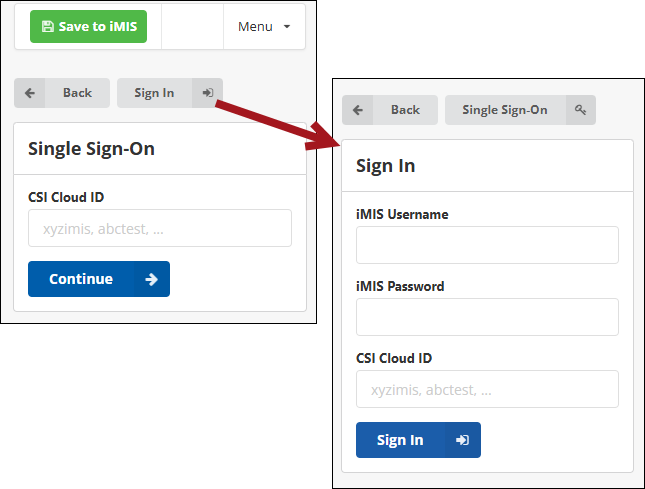
Sign out from the Outlook Integration. The Single Sign-On authentication method displays.
-
You can use the Single Sign-On authentication method or click Sign In to use your iMIS credentials instead. Click Single Sign-On to bring back the SSO authentication method.
-
Enter the Cloud ID and click Continue. A pop-up window will appear and redirect you to the iMIS site for authentication.
-
Sign in using the authentication method. The pop-up window will close, and you will automatically be logged in with the Outlook Integration.
Troubleshooting
Review the following if you are experiencing any issues.
| Error message | Potential cause and fix |
|---|---|
| Missing authentication data from login window. | Certain browser extensions may be interfering with the SSO. Try disabling all browser extensions. Certain extensions, such as MetaMask, have been known to cause login issues when the SSO is enabled. |
Updated 3 days ago