

Initial Deployment Steps
Once you have purchased the Roster Manager iPart, the following deployment steps are required:
1. Creating the panel sources
The following panel sources must be created:
| Source | Description |
|---|---|
| CSI_RosterManager_Action | When users submit a request using the iPart, an entry is saved into CSI_RosterManager_Action as summary information. |
| CSI_RosterManager_ActionItem | Details regarding the request are saved into CSI_RosterManager_ActionItem. |
| CSI_RosterManager_ActionDetails | For easier reporting of the action detail each time the Roster Manager iPart is used, the CSI_RosterManager_ActionDetails source will store the action details specific to the user record that was selected for the action. This panel source is also a good place to store the answers to the additional information questions that will be used within the iPart. |
Do the following to create the panel sources:
- Go to RiSE > Panel Designer > Panel sources.
- Select Add new panel source:
- Source name - CSI_RosterManager_Action
- Parent type - Contact
- Multi-instance - Enabled
- Click Save.
- Select Add new property, and add the following properties:
| Property name | Property type | Length | Data to be stored |
|---|---|---|---|
| ActionKey | Text | 36 | Unique identifier (GUID) - Primary Key |
| Code | Text | 30 | Workflow action code |
| Status | Text | 1 | Status of transaction A - Active B - Busy C - Cancelled D - Done E - Error |
| Message | Text | 4000 | Response message |
| Exception | Text | 4000 | Exception error |
| DateAdded | Date and Time | UTC date and time record was added | |
| LastUpdated | Date and Time | UTC date and time record was last updated |
- Go back to RiSE > Panel Designer > Panel sources.
- Select Add new panel source:
- Source name - CSI_RosterManager_ActionItem
- Parent type - Contact
- Multi-instance - Enabled
- Click Save.
- Select Add new property, and add the following properties:
| Property name | Property type | Length | Data to be stored |
|---|---|---|---|
| ActionKey | Text | 36 | Unique identifier (GUID) tie back to Activity record |
| ItemKey | Text | 36 | Unique identifier (GUID) - Primary Key |
| SelectedId | Text | 10 | (Effected) iMIS ID of the person being selected (altered/changed) |
| Blob | Upload File | Workflow definition compressed and serialized | |
| Status | Text | 1 | Status of transaction A - Active B - Busy C - Cancelled D - Done E - Error |
| Message | Text | 4000 | Response message |
| Exception | Text | 4000 | Exception error |
| DateAdded | Date and Time | UTC date and time record was added | |
| LastUpdated | Date and Time | UTC date and time record was last updated |
- Go back to RiSE > Panel Designer > Panel sources.
- Select Add new panel source:
- Source name - CSI_RosterManager_ActionDetails
- Parent type - Contact
- Multi-instance - Enabled
- Click Save.
- Select Add new property, and add the following properties:
| Property name | Property type | Length | Data to be stored |
|---|---|---|---|
| Action | Text | 100 | Action "code" or "label" to see the action that was selected |
| TransactionDate | Date | Current Date when action was taken | |
| LoggedInUserID | Text | 40 | Logged in User that completed action |
| CompanyID | Text | 40 | Selected ID where the action was completed |
| Date1 | Date | Answer to a date field using in additional info section | |
| Date2 | Date | Answer to a date field using in additional info section | |
| Date3 | Date | Answer to a date field using in additional info section | |
| File1 | File Upload | File added in additional info section | |
| File2 | File Upload | File added in additional info section | |
| File3 | File Upload | File added in additional info section | |
| Text1 | Text | 500 | Answer to a text field used in additional info section |
| Text2 | Text | 500 | Answer to a text field used in additional info section |
| Text3 | Text | 500 | Answer to a text field used in additional info section |
- Add other field types based on the data from the additional info section that you want to store, i.e. decimal, integer, yes_no, etc.
2. Creating the general lookup tables
When you complete a workflow using the Roster Manager iPart, iMIS checks your license information to make sure it’s valid.
Do the following to create the tables:
- Go to Settings > General lookup tables.
- Select Add new table:
-
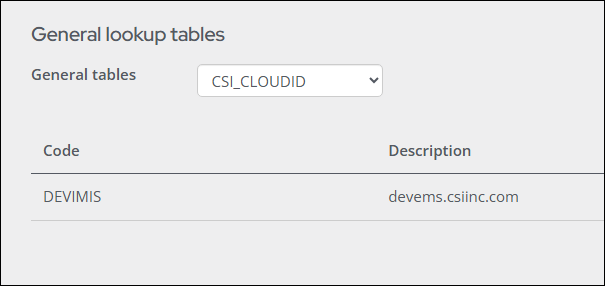
Table name - CSI_CLOUDID
-
Code - Cloud ID provided by ASI at time of purchase (e.g., DEVIMIS)
-
Description - The iMIS URL.
- If you plan on using Roster Manager across more than one of your organizations' sites, then it is recommended to use the root domain of the iMIS URL to cover all subdomains. For example:
- iMIS URL: https://members.example.com
- Code: EXAMPLEIMIS
- Description: example.com
- If you have multiple domain names referring to the same Cloud ID instance, you can add another general lookup entry in the CSI_CLOUDID table and use the Expansion field to store the Cloud ID. In this case the Code value will be discarded, and the Expansion value will be substituted instead. For example:
- iMIS URL: https://online.asi.com
- Code: ASIIMISA
- Description: asi.com
- Expansion: ASIIMIS
- If you plan on using Roster Manager across more than one of your organizations' sites, then it is recommended to use the root domain of the iMIS URL to cover all subdomains. For example:
-
- Click Save & Continue.
- Click Close.
-
From the General tables drop-down, choose (None selected).
-
Select Add new table:
-
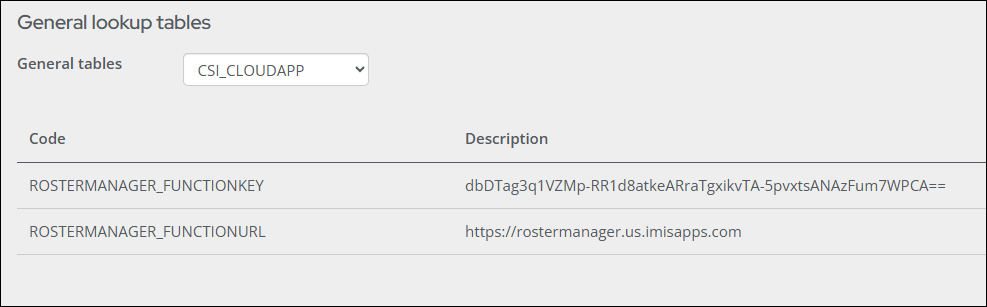
Table name - CSI_CLOUDAPP
-
Code - ROSTERMANAGER_FUNCTIONURL
-
Description - Depending on the region, enter one of the following:
- United States - https://rostermanager.us.imisapps.com/
- Canada - https://rostermanager.ca.imisapps.com/
- Asia Pacific - https://rostermanager.ap.imisapps.com/
- United Kingdom - https://rostermanager.uk.imisapps.com
-
Click Save & Continue.
-
Code - ROSTERMANAGER_FUNCTIONKEY
-
Description -
-
United States - dbDTag3q1VZMp-RR1d8atkeARraTgxikvTA-5pvxtsANAzFum7WPCA==
-
Canada - s4hL-G6mvcDtZgU-Yd6SA7pPVVtLpPCMQ4VKaM8oCW28AzFuSl6lMA==
-
Asia Pacific - H6R6Eq6fBx9IYHtPw1KAkKuaktsMd9dNW7uxGvLBYULjAzFuy8tJwQ==
-
United Kingdom - 5R8obwO8v8gNGjIDmNITjajJfrscyCScPlke63O_U9oWAzFuNBnVog==
-
-
Click Save & Continue.
-
Click Close.
-
3. Creating the content type
Do the following to create a new content type:
-
Go to RiSE > Maintenance > Content types.
-
Select the Custom folder.
-
Select New > Content Type.
-
Select Client-based (preferred):
- Name of Content Type - CSI Roster Manager
- Description of Content Type - CSI Roster Manager - iPart
- URL to the html file that is used to display items of this type at runtime - Depending on the region, enter one of the following:
- United States - https://cdn.us.imisapps.com/apps/roster-manager/display.html
- Canada - https://cdn.ca.imisapps.com/apps/roster-manager/display.html
- Asia Pacific - https://cdn.ap.imisapps.com/apps/roster-manager/display.html
- United Kingdom - https://cdn.uk.imisapps.com/apps/roster-manager/display.html
- URL to the html file that is used to configure content items of this type - Depending on your region, enter one of the following:
- United States - https://cdn.us.imisapps.com/apps/roster-manager/configure.html
- Canada - https://cdn.ca.imisapps.com/apps/roster-manager/configure.html
- Asia Pacific - https://cdn.ap.imisapps.com/apps/roster-manager/configure.html
- United Kingdom - https://cdn.uk.imisapps.com/apps/roster-manager/configure.html
Updated about 1 month ago