

Applying a BluePay Recurring Plan to an Existing iMIS Pledge
If you have an existing iMIS pledge open, and you want to tie it to a BluePay recurring ("rebilling") plan so that future payments will pay down the pledge, follow these instructions.
Keep in mind the following:
- This article only applies if you are on Donate Now - Premium 2.9.1 or higher, and have an existing open pledge that was not created via Donate Now - Premium initially.
- Older versions of Donate Now - Premium do not have the capability to pay down pledge installments.
- If you have an existing rebilling plan you'd like to use within BluePay, navigate to the rebill admin screen which lists the details of the rebilling plan, and skip Step 2.
Step 1: Obtain the original pledge transaction number
Do the following to obtain the original pledge transaction number:
- In iMIS Desktop, go to Customers and load the donor's record.
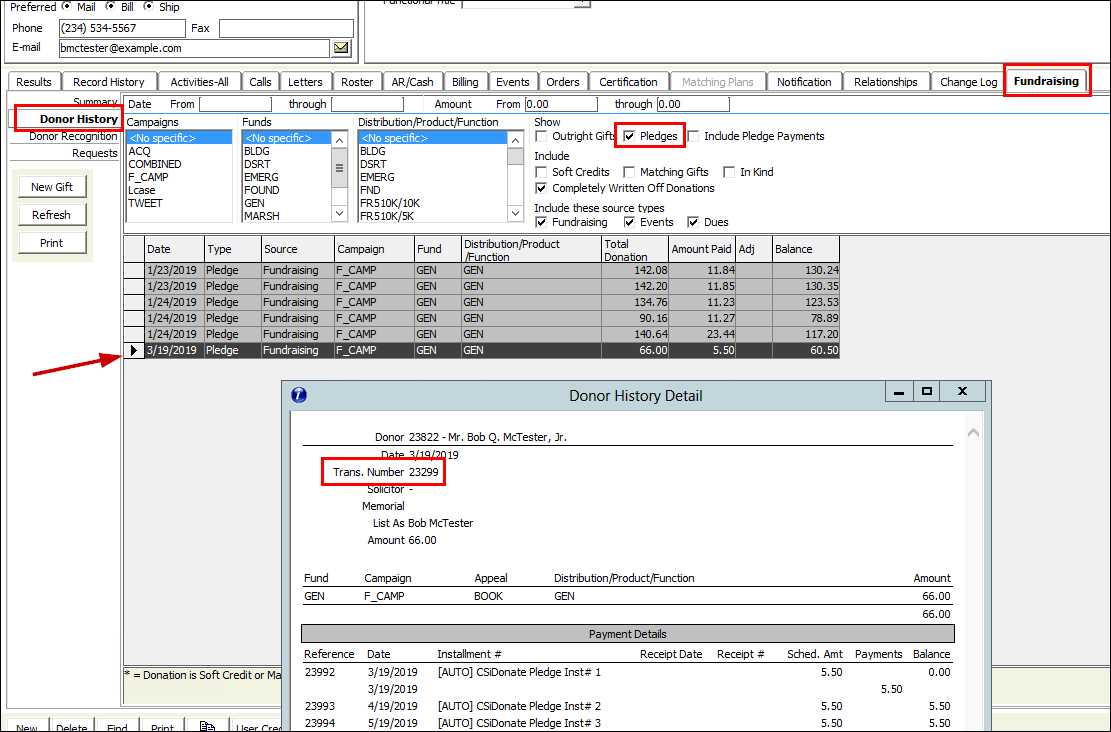
- In the bottom row of tabs, click Fundraising > Donor History, and only show Pledges.
- Click Refresh.
- Find the pledge you'd like to use with BluePay, and double click the record to select it. The pledge detail report opens.
- From this detail window, note the following pieces of information which you will need later:
- Trans. Number
- Number of remaining payments
- Payment amount
Step 2: Set up the BluePay rebilling plan
Do the following to set up the BluePay rebilling plan:
- Sign in to the BluePay Secure Portal with the same account that is used for Donate Now - Premium BluePay payments. For multiple accounts (fraternity/foundation/housing/etc), the account must match.
- Go to Processing > Virtual Terminal.
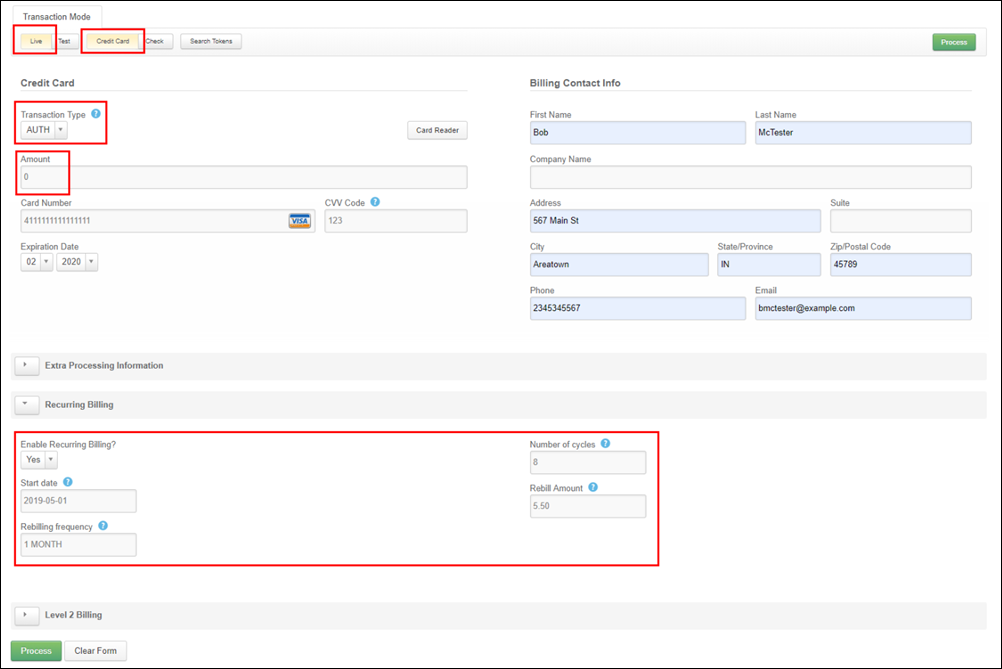
- Fill out the following standard fields with the billing information:
- Transaction Mode: Live
- Transaction Type: Credit Card (Or, select Check if you are processing ACH and have enabled ACH on your BluePay account)
- All Contact Information: (First, Last, Address, Phone, Email)
- Credit Card Number
- CVV2 Code
- Expiration Date
- Additionally, fill out the following non-standard fields:
- Transaction Type: AUTH
- Amount: $0 (The pledge amount will be entered below.)
- Under the Recurring Billing section, fill out the following fields:
- Enable: Yes
- Start date: The first date you would like to start payments on
- Rebilling Frequency: Must match the pledge frequency, use one of the following examples:
- Monthly: 1 MONTH
- Quarterly: 3 MONTH
- Semi-Annually: 6 MONTH
- Annually: 1 YEAR
- Number of Cycles: The number of pledge installments remaining.
- Rebill Amount: The amount to pay towards each installment.
- When finished, click Process.
NoteIf you do not have all of the necessary credit card information (Card #, CVV2, and Expiration), you will need to obtain this information from the donor.
NoteIt is not currently possible to pay a different amount towards the last pledge installment, if it differs due to rounding.
Step 3: Note the BluePay recurring plan information
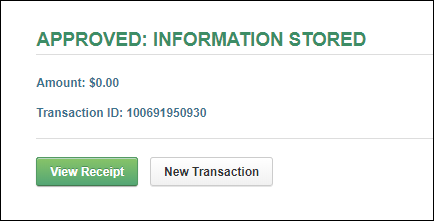
If successful, BluePay will respond with APPROVED: INFORMATION STORED. This is a successful message which tells you the credit card information was stored for later processing (the Start Date above), but was not charged today.
Do the following to note the BluePay recurring plan information:
- On this screen, click View Receipt
- On the Receipt screen, click Return to Details. This will take you to the transaction details screen.
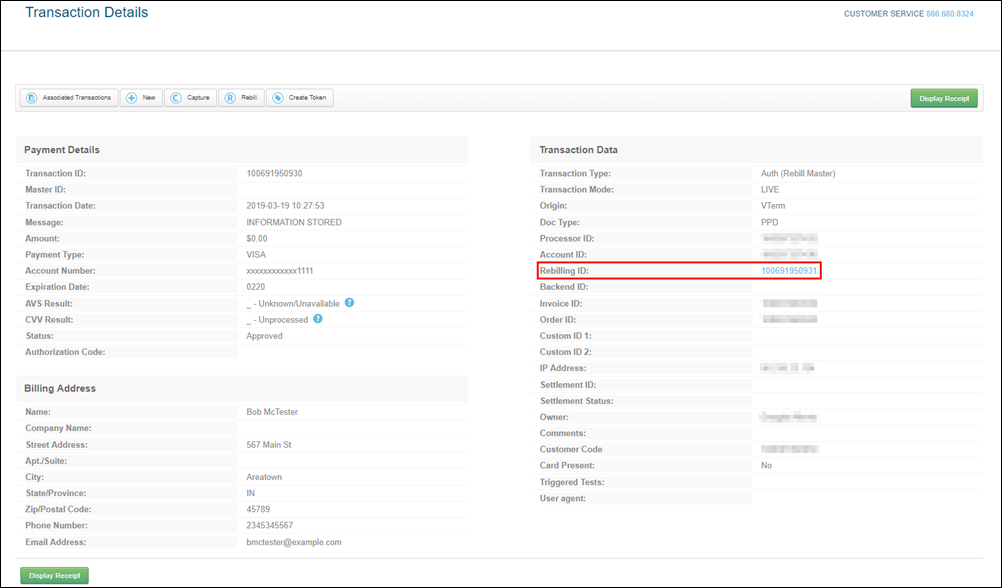
- Click Rebilling ID to go to the Rebill Admin screen.
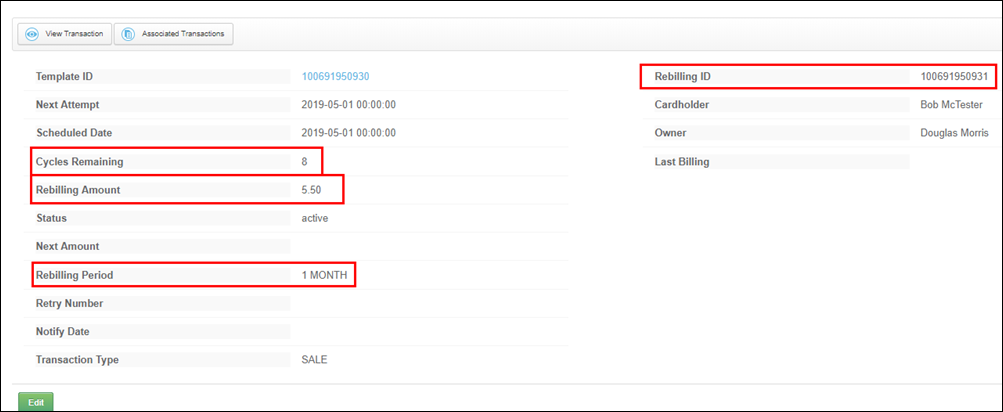
- On the Rebill Admin screen, make note of the following fields:
- Rebilling ID
- Cycles Remaining
- Rebilling Amount
- Rebilling Period
Step 4: Determine the Donate Now - Premium financial account ID
A Donate Now - Premium Financial Account profile is where Donate Now - Premium stores its BluePay settings, as well as settings for batch and cash account settings.
WarningIf you have multiple Financial Account profiles in Donate Now - Premium and/or multiple BluePay accounts (e.g. for Foundation vs Housing), then the BluePay account you use to set up the rebilling plan above in Step 3 must match the Donate Now - Premium Financial Account profile's BluePay information.
To find out which Financial Account ID to use, do the following:
- Sign in to the Donate Now - Premium Admin site, and click Financial Accounts.
- Click the Edit icon next to the one you would like to use.
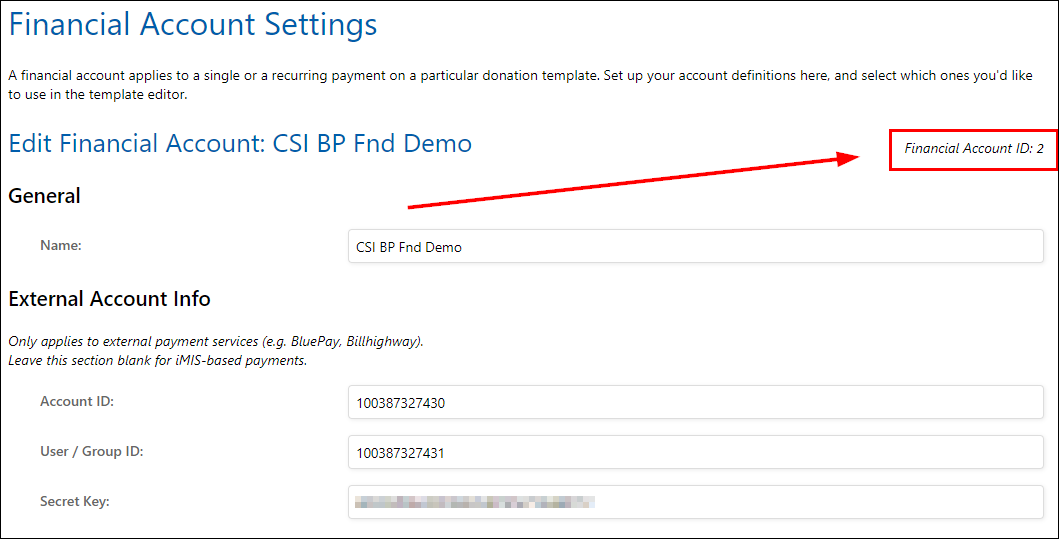
- Verify that the Account ID and User ID fields in Donate Now - Premium match the Account ID and User ID fields on the Transaction Details screen in BluePay (see screenshot above).
- On the Edit screen, in the upper-right corner, take note of the Financial Account ID as we will use it in the next step.
Step 5: Insert the Demo_Recurring_Gift record
Do the following to insert the Demo_Recurring_Gift record for the Staff site and iMIS Desktop:
Staff Site
Do th following in the Staff site:
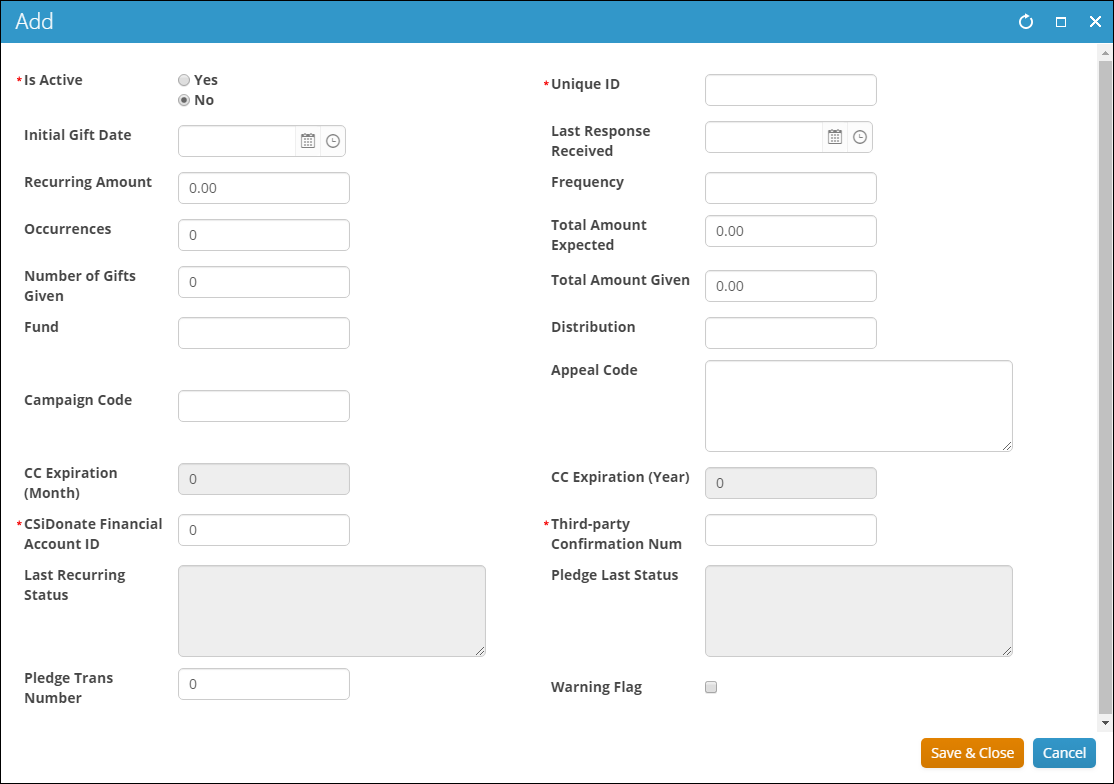
- Go to the Recurring Gifts panel located on the user's record. This can be on their Member Profile or Donor Profile, just depends on how your system is set up.

- You are required to enter all of the following fields except those which are locked/grayed out in the screenshot below:
iMIS Desktop
Do the following in iMIS Desktop:
- In iMIS Desktop, go to Customers and look up the donor's record
- Open the Demo_Recurring_Gift tab window.
- Scroll to the bottom of the table and click the new row to insert a new record.
Your fields may be in a different order or have a different label depending on your demo table setup. If you are not sure which fields are which, refer to your demo table setup to confirm the database fields.
- Enter the following fields:
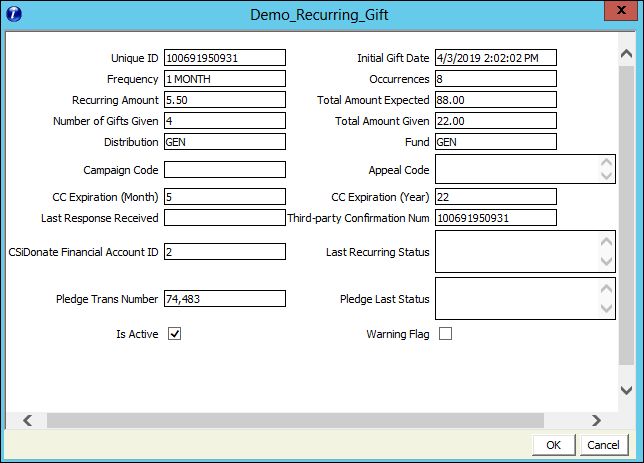
| Field name | Get from | Value to enter |
|---|---|---|
| Unique ID | BluePay | 12-digit Rebill ID |
| Initial Gift Date | N/A | Current Date |
| Frequency | BluePay | Rebilling Period |
| Occurrences | BluePay | Cycles Remaining |
| Recurring Amount | BluePay | Rebilling Amount |
| Total Amount Expected | BluePay | Should match the total pledge amount sum. |
| Number of Gifts Given | N/A | Enter the amount of pledge installments that have already been paid by the donor, prior to setting up BluePay. This can also be 0 if this is a future scheduling with no installments paid yet. |
| Total Amount Given | N/A | Enter the amount that has been given so far. This should equate to (Recurring Amount * Number of Gifts Given). |
| Distribution | iMIS | Enter a distribution code value that exists in the Donate Now - Premium gen table IDONATE_DISTRIBUTIONS, such as "GEN" or "AF". |
| Fund | iMIS | Enter the fund code that the distribution is configured to use in iMIS. |
| Campaign Code | iMIS | Optional. This value is an override only. Enter a valid iMIS campaign code that should be applied to gifts that are written using this recurring plan. If not set, will use the distribution's default code. |
| Appeal Code | iMIS | Optional. This value is an override only. Enter a valid iMIS appeal code that should be applied to gifts that are written using this recurring plan. If not set, will use the distribution's default code. |
| CC Expiration (Month) | BluePay | Enter the card expiration month (1 or 2 digits). Set to "0" for ACH transactions. |
| CC Expiration (Year) | BluePay | Enter the card expiration year (2 digits, e.g. "19" or "23"). Set to "0" for ACH transactions. |
| Last Response Received | N/A | Leave blank. This value is auto-filled when an automatic recurring payment notification is received from BluePay. |
| Third-party Confirmation Num | BluePay | 12-digit Rebill ID (Same as "Unique ID") |
| Donate Now - Premium Financial Account ID | Donate Now - Premium | Numeric Financial Account ID obtained from Step 4 above. MUST NOT BE "0". |
| Last Recurring Status | N/A | Leave blank. This value is auto-filled when an automatic recurring payment notification is received from BluePay. |
| Pledge Trans Number | iMIS | The Pledge Trans number obtained from Step 1 above. (Ignore any automatic commas that appear in this field.) |
| Pledge Last Status | N/A | Leave blank. This value is auto-filled when an automatic recurring payment notification is received from BluePay. |
| Is Active | N/A | Must be checked. (If not checked, automatic recurring gifts from BluePay will not be entered into iMIS.) |
| Warning Flag | N/A | Leave unchecked. This value is auto-filled when an automatic recurring payment notification encounters an error. |
- Click OK.
- Click Save.
Your recurring pledge is now set up in BluePay and iMIS.
Updated 2 months ago