

Overview
The 1:1 Meetings feature allows users to schedule and manage private one-on-one meetings with other users. Meetings can be created as standalone (non-event) meetings or tied to a specific event with slot-based scheduling and predefined locations.
Admins can control visibility by Role, Groups, or Exclude by Groups.
Navigating module contents
The following articles cover specific aspects of the 1:1 Meeting feature.
| Article | Description |
|---|---|
| Slots & Locations (Admin) | Admin configuration: enabling slots per event, managing locations, schedules, and bookings |
| Availability & Slots (User) | User availability settings, slot configuration, and conflict detection |
Reviewing key capabilities
| Capability | Description |
|---|---|
| Standalone meetings | Create 1:1 meetings without event context — set date, time, location, and video link freely. |
| Event-based meetings | Create meetings within an event using predefined time slots and locations. |
| Auto-assign location | The system automatically books an available meeting location for the selected slot. |
| Manual location | Enter a free-text location instead of using predefined locations. |
| Availability control | Users manage their availability during events and outside events separately. |
| Slot conflict detection | Slots blocked by existing meetings, sessions, or personal sessions are automatically excluded. |
| Admin management | Admins can configure locations, slot durations, and schedules, and cancel bookings. |
Accessing 1:1 Meetings
1:1 Meetings can be accessed in two ways.
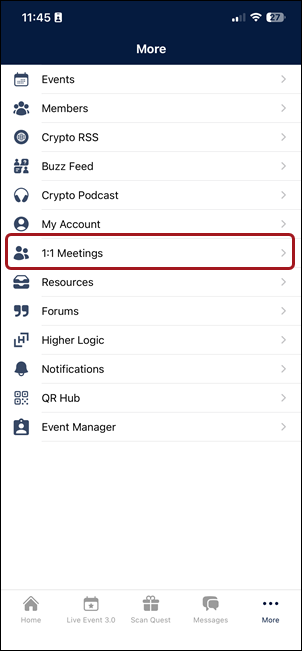
From the main menu
1:1 Meetings appear as a dedicated menu item in the app navigation. This opens the meetings screen with Upcoming, Past, and Declined tabs.
From another user’s profile
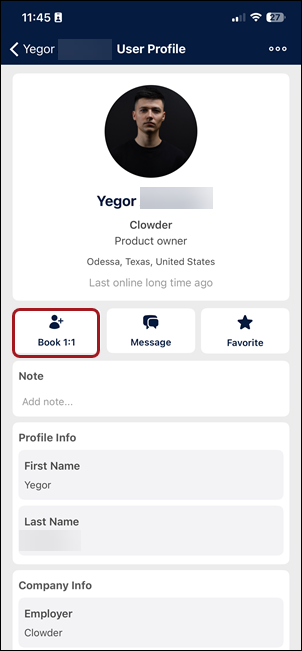
Open a user’s profile and tap Book 1:1. This opens the meeting creation form with the selected user pre-filled.
Understanding meeting statuses
Each 1:1 meeting goes through the following statuses.
| Status | Description |
|---|---|
| Pending | Meeting invitation sent, awaiting response from the invitee |
| Accepted | The invitee confirmed the meeting |
| Declined | The invitee declined the invitation |
| Cancelled | The meeting was cancelled by either participant or by an admin |
Creating a 1:1 Meeting
Users can create a 1:1 Meeting from the app menu, a user's profile, or the Event's page.
Creating a 1:1 Meeting from the app menu
To create a 1:1 Meeting from the app menu:
- Access the app menu.
- Tap 1:1 Meetings.
- Tap the "+" button.
- Specify the following fields:
- Invite User: Select the person from the user list.
- Event: Select an event, or leave as "No event" for a standalone meeting.
- (Optional) Location Type: Appears if an event is selected. Auto-Assign chooses an available location automatically, or select Manually to specify a preferred location.
- Select a time slot (event-based) or set Date & Time manually (standalone).
- (Optional) Add Reminder, Description, Location, Video Conference Link, and Note.
- Tap Send to send the invitation.
Creating a 1:1 Meeting from a user's profile
From the user's profile in the app, tap Book 1:1 and fill in the fields.
Creating a 1:1 Meeting from an event page
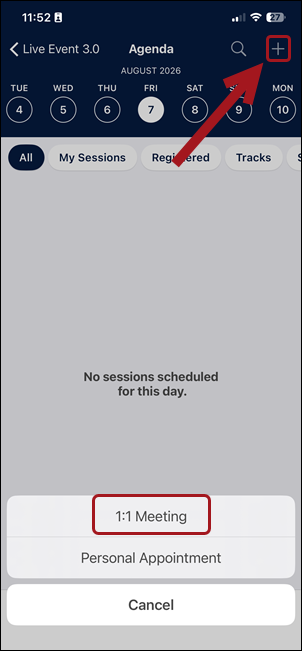
If 1:1 Meetings are enabled for an event, users can book event-related meetings with other attendees. To do so, users must go to the event's agenda page.
From the Agenda page:
-
Tap the "+" button in the upper right corner.
-
Select 1:1 Meeting.
-
Fill in the relevant fields.
Responding to a meeting invitation
When a user receives a 1:1 meeting invitation, it appears in the Upcoming tab with Pending status. The invitee can:
- Tap Accept to confirm the meeting.
- Tap Decline to reject the invitation.
A push notification is sent to both participants when the status changes.
Editing and cancelling meetings
Users can cancel and delete 1:1 Meetings directly from the Meeting Details screen.
Cancelling a meeting is permanent. The slot is released and must be re-booked if needed.
Users can also edit meeting details, including the time and day, location, videoconference link, meeting description, and private notes.
To edit a meeting:
- Tap the three-dot menu on a meeting detail screen.
- Select Edit Meeting.
Updated 3 months ago