

Scan Log Integration to iMIS (check-in/out)
This guide walks you through creating the required iMIS Panels so that Clowder can push check-in/check-out (Scan Log) data into the iMIS instance through the Panel API.
Setting up iMIS panels for Scan Log integration
Step 1: Create the panel definition
-
In iMIS, navigate to RiSE > Panel Designer > Panel definitions.
-
Click Add panel definition.

-
Set the following:
- Panel name = ClowderScanLog.
- Panel description = ClowderScanLog.
- Parent Type = Event.
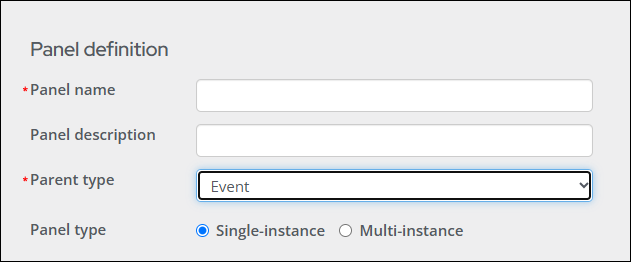
-
For Panel type, choose the Multi-instance option.
-
Click Save.
NOTEThe name ClowderScanLog must be entered exactly as shown — case-sensitive, no spaces.
Step 2: Create the panel source
- Inside the ClowderScanLog Panel Definition, locate and click + Create source.
- Set the Source name to exactly ClowderScanLogData.
- Click OK.
- Click + Add Property on the newly created panel source.
- Add all 14 properties from the Field Mapping table below. For each property set Property Name, Property Type, and Length as specified.
- Save the changes:
- Add & Close: Click this button after adding all new properties.
- Add & Continue: Click this button to add a property and continue adding others.
NOTEProperty names are case-sensitive. Enter them exactly as shown (for example, CheckedInBy, CheckInDate).
Step 3: Confirm identifiers with Clowder
- Verify Panel Definition and Panel Source were saved successfully.
- Share identifiers with Clowder team.
- Clowder will begin posting Scan Log records grouped by EventKey.
- Panel Definition Name: ClowderScanLog.
- Panel Source Name: ClowderScanLogData.
Field mapping — Panel source properties
| # | Clowder Field | iMIS Property Name | Property Type | Length | Description |
|---|---|---|---|---|---|
| 1 | Checked_In_By | CheckedInBy | String | 80 | The person who performed the check-in/check-out |
| 2 | Check_In_DateTime | CheckInDateTime | DateTime | 200 | Check-in/out date (for example, yyyy-MM-dd HH:mm:ss.000) |
| 3 | Event_ID | EventID | String | 100 | iMIS Event ID |
| 4 | Session_Id | SessionId | String | 80 | iMIS Session ID |
| 5 | Status | Status | String | 80 | Attendee check-in or check-out status |
| 6 | Type | Type | String | 80 | Event or Session |
| 7 | Title | Title | String | 80 | Session/Event title |
| 8 | User_login | UserLogin | String | 80 | User Login |
| 9 | External_Id | UserId | String | 100 | iMIS User ID (party_id) |
| 10 | First_Name | FirstName | String | 100 | First Name |
| 11 | Last_Name | LastName | String | 100 | Last Name |
| 12 | Job_Title | JobTitle | String | 80 | Occupation |
| 13 | Employer | Employer | String | 80 | Company name |
| 14 | Clowder_Checkin_ID | Integer | Attendee's check-in identifier |
Updated about 1 month ago
Did this page help you?