

Overview
IMPORTANTSome News Feed categories and configurations, such as user-generated content, are not enabled by default. Contact your Client Account Manager to discuss available options.
The News Feed feature helps users stay connected and informed. It gathers the community's latest posts, updates, and content into one easy-to-use place.
News feed types
The News Feed can be configured to display various types of content:
| Content Type | Description |
|---|---|
| User-generated content |
|
| Integrated RSS feeds |
|
| Manually created posts |
|
| Combined |
|
Creating a text post
To add new content to the News Feed, follow these steps:
-
In the Admin Panel, go to News Feed > Home.
-
Click the Create Post button and select Text in the drop-down.
-
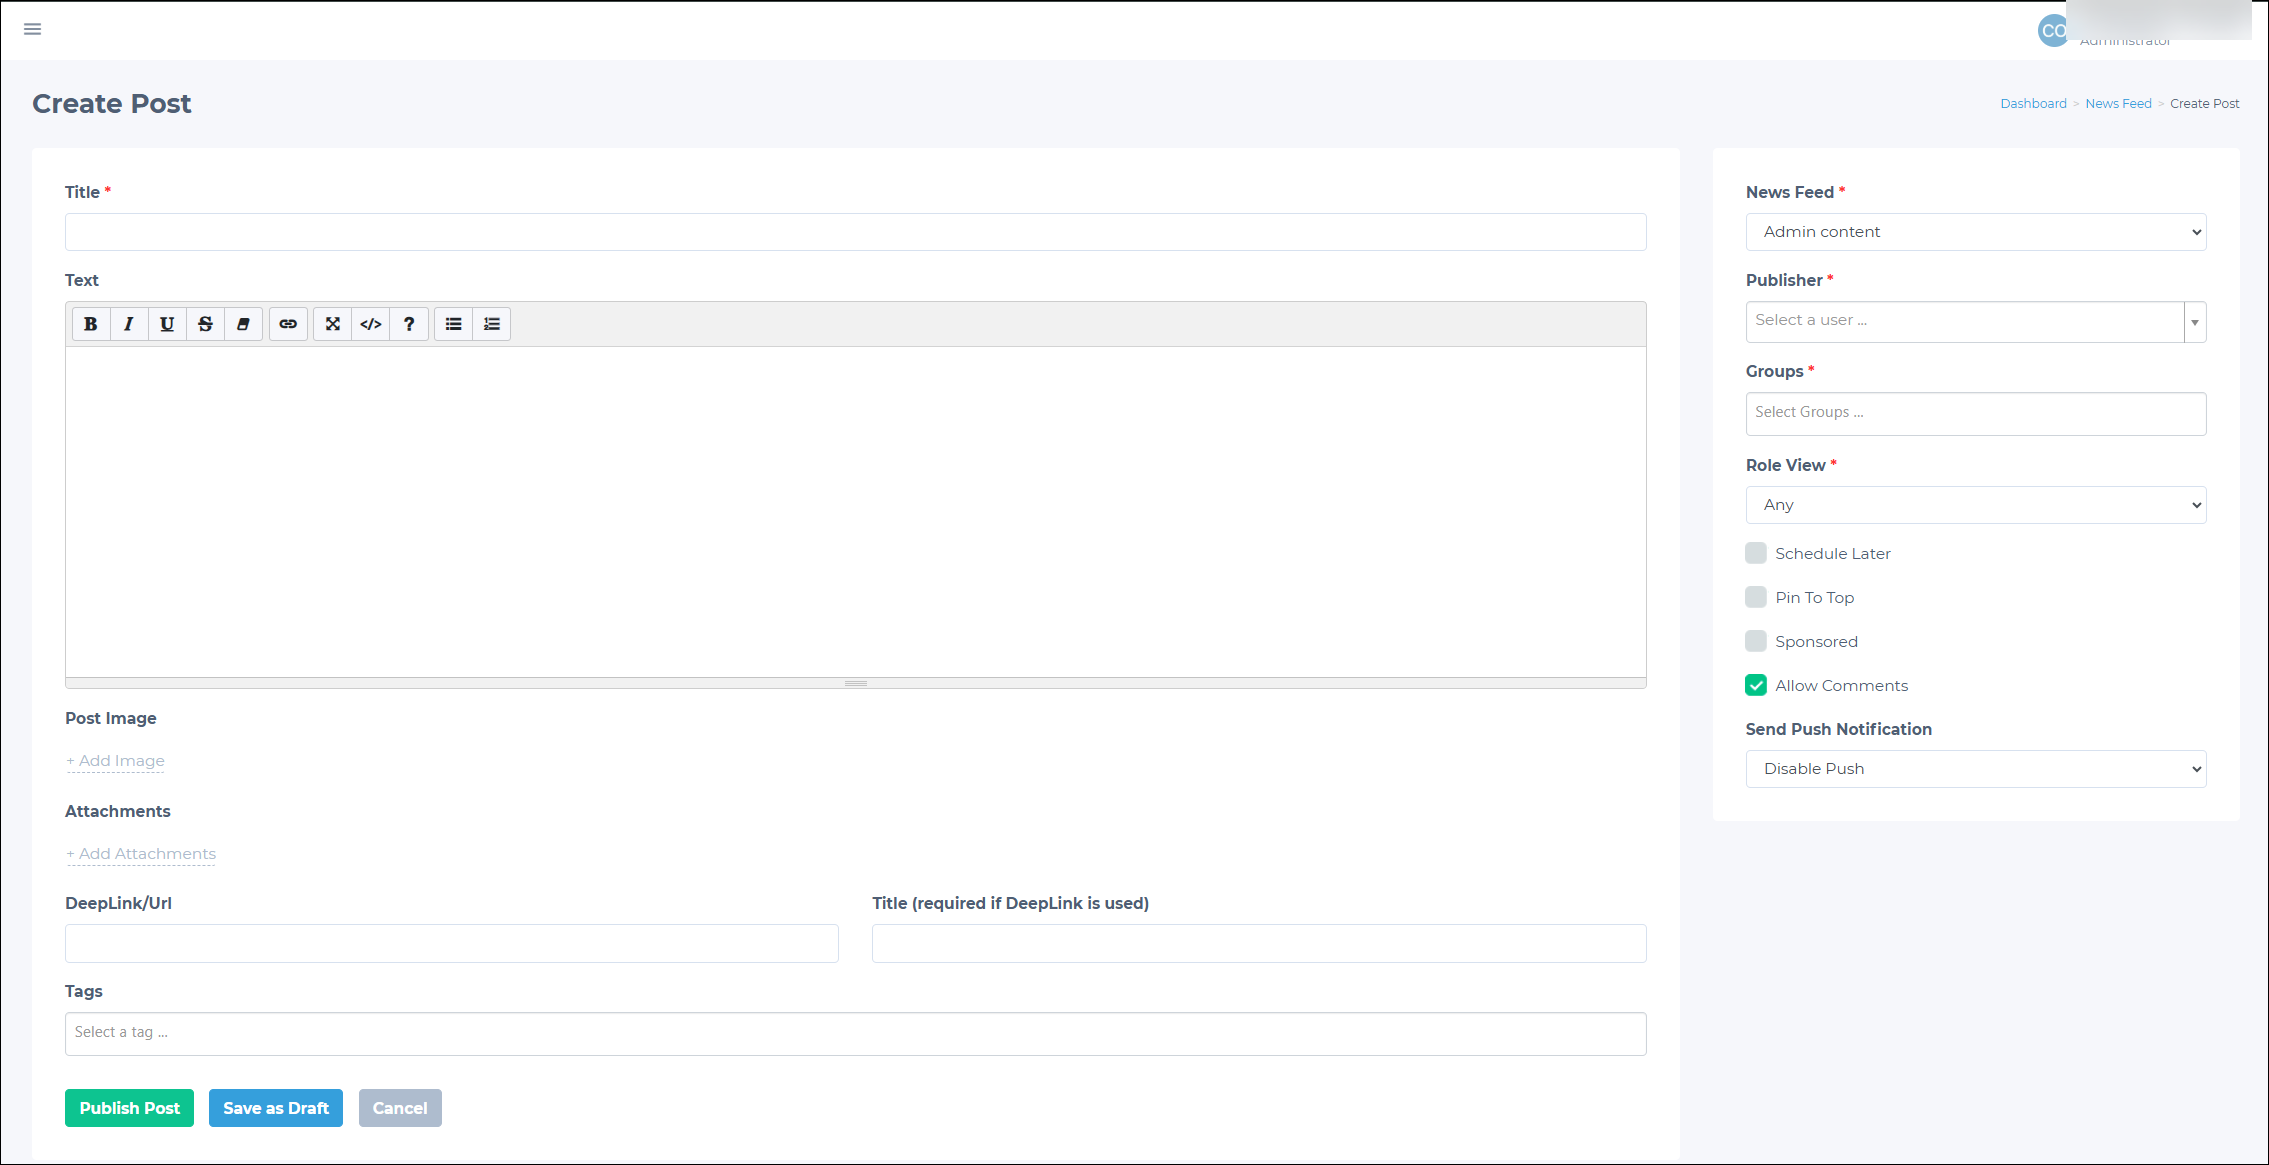
On the new post creation page, set the following details:
| Required fields | |
|---|---|
| News Feed | Choose the appropriate News Feed type for your post. |
| Publisher | Find and choose the necessary user. This user appears as the post publisher in the app. |
| Group | Choose who sees the post. Multiple group tag selection is possible. "All Users" makes the post visible to everyone. |
| Role View | Choose the role that can view this post from the drop-down: Any (visible to all users), Member (visible only to members), or Non-member (visible only to non-members). |
| Title | Enter a title for your post. |
| Optional fields | |
|---|---|
| Text | Provide the main content of your post. |
| Post Image | Add up to 10 images to your post. Click Add Image to upload the desired media. |
| Attachments | Click Add Attachments to upload the desired files. For more information on supported file types and sizes, see File upload requirements. |
| Schedule Later | Enable the box to automatically schedule your post to go live on your preferred date and time. |
| Pin To Top | Enable this option to pin the post to the top of the feed. The Pin To Top End field can also be used to set a date for when the post is automatically unpinned. |
| Sponsored | Specify if the post is sponsored.
|
| Sponsored By | Triggers once the Sponsored box is enabled. Specify the entity (brand, person, organization) sponsoring the post. |
| Send Push Notification | Choose whether to send a push notification to users when the post is published:
|
| DeepLink/URL | Provide a deep link or URL and a title. The title is only required for deep links. |
| Tags | Add relevant tags to your post. |
| Allow Comments | Enabled this box if you want to allow users to post feedback and tag others in the comments section of this post. |
- Click the Publish Post button to publish the text post immediately or at a scheduled date.
Creating a video post
To create a video post in the News Feed:
- Click Create Post.
- Choose Video from the drop-down.
NOTECreating a video post is typically the same as creating a text post. Fill in the usual fields, such as title, description, publisher, and group.
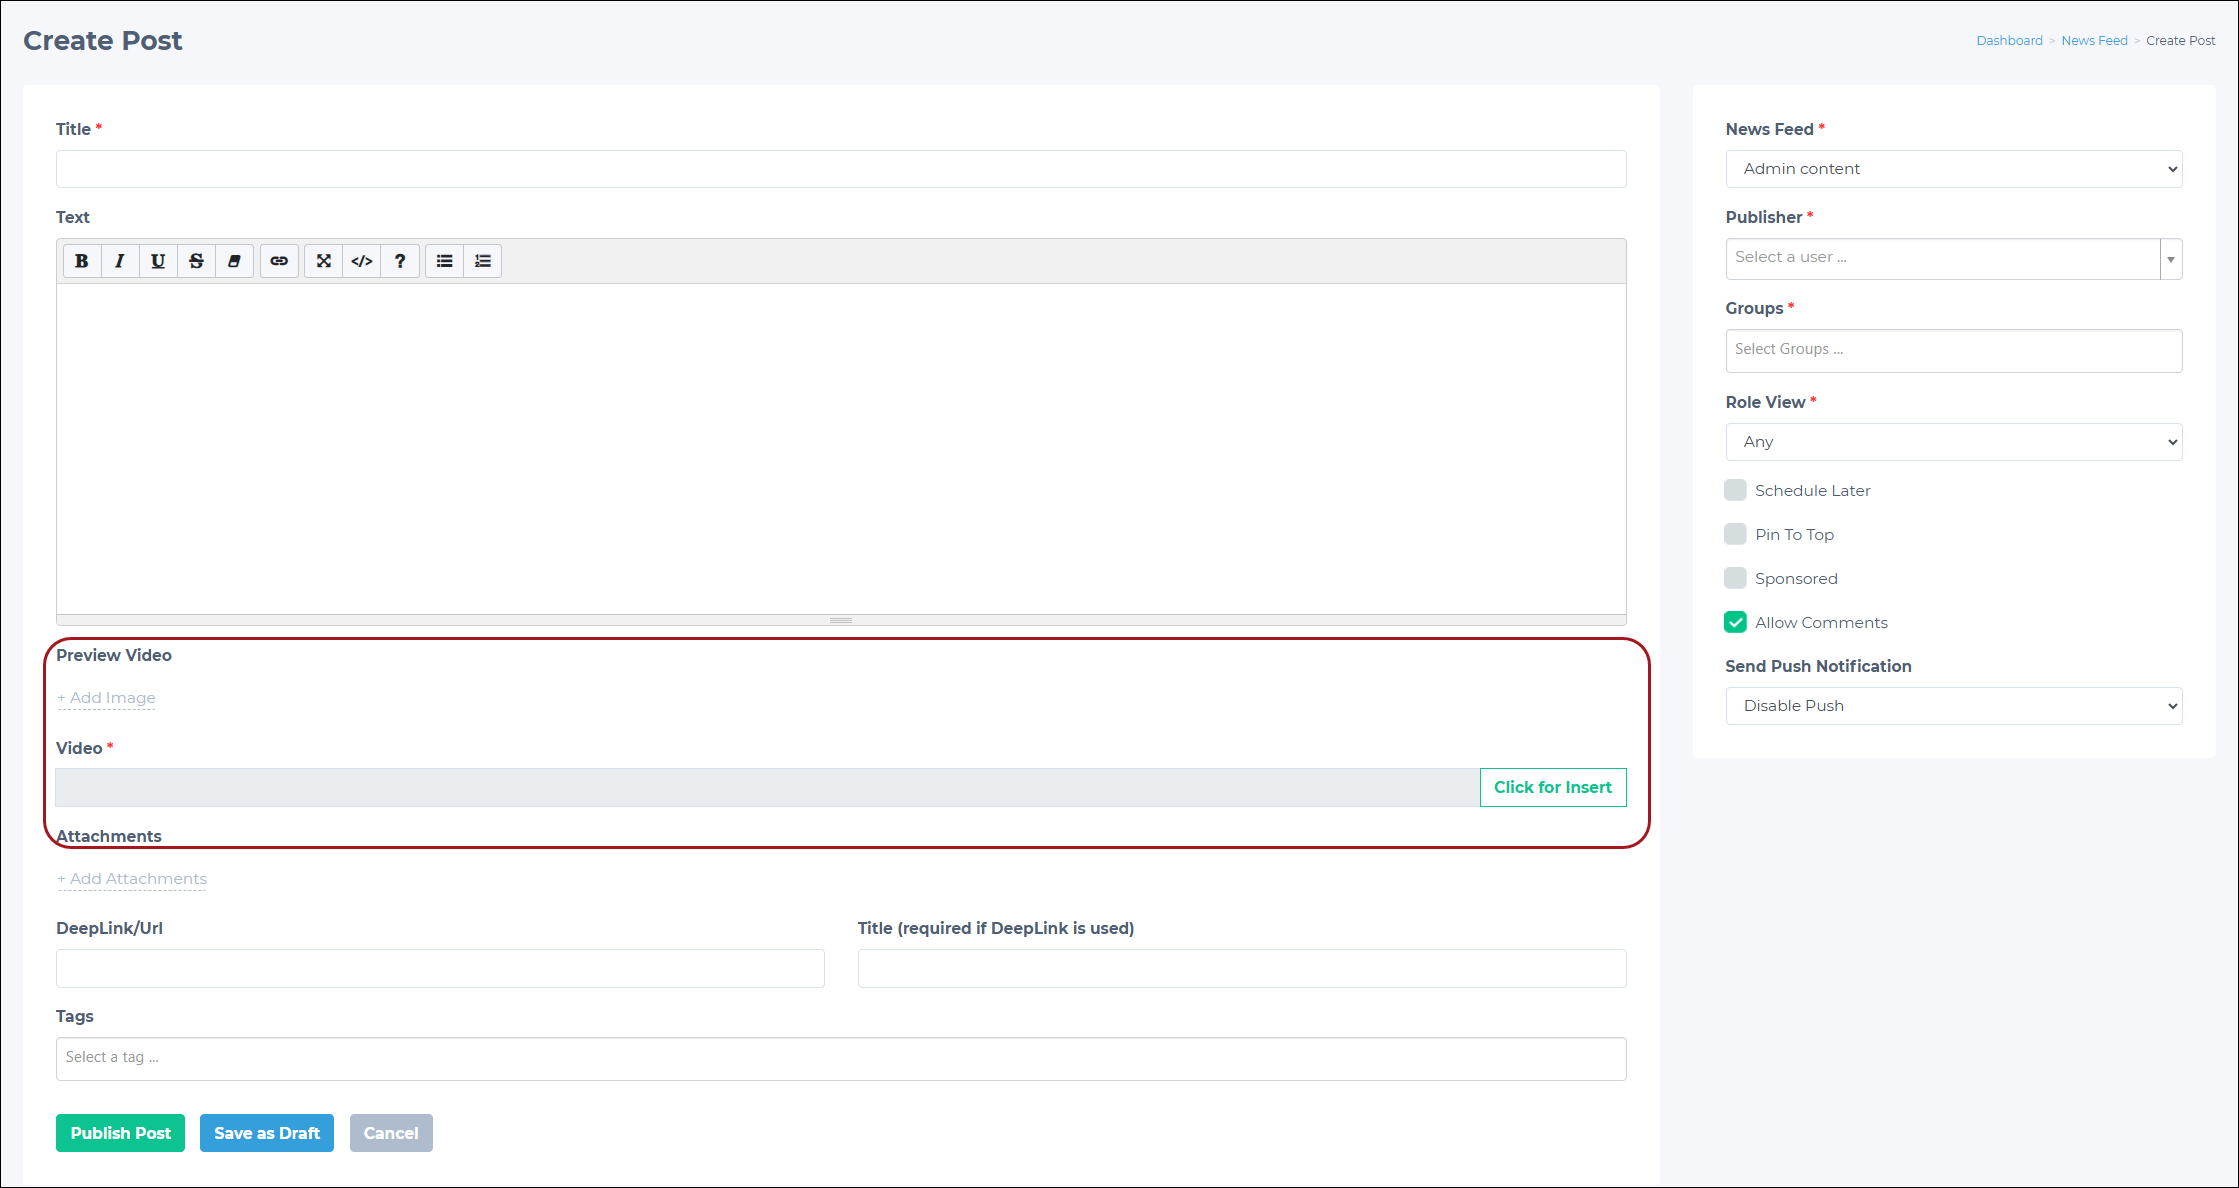
In addition, there are two video-specific fields:
- Video: Paste the link to your video from Vimeo or YouTube.
- Preview Video: Upload the image you want to use as the video preview in the app.
Creating a poll
NOTEUsers can only choose one answer in polls. Users can change their answers, but cannot choose multiple answers simultaneously.
To create a poll in the News Feed:
- Click Create Post.
- Choose Poll from the drop-down.
- Fill in the following information:
| Required fields | |
|---|---|
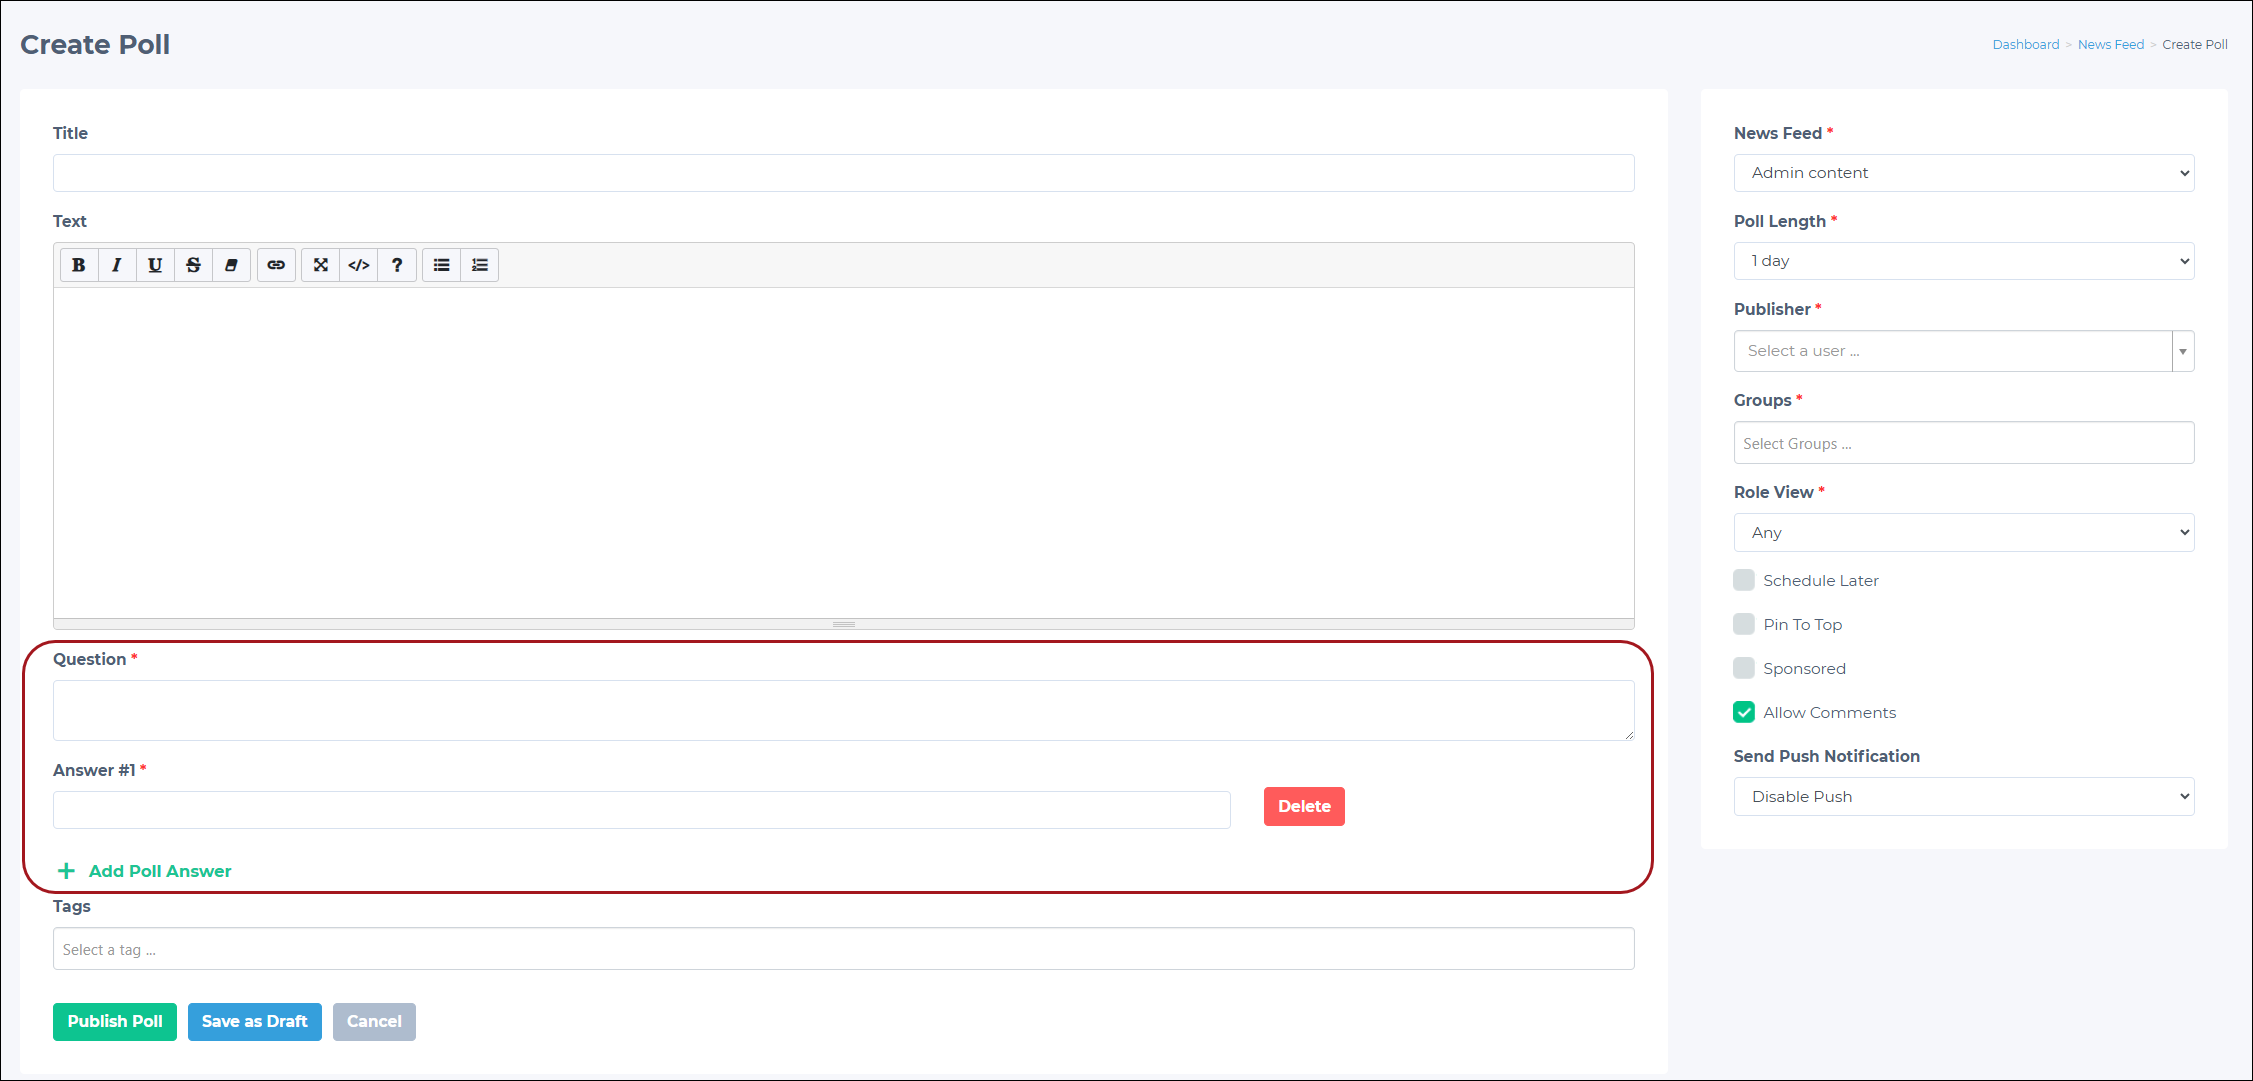
| Question | Enter the question you want to ask. |
| Answers | Add at least one answer option. The number next to each answer indicates its order in the app. |
| News Feed | Choose the appropriate category from the drop-down. |
| Poll Length | Set how long the poll remains active. Choose one of the following options:
|
| Publisher | Choose a user to appear as the content publisher. |
| Group | Specify the group of users to see this poll. |
| Role View | Choose the role that should have access to the poll. To make the poll visible to all roles, choose Any. |
| Optional fields | |
|---|---|
| Title | Add a title for the poll. This title is shown in the app before the question. |
| Description | Provide additional context or details about the poll. |
| Tags | Define tags to help categorize or filter the poll content. |
- Enable optional poll settings as desired:
- Schedule Later: Schedules the poll to go live at a preferred date and time.
- Allow Comments: Enable this box to enable comments.
- Pin To Top: Enable this box to pin the poll to the top. You can set an end date for the pin.
- Sponsored: Enable this box if the poll is sponsored. After enabling the box, you must specify the sponsor.
- Send Push Notification: Customize to disable push for this post, create a custom push, or send a system push.
- Click Publish Poll to create the poll or Save as Draft to continue editing the poll later.
NOTEThe poll question and answers cannot be changed after publishing. Other details, such as title and description, can still be changed at any time.
Ending manual polls
If the admin sets the Poll Length to Manual when creating the poll, they need to end it manually. To end the poll in the Admin Panel:
-
In the list of posts, find the poll you want to close and click the View button.
-
On the Polls Info page, click the Finish Poll button.
The poll closes, preventing users from voting.
NOTEIf the poll length on a user-created poll is set to Manual, the poll can also be closed in the app. The user who created the poll can find it in their News Feed and click the Close Poll button.
Viewing poll results
To view poll results:
- Go to News Feed.
- Look for the poll, then click the View button to open it.
- View poll results and participants:
- Click any of the poll answers to see users who selected that answer.
- Switch between the tabs below the results to see users who viewed, liked, and commented on the poll.
Customizing push notifications for posts
Admins can create a custom push notification for any post (text, video, or poll). From the post creation screen, open the Send Push Notification drop-down to set up a push type:
- System Push: Sends a default push message to targeted users once the post is live.
- Custom Push: Allows admins to define a custom push title and content. The custom push content is sent to targeted users once the post is live.
Managing News Feed content
The News Feed provides several tools and options for content management:
Finding content
- Standard Search: Use the standard search to find specific posts or polls.
- Advanced Search: Use the advanced search feature for more precise results. It allows you to filter content by criteria such as status, category, and type.
Content overview
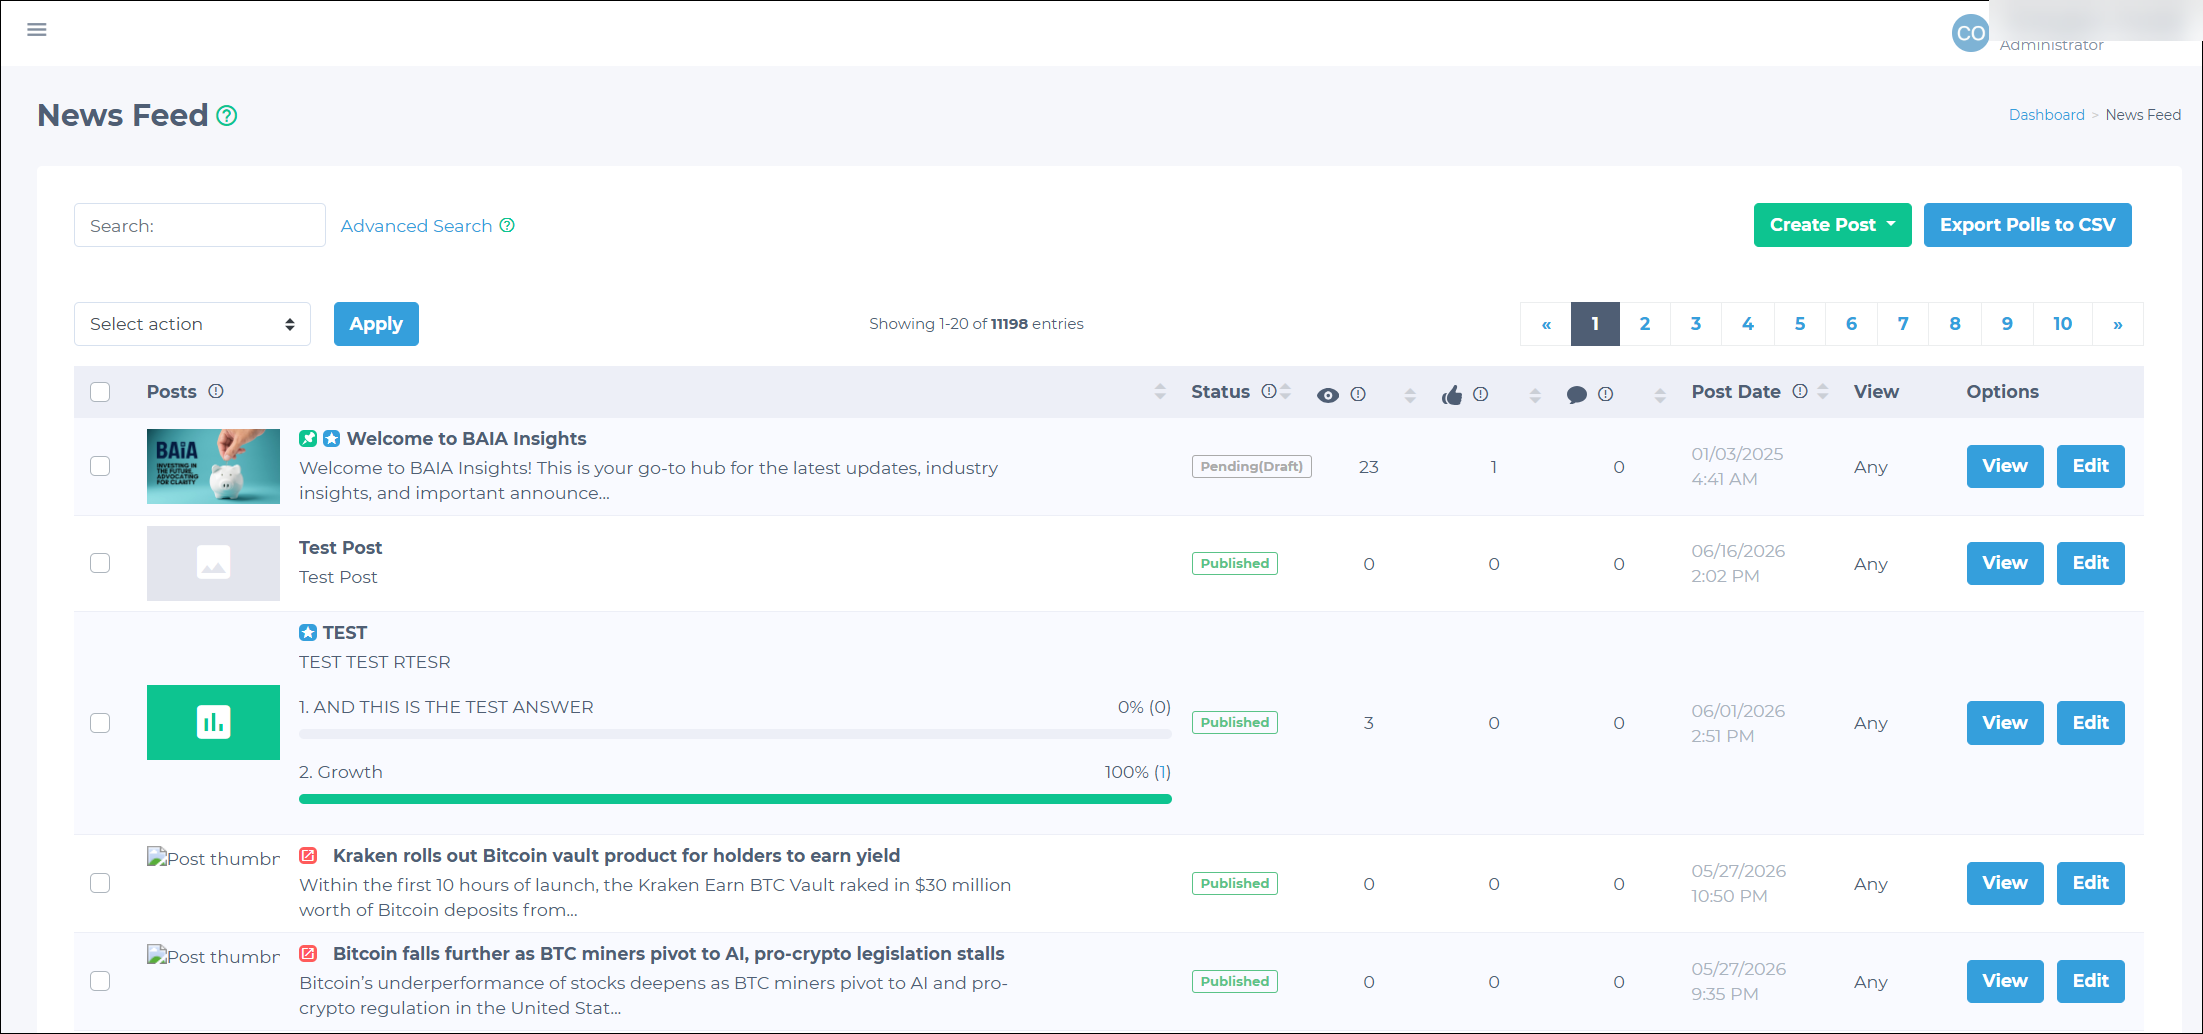
The main content management page displays a table with all posted content. For each item, the table shows:
- Status (for example, Published, Pending (Draft)).
- The number of views.
- The number of likes.
- The number of comments.
- Post date.
- Post viewing permissions.
- View option.
- Edit option.
Viewing сontent details
Clicking the View button for a post opens a detailed page showing:
- Users who viewed the post.
- How many times each user viewed the post.
- Post comments, including the text and the author.
- Users who liked the post.
On this page, the following actions are available:
- Delete user comments from the post.
- Edit or clone the post.
- Finish a poll.
- Export post-related data (for example, post viewers, likes, and comments) to CSV.
- Copy the post's deep link.
Editing a post
To edit a published post:
- Click the Edit button next to the desired post.
- The post form opens pre-filled with existing content.
- Make the necessary changes — update text, add tags, or modify other details.
- Use one of the action buttons at the bottom of the form:
| Button | Action |
|---|---|
| Save changes | Saves the updates. The post remains published. |
| Save as Draft | Changes the post status to Draft. The post is removed from the app but remains visible in the Admin Panel. |
| Delete | Permanently deletes the post. It will not appear anywhere, including the Admin Panel — even with filters applied. |
| Cancel | Discards changes and returns to the post list. |
Scheduling a post
To schedule a post for future publishing:
- Click Create Post in the News Feed.
- Choose a post type (for example, Text, Video, or Poll) from the drop-down.
- Fill in the post details and enable Schedule Later.
- A date and time picker appears — choose a future date and time for publishing.
- Use one of the action buttons at the bottom of the form:
| Button | Action |
|---|---|
| Publish Post | Saves the post with the Scheduled status. It will be published automatically at the selected time. |
| Save as Draft | Saves the post as Draft. The post will not be published automatically until the status is changed. |
| Cancel | Discards changes and returns to the post list. |
Editing a scheduled post
To modify a post that is already scheduled:
- Click Edit next to a post with Scheduled status.
- The post form opens, showing the current scheduled date and time.
- Make the necessary changes.
- Use one of the action buttons at the bottom of the form:
| Button | Action |
|---|---|
| Save changes | Saves the updates. If Schedule Later is disabled, the post is published immediately upon saving. |
| Save as Draft | Changes the post status to Draft, removing it from the publishing queue. |
| Delete | Permanently deletes the post. |
| Cancel | Discards changes and returns to the post list. |
NOTEDeleted posts cannot be recovered — they are permanently removed and will not appear in the Admin Panel, even when using status filters.
Bulk actions
To manage multiple content items simultaneously:
- Choose the posts you want to modify.
- Locate and open the Select action drop-down at the top or bottom of the page.
- Choose the desired action from the drop-down menu:
- Disabled: Hides the post from app users' view.
- Published: Makes the post viewable on the app.
- Pending (Draft): Changes post status to draft.
- Click the Apply button to change the status of all selected items.
Exporting polls
There are two options for exporting polls to CSV:
-
Export selected polls:
- Go to News Feed.
- Enable the checkboxes next to the specific polls you want to export.
- Use the bulk action drop-down to choose the export option.
- Click the Apply button.
-
Export all polls:
- Go to News Feed.
- Click the Export Polls to CSV button at the top of the content management page.
News Feed functionality in the app
Here is what users can do within the News Feed:
- Interact with posts:
- Users can like or share posts with others.
- They can comment on posts. By default, it is allowed, but the admin can change this setting for specific posts in the Admin Panel. It can be set during post creation or by editing the post later.
- View engagement metrics:
- Users can view who liked and commented on each post and access user profiles.
- Users can see the number of likes, comments, and total views for each post. Note that the visibility of these metrics depends on the App Configurator settings for the menu item.
- Manage content:
- Users can bookmark posts for easy future access.
- Users can share posts within the app.
- Discover content:
- Users can use filters to find relevant content.
- Participate in polls:
- Users can vote in polls.
- After voting, users can view poll results.
- Create user-generated content (if enabled):
- Users can create posts if the "User Generated category" setting is enabled.
- After publishing, they can edit, delete, or cancel their posts.
IMPORTANTUser-generated content is not enabled by default. To use this feature, contact your Client Account Manager.
- Manage attachments:
- Download and view attachments included in posts.
- Moderate content:
- Report inappropriate content and provide additional notes.
Updated about 2 months ago