

User Categories
IMPORTANTManaging User Categories requires Super Admin access. To create or edit the User Categories, contact your Client Account Manager.
The User Categories feature allows administrators to create and manage different user categories in the Admin Panel. This feature helps tailor the app experience to various needs, such as events or specific client requirements.
- Administrators can define multiple user categories (for example., Attendees, Staff, Sponsors) to organize users by role or need.
- Each category can include both standard (mapped) fields and custom fields. It ensures that only relevant information is collected for each user type.
- Administrators can allow users from these categories to log in and authorize within the app, even if the primary authorization method is through OAuth2.
Creating a user category
By default, there is a general User category that includes all users.
To create a user category in the Admin Panel, contact your Client Account Manager.
Managing a category
To manage the category fields, contact your Client Account Manager.
Manage Fields tab
Client Account Managers (on behalf of Administrators) can configure standard and custom fields, select a field type, and set properties such as editing permissions, mandatory status, and visibility settings.
The first step in managing category fields is to select the Field Type for each field. The field type determines the kind of data the field accepts and how it is displayed in the app. Below is a table of available field types and their uses.
| Field type | Description |
|---|---|
| String | A plain-text field used for simple inputs such as names, titles, or descriptions. |
| User_logo | Used to upload a profile photo or logo. |
| List | Allows selecting predefined options from a drop-down. |
| URL | Used to collect information about websites or external links. |
| Phone | A field specifically for entering phone numbers. |
| HTML | Used to add or display content with rich formatting, such as bold text, hyperlinks, lists, or embedded elements. |
| Used to collect email addresses. | |
| Boolean | A toggle field that represents a Yes/No or True/False value. It is commonly used for options such as enabling or disabling features, marking preferences, and so forth. |
| Number | A field for numerical values. |
| Price | Used for fields with monetary values. |
| A field to input LinkedIn profile URLs. | |
| A field to input Instagram profile URLs. | |
| A field to input Facebook profile URLs. | |
| A field to input Twitter profile URLs. | |
| Date | A date picker field for birthdays, event dates, and similar uses. |
| Fbu_type |
Some fields cannot be deleted because they are system-required or essential for the app's functionality (for example, Username). For these fields, the Del button will not be available.
Short Profile tab
The Short Profile tab allows users to fill in their short profile.
Users will see the short profile in the following app areas:
- After scanning the QR code.
- When tapping on a user.
- In the QR Hub, under the Saved Cards list.
- In lists such as App Users/Participants/Event Manager.
- Partially in the News Feed and Forums, if the user is the author of a post or comment (not the complete short profile).
Additional Settings tab
The Additional Settings tab allows admins to choose which fields will be displayed in QR profiles and included in exported files.
- QR Profile Fields: This section specifies the fields that will appear in the QR profile when a user's QR code is scanned.
- Export Fields: This section determines which fields the CSV file includes when exporting user data from the system.
Importing users to a specific category
To import users into a specific user category, follow these steps:
-
Go to Users > Users in the Admin Panel.
-
Click the Import Users button.

-
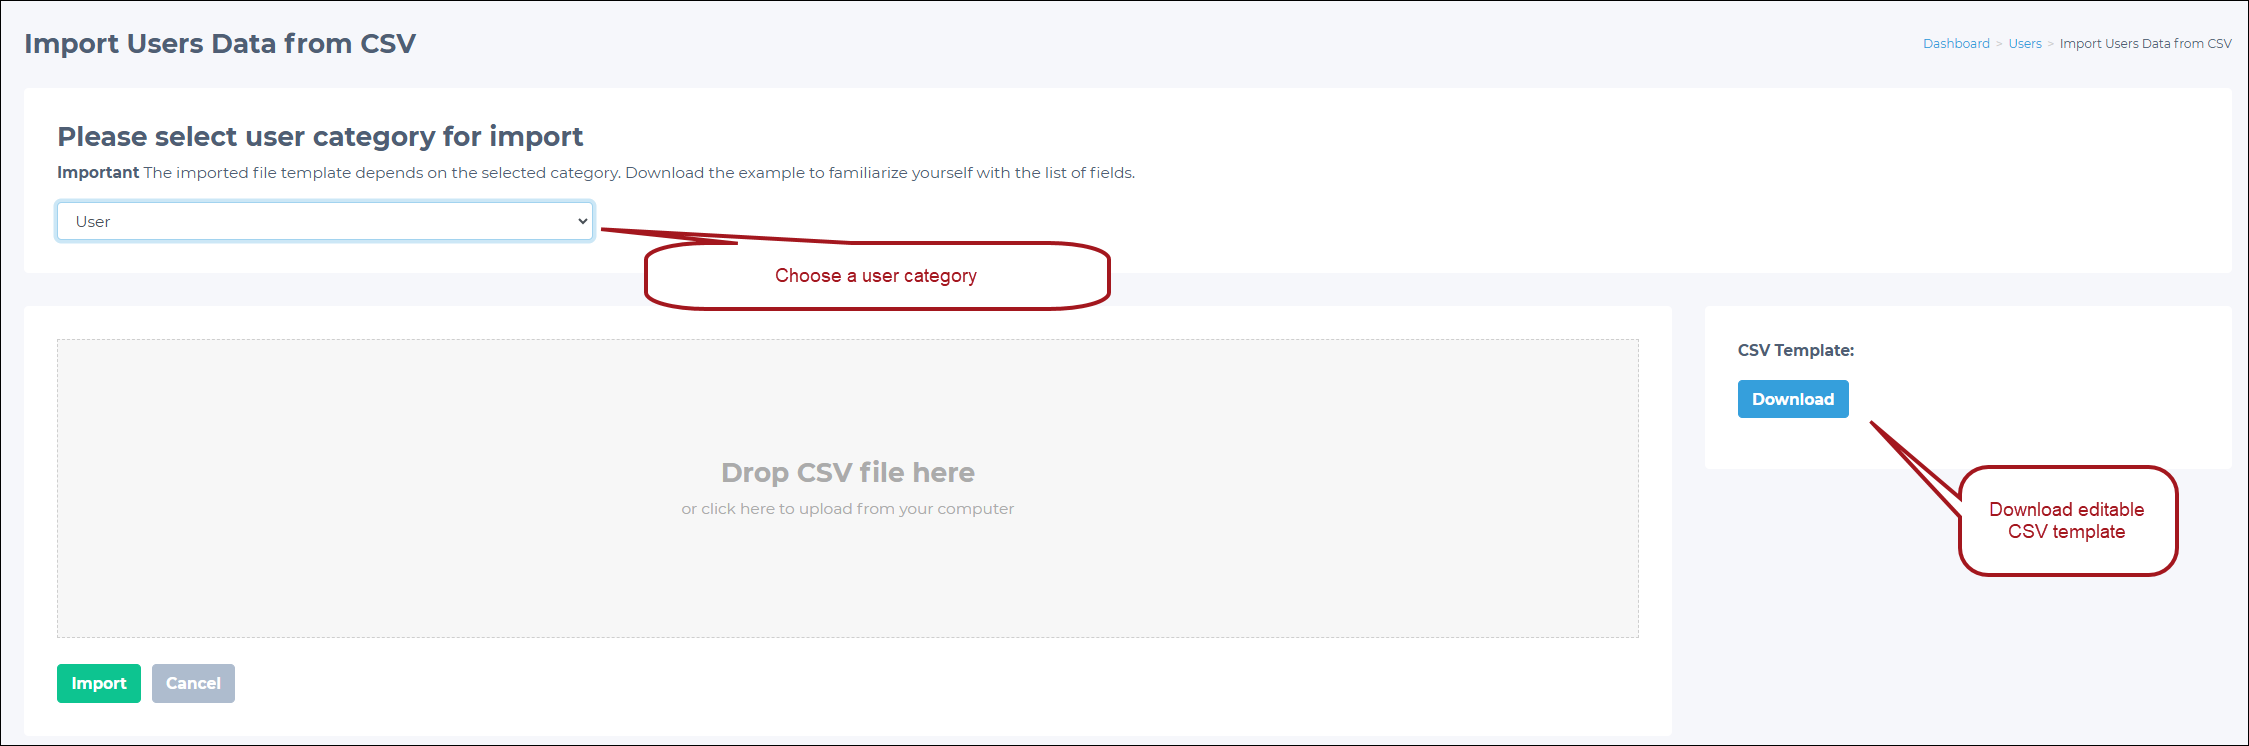
In the drop-down, select the desired user category to import users into.
-
Download the CSV Template. The template will include the required fields specific to the selected user category.
-
Open the downloaded template and fill out the necessary information for the users. Ensure all required fields are completed to avoid errors during import.
-
Upload the completed template by dropping it to the designated area or selecting it manually.
-
Click the Import button to complete the process.
NOTEThe Import Users button is only visible in the following situations:
- There is at least one internal user category in the app.
- There is at least one integration-based category where "OAuth2 SSO Enable" is turned OFF. To confirm this, speak with your Client Account Manager.
Assigning a category for the manually created user
When manually creating a user in the Admin Panel, admins can assign the user to a specific category:
- Go to Users > Users and click the Create User button.
- In the User Category drop-down, select the necessary category for the new user. This field is required.
- Fill out all mandatory fields, such as Username, First Name, Last Name, and Password.
- Click the Save button to create the user.
Updated 3 months ago