Administering security
As a System Administrator (SysAdmin), you can grant access to certain areas of content for different users. You must have the SysAdmin role to:
- Assign logon credentials and user type (Public, Casual, Full)
- Add roles and groups
- Assign access for staff users
- Assign the System Administrator role to other users
- Disable user accounts
iMIS websites by view and class
When users log on to iMIS through any of its website views (Staff, or Member, or Advanced Accounting Console), exactly what each can see and do will vary according to two factors:
- Licensing - the keys registered in your iMIS database which enable features and numbers of users
- Credentials - the user class and any roles, groups, authorization levels, and access keywords defined in each user record
For more information, refer to Module authorization levels.
Which contact records can be accessed?
- Members find contacts and committees through the directory, which shows limited contact information
- Members can access their own records
- Members can also access the profile and event registrations for others in their organization (my company), but only if authorized to manage their company roster
- Users with access to the Staff site and to the Advanced Accounting Console are able to access all contact information
Assign logon credentials and user type
- From the Staff site, go to Community > Security > Users.
- From the Select a query drop-down, you can choose to find Contacts, All Full and Casual users (NonSystem), or Users. Depending on the query you select, additional search filters are provided to help you narrow the search results.
- Click Find and select the record from the search results.
The contact information displays with threemain sections: User Credentials, User Information, and Staff Access.
User Credentials
The credentials shown are retrieved from the ASP.NET authentication store. If the contact listed in the Contact Information area is not an iMIS user, the fields in the User Credentials area are empty. Click the red icon (X) to delete or change the username.
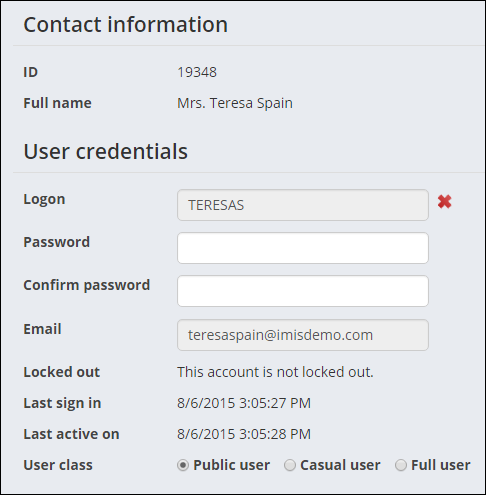
- Logon – Displays this authentication record's logon name (user name). No user selected displays when the authentication record is not linked to a user record. Click the add icon (+) to create user logon credentials.
- Password/Confirm password – Input fields for changing an existing password. By default, passwords must contain at least seven characters with at least one numeric character and at least one alphabetic character.
- Email – When you create a new authentication record, if the iMIS contact record includes an email address, iMIS populates the Create User Logon window with that address. However, the value that is displayed in this area of the Users window is always the value that is stored in the ASP.NET authentication store.
- Locked out – Indicates whether this authentication record is temporarily blocked from gaining access to iMIS. By default, iMIS locks out an authentication record after five failed attempts to log on. You can change the default by editing the web.config file for the iMIS application.
- From the Staff site, go to Community > Security > Users.
- Search for the user, then select their iMIS Id.
- In the User Credentials panel you will see a message stating that the account has been locked out. There will be a pencil icon to the right of this. Click the pencil icon to unlock the account.
- Click Save.
📘 Note
iMIS provides enhanced password hashing to secure all user login passwords. This enhanced password security complies with PCI 3.2 guidelines.
📘 Note
If you are not self-hosted, you must contact your host for assistance modifying web.config files.
Unlocking a user's account
Accounts become locked after several incorrect login attempts.
To unlock an account, log in as a SysAdmin user:
- User Class – Specifies the license (see Types of iMIS license and views) to apply to this user, which controls all subsequent authorization.
📘 Note
Only those contacts with the user class of Full User are able to see the Staff Access areas and be assigned to the On Behalf Of role.
User Information
The User Information area displays after user credentials are entered.
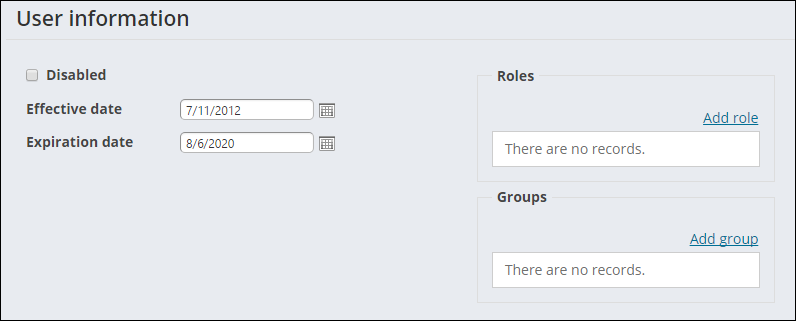
- Disabled – Select this option if you do not want the selected user account to be used immediately.
- Effective date – Enter the date when these credentials become valid.
-
Expiration date – In iMIS, the Expiration date for an account is a rolling date based on the last login (sign-in) date. By default, the expiration date is five years from the last login date, and this date is reset after every login.
- From the Staff site, go to Settings > Contacts > Account Management.
- Specify a new value in the Default expiration date, in years from last login field. Whenever a user signs in, their account expiration date is reset to that login date plus the number of years specified in the Default expiration date, in years from last login field. For example, if this value is 3, and a user signs in on January 1, 2015, their account expiration date is set to January 1, 2018.
Changing the Expiration date
Do the following to configure the account expiration date based on the last login date:
📘 Note
The value entered into the Default expiration date, in years from last login field must be greater than 0.
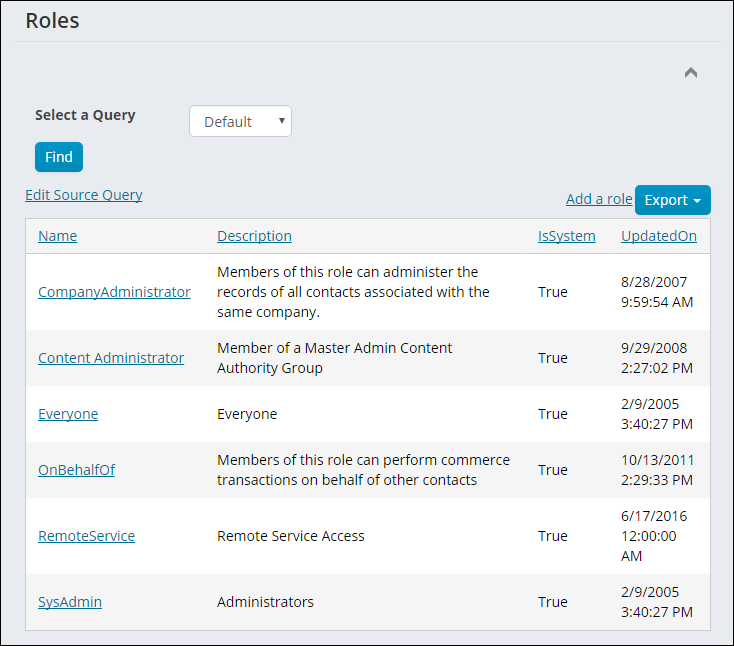
Add security roles
Security roles grant specific administrative privileges to user records, such as the right to edit an iMIS definition object in the Document system. In iMIS, there are six system roles that you cannot delete: SysAdmin, CompanyAdministrator, OnBehalfOf, Everyone, RemoteService, and Content Administrator. The OnBehalfOf role can only be assigned to a Full User.
📘 Note
It is not recommended to use the CompanyAdministrator security role. The Company Administrator role should be assigned to users through the user's organization (see Managing organizations). 📘 Note
The SysAdmin role requires a valid email address. SysAdmins can expect to receive emails requiring their attention in order to maintain the security and performance of their iMIS systems. A valid email address must be provided for SysAdmins.
Two roles are dynamically assigned to users: Everyone and Content Administrator. These roles are hidden and cannot be added to a user's role. The Everyone role is assigned to authenticated and guest users. The Content Administrator role is assigned to members of any Master Admin Content Authority Group.
The RemoteService role allows users to remotely access the REST API.
Do the following to add or edit security roles:
- Go to Community > Security > Roles.
- Click Add a Role or select an existing one and enter Name and Description.
🚧 Warning
Do not remove a user's SysAdmin role without also lowering the System authorization level (see Assign staff access). If the levels and roles do not agree, the system will have access conflicts.
Add security groups
Security groups grant specific access to all individuals who are members of the group. The following security groups affect user privileges.
Click to view table
|
Group |
Description |
|---|---|
|
CampaignAdmin |
Enables full-control access to the Campaign functionality and its objects |
|
CampaignMgr |
Enables read/add/edit/delete access to the Campaign functionality, and read/edit access to its objects |
|
CampaignUser |
Enables read-only access to the Campaign functionality and its objects |
|
Certification Admin |
Used to send emails to the appropriate contacts when certification enrollees complete program stages |
|
Certification Manager |
Used to send emails to the appropriate contacts when certification enrollees complete program stages |
|
Certification User |
Used to send emails to the appropriate contacts when certification enrollees complete program stages |
|
EventUser |
Controls security for IQA integration |
|
FRUser |
Controls security for IQA integration |
|
OpportunityAdmin |
Enables full-control access to Process Manager and its objects |
|
OpportunityCreator |
Enables add access to projects in Process Manager, and read/edit/delete access to created projects, but read-only access to projects created by others |
|
OpportunityMgr |
Enables read/add/edit/delete access to Process Manager, and read/edit access to its objects |
|
OpportunityOwners |
Enables add access to a project's Owner or Contact group |
|
OpportunityUser |
Enables read-only access to Process Manager and its objects |
|
OrderUser |
Controls security for IQA integration |
|
Reporting |
Enables access to IQA query links |
|
RFMAdmin |
Enables full-control access to the RFM application and its objects |
|
RFMMgr |
Enables read/add/edit/delete access to the RFM application, and read/edit access to its objects |
|
RFMUser |
Enables read-only access to the RFM functionality and its objects |
|
SegAdmin |
Enables full-control access to the Segmentation functionality and its objects |
|
SegMgr |
Enables read/add/edit/delete access to the Segmentation functionality, and read/edit access to its objects |
|
SegUser |
Enables read-only access to the Segmentation functionality and its objects |
Assign staff access
The Staff Access area includes settings for user-specific correspondence and Module authorization levels.
📘 Note
By default, this section is collapsed. Simply click on the arrow next to Staff Access to expand this section.
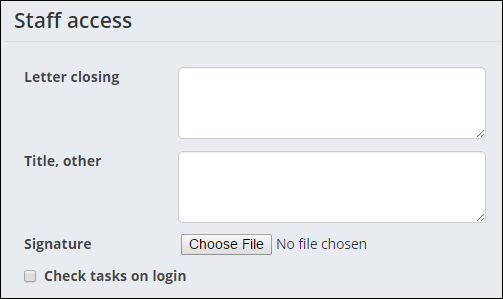
- Letter Closing - The text that closes correspondence sent by the user, for example, Sincerely.
- Title, other - The user's role to use in correspondence, for example, Certification Specialist.
-
Signature - An image of the user's signature to use in correspondence. The image may be in one of the following formats. iMIS converts the image into a BMP file before storing it in the database.
- Microsoft Bitmap (BMP)
- Windows Meta File (WMF)
- Graphics Interchange Format (GIF)
- Portable Network Graphics (PNG)
- JPEG Interchange Format (JPG)
- Check Tasks On Login - (iMIS Desktop only) Displays the user's View activity tasks window when they first log on. When cleared, displays the standard administrative view instead.
To assign someone as a Staff user, do the following:
- From the Staff site, go to Community > Security > Users.
- Select a query and search for a user from the given parameters.
- Click on the ID link.
- On the User credentials panel, select either Casual user or Public user from the User class to view the Staff access panel.
- Choose your Staff access options and Save. For more information, see Module authorization levels.
Tips and troubleshooting
Following is information to help troubleshoot logon issues.
Conflicts from shared Windows logins
iMIS employs the ASP.NET login controls and uses HTTP cookies for state information. If two different iMIS users share the same Microsoft Windows logon information on the same client system, iMIS features that use cookie data may appear to confuse one user with the other. To avoid this problem, always ensure that every iMIS user has a unique Windows username and password.
📘 Note
If you are not self-hosted, you must contact your host for assistance modifying web.config files.
Authorization persistence: web clients
By default, authentication record authorization is persistent for web users. To disable this option, edit the web.config file used for the iMIS application. By contrast, iMIS Advanced Accounting Console users must always sign in and be reauthorized each time.
Authorization changes: locating and disabling
By default, users are allowed to change their password, but not their user name. To allow user name changes, edit the content record that contains the Change Logon Password content item and select the checkbox Allow username change. The option to change passwords can be enabled or disabled in the same way.
- All users (Casual, Public, and Full) can change their user name and password through the My Account page when the setting option is enabled.
- Full users who belong to the SysAdmin role can change the user name and password for other users in the Staff site. (Community > Security > Users).