Building IQA queries: Tutorials
There are an infinite amount of queries you can build using the Intelligent Query Architect. Once a query is built, staff users can use it to email the generated list of contacts (non-staff users cannot email from a query), display the results on a content page, build a report to distribute to your staff, and much more.
Below are examples on how to create unique queries using a variety of different business objects. These examples range from beginner to advanced.
Beginner
Finding contacts
This example outlines how to build a query using only one business object.
You can construct a query that uses the CsContactBasic business object as a source to find the full names, informal names, and email addresses of all your contacts who live in a specific city and state. This example uses Austin, TX as the city and state:
- From the Staff site, go to RiSE > Intelligent Query Architect > New > Query.
- (Summary tab) Enter a Name and Description for your query.
- (Sources tab) Click Add Source:
- Select the CsContactBasic business object.
- (Filters tab) Select the query filters:
- From the Property drop-down, select City to filter the query results by city:
- Select Equal as the Comparison.
- Enter Austin as the Value.
- Select the + button.
- From the second Property drop-down, select State/Province to filter the query results by state:
- Select Equal as the Comparison.
- Select Texas as the Value.
- Select the + button.
Only contacts who have Austin listed as the city and Texas listed as the state in their default address will display in the query results.
- From the Property drop-down, select City to filter the query results by city:
- (Display tab) From the drop-down, select View all columns:
- Select the columns that you want to display when you run the query, such as:
- Full Name
- Informal
- Deselect any columns that you do not want to display when you run the query.
- If needed, change the Order of the selected columns.
- Refresh the query display columns.
- Select the columns that you want to display when you run the query, such as:
- (Sorting tab) Select your preferred sorting options. For example, we will sort the results by last name in ascending alphabetical order:
- From the Property drop-down, select Name (Last, First).
- From the Direction drop-down, select Ascending.
- Click Save.
- Select the location where you want to save the query.
- Click OK.
You can access and run your query from the Intelligent Query Architect or the Document system.
Finding all members in New York
- From the Staff site, go to RiSE > Intelligent Query Architect > New > Query.
- Mode: Basic
- (Summary tab) Enter the name and description for this query.
- (Sources tab) Select Add Source > Common > Business Objects > CsContactBasic.
- (Filters tab) select:
- Filter on StateProvince.
- Property: StateProvince
- Comparison: Equals
- Value: New York
- Click + to add the filter.
- Filter on MemberType
- Property: MemberType
- Comparison: Equals
- Value: Regular Member
- Click + to add the filter.
- Filter on StateProvince.
- (Display tab) Select View > Selected columns. Select the columns to display and the order.
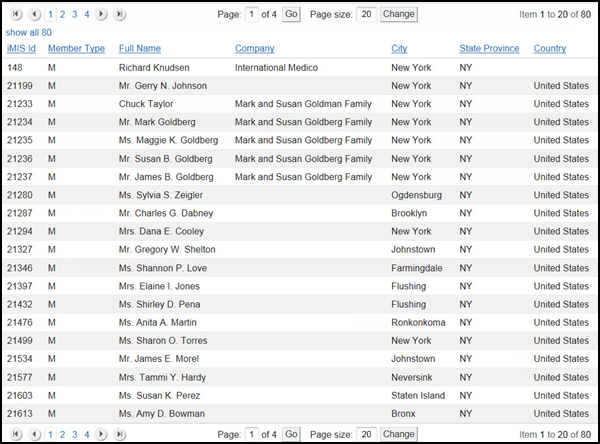
- Click Run. Depending on your system’s display settings, your results could display similarly to the following image.
Finding purchases by amount and date
This query extracts customers who have purchased more than $100 within a specific date range.
- From the Staff site, go to RiSE > Intelligent Query Architect > New > Query.
- (Sources tab) > Add Source.
- Common folder > business objects.
- Select the CsContactBasic and CsActivityBasic business objects.
- Use CTRL to select multiple objects
- Make sure the default join in the Relations area is Contact.iMIS Id Equals CsActivityBasic.Id.
- (Filters tab).
- Mode: Basic
- Filter on CsActivityBasic.Activity Type.
- Property: CsActivityBasic.Activity Type
- Comparison: Equals
- Value: ORDER
- Click + to add the filter.
- Filter on CsActivityBasic.Transaction Date.
- Property: CsActivityBasic.Transaction Date
- Comparison: Between
- Value: "1/1/2016","12/31/2016"
- Click + to add the filter.
- Filter on CsActivityBasic.Amount.
- Property: CsActivityBasic.Amount
- Comparison: Greater
- Value: 100
- Click + to add the filter.
- (Display tab) Define the columns to display in the output:
- Using the Order drop-down list on the (Display tab), assign:
- CsContactBasic.iMIS Id Order 1
- CsActivityBasic.Amount Order 2
- (Sorting tab) Specify the sorting priority.
- Sort the results by CsContactBasic.iMIS Id.
- Click + to add the selection.
- Save your settings.
- Run the query.
📘 Note
A default list of columns displays when you select the Display tab. Deselect the columns you do not need. If a column you need is not in the default list, select All from the View drop-down list and scroll down the page to select the desired column.
Building a directory of members
The following example describes how you can build a query of members defined as anyone who is a member of a group with Is member selected:
- From the Staff site, go to RiSE > Intelligent Query Architect > New > Query.
- (Summary tab) Name the query. For example, My Members.
- (Sources tab) For this example, we know we want the results to return all members of any group marked as Is member, so we need to know information about groups and their members:
- Click Add Source, select the CsContactBasic business object, then click OK.
- We recommend saving your query periodically while you are creating it. Click Save As, and select a save location.
- (Filters tab) Next, we want to narrow the list to only members of Is member groups:
- Click Define, then click filters. The filters tab is where we tell the query whose information we want to see.
- From the drop-down in the Property column, select Is Member.
- Leave the Comparison as Equals.
- From the drop-down in the Value column, select Yes.
- Click the + button.
- Now let's test the query:
- Click the Run tab.
This time you should only see people who are in Is member groups.
- (Display tab) Next, we will want to make the query results look a little better:
- Click the Define tab, then select Display. This is where you select what information displays and what order it is displayed in.
- From the drop-down at the top of the table, select View all columns to see all of the information you could include in the query.
- Select the following properties to display:
- iMISId
- Full Name
- Member Type
- Company
- Country
- State Province
- City
You can reorder the columns by selecting different numbers in the Order column.
- (Sorting tab) For this example, we want the most recently-joined members displayed at the top of the list:
- From the Property drop-down, select Join Date.
- From the Direction drop-down, select Descending.
- Click the + icon.
- Click the Run tab. This time you should see a list of all of your members sorted by most recent join date first.
- Lastly, we want to make sure that only Staff users have access to run this query:
- Click the Security tab.
- In Access Mode, select Advanced.
- From the drop-down, select All Staff Full Control.
- Click Save.
Now you can use your new query in any area that queries can be used. Try adding a Query Menu content item to a page, and select your query for display.
Intermediate
Adding filters and links
In this example, we are going to use the query built in the example above and take it a little further. We are going to add filters that can be used after the query is run, and add clickable links to the query results.
Make sure you are in Advanced Mode to follow these steps:
- Find the query defined above and select Edit.
- (Filters tab) We want to allow people who are viewing the query to narrow the list to members by name:
- From the Property drop-down, select Full Name.
- From the Comparison drop-down, select Contains.
- From the Prompt drop-down, select Required.
- In the text box to the right of the Prompt drop-down, you can define a label that will be used for the Required filter. Enter Name contains in this field.
- Click the + button.
- Click the Run tab to see the new filter. Instead of a list, you will see a prompt for Name contains, which is required in order to see results:
- Enter "an" in the box (without the quotation marks), then click Find. The results return a list of all members whose name contains the letters "an." If there are no results, try a different set of letters.
Next, we want to add links to the query results that will link to a member's profile page. To do this we will need the contact's ID to be used as a URL parameter to tell the page which contacts to display.
- Click the Define tab, then select the Display tab:
- iMIS Id - In the Alias field enter code_ID.
When an IQA query is run, any column with an Alias that begins with code_ will not be displayed, but can be used for links and other IQA functions.
- Click Run to view the results, then click Save.
- Next, let's add the actual links:
- Navigate back to the Display tab.
- In the row Full Name, enter this in the Link field: ~/party.aspx?ID=[code_ID]
Each result of a member's name will now display as a link to the party.aspx page with a URL parameter of ID that equals the contact's ID. In other words, it will link to their account page.
- Lastly, we want to change the column header of Full Name to something a little shorter:
- In the Alias column for Full Name, enter Name. This will mean that when the query results are displayed, the column header for this column will be Name instead of Full Name.
- Click Save.
- Click the Run tab:
- Enter a filter to see results.
- Click a contact's name to verify the links goes to the correct account page.
Finding members by state or join date
This query extracts individual members who live in Texas or those who joined between 2010 and 2015, eliminating duplicates when the same rows are returned by the multiple subqueries.
- Go to RiSE > Intelligent Query Architect. Select New > Query.
- (Sources tab) Browse to the Common > Business Objects folder, and select CsContactBasic.
- (Filters tab) Select the Advanced mode.
- Create a filter on Member Type:
- Comparison: Equal
- Value: Regular Member
- Click + to add the filter.
- Create a filter on State Province:
- Comparison: Equal
- Value: Texas
- Click + to add the filter.
- Click Add Filter.
- Select Or from the Property drop-down list.
- Create a filter on Member Type equal to Regular Member:
- Comparison: Equal
- Value: Regular Member
- Click + to add the filter.
- Create a filter on Join Dates:
- Comparison: Between
- Value: 1/1/2010 and 12/31/2015
- Click + to add the filter.
- (Display tab) Select the Only display unique results option.
- Select the following columns:
- iMIS Id
- State Province
- Join Date
- In the Order column, assign the following:
- iMIS Id – 1
- State Province – 2
- Join Date – 3
- (Sorting tab) Sort the results by iMIS Id to specify the sorting priority.
- Click + to add your selection.
- Save your settings and run the query.
📘 Note
A default list of columns is displayed when you select the Display tab. Deselect the columns you do not need. If a column you need is not in the default list, select View all columns from the drop-down, and scroll to find and select the desired column.
Finding all members in New York who attended an event
- From the Staff site, go to RiSE > Intelligent Query Architect > New > Query.
- Mode: Basic
- (Summary tab): enter the name and description for this query.
- (Sources tab) Select Add Source > Common > Business Objects > CsContactBasic and > Activity.
- Use the default relation between the two business objects:
FK_ Name_Activity (When CsContactBasic.Imis Id = Activity.Id) - (Filters tab):
- Filter on CsContactBasic.State Province
- Property: CsContactBasic.State Province
- Comparison: Equal
- Value: New York
- Click + to add the filter.
- Filter on CsContactBasic.Member Type
- Property: CsContactBasic.Member Type
- Comparison: Equal
- Value: Regular Member
- Click + to add the filter.
- Filter on Activity.Activity Type
- Property: Activity.Activity Type
- Comparison: Equal
- Value: MEETING
- Click + to add the filter.
- Filter on Activity.Transaction Date
- Property: Activity.Transaction Date
- Comparison: Greater Equal
- Value: 1/1/2009
- Click + to add the filter.
- Filter on CsContactBasic.State Province
- (Display tab) Select View > Selected columns. Select the columns to display and the order. Select the Only display unique results option.
- Click Run. The results are a subset of the list in the previous example.
Click to view image

Example query results: Members from New York who attended the 2009 Conference
Finding total number of pledges by amount
This query extracts the total number of members who have made a pledge of $50 or more.
- Go to RiSE > Intelligent Query Architect. Select New > Query.
- (Sources tab) Browse to the Common > Business Objects folder, and select the following business objects:
- CsContactBasic
- CsActivityBasic
- (Filters tab) Select the Advanced mode.
- Filter on CSActivityBasic.Activity Type:
- Comparison: Equal
- Value: PLEDGE
- Click + to add the filter.
- Filter on CsActivityBasic.Amount:
- Comparison: Greater
- Value: 50
- Click + to add the filter.
- (Display tab) Select to display the CsContactBasic.iMIS Id property:
- Function: Count
- Alias: Pledges
- Order: 1
- Save your settings and run the query.
📘 Note
A default list of columns is displayed when you select the Display tab. Deselect the columns you do not need. If a column you need is not in the default list, select View all columns from the drop-down, and scroll to find and select the desired column.
Finding registrants of past (closed) events
This query joins two business objects to extract the registrants for a specified event. At runtime, the user supplies the event code.
- Go to RiSE > Intelligent Query Architect.
- Browse to the folder in which you want to store a new query. Select New > Query.
- (Summary tab) Enter a Name for the query.
- (Sources tab) Browse to the Common > Business Objects folder, and select the following business objects:
- CsContactBasic
- CsEventHistory
- In the Relations area, make sure the default relation is CSContactBasic.iMIS Id = CsEventHistory.Id.
- (Filters tab) Select the Advanced mode.
- Filter on CsEventHistory.Event Code:
- Comparison: Equal
- Prompt: Optional or Required.
📘 Note
Enter a prompt in the field, for example, Event Code. - Click + to add the filter.
- (Display tab) Select the following columns:
- CsContactBasic.iMIS Id
- CsContactBasic.Full Name
- CsContactBasic.Company
- CsEventHistory.Event
📘 Note
A default list of columns is displayed when you select the Display tab. Deselect the columns you do not need. If a column you need is not in the default list, select View all columns from the drop-down, and scroll to find and select the desired column. - Click Refresh.
- In the Order column, assign the following:
- CsContactBasic.iMIS Id Order – 1
- CsEventHistory.Event Order – 2
- (Sorting tab) Sort the results by CsEventHistory.Event.
- Click + to add the selection.
- Save your settings and run the query.
📘 Note
If you want to show current registrants of open events, link to csRegistration instead of csEventHistory and set the default relation as CsContactBasic.iMIS ID = csRegistration.Ship To ID. 📘 Note
The primary difference between Cs and non-Cs objects is that the non-Cs objects contain the .NET security, but Cs objects are views pointing to the underlying non-.NET tables. When you use a non-Cs object, you might notice additional fields such as Access Key and Contact Key. These fields are important when you are linking to objects with security, such as a Campaign business object where a user must have certain security to be able to view data.
Finding registered members by city with award
This query shows individual members with an AWARD activity type.
- Go to RiSE > Intelligent Query Architect. Select New > Query.
- (Sources tab) Browse to the Common > Business Objects folder, and select the following business objects:
- CsContactBasic
- CsActivityBasic
- (Filters tab) Select the Advanced mode.
- Filter on CsActivityBasic.Activity Type:
- Operator: Where
- Comparison: Equal
- Value: AWARD
- Click the + icon to add the filter.
- Click Add Filter.
- Filter on CsContactBasic.Member Type:
- Operator: And
- Comparison: Equal
- Value: Regular Member
- Click the + icon to add the filter.
- (Display tab) Select the following columns:
- CsContactBasic.iMIS Id
- CsContactBasic.Full Name
- CsContactBasic.City
- CsActivityBasic.Description
- CsActivityBasic.ProductCode
- In the Order column, assign the following:
- CsContactBasic.City Order – 1
- CsContactBasic.Full Name Order – 2
- (Sorting tab) Sort the results by CsContactBasic.iMIS Id.
- Click + to add your selection.
- Save your settings and run the query.
Building Progress Tracker queries
The Progress Tracker content item uses a specifically-designed query to display progress towards a goal. The query design depends on the type of goal that is trying to be achieved. The two examples below detail how to build queries that will be used in the Progress Tracker content item.
Using a hard-coded goal
This example walks you through how to build a simple Progress Tracker query that displays this year's total revenue with a hard-coded goal that we hope to achieve by the end of the year.
- From the Staff site, go to RiSE > Intelligent Query Architect > New > Query.
- Name the query Progress Tracker - Order Revenue This Year.
- (Sources tab):
- Click Add source and select CsOrders, then click OK.
- Click Add source and select CsOrderLines, then click OK.
- The two sources will automatically be joined.
- Save the query.
- (Filters tab) Since we only want to see the revenue from this year's sales, we are going to limit the results to return only transactions that occurred this year:
- From the Property drop-down, select CsOrders.Order Date.
- From the Comparison drop-down, select Within Years.
- In the Value field enter 0.
- Click the + button.
- (Display tab) In order to display this year's current total revenue, we need to calculate the sum and then give it a special name:
- From the drop-down, select View all columns.
- Select Display for CsOrderLines.Extended Amount.
- From the Function drop-down, select Sum.
- In the Alias field, enter Sum_Total.
- Deselect Display for all other properties.
📘 Note
This step is required for the Progress Tracker to understand the data. - Click the Run tab. You should see only one row and one column that displays the current year's total revenue.
- Click the Define tab, then click the Display tab.
- Scroll down to the Custom section. This is where you can add custom SQL expressions.
- In the SQL Expression field enter
CAST (2000000 AS INT) - In the Alias field enter Goal_Amount
- Click the + button.
- In the SQL Expression field enter
- Next we need to create a custom display that will tell the Progress Tracker what to do when the new year begins. We want the Progress Tracker to automatically roll forward, so once the new year begins, the new end goal is the last day of the new year:
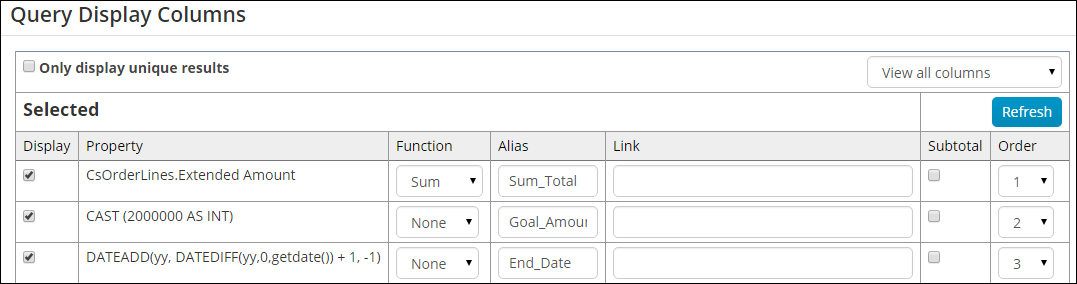
- In the SQL Expression field, enter
DATEADD(yy, DATEDIFF(yy,0,getdate()) + 1, -1) - In the Alias field, enter End_Date
- Click the + button.
- In the SQL Expression field, enter
-
Save the query, then click the Run tab.

- To display the results using the Progress Tracker content item, go to RiSE > Page Builder > Manage content.
- Create a new content record, or Edit an existing content record to display the Progress Tracker.
- From the Manage content window, select Add content.
- Open the Utility folder, select Progress Tracker, then click OK.
- Change the iPart CSS class to read ProgressTracker2.
- In the Source query field, select the Progress Tracker - Revenue This Year query.
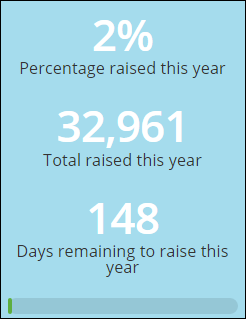
- Scroll down to the Caption Options section:
- From the Progress bar location drop-down, select Below captions.
- Select the Display percent, Display total, and Display days remaining checkboxes.
- Enter a description for each caption.
- Save and Publish the page.
Next, we need to give the Progress Tracker a goal and an end date. For this example, we want the goal to be 2,000,000, and the end date to be the end of the year. Since neither of these values are available using a business object, we will have to use a couple of simple SQL statements.
Using a dynamic amount and goal
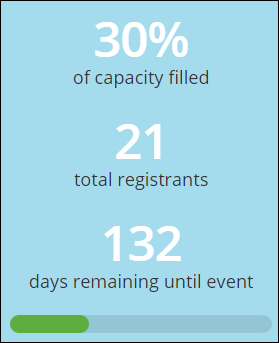
In this example, we are going to build a Progress Tracker query that shows the number of registrants for a particular event. Instead of a set-date goal, the goal is the maximum capacity for the event. The end date will be the start date of the event.
- From the Staff site, go to RiSE > Intelligent Query Architect > New > Query.
- Name the query Progress Tracker - Event Registrations.
- (Sources tab) Click Add Source:
- Select CsEvents, then click OK.
- (Display tab) In order for the Progress Tracker to properly interpret this information, we have to create special display columns:
- Enable Display for the following properties:
- Event Code
- Max Registrations
- Attendees
- Begin Date
- In order for the Progress Tracker to understand the data we are giving it, some properties need to have a particular alias:
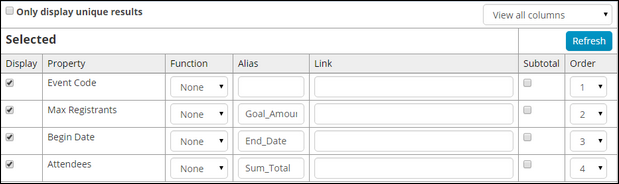
- Max Registrants - Represents the goal.
- Alias - Goal_Amount
- Begin Date - Represents the end date for the goal.
- Alias - End_Date
- Attendees - Represents the current total number of registrations.
- Alias - Sum_Total
- Max Registrants - Represents the goal.
- Enable Display for the following properties:
- Save the query.
- Go to the event dashboard and add a new Progress Tracker content item:
- Rename the iPart CSS class to ProgressTracker2.
- From the Source query field, select the Progress Tracker - Event Registrations query.
- The query we built displays information for all events in the database, but we only want to display the information that is specific to the individual event. To do this, we will need to filter the Progress Tracker results based on the EventKey parameter in the URL:
- In the Filter Options section from the Filter on data column drop-down, select EventCode.
- In the URL parameter field, enter EventKey.
- In the Caption Option section from the Progress bar location drop-down, select Below captions.
- Enable the Display percent, Display total, and Display days remaining options. Enter a description for each.
-
Save and Publish the page.
Click to view image
Your Progress Tracker should look similar to this:
Advanced
Building a multi-level query
Using IQA, you can build a query that displays summary information on one row with the ability to drill down and see more details. This example demonstrates how to build a query that displays a list of event registrations with a drop-down to see the registration options and program items for which users have registered.
- From the Staff site, go to RiSE > Intelligent Query Architect > New > Query.
- Name the query Registrations. Make sure you are in Advanced mode.
- (Sources tab) Click Add Source:
- Select CsEvent, CsFunction, CsRegFunctions and CsRegistration, then click OK.
📘 Note
You can use the Ctrl key to select multiple business objects at once. Use the Quick find field to filter the list. - Set up the relationships between the four selected business objects:
- The automatic join of CsRegistration and CsRegFunctions on the Order Line will not work in this context, so delete the automatic join by clicking the X on the right. Leave the automatic join of CsEvent and CsFunction as-is.
- From the Relations drop-down, select Custom:
- From the drop-downs, select CsRegistration.Event Code Equals CsFunction.Event Code.
- Click the + button.
- Add another relation. From the drop-down, select Custom.
- From the drop-downs, select CsRegistration.Ship To Id Equals CsRegFunctions.Ship To Id.
- Click the + button.
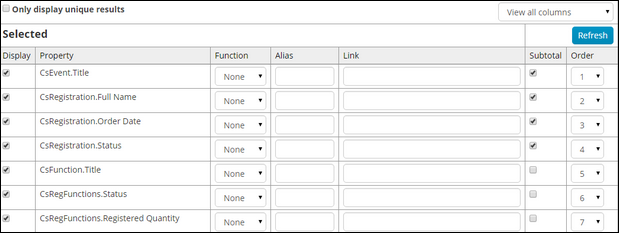
- (Display tab) Select the information you want to see in the query:
- From the View drop-down, select View all columns.
- Select the Display checkbox for the following properties:
- CsEvent.Title
- CsFunction.Title
- CsRegFunctions.Registered Quantity
- CsRegFunctions.Status
- CsRegistration.Full Name
- CsRegistration.Order Date
- CsRegistration.Status
- Re-order and alias the properties as appropriate.
- (Sorting tab) Sort by the name of the event, then the name of the registrant. Then you will sort the functions. Display the registration option, then sort the program items by name. This will require four sorts total:
- From the Property drop-down, select CsEvent.Title, with the Direction of Ascending. Click the + button.
- From the second Property drop-down, select CsRegistration.Last First with the Direction of Ascending. Click the + button.
- From the third Property drop-down, select CsFunction.Is Event Registration Option with the Direction of Descending. Click the + button.
- From the fourth Property drop-down, select CsFunction.Title with the Direction of Ascending. Click the + button.
-
Save the query, then select the Run tab.
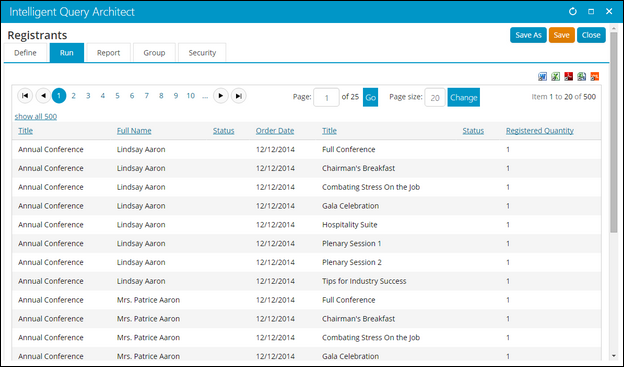
Notice that there is a row in the query per function registration, and the overall event registration data is repeated on each of these rows. Modify the query so that there is just one row per registration with a drop-down to see the selected registration options and program items.
- Select the Define tab, then select the Display tab.
- Select the Subtotal checkbox for the following properties:
- CsEvent.Title
- CsRegistration.Full Name
- CsRegistration.Order Date
- CsRegistration.Status
- Select the Run tab. You should now see one row per order with a toggle button to the left of each row.
- Select the toggle button to see the details of the order.
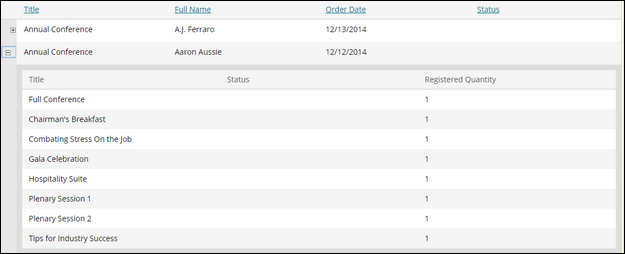
-
Save the query. You can use the Query Menu content item to display the query results on any page.
Building dynamically-filtered queries
The above query example can quickly become overwhelming after just a few registrations have been entered. In this example, we will look at a couple of different ways to dynamically filter the query results to only display needed information.
Displaying event registrations for a specific contact
For the first example, we will build a query that returns results of a contact's event registrations, and then display the results on the contact's page. First, we will need to filter the query to display only a selected contact's registrations:
- Make a copy of the Registrations query from the example above.
- Open the query and click Save As.
- Name the new query Registrations for Contact.
- Click OK.
- (Filters tab) We only want to view registrations for a single user at a time. To do this, we will need to add dynamic filters:
- From the Property drop-down, select CsRegistration.Ship To Id.
- From the Comparison drop-down, select Equal.
- In the Value field, enter "@SelectedId".
- From the Prompt drop-down, select No.
- Click the + button.

- Save the query, then click the Run tab. The only results that display are the registrations that you are registered for.
- To use this query to display a contact's event registrations, go to the contact's account page, add the Query Menu content item, and select the Registrations for Contact query.
- Save and Publish the page.
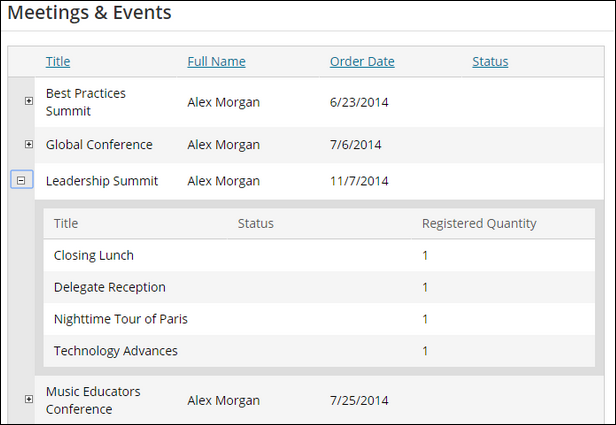
The query will display on the account page with only the selected contact's registrations displayed.
Using the "@url" filter
For this example, we will use the Registrations query to view all of the registrations for one specific event:
- Open the Registrations query and click Save As.
- Name the new query Registrations for Event, then click OK.
- (Filters tab) Next, we need to add a filter that will only show the event whose key is passed in the URL parameter:
- From the Property drop-down, select CsRegistration.EventCode.
- From the Comparison drop-down, select Equal.
- In the Value field, enter "@url:EventKey".
- Click the + button.

- Save the query.
- Next, we need to add the query to the event dashboard:
- Navigate to a specific-event dashboard and add a new Query Menu content item to the page.
- Select the Registrations for Event query as the source.
- Save and Publish the page.
📘 Note
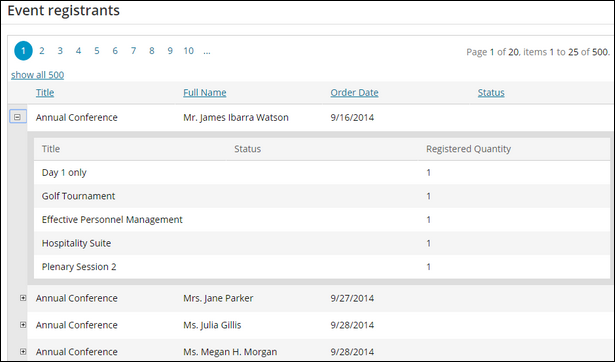
When working on a query filtered by URL parameter, you may not see any results on the Run tab. Try temporarily filtering on the Value of the URL parameter, such as a specific Event Id, until you have the query looking the way you want. Once the query is ready, replace the Value with the "@url" filter.
A list of registrations for the event will now display on the page.
Using the "@Now" filter
In this example, the query finds all of the contacts created this year using the @Now variable to dynamically filter the query.
- Go to RiSE > Intelligent Query Architect. Select New > Query.
- (Summary tab) Enter a Name for the query.
- (Sources tab) Browse to the Common > Business Objects folder, and select the CsContactBasic business objects:
- (Filters tab) Select the Advanced mode.
- Filter on Date Added:
- Comparison: Between
- Value: 1/1/2014 and @Now
- Click the + icon to add the filter.
- (Display tab) Customize the fields to display.
- Save your settings and run the query. When you run the query, it lists all of the contacts created so far this year.
Displaying completed orders
This example uses the Query Menu content item and the Link feature to display completed orders to users.
- Go to RiSE > Intelligent Query Architect > New > Query.
- (Summary tab) Enter the name Completed Orders for the query.
- (Sources tab) Browse to the Common > Business Objects folder, and select the following business objects:
- CsContactBasic
- CsOrderHistory
- (Filters tab) Select the Advanced mode.
- (Display tab) Select the following columns:
- CsContactBasic.Full Name
- CsOrderHistory.Transaction Date
- CsOrderHistory.Id
- CsOrderHistory.Product Name
- CsOrderHistory.Product Code
- CsOrderHistory.Quantity
- Give the following properties an Alias prefaced with code_, so that the column value is hidden in the query results but can still be used as a reference in the Link:
- CsOrderHistory.Id – Alias code_ID
- CsOrderHistory.Product Code – Alias code_ProductCode
- For CsContactBasic.Full Name, enter the following Link:
- For CsOrderHistory.Product Name, enter the following for the Link:
- (Sorting tab) Select the CsOrderHistory.Transaction Date property and sort by Descending.
- Save the query.
- Go to Page Builder > Manage content, and add the Query Menu content item to a content record.
- In the Source query or folder field, select the Completed Orders query.
- Click OK, then save and publish your content record.
- Go to Site Builder > Manage sitemaps, and add the content record to a navigation item. When the query results are displayed in your website, the results in the Account and Product columns are linked to the pages you defined in your query.
~/MyAccount&ID=[code_ID]
📘 Note
This Link assumes that you have a shortcut named MyAccount pointing to a content record containing Contact content items that can use the ID URL parameter.
~/ItemDetail&iProductCode=[code_ProductCode]
📘 Note
This Link assumes that you have a shortcut named ItemDetail pointing to a content record containing the General Product Display content item.
Building a multi-series query for the Query Chart Viewer
The Query Chart Viewer dynamic content item builds a dynamic chart based on the query data. The chart can be set to a range of sizes, skins, and chart types. For more information, see Query Chart Viewer.
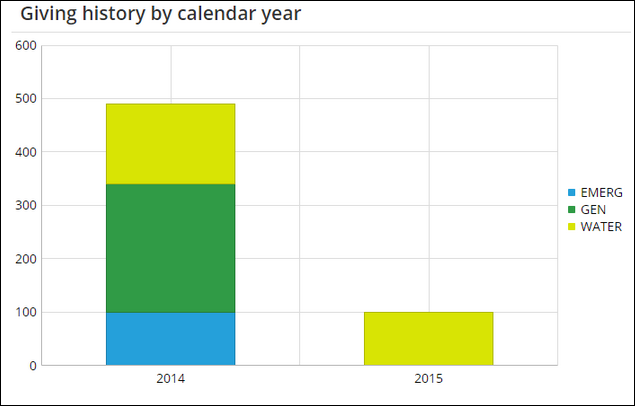
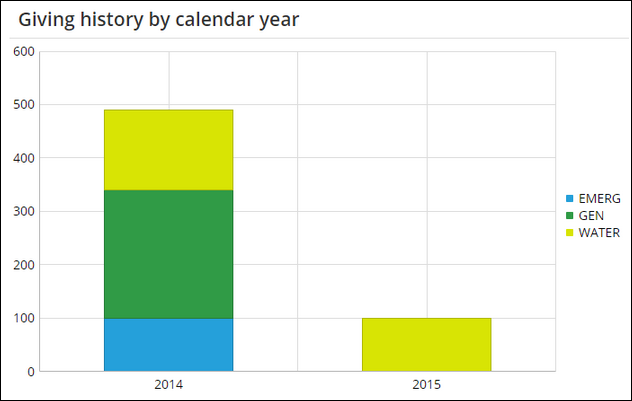
In this example, you will learn how to build a query that will be used to display a stacked bar chart of a contact's gift contributions over two years. Each year will be broken up into the different funds the contact contributes to. For example, this Giving history by calendar year chart:
- From the Staff site, go to RiSE > Intelligent Query Architect > New > Query.
- Name the query Contact Gift Contributions by Year.
- Make sure you are in Advanced Mode.
- (Sources tab) Click Add Source:
- Select GiftsReceived, then click OK.
- (Filters tab) We only want to see gifts that were given by the selected user from this year and last:
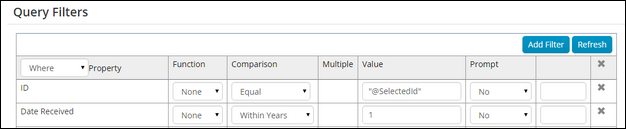
- To filter on the selected user, only add a filter that selects ID Equals "@SelectedId". Click the + button.
- To filter on just this year and last, add a filter with Date Received as the property, Within Years as the comparison, and 1 as the value. Click the + button.
📘 Note
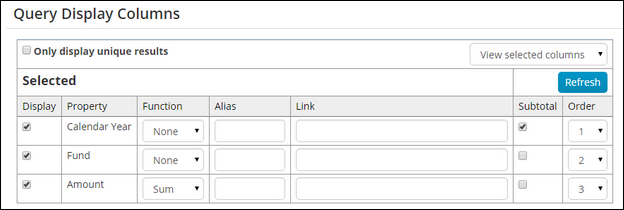
The date "within" comparisons are zero-based. This means that if you want to filter to just this year's activities, you should set Within Years to 0. For two years you would set it to 1, and so forth. - (Display tab) Select the Display checkbox for the following properties:
- Calendar Year
- Fund
- Amount
- For a multi-series chart in the Query Chart Viewer, you must have at least one property that is selected as a Subtotal column. This should be the property that you want to display on the x-axis. Select the Subtotal checkbox for the Calendar Year property.
- For the Amount property, select the Sum function.
- Click the Run tab. Here you will see a list of the gifts that you have made in the last two years with the ability to drill down to see the breakdown by fund.
- Save the query.
- Now we need to configure the content item. Navigate to the account page and turn on Easy Edit. Open the page for edit and add the Query Chart Viewer content item.
- In the configuration for the content item, set the following settings:
- Chart data:
- Source query = Select the query that we just created.
- Display options:
- Type = Bar - Vertical
- Enabled stacked series = checked
- Chart data:
- Series data column = CalendarYear (This will be the x-axis label)
- Series data format = Year
- Data axis = Amount (This will be the value on the y-axis)
- Data axis format = Integer value (This will be the categories each column is broken down into)
- Label axis format = No Format
- Set the other settings as desired. The following are a few of the settings we selected:
- Height = 400
- Width = 0 (When the width is set to 0 it will stretch to fit the width of the container)
- Skin = Metro
- Legend Position = Right
- Chart data:
- Now when you view the account page it will display a bar chart indicating the selected user's gifts broken down by year and fund contributed to.