Configuring the iMIS SOA web service
WarningiMIS SOA installs as an enabled service, so be sure to secure the service before going live.
Preparing your SOA host
For the SOA service to receive connections and pass Windows security, configure the following on the machine that is hosting the SOA service:
- Install iMIS. This installs the SOA service host with the correct database connection information.
- Disable simple file sharing. In Windows Explorer, go to Folder Options > View > Advanced settings.
📘 Note
Missing this can cause the following error:
A remote side security requirement was not fulfilled during authentication. Try increasing the ProtectionLevel and/or ImpersonationLevel.
Securing your SOA service for external access
Preventing unauthorized access through SOA
If IIS is installed on your computer, then iMIS SOA is integrated with IIS so there is no separate service. The default port is 808. You can change this port through IIS administration. For example:
<setting key="EntityManagerDefaultBaseUri" value="net.tcp://10.10.10.10:808/NetTcp"/>
📘 Note
You can use a TCP port other than port 808 if it is a valid TCP port and is not in use by any other service. Because the default port for net.tcp is 808, ASI recommends that you increment from there.
The 10.10.10.10 IP address is an example only. Use your own IP address. 📘 Note
If you change the default port, you must change the EntityManagerDefaultBaseUri key in the site web.config files, as well as any client that uses SOA.
Do the following to help prevent unauthorized access through SOA:
- Limit access to this port to specifically trusted IP addresses only:
- At minimum, the addresses of any iMIS servers that will be using SOA, or hosting content items that use SOA.
- The addresses of any other machines hosting in-house applications that use Windows Communication Foundation (WCF) to consume the SOA service.
🚧 Warning
Do not make this endpoint available externally. For B2B and other external scenarios, use the Soap11 (username/password required) endpoint. - To secure the host service’s port, configure Internet Protocol Security (IPSec) to prevent unauthorized access. For complete walkthroughs of IPSec on Windows, see Microsoft’s IPSec guidance.
Accessing the WSDL metadata definition
In order for the WSDL definition to be properly accessed by third-party vendors, the out-of-the-box web.config file for the Scheduler site must be modified:
- Open the C:\AsiPlatform\Asi.Scheduler_[your instance]\web.config file.
- Change the line:
<serviceMetadata httpGetEnabled="true" httpGetUrl="" />
to the following:
<serviceMetadata httpGetEnabled="true" httpGetUrl="" httpsGetEnabled="true" httpsGetUrl="" />
Enabling the SOA service protocol
Using IIS, you will not see the ASI SOA host service because it is integrated under IIS. Because of this integration, you must do the following to turn on NetTcp for your sites, for each virtual root you create:
- Open Internet Information Services (IIS) Manager on the iMIS server.
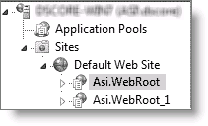
- In the Connections pane, select Sites.
- In the Sites pane, select the virtual root.
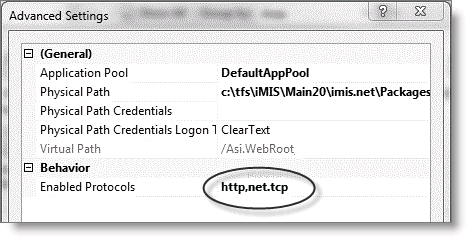
- In the Actions pane, select Manage Web Site > Advanced Settings.
- Make sure net.tcp appears in Enabled Protocols:
- Repeat this process for each of your virtual roots.
📘 Note
After you change any iMIS system configuration item, restart the SOA service to ensure that the changes take effect.
Restricting services access using IP address
By default, iMIS SOA provides the following levels of security to customer data:
- Transport Layer Security (TLS)
- A required user name and password
- User type access rights (ClaimsMap)
In addition, you can protect your customer data by disabling external access, or by restricting SOA or web services access to use by internal systems and trusted partners only. To achieve this, use your Microsoft IIS server to restrict services access by IP address. Regardless of which IIS server version you have, the approach centers on the EntityService.svc file to restrict SOA or ASICommon/Services directory in the web root to restrict access to web services. Choose one of the following strategies:
- DISABLE – If you do not need outside access to your database, disable external access by renaming SOA/EntityService.svc or ASICommon/Services.
- RESTRICT – Add another level of security by applying the specific IP address restrictions to EntityService.svc or ASICommon/Services.
📘 Note
To use EntityService.svc, you must have a security certificate from a certificate authority installed.
Disabling all external services access
Do the following to disable access to external services:
- Locate SOA\EntityService.svc in the scheduler root or ASICommon/Services in the web root.
- Rename the file or directory (such as *.bak).
🚧 Warning
There is a second EntityService.svc file in the directory \SOA\NetTcp. Do not rename or delete this second file, as it is provides internal-only access (using a protocol not available to external users), and it is required for the operation of iMIS.
Restricting services access through IP address
By default, IIS installations do not enable IP restrictions, so restricting IPs requires a few more steps.
Do the following to restrict services access by IP:
- Ensure that your server has IP security enabled.
- Windows Server 2012 or Windows Server 2012 R2:
- On the taskbar, click Server Manager.
- In Server Manager, click the Manage menu, and then click Add Roles and Features.
- In the Add Roles and Features wizard, click Next.
- Select the installation type and click Next.
- Select the destination server and click Next.
- On the Server Roles page, expand Web Server (IIS) > Web Server > Security, and then select IP and Domain Restrictions.
- Click Next.
- On the Select features page, click Next.
- On the Confirm installation selections page, click Install.
- On the Results page, click Close.
- Windows 2008/R2:
- Go to Start > Administrative Tools > Server Manager.
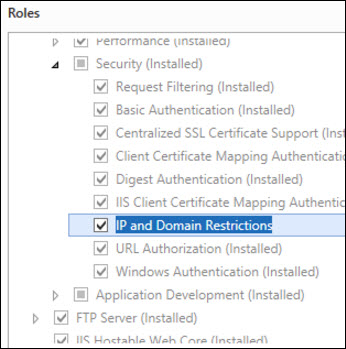
- Select Roles > Web Server.
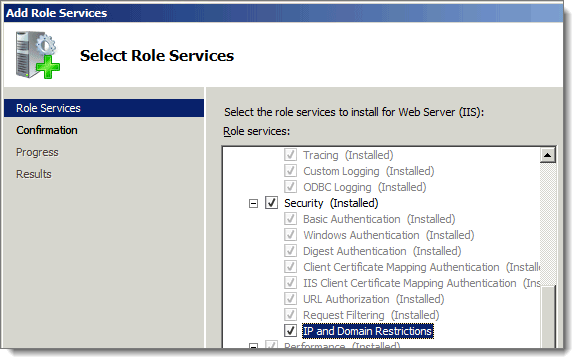
- Select Add Role Services.
- Ensure IP and Domain Restrictions is checked.
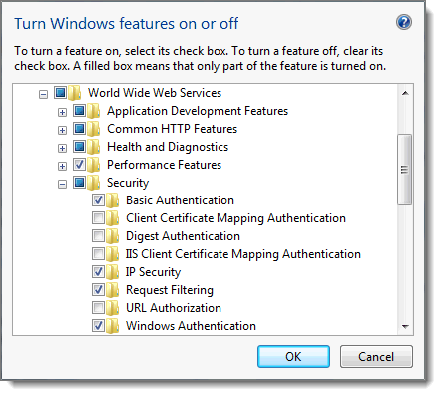
- Windows 7:
- Go to Start > Control Panel > Programs and Features.
- Select Turn Windows features on and off.
- Go to World Wide Web Services > Security.
- Ensure IP Security is checked.
- Click OK and close.
- Windows Server 2012 or Windows Server 2012 R2:
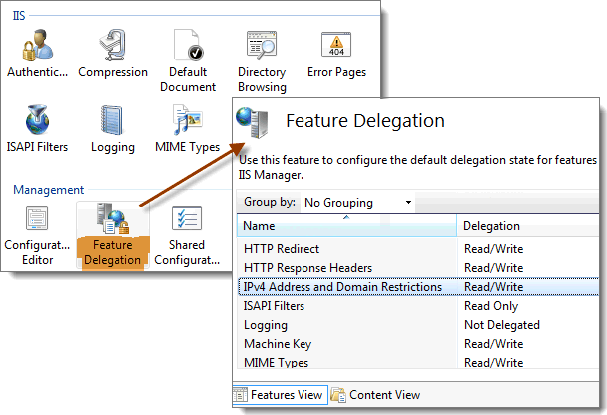
- Enable read/write on IIS IPv4 Address and Domain Restrictions:
- Open Internet Information Service Manager.
- In the Connections pane, select the machine name.
- In the <Machine Name> Home pane, click Feature Delegation.
- Ensure that IPv4 Address and Domain Restrictions are set to Read/Write.
- Edit the applicationHost.config file under C:\Windows\System32\inetsrv\config. You must modify the applicationHost.config file to access the service at the application level.
Modify the following line:
<section name="ipSecurity" overrideModeDefault="Deny" />
change to:
<section name="ipSecurity" overrideModeDefault="Allow" />
Also modify the following:
<sectionGroup name="security">
	<section name="ipSecurity" overrideModeDefault="Deny" />
change to:
<sectionGroup name="security">
	<section name="ipSecurity" overrideModeDefault="Allow" />
- Add IP restrictions to the web.config files:
- Locate the web.config files in the root of the website:
- C:\Program Files (x86)\ASI\iMIS\Net\web.config
- C:\AsiPlatform\Asi.Scheduler_[your instance]\web.config
- Right-click on the web.config file.
- Select Properties.
- Ensure the Read-only check box is clear.
- Open the web.config file with a text editor.
- At the bottom of the file, above the
</configuration>line, add the appropriate IP restrictions for the services to which you want to restrict access:
🚧 Warning
The following ASMX web services are no longer supported. Please see Working with iMIS SOA and Using REST for more information.SOA:
<location path="SOA/EntityService.svc">
	<system.webServer>
	<security>
	<ipSecurity allowUnlisted="false">
		<add ipAddress="127.0.0.1" allowed="true" />
	</ipSecurity>
	</security>
	</system.webServer>
</location>
MembershipWebService:
<location path="[iMIS instance]/AsiCommon/Services/Membership/MembershipWebService.asmx">
	<system.webServer>
	<security>
	<ipSecurity allowUnlisted="false">
		<add ipAddress="127.0.0.1" allowed="true" />
	</ipSecurity>
	</security>
	</system.webServer>
</location>
ClientLog:
<location path="[iMIS instance]/AsiCommon/Services/ClientLog/loggingservice.asmx">
	<system.webServer>
	<security>
	<ipSecurity allowUnlisted="false">
		<add ipAddress="127.0.0.1" allowed="true" />
	</ipSecurity>
	</security>
	</system.webServer>
</location>
QueryService:
<location path="[iMIS instance]/AsiCommon/Services/Query/queryservice.asmx">
	<system.webServer>
	<security>
	<ipSecurity allowUnlisted="false">
		<add ipAddress="127.0.0.1" allowed="true" />
	</ipSecurity>
	</security>
	</system.webServer>
</location>
SiteMapWebService:
<location path="[iMIS instance]/AsiCommon/Services/SiteMap/SiteMapWebService.asmx">
	<system.webServer>
	<security>
	<ipSecurity allowUnlisted="false">
		<add ipAddress="127.0.0.1" allowed="true" />
	</ipSecurity>
	</security>
	</system.webServer>
</location>
For example, these IP restrictions restrict external/http/soap access to only the local computer
- Locate the web.config files in the root of the website:
Testing external access to services
A simple test determines if external web access is allowed to your site with a browser. It is important to make such a test to ensure the procedure has been applied correctly.
Go to https://publicservername.imiscloud.com/asi.scheduler_virtualrootname/SOA/EntityService.svc.
So for example,
https://UK300CloudApp2.imiscloud.com/Asi.Scheduler_<virtualrootname>/SOA/EntityService.svc
- If access is allowed, a simple display starting with EntityService Service or ASICommon/Services should be displayed.
- If you have restricted access, a form of an access denied message should be displayed.
📘 Note
A username and password are still required to access data.
Securing other web services
Security for these web services is set in the web.config file, which defaults to C:\Program Files (x86)\ASI\iMIS\Net\.
Securing QueryService
The QueryService web service gives an administrator access to query results for a specific query or for the default query, if the document folder is specified.
By default, the web.config file value of the AppSetting key "secureQueryWebService" is set to "true". When this value is "true", only authenticated users with the SysAdmin role can access or run queries through the QueryService web service. When this value is set to "false", anyone can access or run queries through this web service.
The QueryService.asmx web service file is located at http://<domainname>/imis/AsiCommon/Services/query/queryservice.asmx.
Securing MembershipWebService
MembershipWebService gives an administrator access to specific membership operations, such as changing user passwords, user names, logins, and so forth.
By default, the web.config value of the AppSetting key "secureMembershipWebService" is set to "true". When this value is "true", only authenticated users with the SysAdmin role can access or change this membership data through the MembershipWebService web service. When this value is set to "false", anyone can access or change this membership data through this web service.
The MembershipWebService.asmx web service file is located in the membership folder at http://<domainname>/imis /AsiCommon/Services/membership/membershipwebservice.asmx.
📘 Note
ASICommon/Services contains the Membership Web Service used for logging in. If you add security on ASICommon/Services, you must grant access to each computer using the Advanced Accounting Console. Secure the group using subnet.