Using the Workbook Converter
The iMIS Workbook Converter lets you easily import contact data from Excel spreadsheets within a workbook into iMIS. Most of the documentation for this tool is embedded within the workbook, on the Instructions tab or as a note that appears when you hover over the column headers in each worksheet. Implementation instructions are included here. Be sure to read the Before you begin section and the FAQs in order to ensure a smooth conversion process.
Recommendations
Before using the iMIS Workbook Converter, consider the following:
- The Workbook Converter must not be run on the web server. The Workbook Converter is designed to be run on the application client only.
- Monitor the memory requirements of the Workbook Converter. Your application client must have at least 16 GB of RAM available.
- For jobs that do not exceed 10,000 entries (names, addresses, related data, activities and so forth), a single Workbook will generally be sufficient. For jobs that exceed 10,000 entries, it is recommended that you use external comma-delimited (CSV) files. The UseLargeWorkbookSupport option supports workbooks exceeding 70 MB. The primary workbook is able to point to CSV files, and the UseLargeWorkbookSupport option is used to support large conversions. The UseLargeWorkbookSupport option does not load the entire workbook into memory for processing in order to optimize conversion time. For more information, refer to the Options worksheet in the sample workbook.
NoteThe UseLargeWorkbookSupport option does not support coloring error cells.
Workbook Converter overview
The iMIS Workbook Converter is a tool that reads and converts data from an Excel workbook (which can in turn be populated with data from an iMIS LAN site or any non-iMIS data source), based on the assumptions/logic outlined below and in the detailed pages for the iMIS Workbook Converter.
The conversion can be used to populate the iMIS database with the following information:
- Contacts (people and organizations)
- Historical activity
- User-defined data
- AutoPay enrollments
This functionality is only available with Service Pack D or later.
The following are some of the areas that are not included in the conversion process:
- Open orders/invoices/accounts receivable
- Setup (products, events, dues cycles, and so forth)
- Notes
- Subscriptions – billing detail on open items
- Lookup/validation tables
- Relationships
- Change log
- Passwords (but you can generate new ones based on email addresses)
- Adhoc searches and reports and letter templates
- Pictures
- Transactions (such as fill event, donations, orders, and membership fees)
Creating contacts
The conversion allows you to specify details for each contact, defining which contacts are created as persons or organizations, and redirecting activity, history, and user-defined data to the appropriate ID.
Phone numbers, email addresses, fax numbers, and so forth are stored in their associated address records.
Contacts whose status is either Inactive or Marked for Deletion should be reviewed. The workbook conversion only converts information for Active contacts.
If you have existing contact data in your database, and you want to update that data or add related data for that contact, you must ensure the IDs that you use have been written to the appropriate column:
- If iMIS 20-300 is ASI-hosted: Contact and coordinate with ASI Hosting or ASI Consulting for more information.
- If iMIS 20-300 is self-hosted: When you create a contact using the iMIS Workbook Converter, the value specified in the ID column for that contact is saved as the MAJOR_KEY value for the corresponding row in the Name table. You can use the specified ID to update or modify that data row or add or modify data related to the contact represented by that ID.
If you have previously run the iMIS Workbook Converter and you did not tie the iMIS Workbook Converter ID to the Name.MAJOR_KEY field, you will not be able to update your data unless you manually add a unique value in the Name.MAJOR_KEY field for each contact whose data you are updating.
When the iMIS Workbook Converter is run, if an ID in the workbook matches the Name.MAJOR_KEY value for an existing contact in the database, then that contact’s data is updated with the data from the workbook.
Converting user-defined data
The Workbook conversion allows you to define multiple objects with all their properties. These objects are converted to virtual objects that are accessible to IQA and the Panel Editor.
Before you begin
Before you begin your conversion task, review the following steps:
- Contact ASI or your AiSP to obtain the iMIS Workbook Converter.
- Do the following:
- If you are using the https protocol from other than the actual server, provide the IP address from which you will be connecting (this can be a single IP or a range of IPs). ASI Hosting must edit the web.config to allow conversion from the remote IP address.
- If iMIS 20-300 is ASI-hosted:
- Review and complete the pre-conversion tasks.
- Prepare iMIS 300 and scrub the source data.
- Contact and coordinate with ASI Hosting. ASI Hosting will back up the database once it is ready for conversion.
- If iMIS 20-300 is self-hosted:
- Prepare the database into which you want to convert. It is recommended that you start with an empty database from the iMIS installer.
- Review and complete the pre-conversion tasks.
- Back up the final prepared database.
- Run conversions in Test Only mode.
- Identify and fix errors.
- Run the conversion and update your iMIS 300 database.
- Save all logs.
- Deal with non-test-mode errors that occur.
- Contact ASI Hosting to restore the database and clear metadata between update runs.
- Review and complete the post-conversion tasks.
- Contact ASI Hosting to make a final database backup and secure the database.
Performing pre-conversion tasks
The following pre-conversion tasks are intended for a new conversion into an empty database. If you are using the Workbook Converter to import new data into an existing iMIS database, some of these tasks might be optional.
🚧 Warning
Complete this setup in the new site (with a new, empty database) provided by ASI. If you were previously provided with a test site or test database and any setup was performed there for testing, this setup/configuration will need to be re-applied to the new site.
-
Configure AutoPay: (This functionality is only available with Service Pack D or later.)
- Enter the DataVault service address.
- Add payment gateways and synchronize with the ASI-hosted tokenization engine as necessary.
- Add payment methods.
- Add payment methods to a payment method set.
- Verify that the AutoPay status is green.
📘 Note
ASI Hosting will provide the DataVault service address for you. - Set up a default financial entity and designate it as the Default organization (go to Settings > Finance > Financial entities).
- Set up any new member types (also called Customer types) you will be importing. Customer types should correspond to values in the MemberType column in the Contact worksheet.
- Configure the appropriate contact options:
- Create any dynamic user-defined data sources and the panels for displaying any custom data properties (go to RiSE > Panel Designer and click Add panel definition).
📘 Note
If you use the iMIS Workbook Converter to import data into legacy user-defined tables, you must temporarily deselect Always create in the table definition (in the Advanced Accounting Console, go to Settings > Membership > Configure membership options > Additional Windows, and click Define Tables) before beginning the conversion. You can re-select Always create after the conversion has successfully completed. See To create a user-defined table for more information on legacy user-defined tables.
- Define your default address purposes and specify communication flow preferences (go to Settings > Contacts > System options). Specify labels for each default Address purpose. Select the appropriate options to Synchronize phone numbers and email.
- If existing phone numbers to be imported are already formatted, you might want to Disable automatic phone number formatting. For sites with a high volume of international numbers, it is recommended that you disable formatting, so that numbers are brought in exactly as they appear in the source data.
- Create any dynamic user-defined data sources and the panels for displaying any custom data properties (go to RiSE > Panel Designer and click Add panel definition).
- Review lookup/validation table information ( From the Staff site, go to Settings > Utilities > General lookup tables):
- Review default prefixes and suffixes and add new prefixes and suffixes if needed. Select the PREFIX or SUFFIX table from the drop-down.
- Set up customer categories if used. Select the CATEGORY table from the drop-down.
- Define additional address purposes if used. Select the ADDRESS_PURPOSE table from the drop-down.
- Set up any additional activity types (From the Staff site, go to Settings > Contacts > Activity types).
- Define the starting number for generating the ID for new contacts (Settings > Contacts > System options).
- Review the system list of countries (Settings > Addresses > Countries).
- From the Staff site, set the following:
- Default country (go to Settings > Contacts > General > Set the default country)
- Default currency (go to Settings > Commerce > General > Default currency code used by RiSE components)
- Ensure your database is accurately prepared.
-
Stop the IIS ASI Scheduler. Use the following command:
iisreset -stop
- Contact ASI Hosting for assistance enabling the Name trigger asi_Name_Insert_Update:
- In SQL Server Management Studio, go to [Database] > Tables > dbo.Name > Triggers. Right-click on asi_Name_Insert_Update and click Enable.
- You can also run the following query in SQL Server Management Studio:
ALTER TABLE dbo.Name ENABLE TRIGGER asi_Name_Insert_Update
-
Contact ASI Hosting for assistance disabling the ContactMain trigger asi_ContactMain_Insert:
- In SQL Server Management Studio, go to [Database] > Tables > dbo.ContactMain > Triggers. Right-click on asi_ContactMain_Insert and click Disable.
- You can also run the following query in SQL Server Management Studio:
ALTER TABLE ContactMain DISABLE TRIGGER asi_ContactMain_Insert
- Contact ASI Hosting for assistance disabling the iMISPublishService. In SQL Server Management Studio, go to [Database] > Service Broker > Services, and delete the iMISPublishService.
- Contact ASI Hosting for assistance disabling the iMISPublishQueue. In SQL Server Management Studio, go to [Database] > Service Broker > Queues, and delete the dbo.iMISPublishQueue.
-
Edit the ASI Scheduler web.config file. You must modify the PublishServerCode value to some letter that will not match what is set in the PublishServerRef table. The default file location is C:\AsiPlatform\Asi.Scheduler_iMIS\web.config.
<SystemParams> <add key="PublishServerCode" value="A" /> <!--Settings for workflow service --> <add key="UID" value="MANAGER" /> - Restart the IIS ASI Scheduler. Use the following command:
iisreset -start
📘 Note
If you are not self-hosted, you must contact your host for assistance stopping and restarting the ASI Scheduler.
📘 Note
If you are not self-hosted, you must contact your host for assistance modifying web.config files.
Using the iMIS Workbook Converter
The iMIS Workbook Converter lets you easily import contact data from an Excel workbook into iMIS.
📘 Note
Most of the documentation for the iMIS Workbook Converter is embedded in the workbook, either on the Instructions tab or as a note that appears when you hover over the column headers in each worksheet.
Preparing the workbook data
📘 Note
Remove any special formatting, for example, color, bolding, and so forth, from your Workbook data.
Before you begin preparing your workbook data in anticipation of your conversion task, review the Before you begin and Performing pre-conversion tasks sections.
- Locate the workbook converter ZIP file.
- If iMIS 20-300 is self-hosted:
- Navigate to the Net\bin folder (under the location where iMIS is installed) to obtain the iMIS20-300WorkbookConverter.zip file. The default location is C:\Program Files (x86)\ASI\iMIS\Net\bin.
- Copy the file to a local folder, and extract its contents.
- If iMIS 20-300 is ASI-hosted:
- Contact ASI hosting or your AiSP to obtain the workbook converter ZIP file.
- Copy the workbook converter ZIP file to a local folder, and extract its contents.
- If iMIS 20-300 is self-hosted:
- Copy the sample Excel workbook file from that folder to a backed-up location for editing, and rename the sample Excel workbook file. Note that the sample workbook is designated as read-only, so you must save changes to a new file. The file must be saved in a .xlsx format. Other file formats are not supported.
- Complete the spreadsheet with the organization's data, following the instructions provided in the workbook. Hover over column headers in each spreadsheet for tips or help for that column.
- Enter and prepare your data:
-
Contents worksheet – Be sure that each worksheet tab that contains data to be imported is listed on the Contents worksheet, and that there is an entry for all appropriate WorksheetTypes.
If you are importing contacts with only one address, you can include all address and name information in a single worksheet. For example, create a worksheet called Individual that is listed twice on the Contents worksheet as both a WorksheetType Contact and a WorksheetType Address. However, if you have a worksheet called Individual that is both a WorksheetType Contact and a WorksheetType Address, but do not provide the AddressPurpose information on the worksheet (which the iMIS Workbook Converter is expecting), that will cause a warning to be displayed during a Test Only validation run.
If you are adding a worksheet that sets the various available options, this worksheet must be identified in the Contents worksheet with a Worksheet Type of Options.
📘 Note
When updating an existing physical address, be sure to re-enter the data for all of the address components (address lines 1-3, City, State/Province, and so forth). If any components are left blank (for example, address lines 2 and 3) and the previously existing address for that Address Purpose contained values in those fields, those values will be cleared.
To update contact information without modifying any address information, ensure that the worksheet being processed is identified in the Contents worksheet as only having a WorksheetType of Contact.
If the primary organization ID for a contact is updated as a result of the import, the default address for that contact will be overwritten with the corresponding address for the new primary organization, unless the automatic flow down of company address information is disabled. Automatic flow down of company address information is disabled by default (go to Settings > Contacts > System options and select the Disable auto flow down of company address information option.In the Contents worksheet, list the worksheet names in the order listed on the Instructions tab. For example, all Contact-WorksheetType worksheets first, then Address WorksheetType, and so forth.
📘 Note
Remove any trailing spaces from all entries in the Contents worksheet. -
Options WorksheetType – Refer to comments on the Options worksheet in the sample workbook for more information.
📘 Note
If you are adding a worksheet that sets the various available options, this worksheet must be identified in the Contents worksheet with a Worksheet Type of Options.- Create User Accounts allows you to create accounts for new contacts. In order for this option to even be considered, Test Only must be disabled, and the CreateAccounts setting must be set to TRUE in the Options worksheet. New accounts are not created if the Test Only option is enabled. Disabling Test Only and setting CreateAccounts to TRUE will allow the conversion process to generate usernames based on the preferred mailing address email addresses.
- Duplicates: If the email address already exists in the iMIS database, the duplicate is flagged in your error log.
- No email: If the contact has no email address, no username is created for them.
- Passwords: The password is a random value, so the user will go through the Forgot my password route to reset it to a password of their choosing
📘 Note
iMIS will only create a new user account if a contact is being added. Modifying a contact will not result in a new user account.
- Create User Accounts allows you to create accounts for new contacts. In order for this option to even be considered, Test Only must be disabled, and the CreateAccounts setting must be set to TRUE in the Options worksheet. New accounts are not created if the Test Only option is enabled. Disabling Test Only and setting CreateAccounts to TRUE will allow the conversion process to generate usernames based on the preferred mailing address email addresses.
- Contact – Create one or more worksheets with this WorksheetType. The sample workbook instructions show which fields apply to each type of contact. Fields at the top of the worksheet that are in bold apply to that worksheet's PartyType. You must have at least one Contact WorksheetType. Follow the instructions provided in the worksheet comments.
- Address – Enter all of the addresses for each contact (individual or organization) into the appropriate columns of the contact worksheets. If a contact has more than one address, you might enter additional addresses into any worksheet with an Address WorksheetType (as defined on the Contents worksheet). Be sure to list all of the worksheets that contain address information in the Contents worksheet, with an Address WorksheetType.
-
RelatedDataDefinition – You can use this WorksheetType to define the structure of an associated RelatedData worksheet. The example workbook contains the following worksheets as examples of this WorksheetType:
- Education Info Definition – Defines the fields used in the associated Education Info Data worksheet. Follow the instructions provided in the worksheet comments.
- Personal Info Definition – Defines the fields used in the associated Personal Info Data worksheet. Follow the instructions provided in the worksheet comments.
-
RelatedData – Worksheets of this type are user-defined. Their structure can be defined by an associated RelatedDataDefinition worksheet, or by a table or panel editor data source that already exists in iMIS.
The example workbook contains the following worksheets as examples of this WorksheetType:- Education Info Data – This worksheet’s structure is defined by the associated Education Info Definition worksheet of the RelatedDataDefinition type. This worksheet contains multi-instance data; it can contain multiple rows of data for a single contact. Enter the educational information for each contact into the appropriate columns.
- Personal Info Data – This worksheet’s structure is defined by the associated Personal Info Definition worksheet of the RelatedDataDefinition type. This worksheet contains single-instance data; it can only contain one row of data for a single contact. Enter the personal information for each contact into the appropriate column.
- Activities – This worksheet is an example of a RelatedData WorksheetType that does not have an associated RelatedDataDefinition WorksheetType. The table referenced by the worksheet already exists in iMIS. Enter information about the activities, such as sales, for each contact in the appropriate column. In order to import the data, the activity type must be valid in iMIS. If the activity type is valid, but not fully set up in the Advanced Accounting Console, the data is imported, but you cannot view it. Follow the instructions provided in the worksheet comments.
Your workbook might contain RelatedData worksheets that are defined by existing tables in iMIS. If a worksheet of this type contains multiple rows of data for a single contact (multi-instance table data), enter True for that worksheet in the MultiInstance column on the Contents tab. This specification ensures that the iMIS Workbook Converter does not produce errors for these rows when run in Test Only mode. The Activities worksheet in the sample workbook is an example of a predefined multi-instance table.
If the worksheet can only contain one data row per contact (single-instance table data), leave the MultiInstance column blank. When in Test Only mode, the iMIS Workbook Converter checks for multiple occurrences of an ID in single-instance table data and produces errors for those rows.
-
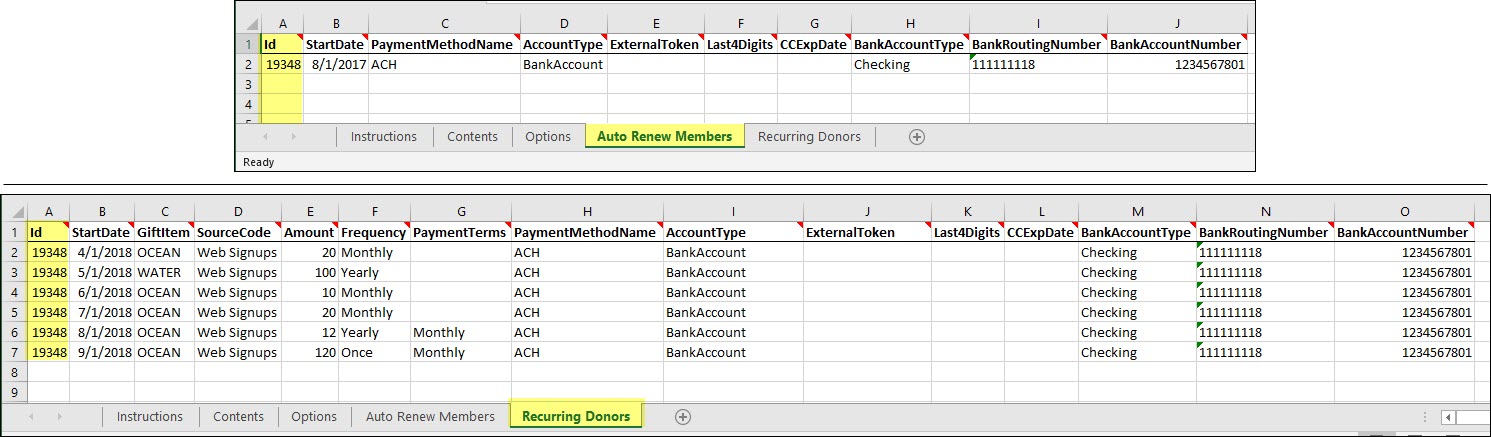
Auto Renew Members – (This functionality is only available with Service Pack D or later.)
Create one worksheet that contains a list of the members for whom you want to generate an enrollment. If you have an external token with a gateway, you can import the ExternalToken into the DataVault; you can then use that token to process your credit card payment. - Id (required)
- StartDate (required)
- PaymentMethodName (required)
- AccountType (required)
- ExternalToken
- Last4Digits
- CCExpDate
- BankAccountType
- BankRoutingNumber
- BankAccountNumber
-
Recurring Donors – (This functionality is only available with Service Pack D or later.)
Create one worksheet that contains a list of donors for whom you want to generate an enrollment. If you have an external token with a gateway, you can import the ExternalToken into the DataVault; you can then use that token to process your credit card payment. - Id (required)
- StartDate (required)
- GiftItem (product code) (required)
- SourceCode (set up in Campaign) (optional)
- Amount (required)
- Frequency (required)
- PaymentTerms (optional)
- Amount - 120
- Frequency - Yearly
- PaymentTerms - Monthly
- PaymentMethodName (required)
- AccountType (required)
- ExternalToken
- Last4Digits
- CCExpDate
- BankAccountType
📘 Note
Numeric columns must use a numeric format of either General or Number. If Number is selected, make sure the option Use 1000 Separator (,) is not selected, and the Negative numbers format should be -1234.10.
🚧 Warning
To create a new worksheet, copy the entire first row containing the column headers from the sample workbook with a matching WorksheetType into the first row of your new worksheet. The column headers must be on the first row, and all column headers must appear. You do not have to fill out every column, but do not delete or rename any column headers.
📘 Note
The first address for each ID must be marked as the default address. All other addresses can be flagged to override that default with a specific value for various communication reasons (for example, preferred mail, bill, and ship).
🚧 Warning
If you created a Panel Editor data source prior to the 20.2 release of iMIS, the data source had a character string maximum of 400 characters. Panel Editor data sources created in iMIS release 20.2 and later have a character string maximum of 4000 characters.
Any Panel Editor data source you created prior to the 20.2 release is still usable in newer versions of iMIS.
You might receive the following error message:
Warning: At [DataSourceName] [3,3], the property named [NewProperty] specifies a string length of [>400] which exceeds the maximum allowed for this data source. The maximum string length will be set to a value of 400.This message indicates that a specific Panel Editor data source had a character string property defined before iMIS 20.2.
New data sources will have a character string property maximum of 4000 characters.
To generate a recurring membership enrollment, add the following information in your Auto Renew Members worksheet:
The Id and StartDate information is used to create a membership enrollment tied to the account.
📘 Note
The PaymentMethodName must match the payment method DESCRIPTION specified in iMIS. The payment method must also be tied to the correct gateway. For example, if you have a VISA credit card that is tied to the PayPal gateway, use a code VISA. If you need to specify a VISA credit card tied to a second gateway, such as Moneris, use a code VISA_M. For more information, refer to payment methods. 📘 Note
If the PaymentMethodName does not match one of the following credit card names:
-Visa
-MasterCard
-AmericanExpress
-DinersClub
-Discover
-JCB
then the credit card is described as Card in the Autopay enrollment.
This information is used to create an AutoPay account. The ExternalToken, Last4Digits and CCExpDate are used to create a credit card payment method summary. The BankAccountType, BankRoutingNumber and BankAccountNumber are used to create a bank account payment method summary.
📘 Note
It is recommended that you only include account details that should be active for future renewals. Even if inactive, a member defined on the Auto Renew Members WorksheetType will create an enrollment. 📘 Note
You must set up AutoPay and the DataVault before importing Auto Renew Members data.
To generate a recurring donation enrollment, add the following information in your Recurring Donors worksheet:
The Frequency is how often the recurring pledge is renewed. For example, a Frequency of Once means that the payment is not renewed (the payment happens Once). A Frequency of Yearly means the recurring pledge is renewed annually.
This information is used to create a membership enrollment tied to the account.
The PaymentTerms define the payment schedule for a recurring installment pledge. Options include Annually, Quarterly, and Monthly.
For example, to create an annual installment pledge of $120 that is to be paid off in 12 monthly installments, enter the following values:
📘 Note
The Frequency option Once is used to create AutoPay accounts for externally tokenized credit cards or bank accounts to pay for partially paid, non-recurring installment pledges. When using the option Once, AutoPay does not generate invoices.
For example, consider a customer who originally pledged to pay your organization $120 for the year, spread across 12 non-recurring installments. If the pledge has only been paid across six installments, and you are intending to import this payment information, you can select Once for the Frequency and Monthly for the PaymentTerms. The remaining six invoices with the remaining balance must be created or imported.
📘 Note
The PaymentMethodName must match the payment method DESCRIPTION specified in iMIS. For example, if you have a VISA credit card that is tied to the PayPal gateway, use a code VISA. If you need to specify a VISA credit card tied to a second gateway, such as Moneris, use a code VISA_M. For more information, refer to payment methods. 📘 Note
If the PaymentMethodName does not match one of the following credit card names:
-Visa
-MasterCard
-AmericanExpress
-DinersClub
-Discover
-JCB
then the credit card is described as Card in the Autopay enrollment.
This information is used to create an AutoPay account. The ExternalToken, Last4Digits and CCExpDate are used to create a credit card payment method summary. The BankAccountType, BankRoutingNumber and BankAccountNumber are used to create a bank account payment method summary.
When all entries are complete, save and close the workbook. The workbook must be closed when running the conversion.
📘 Note
The workbook must be saved with an extension of .xlsx. You will receive an error if you attempt to convert using an .xls extension. 📘 Note
If you have a column of data in a spreadsheet that should be empty, but instead contains a blank or space character (whitespace), then you will get an error during the TestOnly run. To clear a space from a cell in Excel, right-click the cell, and select Delete. To clear an entire column, it might be easier to copy the column header to the clipboard, then highlight the entire column and delete it, and then copy the column header into the first available cell at the end of line 1.
Importing the data
Do the following to import the data from your workbook:
- Locate the WorkbookConverter.exe file. Double-click the file to launch the converter.
- Fill out the Workbook Conversion utility fields as follows:
- Source workbook: Configure the converter to use the correct workbook file. You can use the folder icon to browse to your workbook file.
- Max contacts: Leave at 0 (zero).
- Test only: Keep this checked until you have run a successful test conversion that reports no errors.
- Destination website and Protocol fields: You can use an https protocol to access the conversion utility from outside the ASI firewall (which applies to all except ASI staff, who have the additional option of operating within the firewall using NetTcp protocol).
- If using https protocol, select https://[DomainName]/Asi.Scheduler_[VirtualRoot]/Soa as the Destination website.
- If using the NetTcp protocol, select net.tcp://[DomainName]:808/Asi.Scheduler_[VirtualRoot]/Soa/NetTcp as the Destination website.
- Replace [DomainName] with localhost, the IP address, or the proper name of the destination website.
- Replace [VirtualRoot] with the name given to the scheduler site during the installation of iMIS.
- User name and Password: ASI Hosting will provide credentials for running the conversion.
📘 Note
ASI Hosting or your AiSP will set up the target iMIS website with a valid security certificate.📘 Note
The iMIS Workbook Converter saves the modified website name, so when you next run the conversion, the modified name automatically displays as the Destination website.📘 Note
User name and Password are required only if you selected to use the https protocol. - Run the conversion in Test only mode.
- Verify that the spreadsheet file is closed.
- Click Convert to run the import test. It can take several minutes for the initial connection to succeed, and no information will appear on the conversion update window until after that is complete.
- After conversion completes, click Export log to save the import information and any errors.
- Click Update Workbook to allow the converter to update the spreadsheet and flag any errors in red.
📘 Note
If you receive a timeout error after 60 seconds, try resetting IIS and re-starting.📘 Note
Exported logs include additional details about any Service Errors encountered.📘 Note
This only works if the UseLargeWorkbookSupport setting is FALSE in the Options worksheet of the workbook being processed. - Open the spreadsheet and fix any problems identified, such as duplicate records.
- Re-run the converter in Test only mode until it returns no errors.
- Back up the iMIS database. Run the converter with Test only mode disabled. Some additional errors might be reported at this point. You must examine the conversion log to identify all Errors and Warnings, and either correct them in the workbook and initiate a new conversion with a fresh 20-300 database, or in a few cases, you might correct them directly in 20-300.
- Verify the conversion by logging into iMIS and locating records that should have been imported.
📘 Note
The conversion utility now requires .NET 4.6.2. If not present, you will be prompted to update.
📘 Note
To display the dates differently, format the specific cell. Highlight the cell, then select Format Cells > Number > Dates. Choose from the list of date formats and then select OK.
🚧 Warning
After the database is restored, the IIS ASI scheduler instance associated with the database must be recycled.
Once you have completed the conversion process, proceed to the post-conversion tasks to ensure that your conversion process concludes seamlessly.
Tips and tricks
- If you run the iMIS Workbook Converter again immediately after a data import, you might receive errors. To avoid these errors, do the following before subsequently running the iMIS Workbook Converter:
- Close the WorkbookConverter.exe file.
- Stop Internet Information Services (IIS).
- Restore the database.
- Start IIS.
- Open the WorkbookConverter.exe file and begin the import.
- If you use the iMIS Workbook Converter to import data into legacy user-defined tables, you must temporarily deselect Always create in the table definition before beginning the conversion (in the Advanced Accounting Console, go to Settings > Membership > Configure membership options > Additional Windows, and click Define Tables). You can re-select Always create after the conversion has successfully completed. See the Desktop documentation for more information on legacy user-defined tables.
- When the iMIS Workbook Converter is used to update user-defined table data, the data is updated as follows:
- For single-instance user-defined tables, if a row already exists in the table for the specified ID, then the existing data in that row will be updated with the data present in the workbook. If a row does not exist in the table for the ID, then a row will be added.
- For multi-instance user-defined tables, a new row is always added to the table for the specified ID containing the values present in the workbook.
Importing usernames and passwords
Existing usernames and passwords for your members cannot be imported during the data migration process.
As part of the migration process, the email address is assigned as the username if the CreateAccounts options is True in the Options tab of the workbook. If a contact does not have an email address, or if there is a duplicate email already used for another contact, then no username is assigned to that contact. A staff user with administrative access can manually assign usernames post-migration by doing the following:
- Go to Community > Security > Users.
- Search for the contact for which you want to assign a username.
- In the User credentials area, click the red plus icon
 .
. - Enter the required information to create a user logon for the contact.
With the iMIS Workbook Converter, it is not possible to assign the password, which is an unknown random password assigned by the tool. With the iMIS migration utility (for migrations from other versions of iMIS), you do have the ability to change the default password assigned. However, ASI advises against distributing this to users, since it will be the same for all users and would present a security risk. Users should be instructed to use the Forgot my password process on an initial site visit to reset their password and access the site. If a user is having issues with the password reset process and needs assistance, a staff user with administrative access can manually change the user's password from the Staff site (Community > Security > Users). The staff user can then communicate to the user the temporary password that has been assigned. Once the user logs in, the staff user can assist the user in changing the password.
Importing recurring enrollments
When importing recurring donations or membership renewals, you can do so without a corresponding spreadsheet for the donor, as long as the donor already exists in iMIS and you reference the iMIS Id on the appropriate tab (Recurring Donors or Auto Renew Members). If you only need one of the tabs, you can delete the other one.
📘 Note
The Workbook Converter successfully imports recurring enrollments tied to bank accounts, external bank accounts, and external credit card accounts.
| Workbook | iMIS 20-300 Conversion-Importing AutoRenew and RecurringDonors data using existing iMIS ID.xls |
| Location | C:\Program Files (x86)\ASI\iMIS\Net\bin\iMIS20-WorkbookConverter.zip |
When importing recurring enrollments using the Workbook Converter, the following Options need to be considered:
- UseIMISID - Set this option to TRUE. This enables the Workbook Converter to update existing contacts using the iMIS Id.
- CreateAccounts – Set this option to FALSE.
📘 Note
If CreateAccounts is set to TRUE and valid email addresses are provided, user accounts are created in iMIS. As you are attempting to import additional items for existing recurring enrollments, be sure to set CreateAccounts to FALSE.
Performing post-conversion tasks
These tasks can help you ensure the quality of your data conversion to iMIS 20-300, and some tasks must be performed to ensure proper iMIS 20-300 processing.
After you convert
Confirmation emails will be sent. It is important for staff accounts to be used for all post-conversion testing of orders, event registrations, and so forth. If this is not feasible, another option is to reset the preferred email address for selected contacts.
- Ensure expected numbers of Individual and Organization records were created.
- Review your committees, chapters, and so forth and compare rosters. Review roles that were assigned to members.
- Ensure your database is accurately prepared.
-
Stop the IIS ASI Scheduler. Use the following command:
iisreset -stop
- Open the iMIS DB Maintenance Utility, and click Prepare iMIS Database. This recreates the iMISPublishQueue and iMISPublishService.
- Synchronize the NetContacts in your Name table:
- In the DB Maintenance utility, select the NetContacts tab..
- Click Disable Name Table Trigger to disable triggers temporarily.
- Import your records in the Advanced Accounting Console. Select Utilities > Data Transfer Utilities > Import Utility.
- When the import is done, click Enable Name Table Trigger to restore the trigger.
- Do one of the following to re-enable the ContactMain trigger:
- In SQL Server Management Studio, go to [Database] > Tables > dbo.ContactMain > Triggers. Right-click on asi_ContactMain_Insert_Update_Delete and click Enable.
- Run the following query in SQL Server Management Studio:
ALTER TABLE ContactMain ENABLE TRIGGER asi_ContactMain_Insert_Update_Delete
- Edit the ASI Scheduler web.config file to restore the PublishServerCode value to match what is set in the PublishServerRef table.
- Delete the contents of the C:\Program Files (x86)\ASI\[iMISInstanceName]\indexServiceProtected\Search\Lucene folder.
-
Restart the IIS ASI Scheduler. Use the following command:
iisreset -start
- Secure the database.
📘 Note
If you are not self-hosted, you must contact your host for assistance stopping and restarting the ASI Scheduler.
📘 Note
If you are not self-hosted, you must contact your host for assistance modifying web.config files.
Post-conversion data validation scripts
You can use the following queries with iMIS Workbook Converter migrations to check for any issues:
- Committees: Run this query on a source database to get a list of all the committees and their members, and check resulting data in 20-300 (search for the committee and check against the roster there). Compare names, roles, and in cases where the membership is date-limited, the effective and expiration dates of membership:
SELECT Activity.Product_Code, Committee_Position.TITLE,
Name.FULL_NAME, Name.COMPANY, Activity.ACTION_CODES,
Activity.EFFECTIVE_DATE, Activity.THRU_DATE,
committee_Position.RANK, Activity.TRANSACTION_DATE

from Activity INNER JOIN Name on Name.ID = Activity.ID LEFT
OUTER JOIN Committee_Position on
Committee_Position.POSITION_CODE = Activity.ACTION_CODES

Where Activity.ACTIVITY_TYPE = 'COMMITTEE' AND
Activity.PRODUCT_CODE LIKE 'COMMITTEE/%'

order by Product_Code
- Duplicate organizations: Run this query to determine whether any duplicate Organizations that might have been created in 20-300 (for example, multiple companies were created having the same name) and investigate the cause:
select COUNT(i.ContactKey) as CompanyRecords, InstituteName as CompanyName
from Institute i, ContactMain cm where i.ContactKey = cm.ContactKey
group by InstituteName having COUNT(i.contactkey)>1