Designing communities
You have an advanced set of capabilities available to you to support the communication and collaboration needs of the groups in your organization. You are able to perform the following tasks:
- Redesign the layout of your communities home pages (through its templates and themes)
- Move and edit community content items
- Put community content items into other web pages
Community display
A community content record defines the layout of a community's home page. Default community layouts are provided, but you can move the content items on the page and save the modified version to the Shared Content folder.
📘 Note
The Community Home page is the only editable Community page. Though Easy Edit provides the ability to edit and Save As for any Community page, the updated versions will not be used.
Administrators can always view the Communities list, but you will want to allow non-administrator users to view the Communities once the display is to your liking.
If you want change the look and feel of a community home page, you can do so by:
- Editing the website's definition and selecting different master pages and themes.
- Modifying the selected theme (which affects all websites that share it).
- Reorganizing dynamic content items on an existing or new Community layout.
Community layouts
Four content records with different layouts for your community content items are provided by default:
- The Community layout provides one of each type of Community content item in a TwoColumns50-50 layout.
- The Community Description layout has two content items – one is an "About" content item that displays the Long Description from the community definition, the second is a Recent Activity content item that displays recent posts and comments.
- The Community Newsfeed layout has three content items – one is an "Announcements" summary content item, the second is a Recent Activity content item that displays recent posts and comments, and the third is a listing of Blogs being used by the community.
- The Community Post Summary layout displays a Recent Activity content item that displays recent posts and comments, an Announcements content item in a SingleColumn layout, and a Community Roster content item in a TwoColumns50-50 layout.
Defining the display of a community
To upload a graphic or image for the community
- Log on as a user who is a member of at least one Master Admin CAG or a member of the SysAdmin security role.
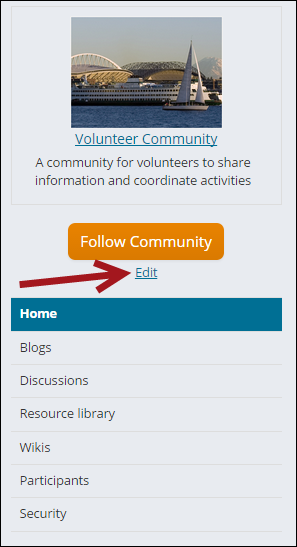
- There are two methods for opening a Community for editing:
- Select Community > Communities and select the edit icon.
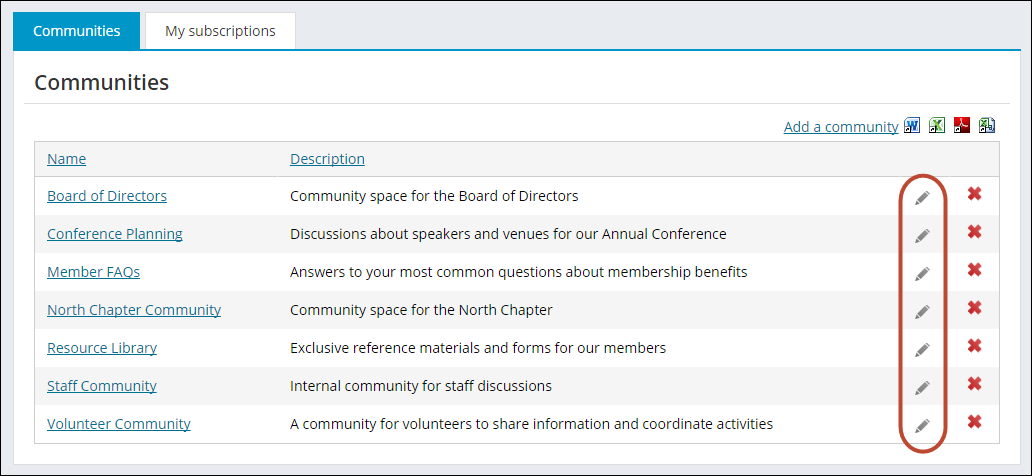
- On the Community page, click Edit.
- Select Community > Communities and select the edit icon.
- Next to Graphic, click Select image.
- Select an existing image or upload a file and click Insert.
To choose a community layout
- Log on as a user who is a member of at least one Master Admin CAG or a member of the SysAdmin security role.
- There are two methods for opening a Community for editing:
- Select Community > Communities and select edit.
- On the Community page, click Edit.
- Next to Community Layout, click select. The Document system opens to the CommunityLayouts folder (@/Core Content/ Communities folder).
- Select from one of four community layouts, or create your own content record with Community content items, and select it.
- Save the community with the new layout.
- To view the community with the new layout, click the link to the community.
To prepare to modify a community layout
Since the default Community layouts (@/Core Content/Communities/Community Layout) cannot be modified in their default location, you must create a place to store community layouts (@/Shared Content/Community Layout).
- From the Staff site, go to RiSE > Page Builder > Manage content.
- Select the Shared Content folder.
- Choose New > Website Content Folder. The Content Designer will open.
- In the Title field, enter Community Layouts. A value will auto-populate in the Folder Name field.
- Click Save.
To reposition a content item on a community
- Go to the community page.
- Select the Easy Edit icon.
- Scroll to the bottom of the page and select the Content Record icon. See Managing content for more information.
- Click the title bar of the content item and drag it to another location in the content record. An insertion bar indicates where you are inserting the content item.
- Release the mouse button to drop the content item. The content item relocates to the place where the insertion bar displays.
- If you want to remove a content item completely, select Remove.
- Save the content record.
- Publish the content record. When you click the link to the community page, your rearranged content items display.
📘 Note
If you haven’t previously saved this Community Layout to @/Shared Content/Community Layouts, select Save As to save a copy of the content record to that folder. This instruction assumes you have followed the instruction in To prepare to modify a community layout.
Tips
- The arrangement and relationships of the community parts to each other and to the website as a whole are important aspects of how the website users will navigate.
- Privileges determine what users see, and can be modified.
- Only administrators have access to the management of the image associated with a wiki.
Troubleshooting
- If you decide you want to reverse your changes, you can do so. Every time you publish a content record, the previously published version is saved as an Archived version. You can revert to an older archived version by selecting the content record, and then from the toolbar choose Versions. In the resulting window, select an archived version and click Revert.
- Modifications to your master pages may be required if content items appear to overflow the boundaries of content item zones in the rendered pages. In general, this requires modifying the template's master page and accompanying CSS files to make the Home page and interior page layouts larger than their default size.
Community content items
This window lists the available content items used to build community web pages. To see the Communities gallery, you need a Communities license. To create a link to a content record, use a ContentReference content item from the Content Gallery.
- Announcement Configuration — The edit screen for the Announcements discussion.
- Announcements — Displays the list of announcements for a given community.
- Attachment List — The rendered list of attachments for a given item.
- Attachment Manager — Allows controlling the list of attachments for a given item.
- Blog Archive — A list of blog archive links by month and year.
- Blog Archive Entries — A list of blog entries belonging to a particular archive set.
- Blog Configuration — The edit screen for blogs.
- Blog Home — The "home view" of an individual blog. By default, this 2-column view includes recent activity and archives to the right.
- Blog List — A list of blogs for a given community.
- Blog List Item — A single blog in a blog listing.
- Comment Configuration — The edit screen for comments.
- Comment List — A list of comments for a given item.
- Comment List Item — A single comment in a comment listing.
- Community Breadcrumb — Displays the path to the current object as a breadcrumb.
- Community Configuration — The edit screen for a Community.
- Community Description — Displays the long description for a Community.
- Community List — The list of all available Communities.
- Community Recent Activity — Displays recent activity of all types for the entire community, such as new replies on discussion topics, new blog entries, and new wiki articles.
- Community Roster — Displays the list of all members (subscribers and administrators) of a community.
- Community Sidebar Helper — Helper control that inserts the Community Summary into the template's sidebar.
- Community Summary — Displays the item's linked name, image, description, and relevant links.
- Discussion Forum Configuration — The edit screen for a discussion.
- Discussion Forum Home — The "home view" for a discussion. By default, this 2-column view includes recent activity to the right.
- Discussion Forum List — The list of discussions for a given community.
- Discussion Forum List Item — A single discussion in a discussion listing.
- Entry Configuration — The edit screen for blog entries.
- Entry Home — The "home view" of an individual blog entry. By default, this 1-column view includes the complete comment thread for the entry.
- Entry List — A list of entries for a given blog.
- Entry List Item — A single entry in an entry listing.
- Image Manager — Image manager for a community.
- Preferences — Manages a user's community preferences and subscriptions.
- Recent Activity — Displays a recent activity in an individual blog or discussion in a particular community.
- Resource Library — Displays the Community Resource Library.
- Security — Manages a community's security.
- Subscribers list— Lists subscribers to the current object.
- Subscription Link — Allows a user to subscribe to or unsubscribe from a given item.
- Topic Configuration — The edit screen for a discussion topic.
- Topic Home — The "home view" for a discussion topic. By default, this 1-column view includes the complete reply thread for the topic.
- Topic List — A list of topics for a given discussion.
- Topic List Item — A single topic in a topic listing.
- Wiki Configuration — The edit screen for a wiki.
- Wiki Contents — The Table of Contents list for a given wiki.
- Wiki Home — The "home view" of a wiki. By default, this 2-column view includes a table of contents to the right.
- Wiki List — The list of wikis for a given community.
- Wiki List Item — A single wiki in a wiki listing.
Including a community content item on a web page
- Log on as a user who is a member of the SysAdmin security role.
- Create a community and a discussion, blog, resource library, announcement, or wiki that you want to include in another web page.
- Using a web browser, navigate to the community item that you want to include in another web page.
- On the web address for the page you want to include, find the iUniformKey=, a string of 36 characters and numbers.
- Open the content record where you want to include the Community content item. There are two methods for opening a content record for editing:
- In the Definition section of a content record, click add content, then select the Content Gallery and add one of the listed content items to the content record.
- When using the Edit, click the Edit icon that relates to various content items in the content records used in the content areas of the page. You must be logged on to the website and have Content Editor permissions in at least one content authority group (CAG).
- Click add content.
- Select a content item in the Communities folder, such as Blog List.
- Enter a name for the new content.
- Under Community Item Key, enter the iUniformKey you copied from the URL as specified below.
- From the drop-down list, select the community you want the content item to reference.
- Save the content record.
- Publish the content record.
To locate the Community Item Key
- Using a browser, navigate to the community item listed in the table below.
- Copy the 36-character iUniformKey= string from the web address.
📘 Note
If you cannot right-click to see Properties on a link, edit the web.config file for the website (located by default at C:\Program Files (x86)\ASI\iMIS\Net and C:\AsiPlatform\Asi.Scheduler_your instance). Search for Browser.DisableContextMenu and change the value from "true" to "false".
If you are not self-hosted, you must contact your host for assistance modifying web.config files.
| To get key for: | Copy iUniformKey from: |
|---|---|
| Community | web address for the Community home page |
| Announcements discussion | On community home page, right-click the "Configure" link in the Announcements section to view Properties. |
| Discussion | web address for the discussion home page |
| Discussion Topic | web address for the topic home page |
| Discussion Topic Reply | on a reply, right-click the "report" link to view Properties |
| Blog | web address for the blog's home page |
| Blog Entry | web address for the blog entry's page |
| Blog Entry Reply | on a reply, right-click the "report" link to view Properties |
| Wiki | web address for the wiki home page |
| Wiki Article | on an article, right-click the "report" link to view Properties |