Registering for events
For yourself or On Behalf Of another contact, you can view contacts' events and register them for events. Users are able to register other contacts from the same company. You can also register guests for yourself or other contacts if the event permits it.
If a staff user has specified a time range that the event is open for registration, potential event attendees can only register for the event if the current date falls within the date range. Staff users and System Administrators can always register themselves and other contacts for the event at any time.
As a Staff user, when you are registering yourself or others, you are able to proceed even if the following warnings occur:
- Event or Program Item capacity
- Itinerary conflicts
- Editing existing registrations
- Unanswered but required survey questions
Registering for an event
All available events are listed on the Event calendar and in the general events list (Events > Find events). Events listed on the Event calendar are color-coded to indicate visibility and availability for registration:
- Green indicates that the event is visible to all users and open to registration.
- Yellow indicates that the event is visible to all users but not open to registration.
- Orange indicates that the event is visible only to staff users.
You can browse this list or use the Search box to search for a word or phrase. Event registration is only available for events with an Active status. Registrations appear in your cart along with any other items added, such as products and donations.
📘 Note
If double-clicking an event in the Event calendar returns the error The requested content could not be found, ensure that the EventDetail shortcut is configured correctly in Site Builder > Manage shortcuts.
- Select Events > Find events or Search for the event.
- Select the event. Navigate to the Showcase tab.
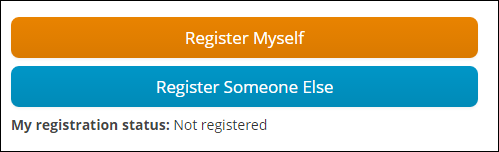
- Click Register Myself. If you would also like to register someone else, or register On Behalf Of someone, please see Registering Someone Else.
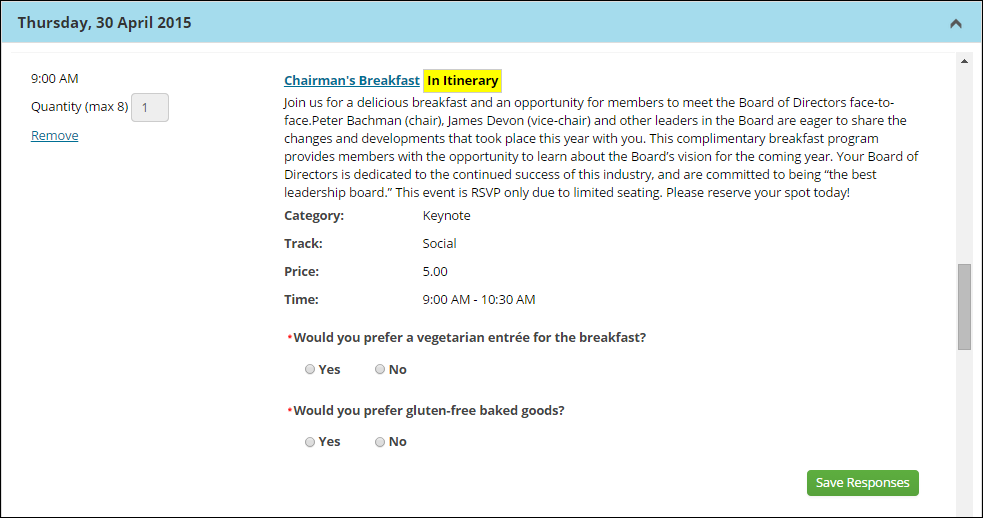
- Answer any questions that appear below your registration status and click Save Responses.
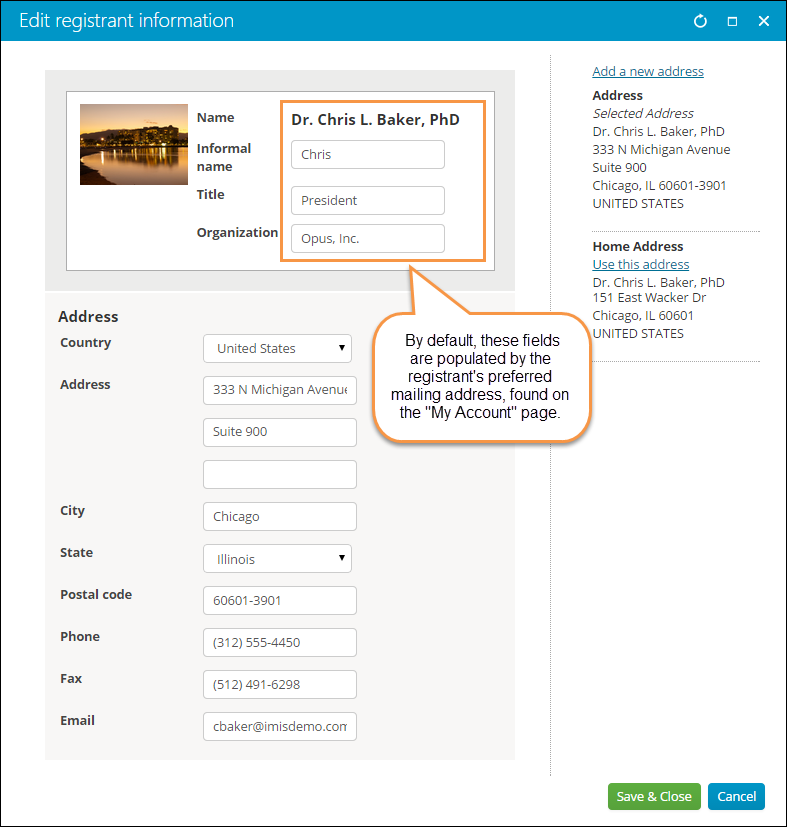
- Click Edit registrant information to manage the registrant details (Informal name, Title, Organization, and Selected Address). This information is used for badges and other event-related reports. Registrants can edit this information or add a new address:
- To override this default (Preferred Mail) address, select a different address or add one to the user’s account.
- Any changes made to these registrant details update every instance of that address throughout iMIS. If you would like to create unique badge information for a registration, choose Add a new address and include your desired information.
- If you would like to leave the Informal name, Title, or Organization blank, this information must be removed from the My Account page. When a user simply deletes this information while registering for an event, it is repopulated by the information on the My Account page.
- If the event has registration options, select one for the registrant.
- Select the program items the registrant will attend.
-
Click on the program item group headings to expand and collapse the group sections.
-
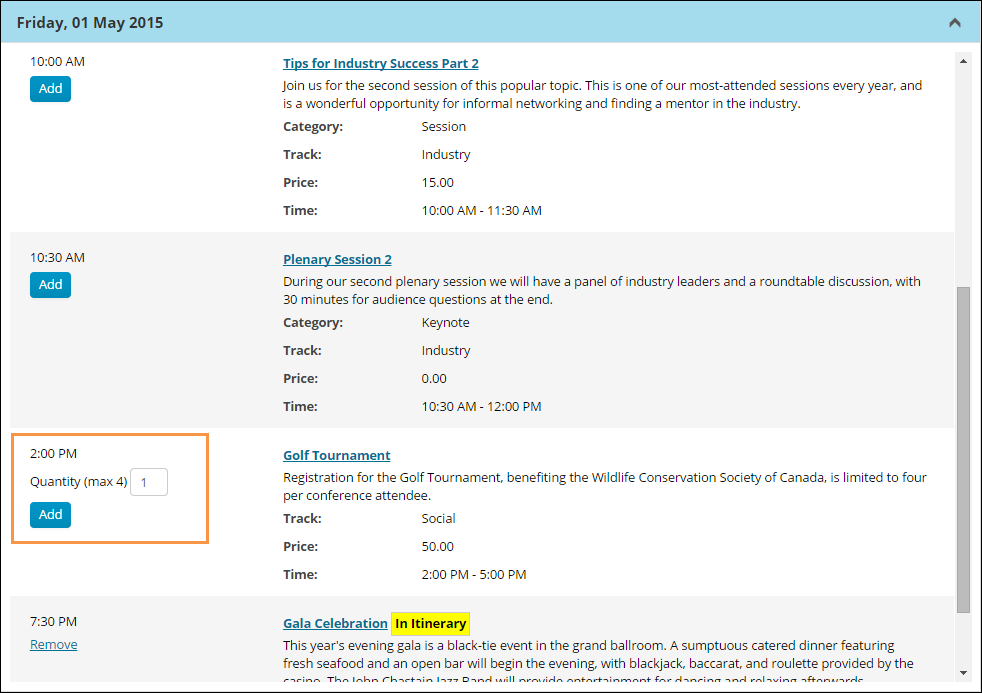
(optional) If the Maximum Registrations per Registrant attribute for this event was set to greater than 1, you can add a number of guests to your registration. For example, if the attribute was set to 4, you can specify up to a maximum of four (yourself and three guests) in the Quantity field on the program item. If you specify a number greater than the maximum value for this attribute, you will see an error message, and the quantity will not update.
-
Click Add.
-
For each program item added, the text In Itinerary appears next to the program item name.
-
If there are any conflicting program items in the itinerary, such as two program items at the same time, you will receive a conflict message and will not be able to complete the registration process. You can easily clear up the conflict by removing one of the conflicting items
-
If the added program item has questions, complete the question form and click Save Responses.
- The Cart will contain your registration checkout details.
- If you have registered for an event that contains required questions, a reminder message displays in the shopping cart alerting you to return to the event and answer any missed required questions.
- If a public user adds an event to the cart on a date outside the registration period, a message notifies him or her that registration for the event is unavailable and to remove the event from the cart.
-
Cancel the pending registration by removing it.
-
Click back to the event showcase (the page with both event details and the program items).
-
After checking out from the Cart, an Order Confirmation page is displayed. The Order Confirmation page reflects all registration details, including additional registrants and program item details.
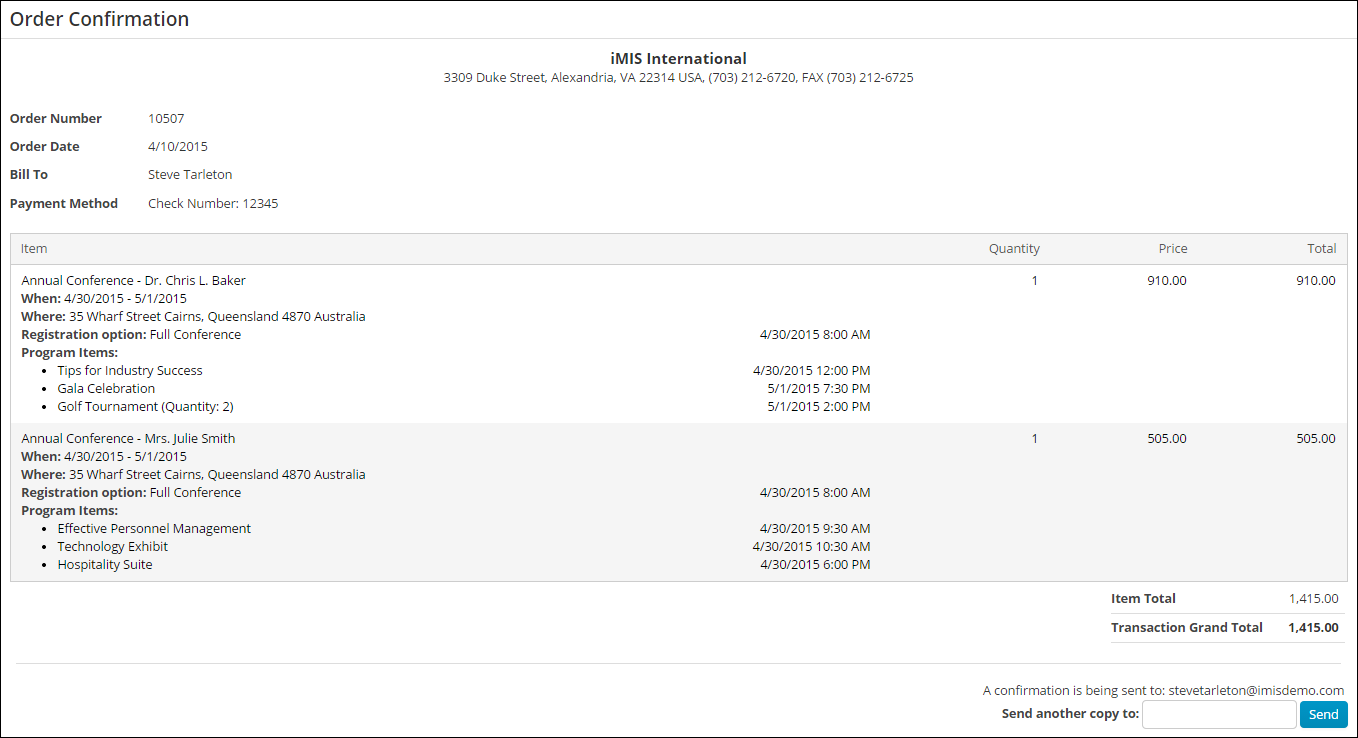
-
After you have completed a registration for yourself or someone else, you can return to the event and view registration details. Select the desired registrant from the Registrants carousel. You can add and remove program items if the event permits it, or add a guest for yourself or others you have registered. You can also edit the registrant information for anyone you have registered.
📘 Note
If no registration button appears, then registration is currently disabled because of the registration time range. When a registration period is defined, notification messages display. The messages inform the user when a registration period begins or ends. The time noted in these messages is populated by the system Time zone setting.
📘 Note
If items in the itinerary are no longer available based on the selected registration option, they are removed from the itinerary. A message is displayed indicating which items have been removed. Hidden program items are not included in the displayed message. 📘 Note
If a registration is removed from the cart, the selected program items are still in the itinerary. They can be removed on the event page.
📘 Note Functions set up for automatic enrollment do not have an Add link.Click for details
iMIS guides you through the payment process.
Event and program item registrations appear in the shopping cart. Registrants can continue shopping or proceed to checkout. The pending registration is noted in the cart counter at the top of the page, and it shows up in the cart along with any other items selected for purchase. Links in the cart let users: 📘 Note When you have submitted the order, iMIS sends an email confirmation. This online confirmation serves only as an acknowledgment of registration from the web. It does not update the registration record for a confirmation. The message, "This registration has been confirmed," does not appear in the Register a customer window.Click for details
Issuing event confirmations
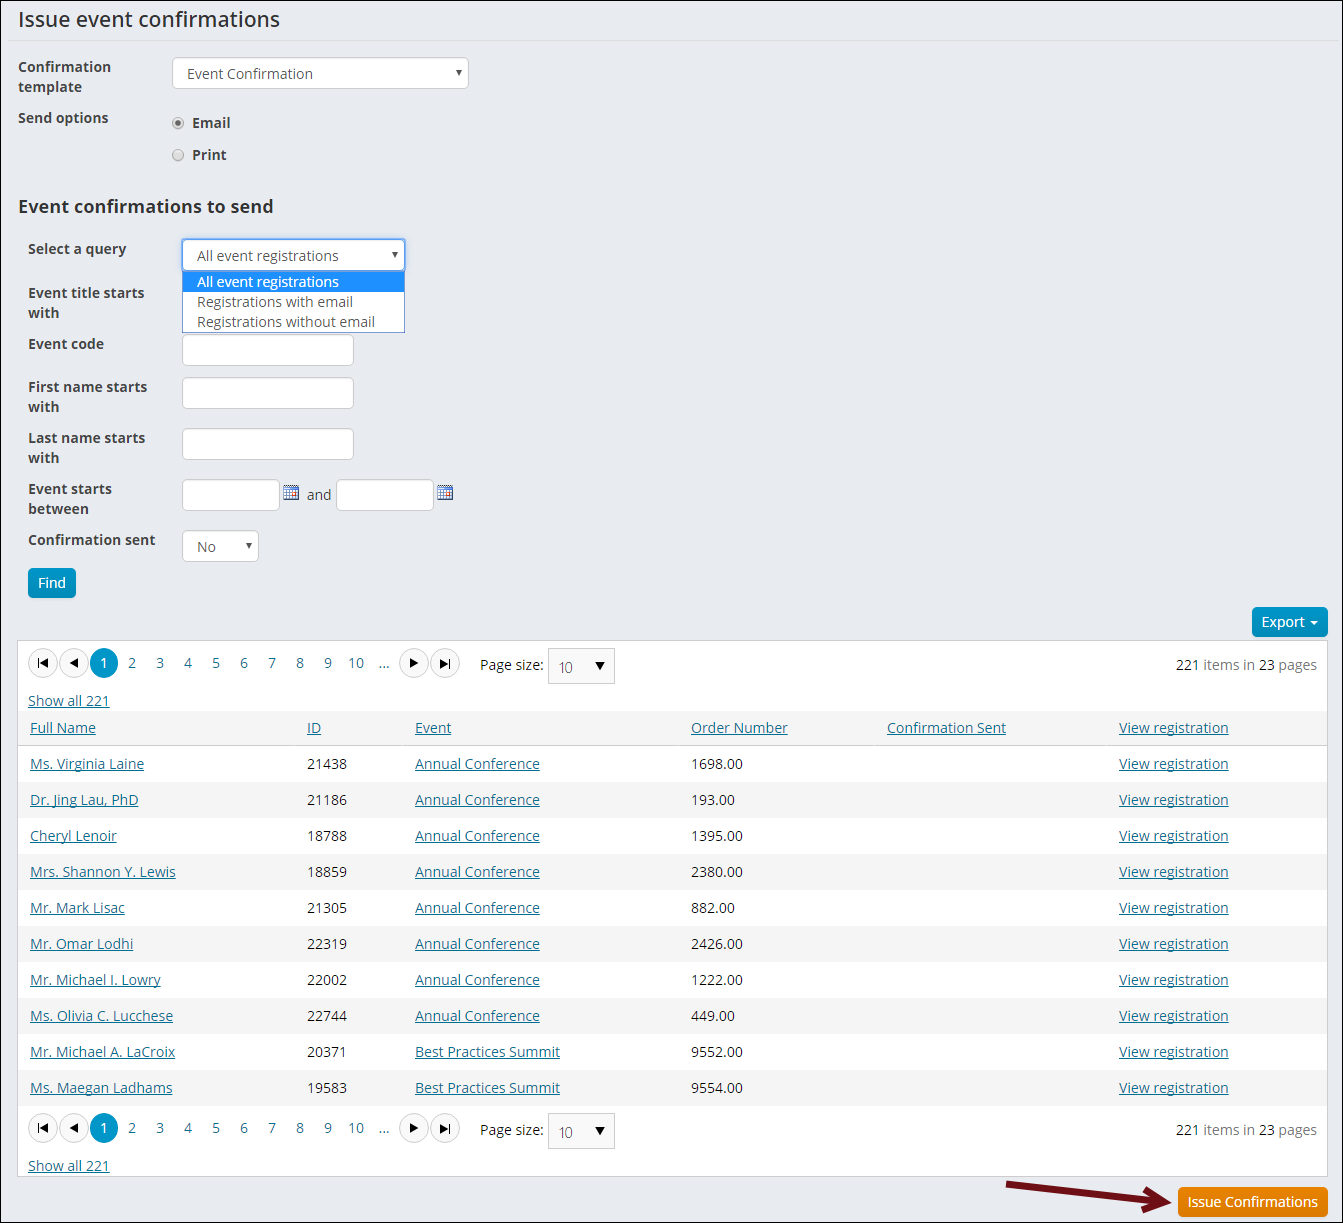
Event confirmations can be issued by print or email from the Staff site (Events > Issue event confirmations) with the Issue Confirmations button.
Staff users can choose to email or print confirmations using a template from the Confirmation template drop-down. The Event Confirmation and Sample event confirmation with report templates are available out-of-the-box, and more templates can be made available by adding them at $/Common/Communications/Event confirmations.
The Sample event confirmation with report template should only be used with Issue event confirmations.
Viewing the time and date for sent confirmations
Confirmations that have been sent using the Issue Confirmations button will have a recorded date and time. This is displayed under the Confirmation Sent column of the query result.

Selecting a send option
The print option will export the communication to a PDF file that is downloaded to your browser. If the communication includes a file attachment, the file attachment will be printed instead of the email body.
The email option will send the communication as an email to the selected registrants, including any attachments.
After printing or sending the email, the registrant’s confirmation sent date is updated if a confirmation was not previously sent. Resending a confirmation will update the Confirmation Sent column of the query result.
Refining the Event Confirmations to send query results
In choosing what Event confirmations to send, staff users can narrow results by making a selection from the Select a query drop-down. New queries can be added to this drop-down at $/EventManagement/DefaultSystem/Queries/Registration confirmations. The following queries are available:
- All event registrations
- Registrations with email
- Registrations without email
Query results can be narrowed by entering values for one, or more, of the following parameters:
- Event code equals: Enter event code
- Event title starts with: Enter value for event title
- First name starts with: Enter value for first name
- Last name starts with: Enter value for last name
- Event starts between: Enter start and end dates
- Confirmation has been sent: Select Yes or No from the drop-down
Staff users can Export query results in Word, Excel, PDF, CSV and XML format.
📘 Note
If you want to use any of the Event confirmations to send queries to issue a confirmation, ensure that the query has a Display property for Order Number, as shown in the out-of-the-box Event confirmations to send queries.
Additionally, any event confirmation report that will be attached to the event confirmation template must have a parameter for Order Number, so that the information will correctly display (Review Modifying and creating reports for information on editing out-of-the-box reports and making new reports).
See the Building the query and Creating a communication template sections of Creating an automatic email for an example of an event registration query used to a populate a confirmation email.
Register a Guest, Register Someone Else, and Register On Behalf Of: What’s the difference?
There are three different ways to register someone other than yourself using iMIS.
| Registration | Payment | Example | |
|---|---|---|---|
| On Behalf Of |
|
|
The Annual Conference registration deadline is today. Sarah Smith wants to register for the event, but cannot make it to a computer before the event registration closes. Sarah calls a Staff member, and asks if they can register her. The staff user begins working On Behalf Of Sarah, navigates to the Annual Conference event showcase page, and clicks Register Sarah. |
| Register Someone Else |
|
|
Amanda is going to the Annual Conference and she wants her friend, Sarah, to go with her. So Amanda navigates to the Annual Conference event showcase page. She doesn’t want Sarah to be excluded from any event programs, so she doesn’t register Sarah as a guest, and instead clicks Register Someone Else. |
| Add a Guest |
|
|
Cindy is registering for the Summer Fun Run. Her best friend, Robby, says he would like to participate in the run, but cannot attend the Celebration Lunch held after the race, and doesn’t want to have to pay for it. Cindy notices the Guest Registration option only includes the Fun Run and is $20 less. So Cindy selects Register Myself, and then selects Add a guest for Robby. |
Adding Guests to Event Registrations
If an event is configured to Allow adding guests, you are able to add a guest to a registration. When you register someone as a guest, their registration is dependent upon the registration of the primary registrant. The primary registrant can be the person you are working On Behalf Of, an individual registered using Register Someone Else, or yourself. If the primary registrant cancels their registration, all of their guests’ registrations are cancelled as well. Your guest registrants will appear in the Event-specific dashboard and will be listed with the primary registrant.
You can configure the Customer Type that is assigned to your newly created guest contacts based on the membership status of the primary registrant. These Customer Types are configured in the system settings in the Staff site at Settings > Organization. See Organization to learn more about configuring customer types.
Staff users have the option to define a registration time range when creating events. If the event is not open for registration, the registration buttons are disabled for non-staff users. When a registration time range is defined, the user will see a message stating when registration begins or ends. The registration time range is based on the system Time zone setting.
Do the following to add a guest to an event registration:
- Select an event.
- Click Register Myself or Register Someone Else.
- Click + Add a guest:
If you have not previously registered a guest, a Register Guest window is displayed. You must create a contact account for your guest. Only First name and Last name are required, but you can include other values.
- If you have previously added a guest, a Register Guest window is displayed with the following options:
- Select an existing contact: Select an existing contact from the drop-down. You can edit some of the contact information for the existing contact, including Informal name, Organization, and Address.
- Add a new contact.
- Complete the guest registration form and click Save & Close.
- Select a Registration Option. If one registration option is defined, that option is automatically selected. If more than one guest registration option is defined, choose the desired option. See Defining event pricing and registration options for further details.
- (optional) Answer any event questions, then select the desired program items.
- Click Proceed to Checkout to complete the registration process.
📘 Note
Add a guest will not appear if there are no defined guest registration options.
📘 Note
All available program items will display unless the guest registration option has been configured to only show specific program items available to guests. For more information, see Adding program items to an event.
📘 Note
By default the primary registrant's information populates the address field for a new contact. If the primary registrant has no default address selected, new guest information will remain blank. You can change or remove your guest's address as needed.
Registering Someone Else
When you Register Someone Else, Staff and authorized members are able to search for an existing contact to register or add a new contact from a single screen. Staff can also complete bulk registrations using Register Someone Else when they work On Behalf Of.
Do the following to register someone else:
- Select an event.
- Click Register Someone Else.
-
Select an existing contact: Select an existing contact from the drop-down. You can edit information for the existing contact, including Informal name, Organization, and Address.
- The drop-down contact list is generated by a system query which returns a list of contacts who belong to the same organization as the registrant ($/EventManagement/DefaultSystem/Queries/Advanced/Event/Registrant Search).
- The CsContactBasic.IMIS ID property. On the display tab in IQA, set the Order for this property to 1. To hide the ID field in the query results, give this property an Alias of code_ID.
- A name property so that it is clear which contact the user is selecting. For example, CsContactBasic.Full Name.
Customizing the Register Someone Else query
You can create a custom query to be used when registering someone else. The custom query must include the following in the query display columns:
The query generated drop-down will only return the first 100 contact records. To return all contact records, add a filter to the query for Full Name Contains, with an Optional prompt. Adding this filter will also allow users to search on any portion of the full name while searching through all contact records.
Once your custom query is ready, select Configure on the Event Display content item. From the field IQA query used when registering someone else, select the custom query.
📘 Note
Make sure that the contacts available in your Register Someone Else query (configured in the Event Display content item) are also included in the Contact security query for All authenticated users. Otherwise, users who attempt to register someone else could receive an error if they do not have access to the contact they are trying to register. - The drop-down contact list is generated by a system query which returns a list of contacts who belong to the same organization as the registrant ($/EventManagement/DefaultSystem/Queries/Advanced/Event/Registrant Search).
- Add a new contact: Only First name and Last name are required, while the other fields are optional. At this time, the Add a new contact options are not configurable, and you are not able to edit additional fields to be required.
- Click Save & Close. The registration will appear in the Event Showcase.
- Continue the registration process as you would for any other event, answering questions and selecting the appropriate registration options and program items as desired. You can also add a guest. The guest registration will appear in the showcase as Full Name Guest of selected registrant.
- Click Proceed to Checkout to complete the registration process.
📘 Note
Staff users have the option to define a registration time range when creating events. If an event is not available for registration then the registration buttons are disabled for public users. When a registration period is defined, notification messages display. The messages inform the user when a registration period begins or ends. The time noted in these messages is populated by the system Time zone setting.
You will have two options:
📘 Note
You can cancel or edit the registration information of any registrant in your Event Showcase before you checkout. Simply select the registration you would like to edit and click Edit Registrant Name registrant information.
Primary and guest registrant relationships
Guest registrants are connected to primary registrants, even if the registrations are cancelled before checkout. The Add a guest registration procedure creates contact relationships through the iMIS relationship module.
These relationships can be edited:
- Navigate to the primary registrant's profile page.
- Scroll down to the Relationships section.
- Select the guest that was registered with the primary registrant. Here you will notice the relationship Role is Event Guest.
- From the Group member detail window, select edit.
- Make desired changes, then click Save & Close.
Cancelling an event registration
Cancelling before checking out
Users and staff acting on behalf of users can cancel an event registration before checking out:
- Select Events > Find event or Search for the event.
- Select the desired event.
- Click Cancel My Registration.
Cancelling an event registration before checkout has the effect of cancelling registration for any or all of its program items as well.
📘 Note
If the ability to register someone else is enabled, you can delete others’ registrations in bulk from the shopping cart.
Charging a cancellation fee
The cancellation fee must be the only event function that has a quantity, and the Status must be C. If the cancellation fee is not the only charge, iMIS reverses all other charges. The registration record is retained until the event is closed, which enables you to reactivate it later during the registration process. However, the registrant does not appear on reports unless you enable the Include Canceled option on the Event Selections window.
- In the Advanced Accounting Console, go to Events > Register for an Event.
- From the Register for an event window, click Open or Find.
- Find the registration to cancel.
- Click Delete.
- A system message prompts you to verify the cancellation of the registrant. Click Yes.
- Click Edit.
- A message prompt is displayed. Click Yes.
- Select the Cancellation Fee product from the Function list.
- Enter a C for cancelled in the Status field.
- Click Save.
📘 Note
If there is currently no open batch, iMIS will prompt you to open a one.
Cancelling a program item registration
Users can also cancel a program item registration if they have not yet paid for it.
- Select Events > Find events or Search for the event.
- Select the desired event.
- Click Remove for the desired program item.
Changing program item registrations after registration is complete
If Allow itinerary changes after checkout is enabled for the event (and the Cutoff for itinerary changes date has not passed), users can change their program item registrations after completion of the registration process, with the following exceptions:
- Fundraising program items
- Program items with a promotion discount applied
- VAT or Canadian taxation methods
- Cancelled registrations
- In the program area of an event you have already registered for, add, remove, or update the quantity for any program item.
- After completing all desired changes to program items, click Proceed to Checkout or view the Cart.
- The Cart will contain a line for the adjusted event with the total charge or credit for all adjustments.
- An Order Confirmation page will appear, reflecting all of your registration and program item details.
iMIS guides you through the payment process.
Overriding event pricing
If you are a staff user, you can manually override event pricing to give your organization’s members (and non-members) one-time discounts on event registration options and related program items. Registrations and program items can then be added to the cart with the price override included. This can also be done working On Behalf Of a user.
📘 Note
The ability to override the price of an item is not available to any systems in which the displayed price's tax type is inclusive. Overriding a price is not available for cases in which value added tax (VAT) or GST inclusive taxes (GSTINC) are included in the displayed prices.
- Go to Events > Find events, and then search for the event.
- Click the event you wish to register the user for.
- On the resulting event display, click to register the user.
- Select a Registration Option.
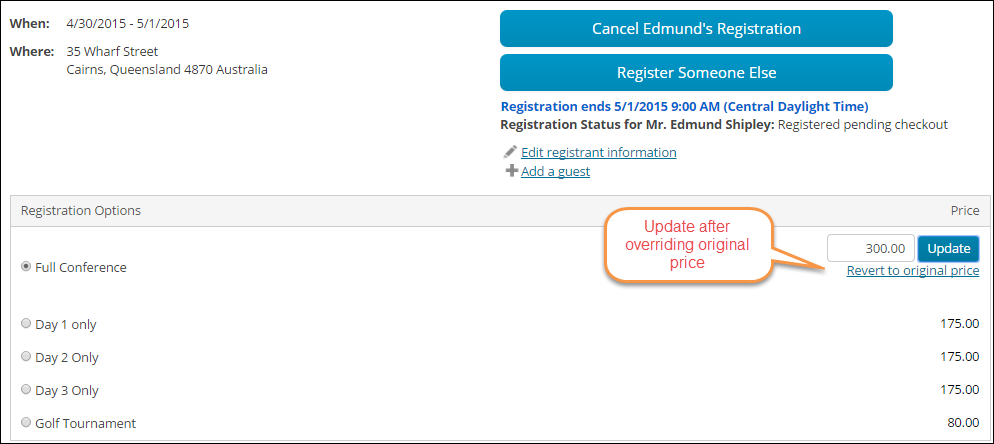
- Manually edit the price in the editable Price field. Click Revert to original price if you want to return to the original price.
- Click Update.
- (optional) Repeat this step for any program items you have added to the user’s itinerary, and would like to override. Click Update for each overridden program item.
- Click Proceed to Checkout when you are ready to check out with the new prices.
- Once in the cart, you will see the new price under Items. You can proceed through checkout as normal.
📘 Note
After a price is overridden, no further discounts or promotions may be applied.
(optional) Advanced Accounting Console
An event can be created and registered for entirely through the Staff site, however some features are exclusively configured in the Advanced Accounting Console. Your Advanced Accounting Console includes an Events page with additional access to often-used features (Events > Define an event). For more information, see Accessing the iMIS Advanced Accounting Console from a Web Browser.
Edit batch date of registration
The date of registration defaults to the batch date if Batch Control is used; otherwise, the date defaults to the current system date.
1. Navigate to Events > Register for an event and select Open.
2. Enter the Order number that was issued from the order confirmation.
3. Edit the Date field.
Specify the source code
Specify the Source Code to be used for response tracking.
1. Navigate to Settings > Membership > Set up tables > Lookup/validation tables.
2. From the dropdown, select SOURCE_CODE.
3. Add or edit the source codes.
Register multiple customers simultaneously
Organizations often need to register multiple customers for the same event. Using iMIS Events, you can simultaneously register multiple customers for an event rather than registering each customer separately.
- From the Register for an event window, click New.
- Enter an Event Code or click the lookup icon and select an event code.
- Click the lookup icon located to the right of the ID field to display the Find window.
- Perform a search in the Find window. If the search returns two or more results, the Register Result List button is enabled. The current system date is used, so if Current Committee is selected and a search is performed on a committee, only the current committee members are displayed in the search results.
- To register all of the IDs returned by the search, click Register Result List.
- A confirmation message displays. click Yes. A message displays indicating that the event registrations are being processed. If an ID is already registered for the event, the ID is skipped and event registration processing continues with the next ID.
After the event registration processing for the IDs is complete, the Find window closes. A message is displayed indicating the number of successful registrations and the number of IDs which were already registered for the event. When you click OK, a message indicating the number of event registrations processed displays at the bottom of the Overview tab on the Register a customer window. All of the IDs that were just registered are loaded in the transaction list so that you can use the Previous and Next buttons to view the event registrations on the Overview tab.
Edit a registration
- From the Register for an event window, click Open or Find.
- Enter the Event code, or select the Event field lookup icon to search for an event.
- Enter the registrant's ID, or select the ID field lookup icon to search for a registrant.
- Click Edit.
- Select the program item you want to add OR double-click the program item to delete it from the event registration.
- Click Save.
- The total price and balance is updated.
Re-registering after cancellation
Once an event registration is cancelled, a user can re-register for the event, but re-registration must be done by a Staff user in the Advanced Accounting Console:
- In the Advanced Accounting Console, go to Events > Register for an event.
- Click Find.
- Enter the Event code or search for the event using the lookup icon. Click OK.
- Tab over to the ID field. Enter the registrant's ID, or search for the registrant using the lookup icon. Click OK.
- Click Edit.
- A warning window displays asking if you wish to uncancel the registration. Click Yes.
- Click Save.