Tailoring default navigation and content
You can tailor many aspects of your out-of-the-box sites without worrying that your changes will be overwritten on upgrade. Items that will be overwritten during an upgrade that you want to tailor can be copied and any needed modifications made to the copy.
There is typically no need to copy the Staff site. In most cases, you can use the out-of-the-box Staff site and tailor it to your specific needs.
| Items saved at upgrade | Items overwritten at upgrade |
|---|---|
| - Shortcuts - New navigation items - Original content (Shared Content) - New communication templates - New business objects | - IQA queries - System navigation items - System content items (Core Content) - System communication templates - System business objects |
Tailoring the dashboards
To customize the dashboard so it is unique to your organization, you must first make a copy of the dashboard (@/iCore/Staff_Dashboards), then paste it in a Shared Content folder. The dashboards were designed to visually look similar, but contain different information specific to the featured area. To learn more about the specific information on each dashboard, see Understanding the Staff site dashboards.
Modifying dashboards
The navigation items for these top-level dashboards use default shortcuts to point to the dashboard content records. If you want to edit one of these dashboards, you can copy and modify the existing content record or create a new content record and edit the shortcut to use your version of the content. After an upgrade to a new version of iMIS, the dashboard navigation will continue to use your new content since shortcuts that you can edit are not overwritten.
Do the following to modify the out-of-the-box dashboard so that the Staff site navigation is using your dashboard instead:
- From the Staff site, go to RiSE > Page Builder > Manage content.
- Navigate to @/iCore/Staff_Dashboards.
- Open the folder of the dashboard you wish to modify. Copy the dashboard content record, then paste it into a Shared Content folder. Copy and paste the remaining content records into the same Shared Content folder if you wish to modify the panel tab's source queries ($/Samples/Dashboards).
- After the content is in a Shared Content folder, begin making the desired changes.
- Save & Publish the changes.
- Next, you will need to modify the dashboard landing page shortcut. Go to RiSE > Site Builder > Manage shortcuts.
- Find and edit the dashboard shortcut for All Sites. See Staff site sitemap shortcuts for more information about the names of the dashboard shortcuts.
- Select your version of the dashboard content record as the URL or Content Record used by the shortcut.
- Save the shortcut.
- Next, you must republish the dashboard sitemap:
- Navigate to RiSE > Site Builder > Manage sitemaps.
- Make sure Staff is the selected site.
- Click Publish.
📘 Note
If you prefer, you can create a new content record instead of modifying the existing content.
Customizing the dashboard queries
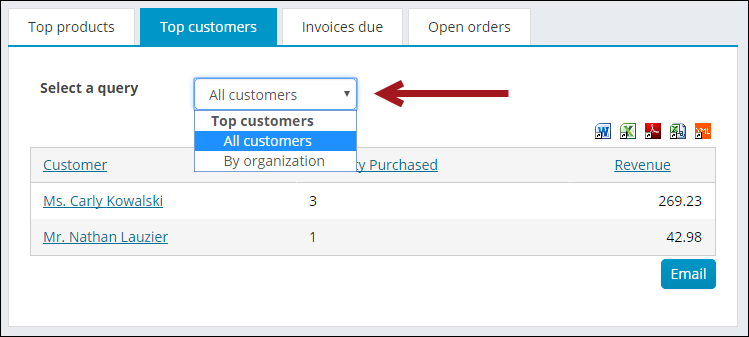
Several areas of the out-of-the-box dashboards contain "Top" queries. For example, the Top Products or Top customers in the image above. These areas are limited to show a maximum result of ten, but can be easily modified to show a different top ten. For example, if you click Revenue in the image above, the list reorders to show the products with the lowest generated revenue. Query-generated information on each dashboard can be found in the appropriate folder at $/Samples/Dashboards.
Some tabs allow you to select an entirely different query to display. For example, the Top customers tab on the Commerce Dashboard. From the Select a query drop-down, choose a different list of Top customers to display. To add queries to this drop-down, do the following:
- Copy the query you want to add to the drop-down.
- Navigate to $/Samples/Dashboards and open the appropriate dashboard folder.
- Locate the folder with the same title as the Select a query drop-down. For this example, the folder is Top customers ($/Samples/Dashboards/Commerce/Product Sales/Top customers).
- Paste the query into the folder.
📘 Note
If the Select a query drop-down is not on the out-of-the-box tab, no other queries can be added to that tab.
🚧 Warning
Do not modify a system query. Make a copy of the query and apply the changes to the copy. Any system query that is modified will be overwritten on an upgrade.
Tailoring navigation and links
New navigation items that you create are not overwritten during an upgrade. To tailor the navigation on your website, create new navigation items that point to the correct content records.
📘 Note
If a new navigation item is nested under a system navigation item and the system navigation item is updated, the new navigation item might be affected by this change.
It is important to note that out-of-the-box navigation items, however, might be overwritten on upgrade.
For more information on creating navigation items, see Using sitemaps
Modifying system links (shortcuts)
iMIS shortcuts allow you to use short URLs to reference existing pages, and are also used by the iMIS system to navigate to well-known pages. It’s important to know where system shortcuts are being used, and to change the page the shortcuts are pointing to before going live with your website. For example, the Find products page uses the ~/ItemDetail shortcut to navigate to and display the product page. The product page uses the ~/Cart shortcut to display a View cart link when the item is added to the cart. You can change where system-defined links like these will go by updating shortcuts.
You will also need to update these shortcuts after you have copies or new content records to display. For example, the out-of-the-box event page is called EventDetail, and it has an Annual Conference banner on it. This means that each event will display this banner until the shortcut is redirected to display a different content record. You are going to want to make a copy of the Event Display content record, delete the banner, and apply your own customizations. After customizations are made, you will need to edit the Event Detail shortcut to point to your new page without the Annual Conference banner on it.
The following content records and associated shortcuts are areas of iMIS that you will need to configure before going live with your website:
| Shortcut | Area or link |
|---|---|
| ActivityProfile | Used to display the activity profile for activity follow-up tasks. See Managing activity tasks for more information. |
| AddContact | When selecting Add New from places such as the On Behalf Of window or when adding a new contact to a group, this is the screen you will see. |
| Cart | Used to display the Cart. When clicking the Cart button or selecting View cart, this is the page you will see. |
| CommitteeDetail |
Used for displaying committee group details. From the Staff site, go to Community > Committees, and select a committee. The page displaying the committee is the page you will see using the CommitteeDetail shortcut. This page is also used by the group.aspx redirector. |
| CommitteeDetailAdmin | Used to display committee group details for users authorized to administer the group. From the Staff site, go to Community > Committees, and select a committee. The page displaying the committee is the page you will see using the CommitteeDetailAdmin shortcut. This page is also used by the group.aspx redirector. |
| CommunicationPreferences | Used for managing communication preferences. For example, the Manage subscriptions link at the bottom of emails will navigate to this page. It is important that the security settings for the page are set to allow unauthenticated users. |
| CreateAccount | Used for creating a new account from any of the Create Account links. For example, the Create Account link at the top of the out-of-the-box Member site next to Sign In and Cart. |
| CreateAccountSocialMedia | Used for creating a new account from social media. When users are creating their iMIS account with a social media account, you can prompt them to enter more information. The additional information is displayed using this shortcut. See Using social media to login for more information. |
| CreateCommunication | Used to create and manage communications. For example, the Email button at the bottom of query results or the Email button on user account pages. |
| EventDashboard | Used for displaying an event. This is the default staff view of an individual event. See Event.aspx for more information. |
| EventDetail | Used for displaying an event. This is the default public view of an individual event. See Event.aspx for more information. |
| EventRegistrationDetails | Used to display the details of a contact’s event registration. The View registrations link in the event Registrants tab, and on the Meetings and events query on a user's account page, displays the registration details. |
| FullAccount | Used for displaying the Staff site view of a user account page. For example, from the Staff site, navigate to a contact's account page. The page you see is using the FullAccount shortcut. |
| FunctionDetail | Used for displaying a function, also known as a program item. For example, from an event page, select a program item. The window displayed uses this shortcut. |
| GiftDetail | The GiftDetail shortcut displays the Gift_Detail content record, which uses the Donation Creator to display donation pages selected from search results. Gift item links such as search results go to this shortcut. This page should include a Donation Creator content item that is configured to take a URL parameter for the gift item. Out-of-the-box it is configured to add the gift item to the cart, but customers could instead use a "Give Now" mode if they prefer. For more information, see Creating online donation pages. |
| GiveNow | Used for displaying the Give Now page. For example, from the Donate button on the staff account pages. |
| GroupDetail | Used for displaying group details, and is used by the group.aspx redirector to display a group landing page. If the group passed in the URL is a committee, it will use the CommitteeDetail shortcut. Any other groups will use the GroupDetail shortcut. |
| ItemDetail | Used for displaying an item, also known as a product. For example, from the Staff site, go to Commerce > Find products, then select a product. The page displayed is using the ItemDetail shortcut. |
| JoinNow | Used for displaying the options to join as a member. For example, from the out-of-the-box Member site home page, click the Join Now button. |
| MemberHome | Used for displaying the home page of signed in user. This is used in the out-of-the-box Member site to display a special home page for authenticated users. See Changing the homepage for authenticated users for more information. |
| MyAccount | Used for displaying the account page a user sees when selecting their account. This is also the view the Company, Chapter, and Committee Administrators see when they view their company, chapter, or committee member's account pages. This shortcut is also used by the Party.aspx redirector. |
| Organization | Used for displaying a limited profile of an organization. Public users viewing an organization record will see this page. See Party.aspx redirector for more information. |
| OrganizationAccount | Used for displaying the account page of an organization which the user can edit. This is the view for company administrators of an organization viewing their organization's account page. This view allows for editing the organization, viewing transactions, and viewing open invoices. This shortcut is also used by the Party.aspx redirector. |
| OrganizationFullAccount | Used to display the staff view of the organization account page. This shortcut is also used by the Party.aspx redirector. |
| OrganzationJoin | Used for displaying the organization join as a member page. From the out-of-the-box Member site, click Membership, and then scroll to the bottom of the page. The Join - organization button uses the OrganizationJoin shortcut. |
| OrganizationJoinNow | Used for displaying the product for organization membership fees. |
| PrintProfile | The destination for the Print Info button from a profile page. |
| Profile | Used for displaying a limited profile of a user. This is the public user view of another user's account, and is used by the Party.aspx redirector. |
| Search | When using the universal search, the search results will display on this page. This can be customized to only allow searching certain areas on a particular site. |
| SignIn | Used for signing in. For example, from the out-of-the-box Member site, the Sign In link next to Create Account. |
| Store | Used for displaying products. This is the default page used by the Continue Shopping buttons. You should use this shortcut to customize what the default store display page is. |
Staff site sitemap shortcuts
Shortcuts that you can edit are not overwritten during an upgrade. Core content navigation items, however, are overwritten on upgrade. To tailor certain system content on your website, you can make a copy of the content and simply point existing shortcuts to the new content records. For example, several key Staff site navigation items use shortcuts, so you can point to tailored versions of Staff site pages by changing which content record the shortcuts use.
Before editing out-of-the box shortcuts, you should review the shortcut descriptions to identify system content which uses a shortcut. Examples include the account pages (including the staff account page), the staff event dashboard for a specific event, and the content used when adding a contact from various contexts. The majority of the shortcuts used in the Staff site are listed as All Sites shortcuts.
You can edit the following Staff site shortcuts which are used by system navigation items:
| Navigation | Shortcut |
|---|---|
| Community > Dashboard | StaffCommunityLanding |
| Community > Engagement > Overall | StaffEngagementLanding |
| Community > Engagement > Organizations | StaffOrgEngagement |
| Community > Find contacts | StaffFindContacts |
| Community > Add contact | StaffAddContact |
| Community > Volunteers > Dashboard | StaffVolunteersLanding |
| Membership > Dashboard | StaffMembershipLanding |
| Fundraising > Dashboard | StaffFundraisingLanding |
| Events > Dashboard | StaffEventsLanding |
| Events > Find events | StaffFindEvents |
| Commerce > Dashboard | StaffCommerceLanding |
| Finance > Advanced Accounting Console | AdvancedAccountingConsole |
New shortcuts that you create are also preserved during an upgrade.
📘 Note
Non-editable shortcuts, such as the ones used for the Member site, might be overwritten on upgrade.
Business example: Print Info button on the staff account page
For example, the Print Info button on the staff account page, which displays a printable SSRS report with account information, uses the PrintProfile shortcut by default. If you edit the PrintProfile shortcut, so that it points to your tailored content (in the Shared Content folder), this change will not be overwritten during an upgrade. After the upgrade, clicking the Print Info button will still send users to the content you configured the shortcut to use.
Using redirector pages
Redirector pages can be used to dynamically redirect a user to the correct page based on certain criteria. iMIS offers three redirector pages out-of-the-box to help you easily create links in HTML or in IQA queries:
Event landing pages (Event.aspx)
The Event.aspx redirector operates based on the Default (public user event display) and Owner (Staff user event display) Event Showcase Layout defined during event definition.
The layouts can be customized content records or shortcuts.
| Event Showcase Layout | Users who can see this page |
|---|---|
| Owner | System Administrators and Staff |
| Default | Public users |
Event.aspx directs users to the event landing page specified in the Event Showcase Layout fields for the event. If no customized showcase pages are selected, or no custom shortcut is entered, the default shortcuts of EventDetail (Default) and EventDashboard (Owner) are used.
If you have not modified the out-of-the-box shortcuts for EventDetail or EventDashboard to point to your organization's default event pages, these layouts will show out-of-the-box demo content.
Group landing pages (Group.aspx)
Group.aspx resolves the correct URL for a group depending on the group type’s defined landing page.
If the group passed in the URL is a committee, it will use the CommitteeDetail shortcut. Any other groups will use the GroupDetail shortcut.
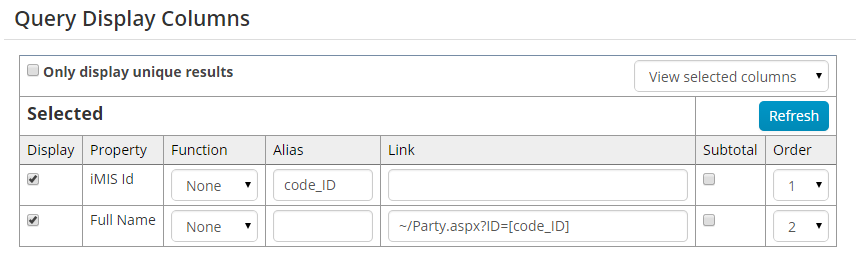
The link on the group name in this IQA query will direct to the correct landing page for each group.
Contact account pages (Party.aspx)
Party.aspx directs users to the correct account pages depending on their permissions. If no target Contact ID is provided, the user will be directed to their own account page.
Individuals:
- System Administrators and Staff users with Customers level 1 permissions viewing any user’s account will be redirected the FullAccount shortcut.
- Public users viewing their own accounts will be redirected to the MyAccount shortcut.
- Public users viewing another contact’s accounts will be redirected to the Profile shortcut.
Organizations:
- System Administrators and Staff users with Customers level 1 permissions viewing any company will be redirected to the OrganizationFullAccount shortcut.
- Company administrators viewing their own company will be redirected to the OrganizationAccount shortcut.
- Public users viewing any company will be redirected to the Organization shortcut.
|
Shortcut |
Users who can see this page |
|---|---|
|
FullAccount |
|
|
MyAccount |
|
|
Profile |
Users who do not have permission to edit the account but have permission to view |
| OrganizationFullAccount |
|
|
OrganizationAccount |
|
|
Organization |
Users who do not have permission to edit the account, but have permission to view |
HTML Example
Please review <a href=”[website]Party.aspx”>your account settings</a>and fix any inaccuracies.
IQA Example
The link on the individuals full name in this IQA query will direct to the correct profile page.
📘 Note
See Linking IQA results for more information.
Creating or modifying a shortcut
- From the Staff site, go to RiSE > Site Builder > Manage shortcuts.
- Click Add new.
- Provide values for the shortcut URL:
- Select the website you are creating a shortcut for in the For Websites drop-down list. The All Sites option applies the shortcut to all websites in the system. Select a specific site to only apply the shortcut to a single website. If you enter an iMIS URL for the shortcut, it's important to ensure that all of your sites have the specified relative navigation item path in their respective sitemaps.
- Select the shortcut you want to use in the Shortcut drop-down list, or enter a new Shortcut name. The Shortcut name should not be the same as the name of a website or a top-level folder in Page Builder.
- Enter the URL or content record in the URL or Content Record field. If you enter a URL, replace the site’s root URL with ~, for example ~/Events/Conferences/ConferenceList.aspx.
- Enter a URL Parameter. You can tell the URL to open on a specific section of the page. For example, say you want event dashboards to open on the Showcase tab by default. In the URL Parameters field, enter Event_Dashboard=1.
- Enter a description of the shortcut in the Description field.
- Click Save.
- You can click the Shortcut to test the link.
📘 Note
Do not name a new shortcut Admin.
For example, create an Events shortcut that points to the Conference List page. You can do this either by entering the URL to the page (~/Events/Conferences/ConferenceList.aspx) or by selecting the content record (@/Events/Conferences/ConferenceList). After inserting the shortcut, the link www.yourwebsite/Events automatically displays www.yourwebsite/Events/Conferences/ConferenceList.aspx.
By default, shortcuts apply to all of your websites. For example, if you define an Events shortcut for all sites, the shortcut always displays the same content record, regardless of which website the user is visiting, www.yourwebsite/events or www.otherwebsite/events. But you can also define shortcuts for a specific site. For example, you might want your mobile website to display a different content record for www.mobilesite/events. In that case, select your mobile site from the ForWebsite drop-down list and point the Events shortcut to the content record you prefer.
📘 Note
System shortcuts used in the Quick Start Sites cannot be edited or deleted. Shortcuts included in the product for All Sites behave as defaults shortcuts. They cannot be deleted because they are used by content items, but they can be edited to point to different content. 📘 Note
Your shortcuts will not be overwritten during upgrade.
Tailoring account pages
iMIS provides out-of-the-box account pages with content records displayed in a tabbed format. There are two different account pages that you should be aware of: Staff and Member. The Staff site account page is the account page a staff person sees. The Member site account page is the account page a member sees when they login to their account from your website.
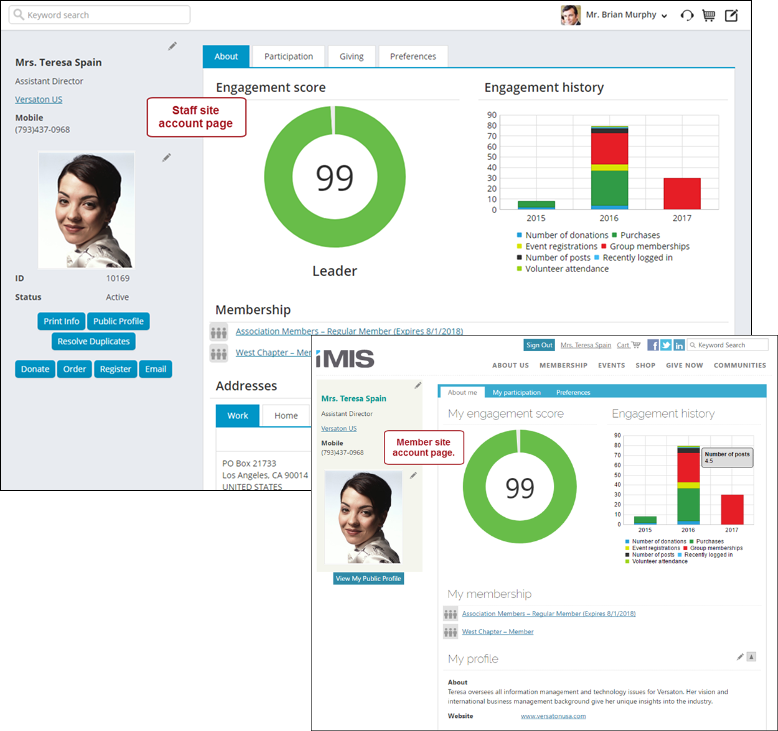
As a staff person viewing a member's page from the Member site, you are seeing the same view of the member's profile page as you would see from the Staff site. This means as a staff person, you will see the same content on a member's profile page whether you are viewing the page from the Staff site or Member site.

Out-of-the-box, these pages are located in system-content folders. You will need to update these page locations and shortcuts in order to avoid losing your changes on an upgrade. You must separately update the Member-facing profile page and Staff-facing profile page.
Updating the staff-facing account pages (including organization pages)
To begin creating custom content that will display on a staff person's profile page, do the following:
- From the Staff site, go to RiSE > Page Builder > Manage content.
- Navigate to @/iCore/Contacts/ContactLayouts/Staff/Tabs, and copy the content records you want to edit.
- Navigate to @/Shared_Content/Staff/Tabs.
- Paste the content records in this folder (Organize > Paste).
- Make any changes to the content, then Save & Publish.
📘 Note
To copy all content records at once, hold down Shift on your keyboard, then click each content record. Then from iMIS, go to Organize > Copy.
Now, when you navigate to staff-facing profile pages, you will be able to edit all content on the tabs without worry that the information will be overwritten on an upgrade.
The same process can be done for organization profile pages. There are also two different organization profile page views. One is the view a staff user sees, and the other is the organization's company administrator view. A member of the company will always only see the Profile tab of the company administrator's view.
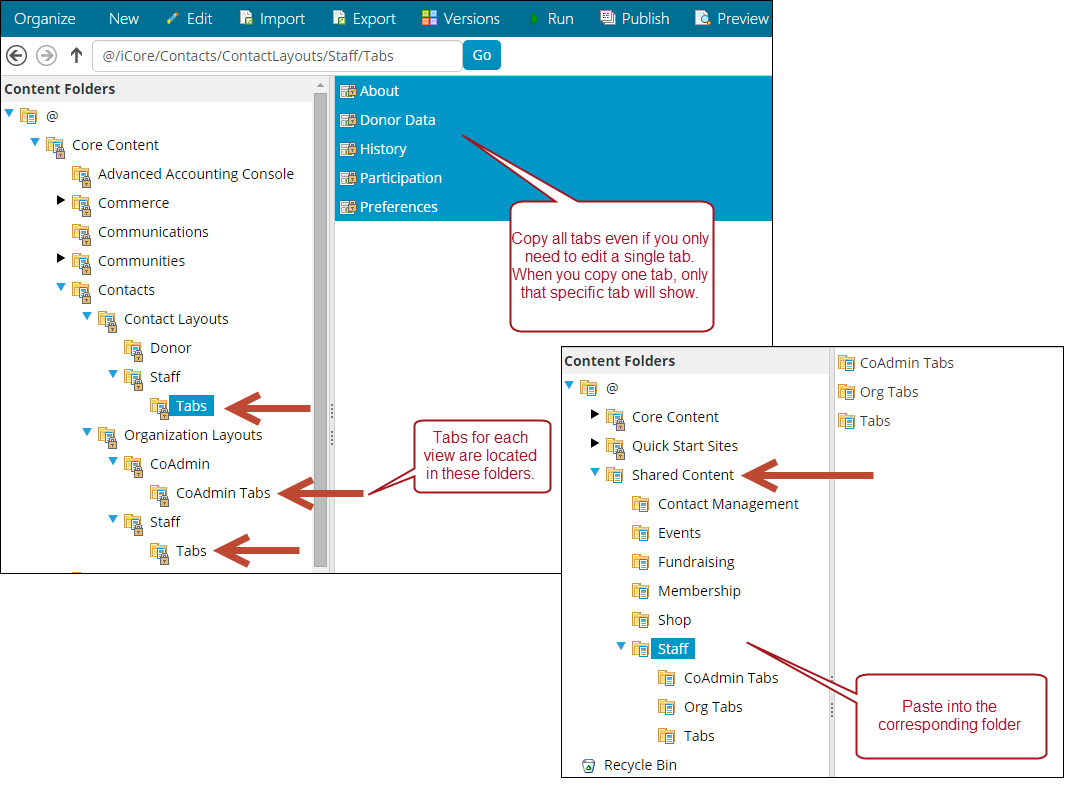
| Account page shortcut | System location | Paste location |
|---|---|---|
| FullAccount | @/iCore/Contacts/ContactLayouts/Staff/Tabs | @/Shared_Content/Staff/Tabs |
| OrganizationFullAccount | @/iCore/Contacts/OrganizationLayouts/Staff/Tabs | @/Shared_Content/Staff/OrgTabs |
| OrganizationAccount | @/iCore/Contacts/OrganizationLayouts/CoAdmin/CoAdmin_Tabs | @/Shared_Content/Staff/CoAdmin_Tabs |
The label for each tab is the Title for each content record. The display order of tabs is sorted in alphabetical or numerical order by the content record Publish file name. Numerical items have precedence for display order. For example, if you have two content records and the Publish file names are 2Creator and 1Record, 1Record will be displayed in the first tab before 2Creator.
Alternate method for tailoring the staff account page
An alternate method for tailoring an account page is to copy the page and modify its system shortcut. First, copy the page (Account Page Staff at @/iCore/Contacts/ContactLayouts), and save the new content record in a Shared Content folder. Make any desired changes in your version of the content record. Then, edit the FullAccount shortcut (used for All Sites) to point to your modified content record. If you use this method, you should check the system Staff Account Page after upgrades for new features that you might want to include on your version of the page.
Updating the member-facing account pages
To begin creating custom content that will display on a member's profile page, do the following:
- From the Staff site, go to RiSE > Page Builder > Manage content.
- In the search bar, enter @/iCore/Contacts/ContactLayouts, then click Go.
- Copy the About Me, Account Page, My Participation, and Preferences content records (Organize > Copy).
- Paste the content records into a Shared Content folder (Organize > Paste). For example, the @/SharedContent/Membership folder.
- If you need to display additional tabs on member profile pages, continue adding content records to the @/SharedContent/Membership folder.
Next, you need to update the Account Page content record to point to the other content records you just pasted in the Membership folder:
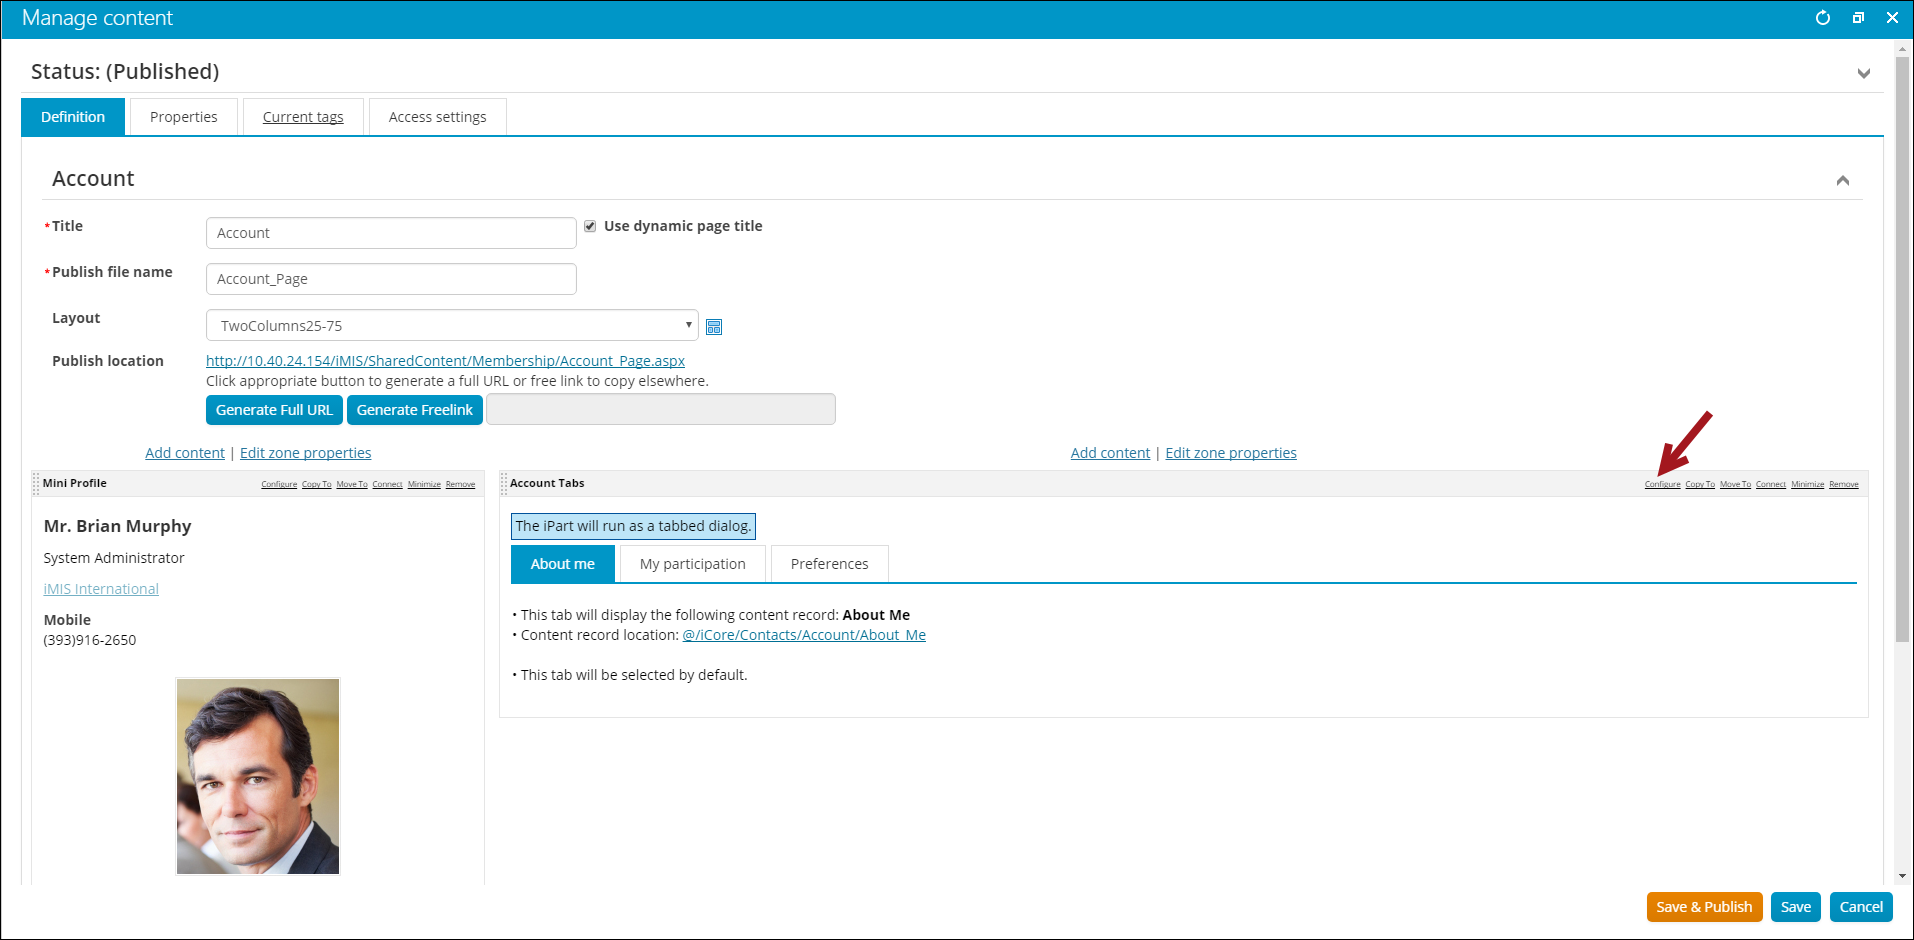
- Open the Account Page content record for edit.
- From the My Account content item, select Configure.
- From here you have two options: Update each tab individually, or point to an entire folder:
- Individually update each tab:
On each tab there is a Content to display field. You will need to select the appropriate content record for each of these tabs. For example, the About me tab will need to be updated to point to @/SharedContent/Membership/AboutMe.
- Pointing to an entire folder:
Enable the Use content folder to define tabs option. From the Source folder field, select the @/SharedContent/Membership folder.
📘 Note
The Account Page content record must be in a different folder than the other content records in order to use this option. - Individually update each tab:
- Save & Publish the content record.
Next you must update the MyAccount shortcut:
- Go to RiSE > Site Builder > Manage shortcuts.
- Click the MyAccount shortcut row, then select Edit selected.
- From the URL or Content Record field, select the @/SharedContent/Membership/AccountPage content record.
- Click Save.
As a staff person viewing a user's profile page, you will see the content pointing to the FullAccount shortcut. To view a member's profile page as a member would see it, you must view the page directly from the MyAccount shortcut. To do this, go to RiSE > Site Builder > Manage shortcuts, locate the MyAccount shortcut, then select the MyAccount link.
Account page security
Staff users can define what type of user can see certain content on an individual's public profile.
There are three different types of users that you can define security queries for:
- All website visitors
- Authenticated users
- Members
If you are experiencing issues with certain users not being able to see specific content on public profiles that they should have access to see, there could be a problem with how the security queries are set up. See Contact security for more information.
Tailoring IQA queries
Queries that are provided out-of-the-box might be overwritten during an upgrade. If you want to tailor an existing query, you should copy the query and modify the copy. Copied queries are preserved during an upgrade.
Tailoring content
All content records saved in Core Content folders are subject to being overwritten during an upgrade. Any content records saved in the Shared Content folders, however, will not be overwritten.
If you want to tailor an out-of-the-box content record, you should copy the content record, modify the copy, and save it in the Shared Content folder. You can then point navigation items or shortcuts to your version of the content. Be aware, however, that out-of-the-box navigation items might be overwritten on upgrade.
New content records created by your organization should always be saved in the Shared Content folder.
Business example: Event-specific console
When a staff user views an event in iMIS, they see an event-specific console that includes Showcase, Dashboard, Registrants, and Questions tabs. You might want to configure these tabs to use tailored content or to add or remove tabs. By default the event-specific console uses the Event Dashboard content record (located at @/iCore/Staff_Dashboards/Specific_Event). This content record contains a Content Collection Organizer content item that controls the four default tabs.
Any changes you make to the Event Dashboard content record will affect every event page; the content is not specific to a certain event. After you copy and modify the content record, you must also update the EventDashboard shortcut to point to your version of the content.
- From the Staff site, go to RiSE > Page Builder > Manage content.
-
If you want to modify the content that displays in one or more of the tabs in the event-specific console, create new content records for the tabs. You might want to copy and modify the default content records for the tab. Save the copied content records in the Shared Content folder.
- Default content records located at @/iCore/Events:
- The Showcase tab uses the Event Display content record
- Default content records located at @/iCore/Staff_Dashboards/Specific_Event:
- The Dashboard tab uses the Event Detail content record
- The Registrants tab uses the Event Roster content record
- The Questions tab uses the Event Questions content record
- Default content records located at @/iCore/Events:
- Navigate to @/iCore/Staff_Dashboards/Specific_Event and open the Event Dashboard content record.
- Configure the Content Collection Organizer content item (titled Event Dashboard by default).
- For each tab, you can select your content as the Content to display.
- If needed, add new tabs and select your content as the Content to display.
- Click Save As and select a location in the Shared Content folder. You can rename the content if desired.
- Save and publish the new content.
- To edit the EventDashboard shortcut, go to Rise > Site Builder > Manage shortcuts.
- Find and edit the EventDashboard shortcut for All Sites.
- Select your version of the content record as the URL or Content Record pointed to by the shortcut.
- Save the shortcut.
Reviewing new content after an upgrade
When you upgrade to a new release of iMIS, you will receive the new content, such as updates to core content records and new queries, for the release. It is strongly recommended that you review this new content.
- If you have tailored shortcuts and navigation items to point to your own content, you might not see the updates to the system content that these items initially accessed. Since you might want to incorporate some of these new features or enhancements into your Staff site, you should review the core content records to which the shortcuts and navigation items originally pointed.
- If you have copied an item, such as a query or core content record, and modified the copy, you should review the original item in case it has enhancements that you want to use in your copy