Using the DONATE license
The DONATE license allows you to create funds and distributions so that contacts can make donations towards a specific cause.
NoteThe DONATE license is separate from the AutoPay license (recurring donations). If you would like the recurring donations functionality, you must purchase the AutoPay license. Contact ASI or you AiSP for more information.
Defining activity types
Before you can create funds and distributions, the GIFT Activity type must be configured:
- From the Desktop, go to Customers > Set up module > Activity types, or from the Advanced Accounting Console, go to Settings > Membership > Activity types.
- From Product Types, look for the GIFT item.
- If the product type is listed, select it and click Edit.
- If the product type is not listed, click New and enter the product type in the Type text box.
- Set the activity type values according to the image below.
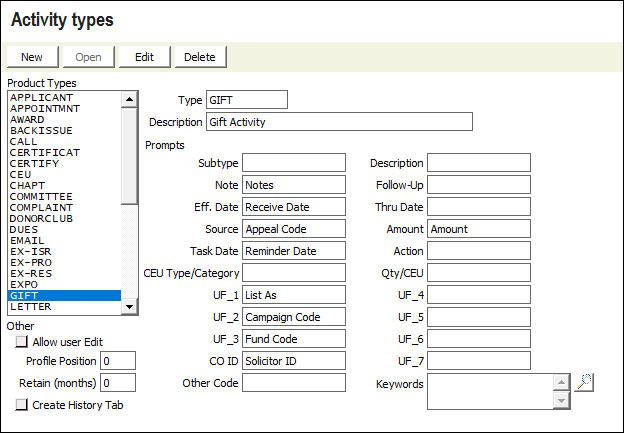
- Click Save.
Setting up the funds
Adding the navigation items
The navigation items must be manually created:
- From the Staff site, go to RiSE > Site Builder > Manage sitemaps.
- From the drop-down, select the application you are using (either Advanced Accounting Console or iMIS Desktop View).
- Click New > Website Navigation Item.
- Enter a Navigation link text of Donate, then click Save.
- Add the following navigation items under the new Donate navigation:
- Funds:
- (Properties tab) Navigation link text: Funds
- (Properties tab) Content or URL to link to: imisproc:IMISFR.FundRaisingTbl/1
- (Access settings tab) Security Set: All Staff Full Control
- (Access settings tab) Level Assignment: Fundraising: 5 - Table Maintenance
- Distributions:
- (Properties tab) Navigation link text: Distributions
- (Properties tab) Content or URL to link to: imisproc:IMISFR.FundRaisingTbl/4
- (Access settings tab) Security Set: All Staff Full Control
- (Access settings tab) Level Assignment: Fundraising: 5 - Table Maintenance
- Funds:
- Click Save.
Creating the funds
To create the funds and distributions, do the following:
- Go to the iMIS Desktop or Advanced Accounting Console.
- Go to Donate > Funds, and create the funds.
- Go to Donate > Distribution, and create the distributions that point to the funds.
- Save.
See Defining funds and Set up distributions for more information.
Creating the donation page
Before you can begin accepting donations, you must create a "Give Now" page. To create a "Give Now" page, do the following:
- From the Staff site, go to RiSE > Page Builder > Manage content.
- Navigate to @/iCore/Fundraising, then select the Give Now page.
- From Organize, select Copy.
- Paste the page in a Shared Content folder.
- Open the page for edit.
- Locate the DonationCreator content item, then select Configure.
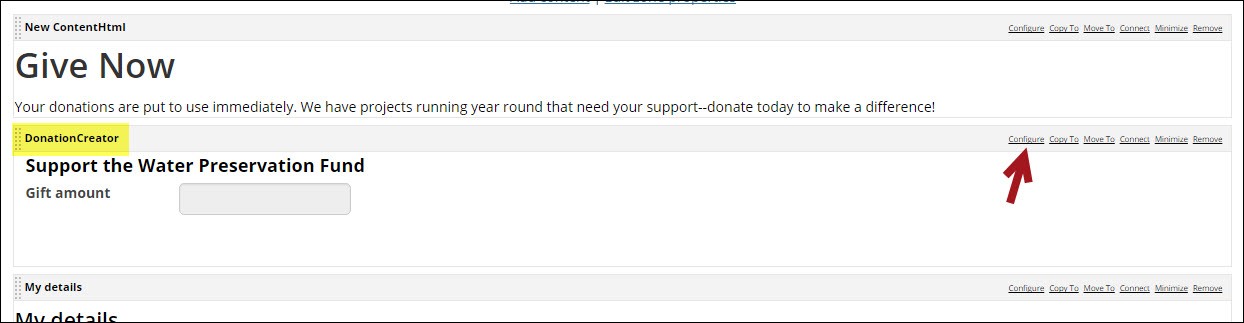
- From the Gift item drop-down, select the Distribution you created.
- Click OK.
- Make any other styling changes, then click Save & Publish.
Adding the donation page to your website
To make the donation page accessible to donors, you must associate the page with a navigation item on your website. To add a new website navigation item, see Adding new menus and task list items.