iMIS DB Upgrader
You can run the iMIS DB Upgrader standalone from the iMIS program group. You can click View Logs to quickly locate and view log outputs for all upgrades, completed and failed.
WarningSpecial characters in your sa password can disrupt command-line processing, so change the password to use only alphanumeric characters and ! # @, with no spaces. You can use hyphens and underscores after the first character, but avoid all other punctuation and symbols.
At upgrade time, the application server or the iMIS Scheduler is not running, so you cannot use a URL.
The following folder paths point the iMIS DB Upgrader to the correct locations from which to run the appropriate upgrade utilities:
NoteThe following folders must be associated with the same instance.
- iMIS application server bin instance folder: The path to the bin folder of the application server root folder associated with this instance.
- iMIS Scheduler bin instance folder -- The path to the bin folder of the Scheduler root folder associated with this instance.
NoteThese fields are auto-populated if an upgrade has already been run at least once.
You can click Exit Without Upgrading to close the iMIS DB Upgrader without initiating a database upgrade process.
Begin Upgrade
🚧 Warning
Users must always make a backup copy of their database before attempting to run the iMIS DB Upgrader. 📘 Note
After upgrade, the iMIS DB Upgrader logs must always be reviewed for any warning or error messages. Any errors must be resolved before attempting to resume the upgrade. In extreme cases, the database should restored, issues addressed, and the upgrade re-attempted from scratch.
This button runs a set of database upgrade scripts against the specified iMIS database. The specific scripts that are run depend on how many versions back the database is from the current version of iMIS. The number of scripts that must be run depends on the age of the iMIS instance being upgraded. The older the iMIS instance is, the greater the number of scripts that must be run to bring the instance up-to-date. The iMIS DB Upgrader upgrades the starting version to the next version, then the next, and so on until the final script updates the database to the current release of iMIS.
🚧 Warning
iMIS supports upgrading from release 15.2.1 to current. If you are using a version of iMIS that predates release 15.2.1, you must upgrade to 15.2.1 before upgrading to current.
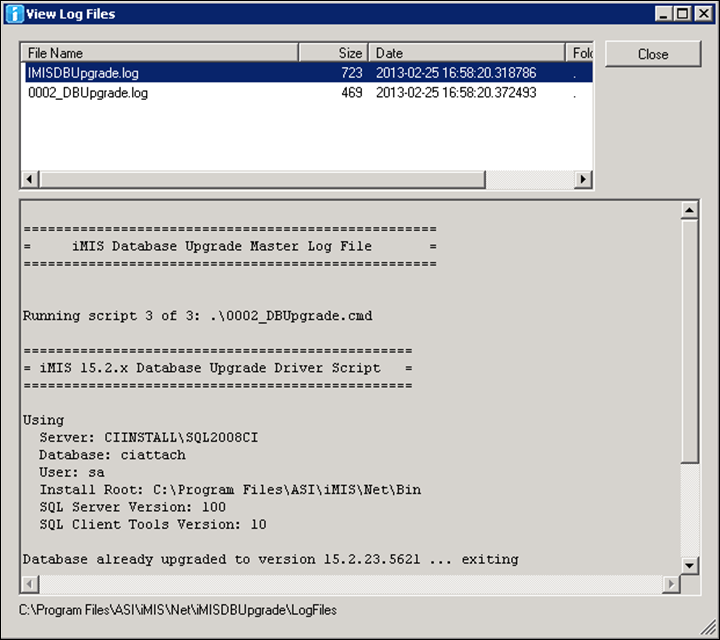
View Log Files
📘 Note
When reporting upgrade failures or issues to Tech Support, include the following information:
--Entire zipped contents of the LogFiles folder.
--All LogFilesBackup folders from the file system.
These files and folders should always be preserved for every iMIS install instance. If an instance is copied and moved, these folders should either be copied and moved to the new instance, or zipped up and saved to be sent along with any future upgrade problem reports.
The log files appear chronologically by run time. To sort the list by any column, click on its header. To help you spot errors, *.err files have red highlighting.
The contents of the selected log display below the list, and the pathname displays at bottom. At top right, the Viewing: information and Log History command remain hidden until you have run multiple upgrades.
📘 Note
You can select and copy text within both the log contents and the pathname areas.
Upgrade History window
All logs of every run are preserved, so use this archive to access prior runs, for getting log file locations and copying log file text (such as error messages) into other applications or email. Click Log History on the View Log Files window.
The Upgrade History window lists the order, date, and location of all the upgrades that have ever been run. Following the list, you can see which SQL server, database name and database user were used for the selected upgrade.
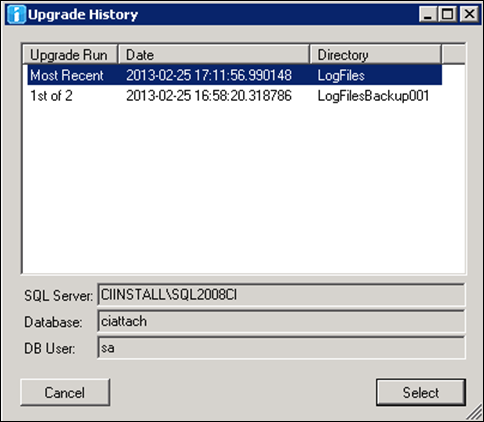
Click Select to return to the previous window with the selected run’s logs displayed, rather than the most recent run (the default).
📘 Note
If you need to contact Technical Support for assistance with a failed upgrade, do the following:
1. Zip up the entire contents of the LogFiles folder along with all LogFilesBackup folders.
2. Submit the zip file to Technical Support along with the request for assistance.