Reporting specifications
Each iMIS module contains a Reports menu item through which module-specific reports can be run. The specifications or details of all the iMIS standard reports can be modified or cloned (copied and renamed) through the Report Specifications window and the Detail Report Parameters window in the Advanced Accounting Console. This is a powerful tool when used in conjunction with the Ad Hoc Search feature to create customized end-user reports with a minimum of time, energy, and expertise.
Report Specifications window
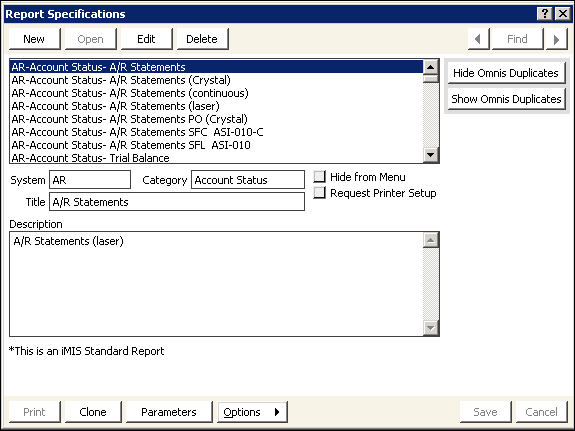
From the menu bar, select Utilities > Report Specs
- Report scrolling area - List of all iMIS reports.
- System - Indicates the iMIS system or module where the report resides. For example, if a report is listed in the AR system, you would access the AR system report by selecting AR/Cash, and selecting Generate reports.
- Category - Refers to the report type. For example, if you access the AR/Cash Generate reports window (from AR/Cash, select Generate reports), there would be three report type categories: Account Status, Deferred Income, and Transaction Lists. Each category contains reports that are specific to the category.
- Title - Indicates the report name that will display on the report and in the Available Reports area of the report window. For example, you would access the A/R Statements report by selecting AR/Cash > Generating reports > Account status report type.
- Hide from Menu - If enabled, hides the report from displaying on the report window.
- Request for Printer Setup - If enabled, the system automatically displays the Set Report Destination window so you can select the appropriate print destination.
- Description - This is a detailed description of the report.
- Options button - Drop-down menu items of current report format options that can be modified for the selected report. Options range from adjusting the margins, modifying the search criteria, changing the sorting option, exporting report records to another application, adding additional fields that are mapped to the specific parameters, and adding text to letter formats. Report options vary by report type.
- Clone button - Used to create an exact copy of the selected report. Modify the title and some of the report properties to create a new report on the report menu.
- Parameter button - Opens the Detail Report Parameters window. This window contains a detailed list of the report parameters.
Common report tables and joins
Activity reports
| Tables: |
|
| Join Examples: |
|
AR/Cash reports
| Tables: |
|
| Join Examples: |
|
Committee reports
| Tables: |
|
| Join Examples: |
|
Dues reports-invoices (Cash method)
| Tables: |
|
| Join Examples: |
|
Dues reports-invoices (Accrual method)
| Tables: |
|
| Join Examples: |
|
Meeting reports
Consist of Rosters, Badges, Confirmation Letters, and Invoices
| Tables: |
|
| Join Examples: |
|
Membership reports
| Tables: |
|
| Join Examples: |
|
Orders reports
| Tables: |
|
| Join Examples: |
|
Common address joins
| Common address joins | |
|---|---|
| Reports using Address 1 | Name.ADDRESS_NUM_1= Name_Address.ADDRESS_NUM |
| Reports using Address 2 | Name.ADDRESS_NUM_2= Name_Address.ADDRESS_NUM |
| Reports using Address 3 | Name.ADDRESS_NUM_3= Name_Address.ADDRESS_NUM |
| Reports using Preferred Bill Address | Name.BILL_ADDRESS_NUM= Name_Address.ADDRESS_NUM |
| Reports using Preferred Mail Address | Name.MAIL_ADDRESS_NUM= Name_Address.ADDRESS_NUM |
| Other Alternate Addresses |
For example, if you have more than three purposes: Name.ID=Name_Address.ID where PURPOSE=' ' (List purpose in between single quotes.) |
SQL Query
In the Advanced Accounting Console you can run SQL queries to view the data in the tables:
- From the menu bar, select Utilities > SQL Query to open the SQL Query window.
- Click New.
- Enter the SQL query in the SQL Command Text box. In the following example, we are selecting all the data from the Name table.
- Click Execute. The results of the query are displayed in the Command Result box.
- To clear the screen, click Clear Query to clear the SQL command.
- Clear Clear Result to clear the results.
Reports and queries
The Advanced Accounting Console provides several SQL scripts that can add or change data in the tables. The SQL scripts are stored as standard iMIS reports that you can clone and customize.
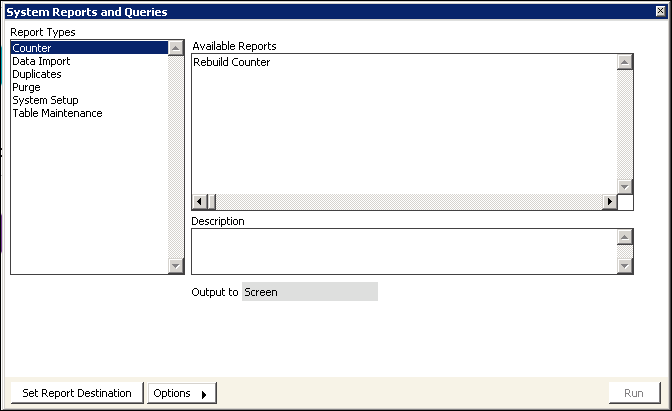
System Reports and Queries window
From the menu bar in the Advanced Accounting Console, select Utilities > Reports and Queries
📘 Note
Run the System Setup routines only after the prerequisite conditions are met.
The following Data Import, Purge, System Setup, and Table Maintenance report types display with a brief description:
Data Import
Import Data into the Prospect Table: Imports prospect records from a tab-delimited file into iMIS.
Purge
- Membership Purge for MS SQL: Deletes customer records with a status of “D.”
- Purge Old Invoices: Deletes records in the Invoice and Invoice_Lines tables which have a zero balance, are dated before the retention months and in which there are no linked and unposted transactions remaining.
- Purge Old Transactions: Deletes records in the Trans table where TRANSACTION_DATE is less than Trans retention months and are no longer associated with its corresponding invoice record.
- Purge Old Activity attachments: Deletes activity attachments with a timestamp before a specified date.
System Setup
-
Co. to Member Addr. Flowdown: Populates a member’s first Name_Address record (the required one where PURPOSE = Membership Address1 Prompt) from the corresponding Name_Address record of the company ID (CO_ID). Only member records where ADDRESS_1 is blank are updated.
- Prerequisite: This procedure requires that Name_Address.ADDRESS_NUM be populated and Name_Address.PURPOSE be populated to match the address prompts in Customers > Set up module > General > Address and Notes button.
📘 Note
This script updates only the Name_Address record; it does not update user-defined fields within Advanced Flow Down. -
Rebuild Chapter Subscriptions: (for optional Chapter Management) Inserts Chapter Subscription records based on Name.CHAPTER.
- Prerequisite: Requires that Name.CHAPTER be populated.
-
Rebuild Member_Type Info: Populates Name.MEMBER_RECORD, COMPANY_RECORD, and CO_MEMBER_TYPE.
- Prerequisite: Requires that you first complete Member_Type setup and create the Company_Index view.
-
Rebuild Name Fields: Rebuilds the index fields Name.LAST_FIRST, COMPANY_SORT, and FULL_NAME. To speed processing, select Drop Indexes first.
- Prerequisites: (1) Requires that you first upload the Name table, (2) populate elements of member name (at least LAST and FIRST), and (3) populate Name.COMPANY.
- Rebuild Name.DUP_MATCH_KEY: Rebuilds the Name.DUP_MATCH_KEY according to the following iMIS default formula. This formula checks for duplicates: the first five digits of the ZIP (postal code) field, the first four characters of the last name, and the first initial.
con (mid(Name.ZIP,1,5),mid(Name.LAST,1,4),
mid(Name.FIRST,1,1))
- Prerequisite: Requires that you first run Rebuild Name_Address Pointers (to populate ZIP in Name) and populate any other fields used in the dupmatch formula.
The standard formula is used unless a custom formula has been entered in the Duplicate Record Check Formula field on the Customer Setup – Advanced window (from Customers, select Set up module > General, and click Advanced). If the Duplicate Record Check Formula field is blank, the default formula will be used.
📘 Note
If you customize your dupmatch formula, you must populate the parameters of the report specification (select Utilities > Report Specs).
- Prerequisite: Requires that you first populate the Name table with unique ID’s, populate the Name_Address table with unique ID’s that correspond to the Name table and populate the Name_Address.ADDRESS_NUM field with unique sequential numbers. From Customers, select Set up module > General and click Address and Notes, populate the Address Usage fields (Name_Address.PURPOSE) to match your setup, and make sure that you have at least one Name_Address record for each member, with a PURPOSE matching the first address prompt.
- Post Processing: (1) Select Utilities > Table Analysis (2) Select Name table record, and (3) Click Make Indexes.
- Prerequisites: (1) A column or Omnis expression using columns from the Name table must be defined as an additional index on the Customer Setup – Indexes window. In this example, Name.STATE_PROVINCE is defined as additional index 1. (2) To modify this script, clone it and substitute a SQL expression equivalent to the Omnis expression used in System Setup and the corresponding index number (1, 2, 3, or 4) where this script has Name.STATE_PROVINCE and 1, respectively. (3) This script truncates and rebuilds the whole Name_Indexes table, so if you have several additional indexes you should put all the updates in one script.
Table Maintenance
- Remove Ref_Provided NULLs: Replaces NULLs in the Ref_Provider table with either a blank (‘ ‘) or a zero (0) depending on the datatype of the field being updated.
- Set Activity type donor club: Updates Activity.ACTIVITY_TYPE = ‘DONORCLUB’.
- Set Activity.ORIGINATING_TRANS_NUM: Updatse Activity.ORIGINATING_TRANS_NUM with its matching Trans.TRANS_NUMBER.
- Set Product type donor club: Updates Product.PROD_TYPE = ‘DONORCLUB’.
- Set Product FR type donor club: Updates Product_FR.FR_TYPE = ‘DONORCLUB’.
- Set Product_Type type donor club: Updates Product_Type.PROD_TYPE = ‘DONORCLUB’.