Utility gallery
AddThis For Social Networking
This content item has been deprecated. Instead, use the Social Share content item.
Advanced Accounting Console
- Description - Access the Advanced Accounting Console directly through the iMIS Staff site, using a web browser.
- Usage Scenario - The configuration for this content item allows you to set up a Remote Desktop Protocol (RDP) connection that will allow the Advanced Accounting Console to be accessed through a web browser. You can specify connection values for your remote desktop session. You can also specify the width and height of the displayed remote desktop screen. The Advanced Accounting Console section allows you to specify information about the Advanced Accounting Console, including a working directory.
Advanced Search
This content item has been deprecated. Instead, use the Common Search content item.
Alert Display
- Description - Displays alerts to users. It must be configured to display a selected alert set.
- Usage Scenario -

Change History Display
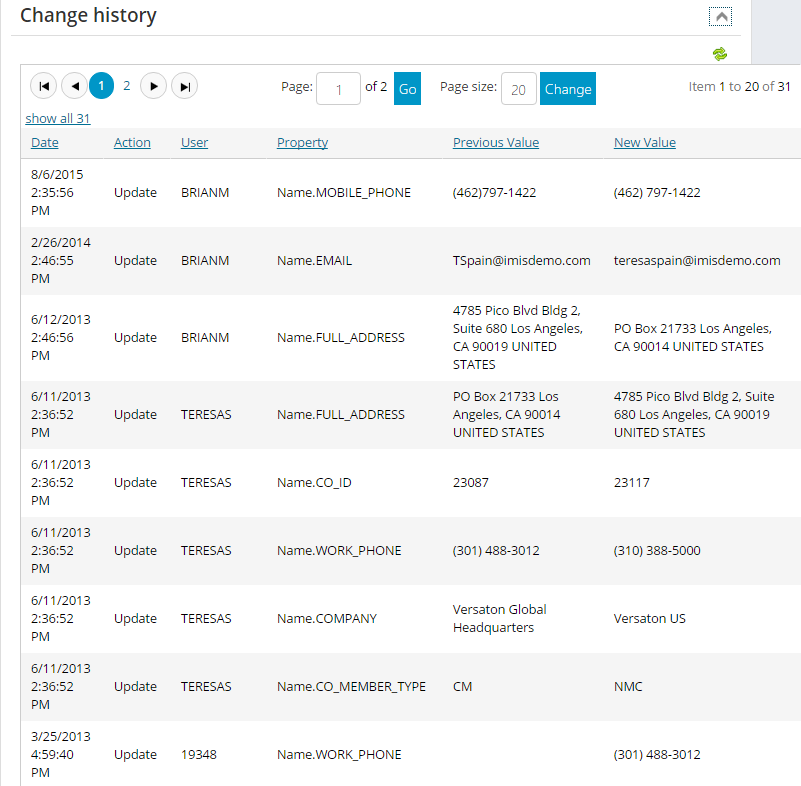
- Description - Displays a list of data changes made in the Name and Name_Fin tables. The information that displays is information specific to the current user.
- Usage Scenario -
You can track changes made to specific business object fields by enabling the “Log All Changes” option in the BOD Property definition. The following columns display on the content item: Date, Action, User, Property, Previous Value, and New Value. The Previous Value and New Value columns are truncated to 500 characters. The data displayed is read-only and cannot be modified.
Common Search
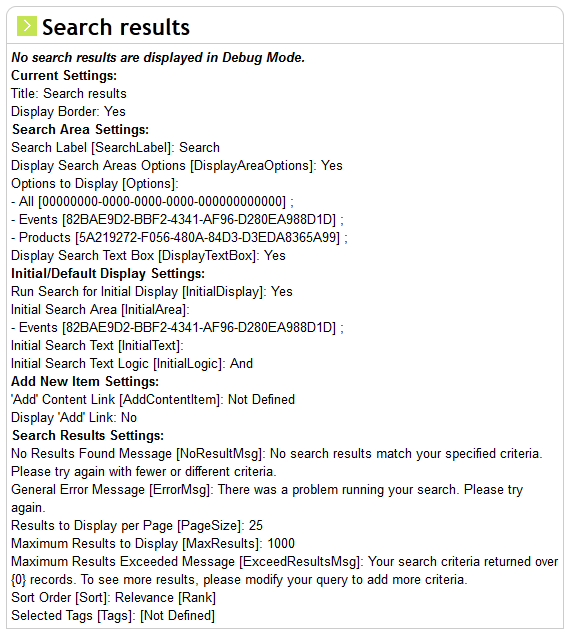
- Description - Displays a universal search page with multiple configuration options.
- Usage Scenario - This iPart can be configured in many ways, from a simple search page (with label and text box) to an Amazon-like search, that filters by department (such as Events versus Products).

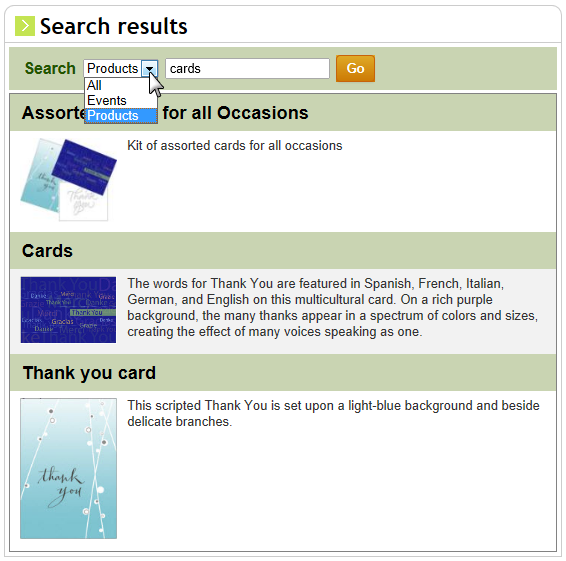
This iPart supports a "debug mode" that allows you to display all current iPart settings at any time by simply adding the URL attribute: &Debug=true
Communication Creator
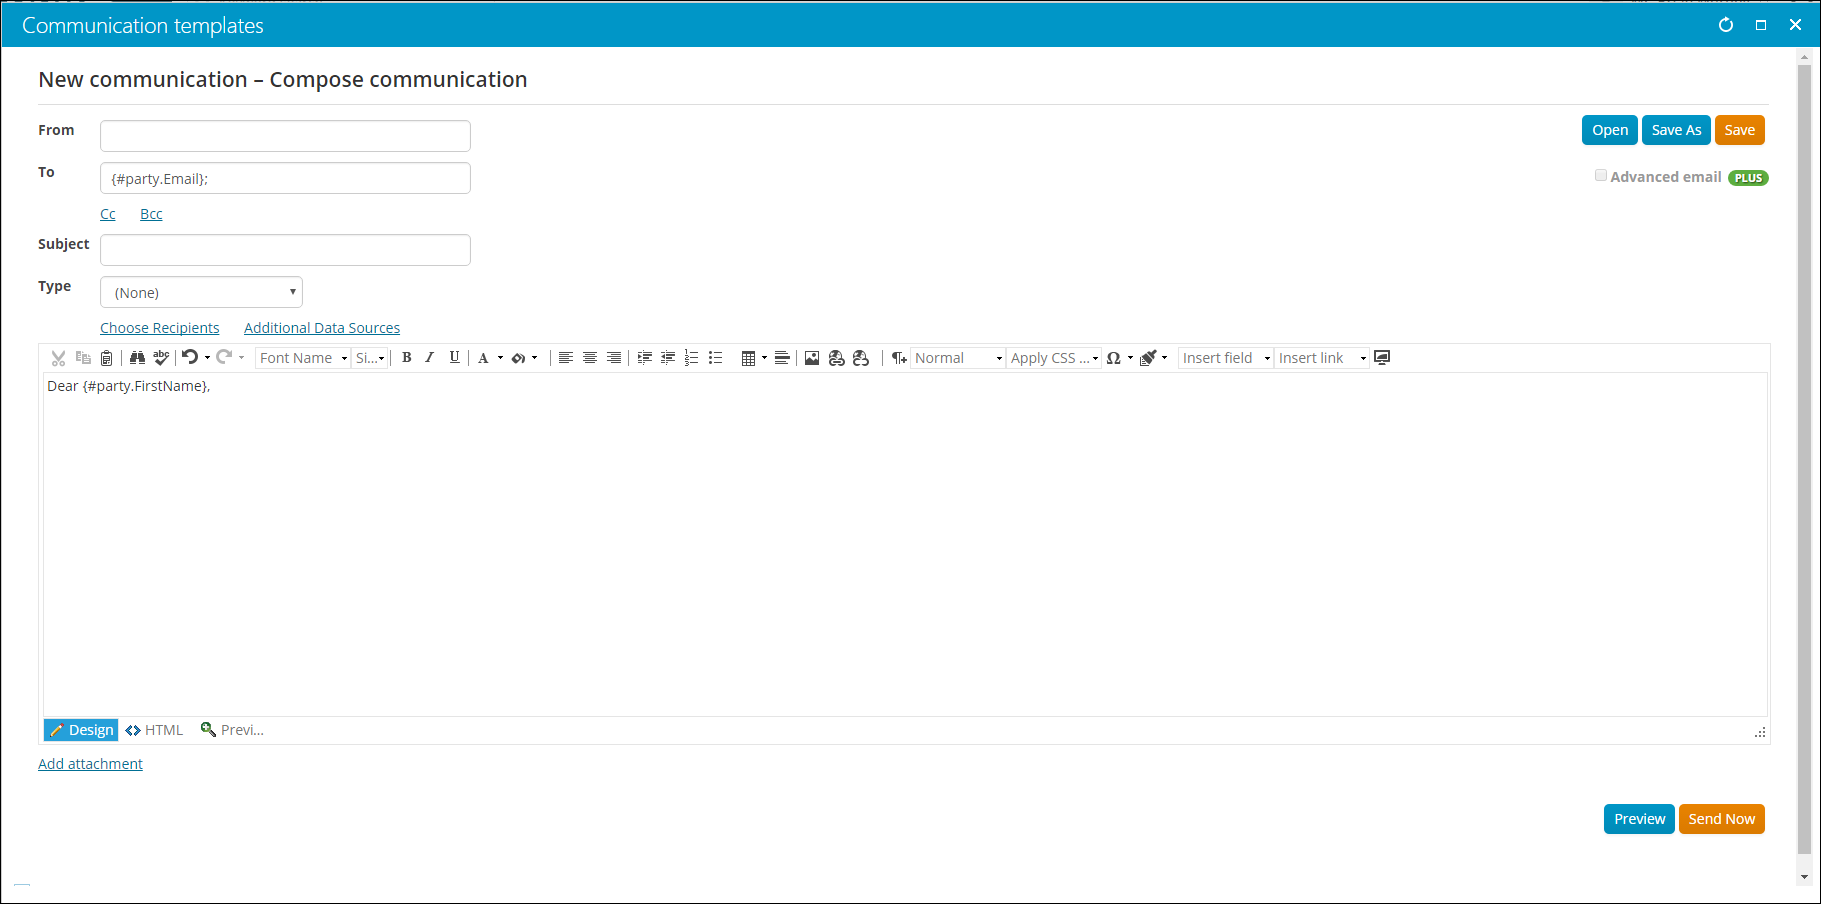
This content item allows you to send communications (emails) to specific recipients. Place this content item on a content record that you want to send communications from. This content item is used out-of-the-box at Marketing > Communication templates > New > Communication. For more information, see the related Communications articles. For more information about the toolbar icons in the Communication Creator, see Understanding the toolbar icons.
Engagement Score Display
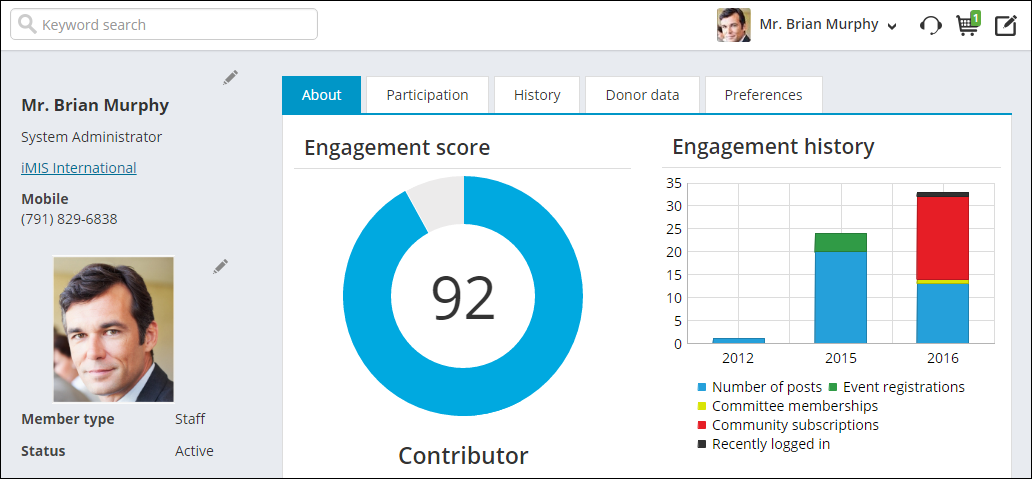
This content item allows you to display engagement scores for members and donors. Engagement scores allow you to easily define who is engaging with your organization, how they are engaging, and at what level. Configure the content item to display an engagement score for a particular formula in a Donut graph or a Progress bar.
📘 Note
The Donut chart is not supported in IE8.
This content item appears out-of-the-box on the About tab (@/iCore/Contacts/ContactLayouts/Staff/Tabs) of Staff account pages.
See Engagement Scoring for more information.
File Importer For Web Services
The File Importer For Web Services content item imports data into iMIS using iMIS SOA Web Services. Imported files are displayed in the File Viewer For Web Services.
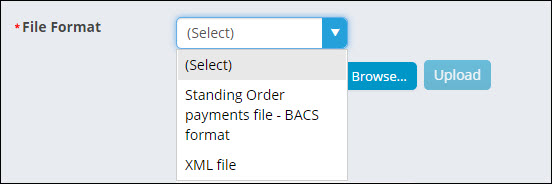
Users select the file format they want to import. The file format identifies the structure of the data within the file, so that iMIS can properly import and process the contents. In order to import a file, you must first select a file format:
-
Standard
- Standing Order payments file - BACS format uploads the content of a file that is then converted into a common Standing Order payment file. Each line of the file is then matched against the Standing Order commitments made to an organization. See Standing Orders for more information.
- XML file uploads a valid XML file format that is recognized by iMIS SOA Web Services. See Friendraising for more information.
-
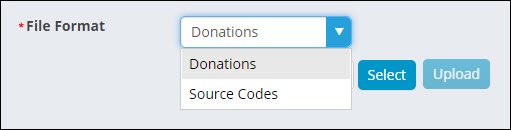
Custom
- Donations uploads a tab-delimited file that contains either your donor and donation data, then converts it to an XML file. See Importing donor and donation data for more information
- Source Codes uploads a tab-delimited file that contains your source codes, then converts it to an XML file. See Importing source codes for more information.
File Viewer For Web Services
This content item lists those files imported through the File Importer For Web Services.
Select the Batch Type that matches the File Format defined in the File Importer For Web Services. Not every imported file will be displayed; only the imported files with the selected batch type will be displayed:
- Donations
- Source Codes
- Standing Order payment file - BACS format
- XML file
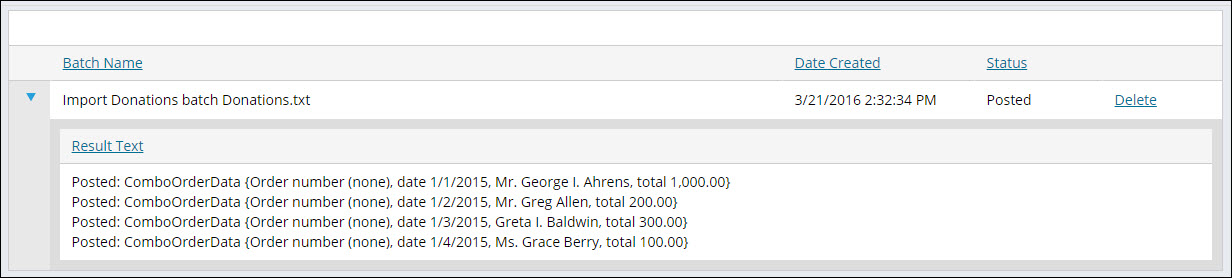
When you process a file in the viewer, the results are posted to the Log Viewer For Web Services content item.

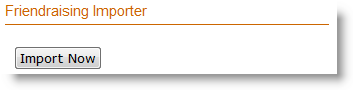
Friendraising Importer
- Description - Imports Friendraising Export Files on demand from the Friendraising Advanced Accounting Console. You can view imported files from the File Viewer For Web Services iPart. Use the Friendraising Settings and Friendraising Mappings iParts to define the settings and mappings required for a Friendraising import.
- Usage Scenario -
Friendraising Mapping
- Description - Defines the mappings required to use the Friendraising Bridge.
- Usage Scenario -
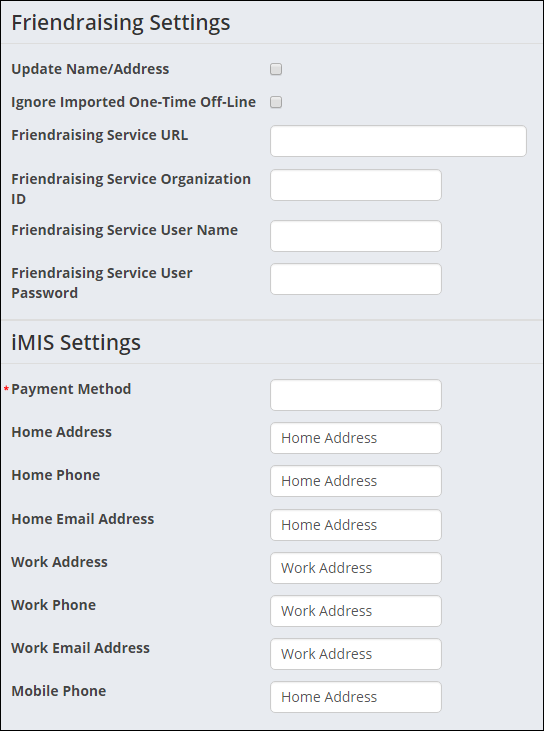
Friendraising Settings
The Friendraising Settings content item enables Staff users to define the settings required to use the Friendraising Bridge. For more information, see Defining Friendraising settings.
The Friendraising Settings content item is available out-of-the-box on the @/iCore/Contacts/ContactLayouts/Profile page.
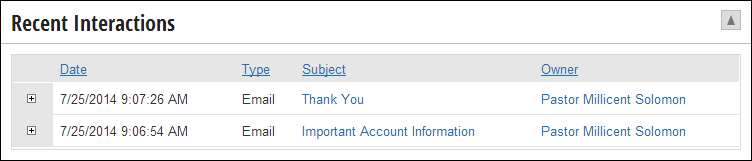
Interaction Log
You can use the Interaction Log content item to track your organization’s email communications with your contacts. This content item displays useful information about each email your organization has sent a contact, such as date, type, subject and owner.
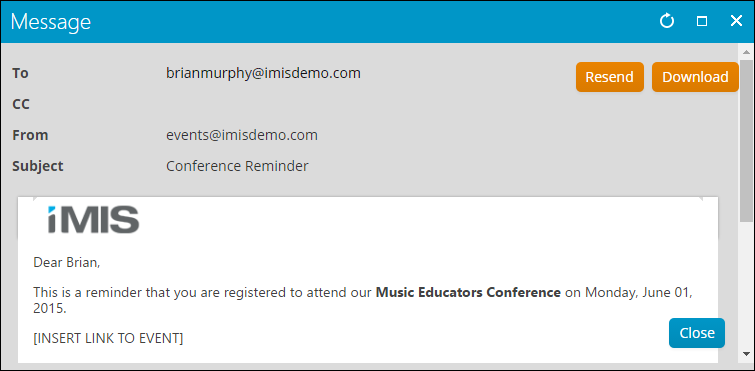
To view more detailed information about the email interaction, you can click the subject line link to view the email in preview mode and download any attachments sent with the message. You can also click the owner link to access the account page of the staff member who sent the email message.
Once you click the subject line and the communication is displayed as a preview, you can then select to resend a communication, or download a communication as a PDF that can then be printed.
Log Viewer For Web Services
The Log Viewer For Web Services content item lists the processing results for files uploaded through the File Importer For Web Services content item.
Once a file has been uploaded, users can then process the file through the File Viewer For Web Services content item. The Log Viewer For Web Services content item displays the processing result.
Select the Batch Type that matches the File Format defined in the File Importer For Web Services. Not every imported file will display, only the imported files with the selected batch type:
- Donations
- Source Codes
- Standing Order payment file - BACS format
- XML file
If there was an error processing the uploaded file, the user is notified, and is able to review any additional information about the error by selecting the toggle next to the Log Name.
NRDS Configuration
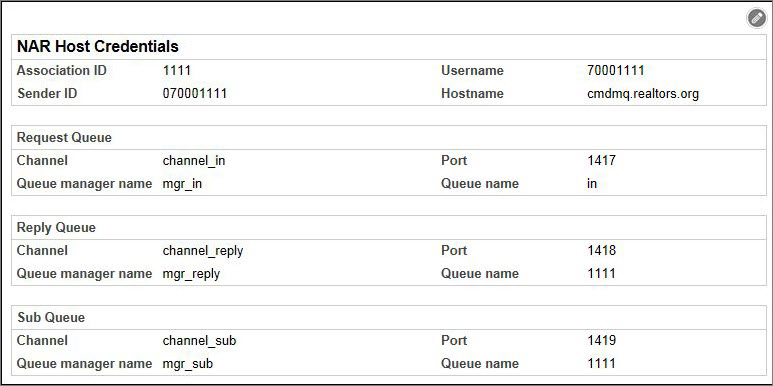
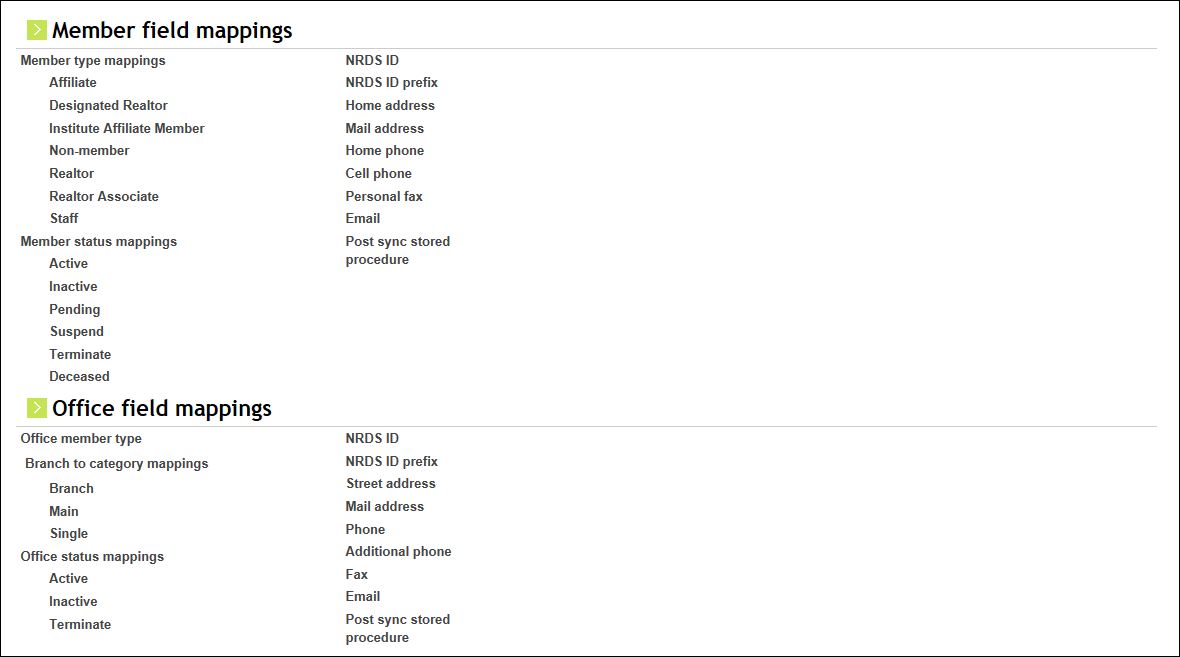
- Description - Configures Host Credentials and Policies for connecting to the National Realtor Database System (NRDS).
- Usage Scenario - This iPart allows you to set up the configuration to connect to and sync with NRDS. There are three sections: NAR Host Credentials, Member field mappings, and Office field mappings. The Host Credentials section contains your credentials to connect to NRDS, including the Queue information. The field mappings sections allow you to define how NRDS fields should map to iMIS fields. The fields you can map include type, status, and address and phone data.
NRDS Sync Buttons
- Description - Sync the selected iMIS record with NRDS. You can update data from NRDS or send data to NRDS.
- Usage Scenario - This iPart consists of two buttons: Send to NRDS and Update from NRDS. When clicked, the buttons sync the currently selected iMIS record with NRDS data. The Send button sends data to NRDS, and the Update button receives data from NRDS. The iPart can be placed in a content record which serves as a contact profile in order to sync that contact with NRDS. The currently selected iMIS record is the logged-in user by default. If you are viewing a profile for another contact, or if there is an On Behalf Of contact selected, then that contact will be the currently selected iMIS record.

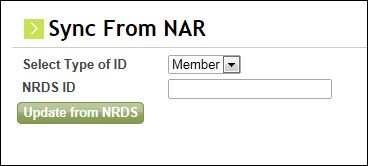
NRDS Sync By ID
- Description - Updates iMIS with data from NRDS for a single record, either a Member or an Office. If the record does not exist in iMIS, it will be created.
- Usage Scenario - This iPart allows you to enter an NRDS ID for a Member or an Office, and update iMIS with NRDS data for that record. The NRDS ID is stored in iMIS as the MajorKey or iMIS ID, depending on how you have configured NRDS in iMIS. If there is no existing iMIS record for the ID, a new record will be created.
Package Installer
- Description - Provides an easy way to install iParts and other iMIS functional packages, such as reports.
-
Usage Scenario - Select packages to be installed, view currently installed packages, and view failed package installs. The packages can include:
- Objects, such as iMIS queries, business objects, and content types
- SQL Scripts, which are are triggered to run against the iMIS database during an installation
- Files, such as ASCX pages, images, and Word templates
Progress Tracker
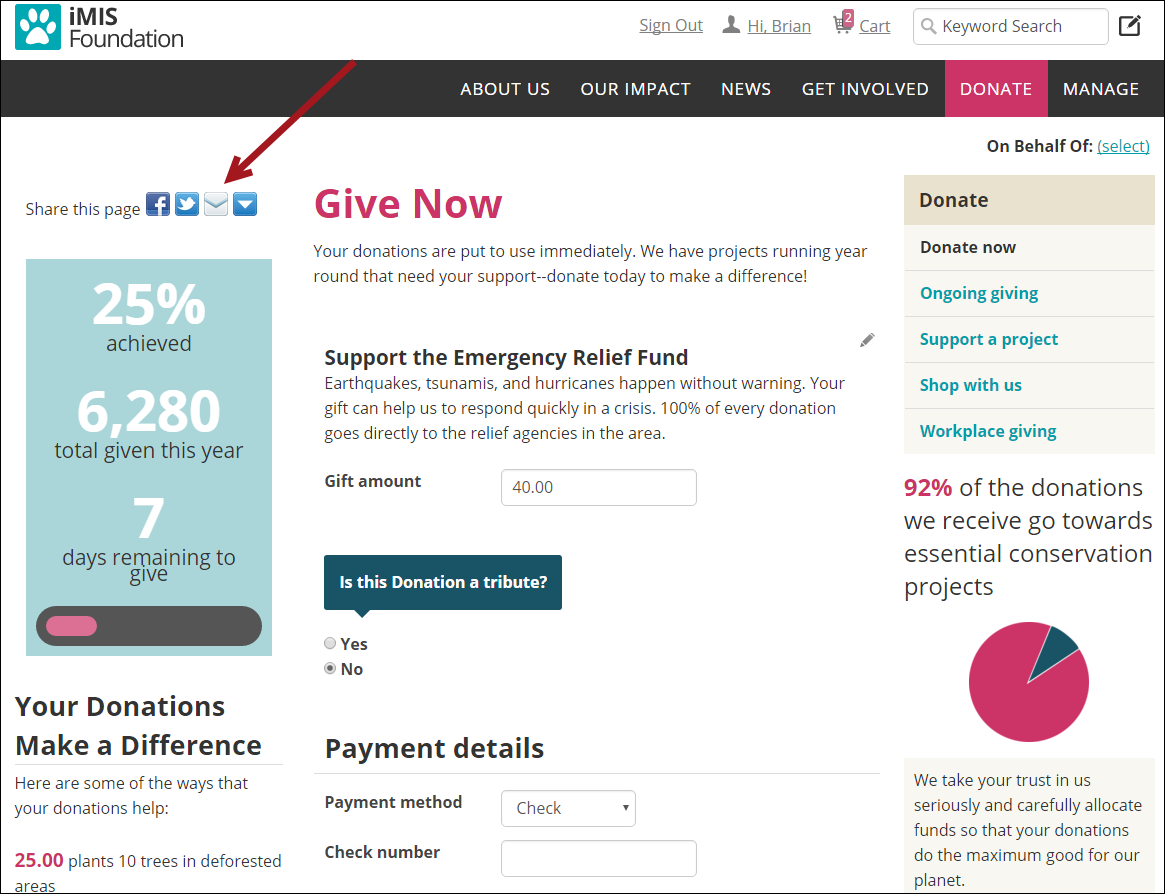
With Progress Tracker, you can visually display progress towards a goal based on the results of an IQA query. For example, connect this content item to a fundraising query, so that your members can easily track the progress of a fundraising effort towards a specific goal. Or connect it to an events query, so that you can see at a glance how many people have registered for an event.
![]()
To set up the Progress Tracker
- Create a query for the Progress Tracker.
- Goal_Amount: Indicates which property is the goal amount. You can apply this alias to a property of a business object, or apply it to a Custom SQL Expression property. For example, add CAST(25000 AS INT) as a property to set the goal amount to 25,000.
- Sum_Total: Indicates which property is the amount to be summed. The percentage displayed in the Progress Tracker is based on this amount compared to the goal. It can be a monetary amount or any other number, such as the number of event registrations.
- End_Date: Indicates which property specifies the end date. This alias is only required if you want to display an end date in the content item. You can apply this alias to a property of a business object, or apply it to a Custom SQL Expression property. For example, add CAST('2012-12-25' AS DATE) as a property to set the end date to 25 December, 2012.
- Add the content item to a content record and configure it.
- Go to RiSE > Page Builder > Manage content.
- Do one of the following:
- Select a Content Folder and click Edit.
- Select New > Website Content.
- Click add content.
- Go to ContentTypes > Utility.
- Select Progress Tracker.
- Click OK.
- Enter the CSS class to style the Progress Tracker. Two styles have been pre-defined that you can use in the content item: ProgressTracker and ProgressTracker2. You can edit these classes to change the look and feel, or you can create your own style for the Progress Tracker.
- Select a Source query.
- (optional) Select a data column by which you want to filter. You can use this feature to dynamically update your Progress Tracker, based on the value passed to it in the URL. If you choose to filter on a data column, then also enter the name of the URL parameter, which the content item uses to identify the value to filter on. For example, to limit the results of an event query to a specific event, you can select the EventCode property and give the URL parameter a name such as EventCode. The progress displayed will then reflect only the event code which is included in the URL as EventCode=[EventCodeValue].
- (optional) Enter any messages you want to appear in the content item. The variables below can be used in the descriptions. For example, "Help us reach our goal of [GoalTotal] new members by [EndDateLong]!"
- [GoalTotal] displays the goal total
- [CurrentTotal] displays the current sum total or count
- [EndDateLong] displays the end date in a long format
- [EndDateShort] displays the end date in a short format
- Select the Caption Options. In addition to the progress bar, you can also display the values as text. If any of the Caption Options are unavailable after selecting a query, this indicates that the required aliases have not been defined in the query.
- Select the Progress bar location. The bar can be displayed above or below the captions.
- Click OK.
📘 Note
You can also use this content item to display only a countdown (days remaining to a certain date). In configuration, only select the caption option Display days remaining, then for the Progress bar location, select (None).
📘 Note
For sample queries that will work with this content item, see $/Samples/ProgressTracker/ in IQA. The Progress Tracker uses three pieces of information supplied by an IQA query: a goal amount, the sum total of what you are tracking, and the end date (which is optional). When you build your query for this content item, it must contain specific aliases. In IQA, create a new query and choose the business object you want to query on. Make sure you are in Advanced Mode, then from the Display tab, choose properties to assign the following aliases to:
📘 Note
From the Function dropdown list for this property, select Sum, so that only one row is sent to the content item. This is not required, but it will improve performance.
Query Chart Viewer
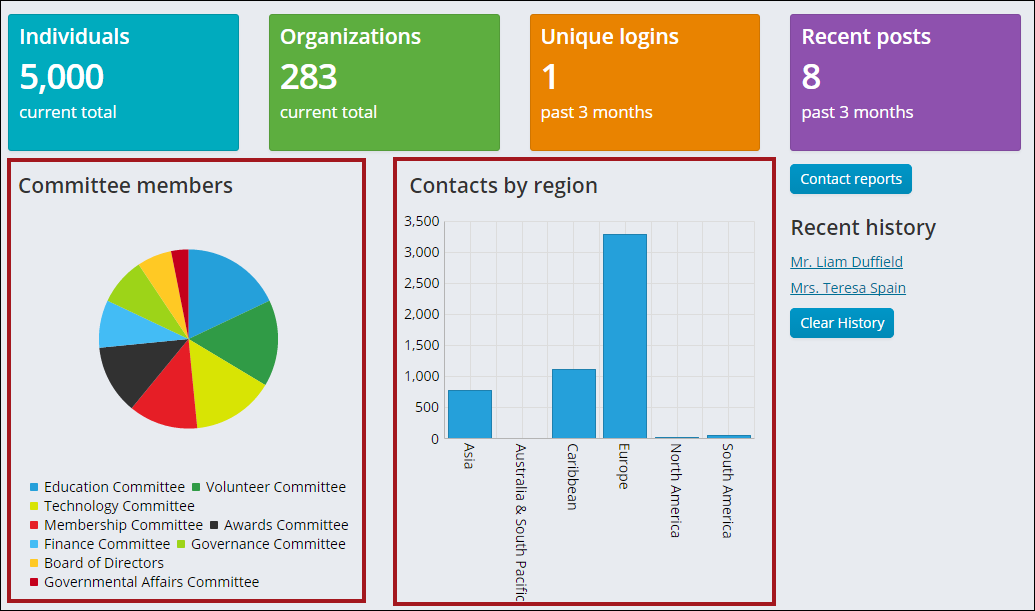
Place the Query Chart Viewer content item on any content records to display query results in a chart. The chart can be set to a range of sizes, skins, and chart types. This content item can be seen on any of the out-of-the-box Staff site Dashboards.
Designing queries for Query Chart Viewer
The Query Chart Viewer can render any existing query, but you will get the best results by following these guidelines on how to design queries specifically for use with this content item:
- Queries – The queries you create for the content item should be structured so that the results are appropriate for charting. For example, if you want the chart to display the total sales per salesperson, then the source query should be written using the Sum function in IQA.
- Query Display Columns – Each property you select on the Display tab in IQA is available in the configuration page as a Data column display option. You can select up to three properties to be displayed on the content item if you want to display a chart with multiple data values.
- Aliases – In your source query, enter an Alias for the Display properties you plan to show in the content item. Relying on the default labels might not be sufficient, especially when your query uses multiple joined sources or custom SQL expressions. If the query does not display as you expect, using an Alias often resolves the issue.
- Sorting – You can sort the query results displayed in your chart in ascending or descending order. To sort your results, edit your source query and, from the Sorting tab, add the property to be sorted.
- Labels – The labels on your chart’s x-axis might overlap if there are too many data points or if the labels are too long. You might be able to improve the display through a few methods: In the content item, you can expand the width of the chart or change the label angle. In the query, you can try to reduce the number of data points.
📘 Note
In order to display multiple data values in a chart, a property in the Display tab must have the checkbox checked in the Subtotal column. After that property has been checked in the Subtotal column, the Series data column will appear in the Chart Data section and the Enable stacked series checkbox will become available in the Display options in the Query Chart Viewer content item.
Chart types
The following are examples of chart types in the Query Chart Viewer.
Area
Displays data in an area filled with color to illustrate trends.

📘 Note
You can display multiple data values in an Area chart.
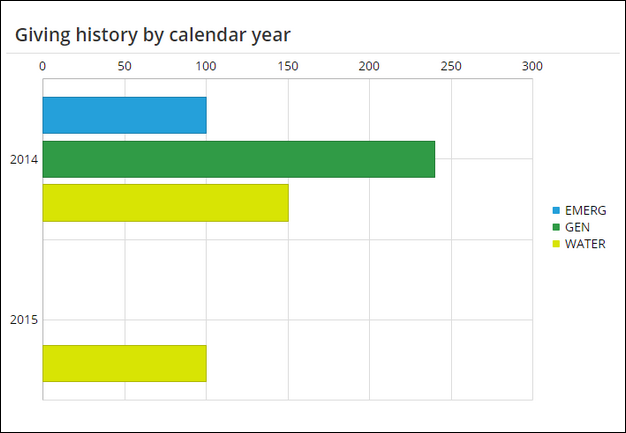
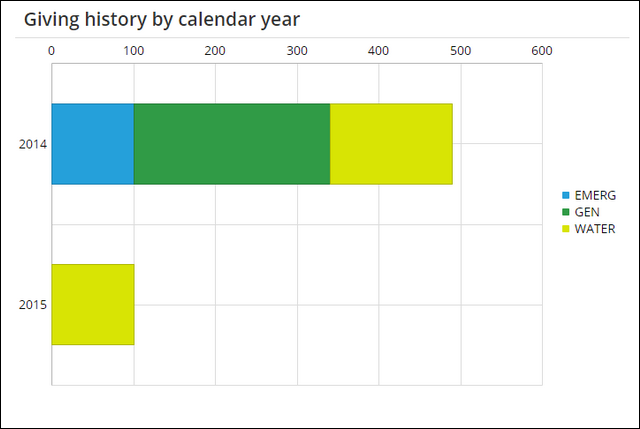
Bar - Horizontal
Displays sets of data with horizontal rectangular bars for comparison.
📘 Note
You can display multiple data values in a Bar - Horizontal chart.
You can also select Enable stacked series. This option allows related data to be stacked on the same data-point bar. This option is only available for Bar - Horizontal and Bar – Vertical charts.
📘 Note
A property in the Display tab of your query must have the checkbox checked in the Subtotal column in order for the Enable stacked series checkbox to appear in the Query Chart Viewer content item.
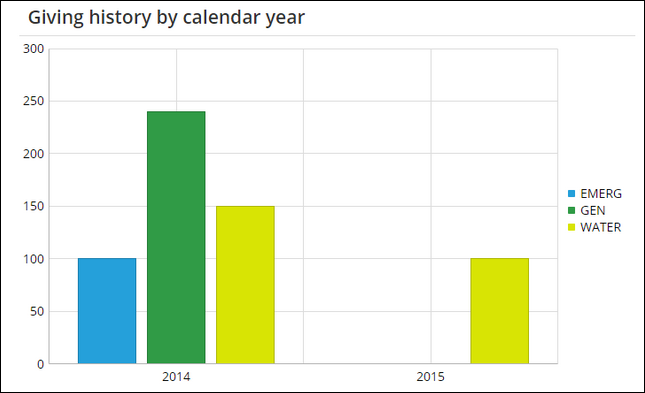
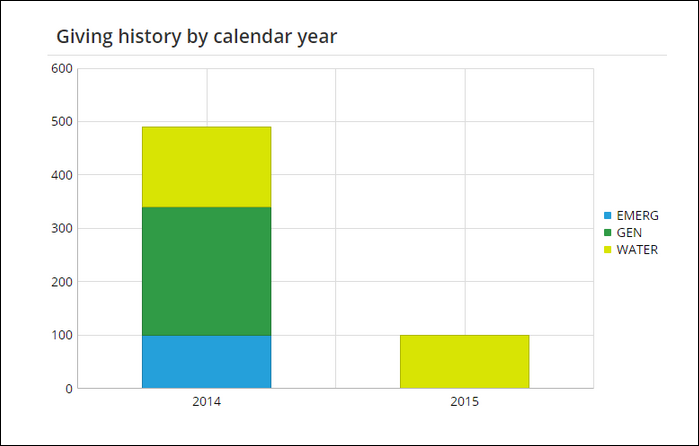
Bar - Vertical
Displays sets of data with vertical rectangular bars for comparison. For example, create a vertical bar chart that shows the number of contacts in your organization by customer type.
📘 Note
You can display multiple data values in a Bar - Vertical chart.
You can also select Enable stacked series. This option allows related data to be stacked on the same data-point bar. This option is only available for Bar - Horizontal and Bar – Vertical charts.
📘 Note
A property in the Display tab of your query must have the checkbox checked in the Subtotal column in order for the Enable stacked series checkbox to appear in the Query Chart Viewer content item.
Bubble
Displays data as a series of bubbles.
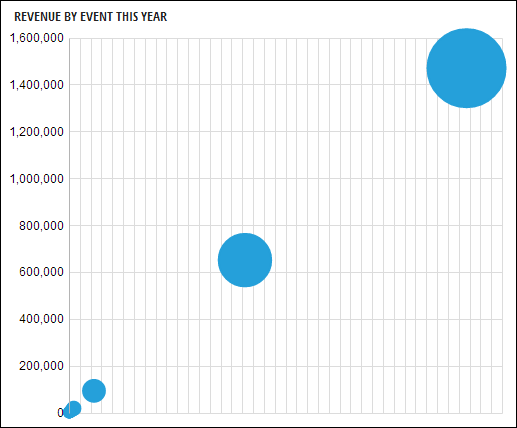
📘 Note
You cannot assign a size value to the bubbles in the Bubble chart.
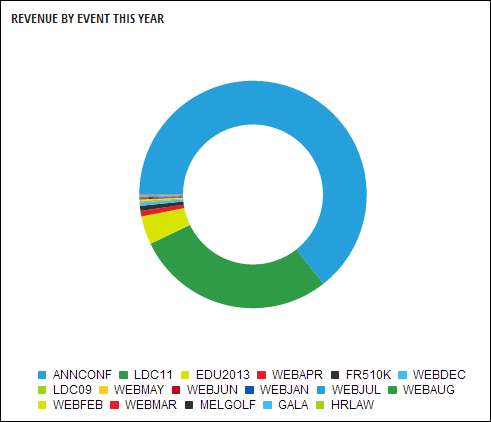
Donut
Functionally identical to a pie chart, with the exception of a blank center and the ability to support multiple statistics at once.
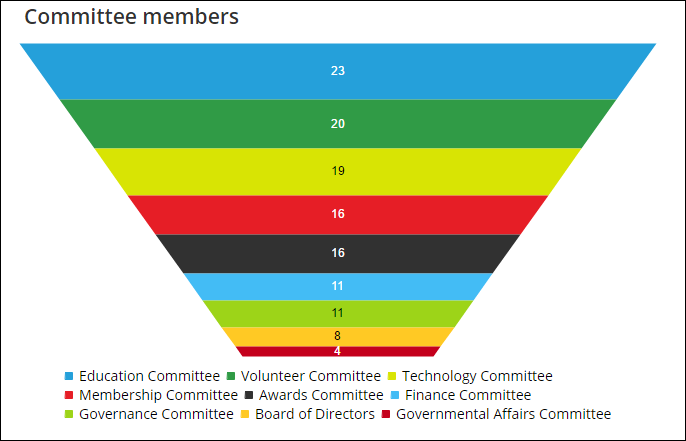
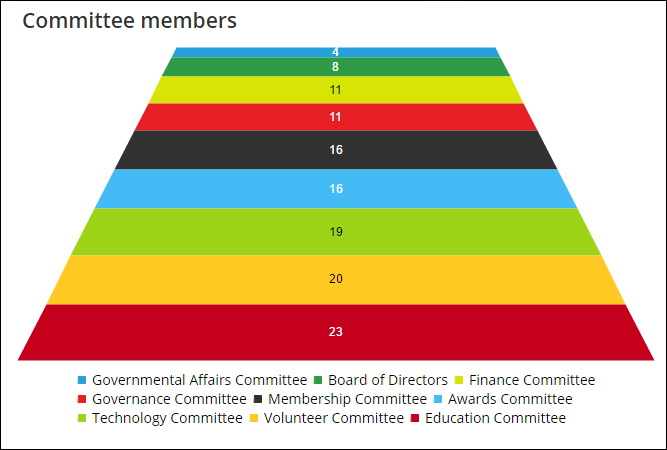
Funnel
Displays data in descending order to create a top-down funnel. Adjust the width and height to change the size of the chart.
Line
Displays data as a series of data points connected by a line to illustrate trends. For example, create a line chart that shows the number of contacts in your organization by customer type.
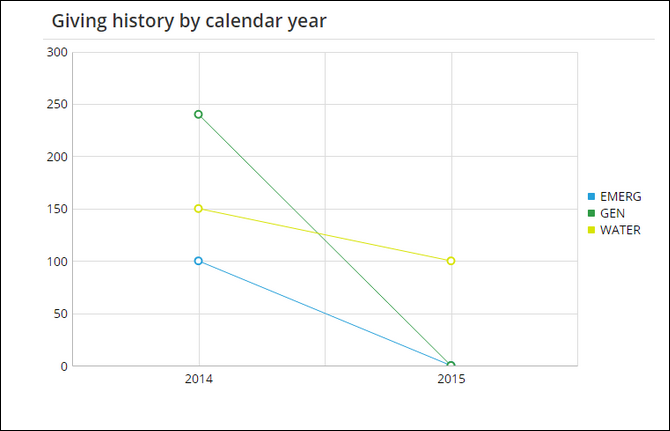
📘 Note
You can display multiple data values in a Line chart.
Pie
Displays data in a circular chart divided into sections to illustrate proportion.

Pyramid
Displays data in ascending order to form a pyramid shape. Adjust the width and height to change the size of the chart.
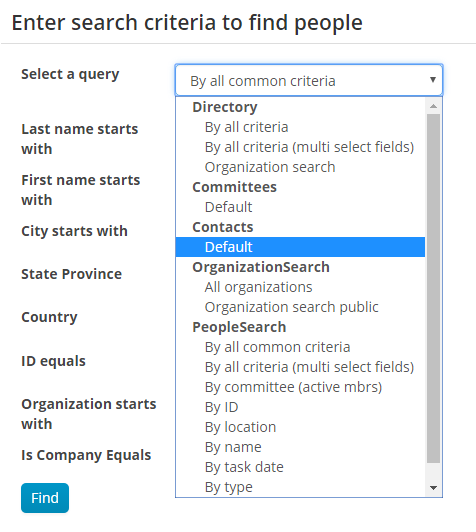
Query Menu
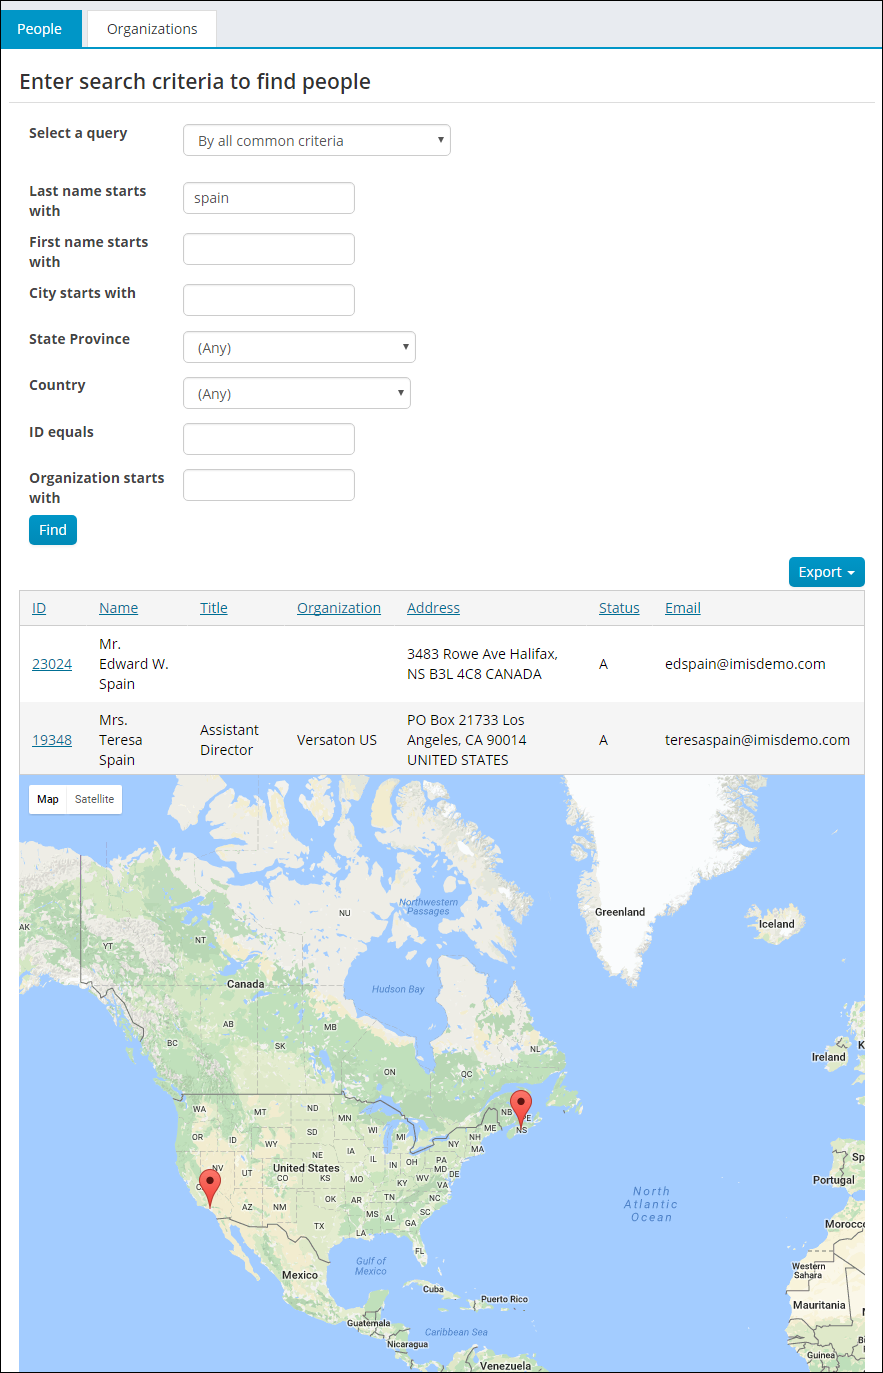
The Query Menu content item allows you to merge query results into your site for tremendous utility. You can configure the content item to display a query's title, parameters, columns, and labels. You can enable the query results to be exported, allowing data to be opened with several different applications.
📘 Note
Query Menu results exported to Excel are stored as text; this includes numeric data. If you wish to convert numeric data from text to numbers for a desired operation, the data will need to be manually formatted.
This content item can be found out-of-the-box in the Staff site at Community > Find contacts.
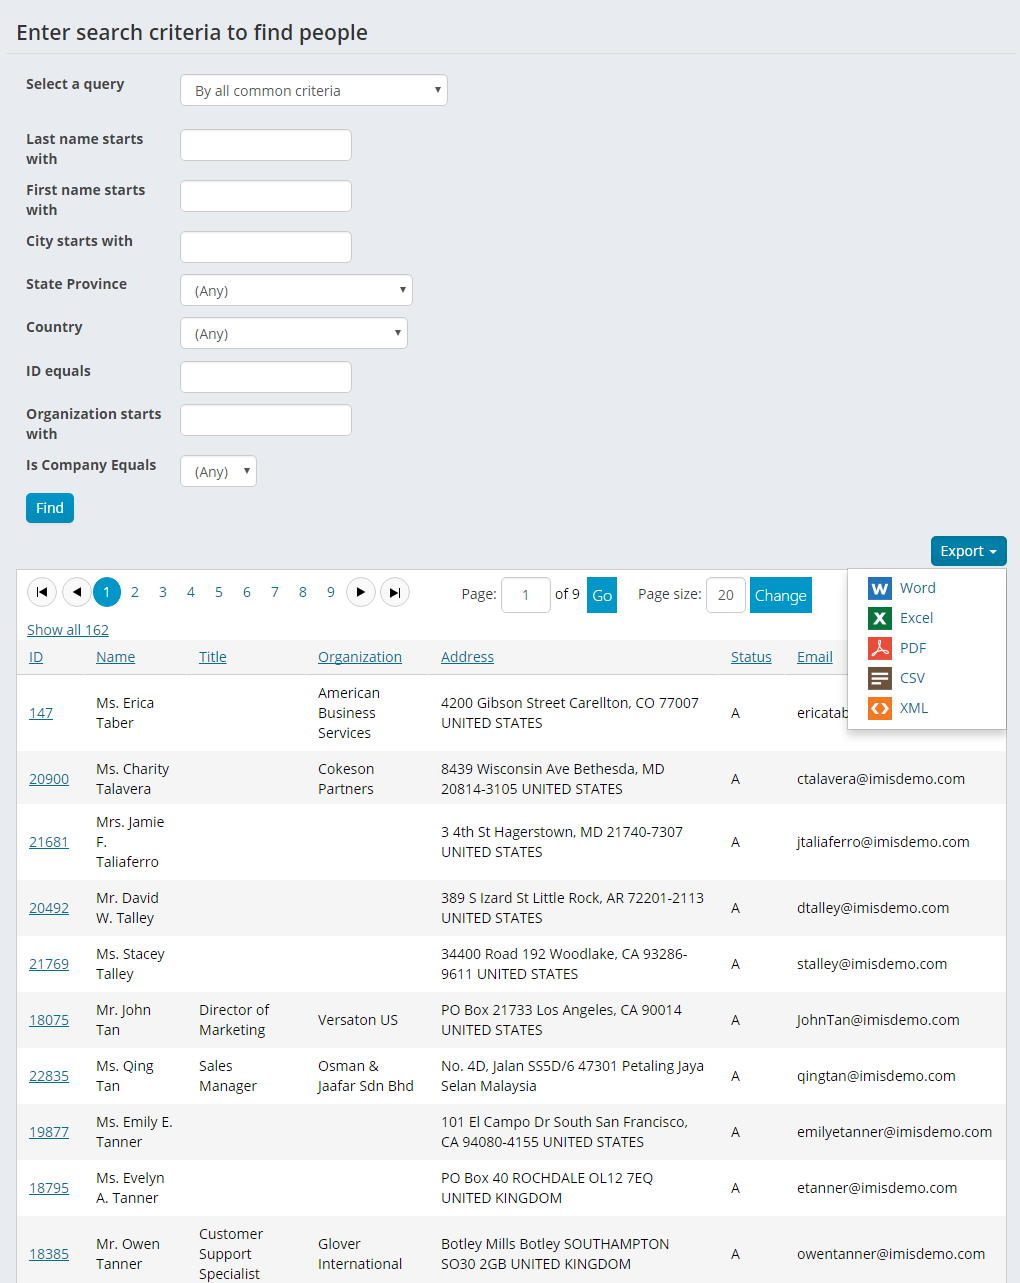
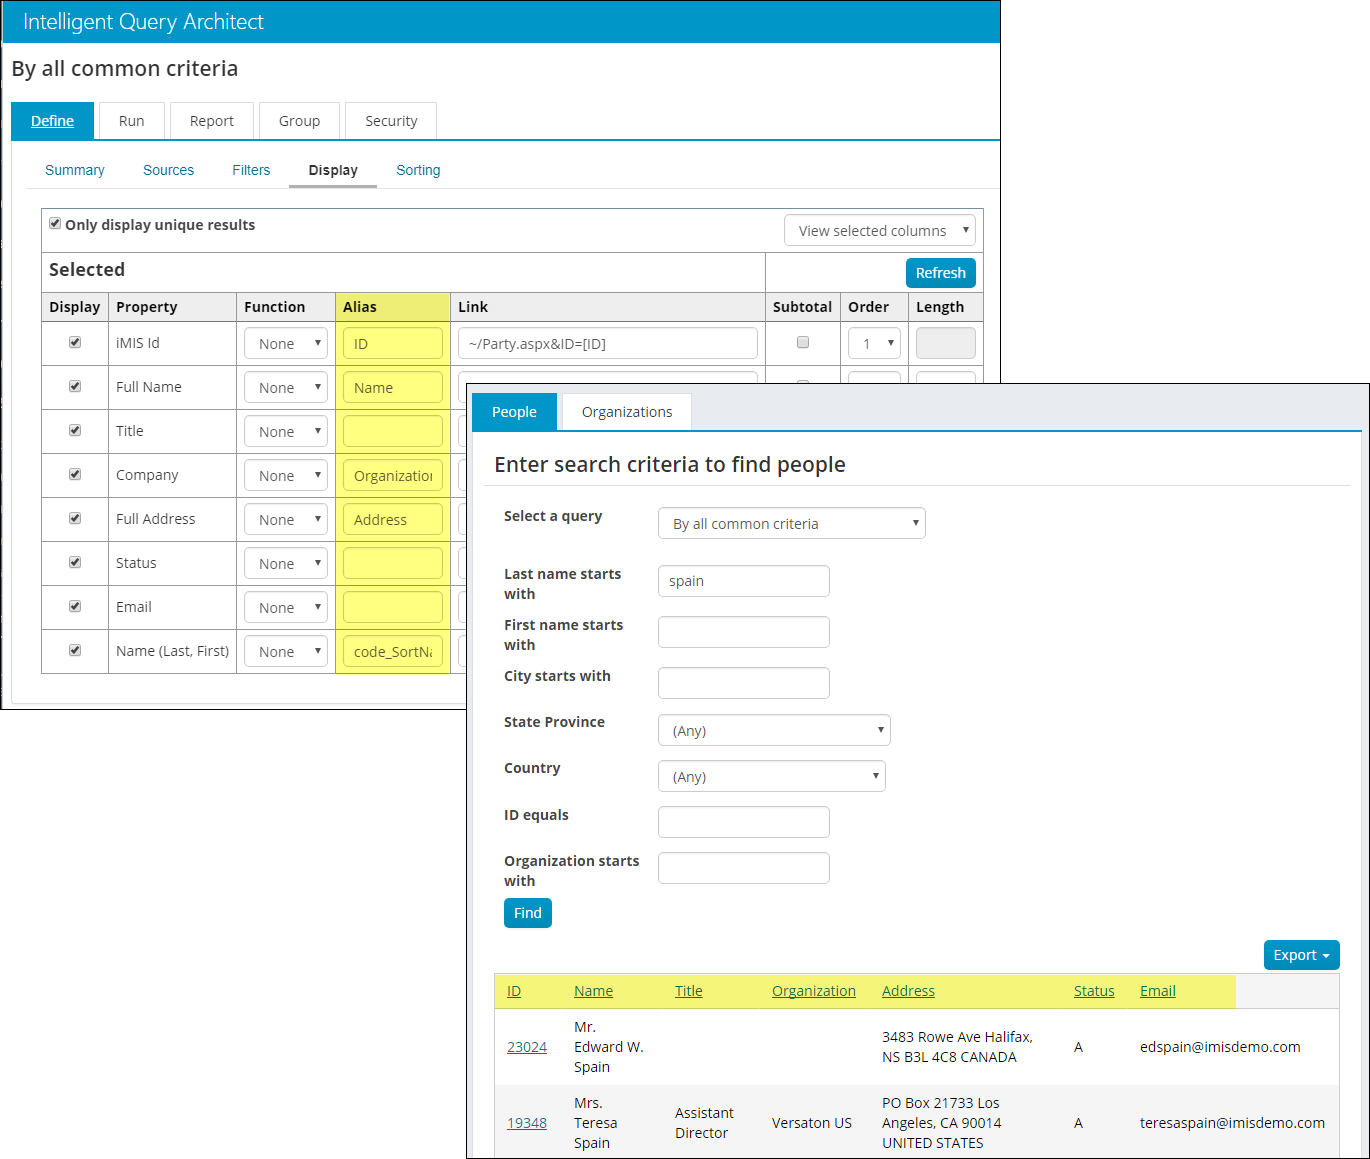
Changing the query column headers
The column headers that display can be overwritten by entering a value in the Alias column for the query properties.
Automatically displaying query results
You can configure the Query Menu content item to automatically display query results by enabling the Show initial results for queries with optional filters option. However, if your query requires at least one value, or contains a required prompt, this option, even when selected, will not automatically display the query.
Emailing the returned list of contacts
If the query selected returns contacts, the Query Menu provides the ability to send an email to all of the contacts using the Communication Creator content item. You can use the Email button in the Query Menu to email the entire contact list if the query contains a required Id column or column alias. You must be a staff user to use the Email button. Non-staff users do not have access to the Email button.
See Creating a list of contacts to email to view a list of columns and column aliases that you can use to enable mass emailing of the contact list.
Mapping the contact list using Google Maps
If the query selected contains an address property, you can configure the content item to automatically map the query results when an address is available. Only one address property per query can be mapped. When this option is enabled, the content item looks for the following address properties in this order and maps the first one it finds: FullAddress, Address, FullAddressText, AddressText, Address Text, and Full Address Text.
📘 Note
The Google Maps API key (Settings > RiSE > Quick setup) must be defined in order for the map to properly load. To learn how to obtain a Google Maps API key, see the Google Maps API documentation.
Pointing to an entire query folder
You can also organize helpful queries into a folder and point the content item to that folder. When the page loads, the content item displays the first query at the top of that folder, and it presents a drop-down menu of additional queries available, organizing them by subfolders, if any. When the user clicks on a query from the menu, the content item immediately runs that query and displays the results.
Query Profile Picture List
This content item has been deprecated. Instead, use the Related Items content item.
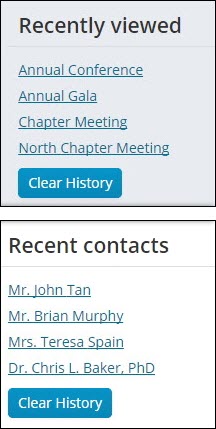
Recent History
The Recent History content item shows a list of recently viewed items and allows all users to quickly review and access items that have been recently viewed such as events and contacts.
The Recent History content item is available on the following pages in the Staff site out-of-the-box:
- /iCore/Staff_Dashboards/Membership/Membership_dashboard
- /iCore/Staff_Dashboards/Events/Events_Dashboard
- /iCore/Staff_Dashboards/Community/Community_dashboard
- /iCore/Staff_Dashboards/Volunteers/Volunteers_dashboard
When configuring this content item, you can choose the types of recent items you would like to include from a drop-down. You can also specify the maximum number of items to display.
Related Items
With the Related Items content item, you can display a list of profile or product pictures based on the results of an IQA query. For example, you can write a query to display the profile pictures of everyone who has registered for an event, made a donation, or ordered a particular product, or to display products in the same category. You can configure the list to display horizontally or vertically, to display a name for the item, and to choose the size of the image. You also have the option to make the profile picture a live link that opens a URL of your choosing, such as the member profile page.
Guidelines for working with theRelated Itemscontent item
- The pictures displayed in the content item are based on iMIS product or contact IDs. When creating the query for this content item in IQA, you must select a property that returns an iMIS product or contact ID on the (Display tab). Give this property an Alias of key_Id (the Alias is case sensitive).
- To define the image to display for each record, include a column in your query that specifies the image file name for that record. Give this property an Alias of Image.
- To display a name for each record, include a column in your query for the name of the item or contact. Give this property an Alias of Name.
- When you add Display columns to the query in IQA, they become available within the content item as Filter columns to filter on.
- You can dynamically filter the query results displayed in the content item based on the value of another content item’s URL parameter. For example, you can set up your donation page to display the profile pictures of people that have donated to a particular cause (called a gift item in iMIS). Donation Creator uses the URL parameter itemid to determine which gift item the donation should go towards. If you add your content item to the same content record as the Donation Creator, then you can set up the Related Items content item to look at the value of itemid to determine which profile pictures to display. You just have to make sure that your query includes the CsActivity.Product Code property, so that you can select it as a Filter column on the content item’s configuration page. Once selected, enter itemid for the Filter on URL parameter, so that the content item knows to filter the results based on that URL parameter’s value.
Example: Display other products in the same category
In this example, the Related Items content item is set up to display clickable images for other products in the same category as a particular product. This example uses content installed for the sample Member site.
- Go to Page Builder > Manage Content.
- Click Core Content > Shop > Store Layouts > Item Detail.
- Select Add content > Utility > Related Items.
- For the Source query, click select. Navigate to $ > Samples > RelatedItems and select Related Products.
- Filter Options drop-down, select ProductCategory. ProductClassKey.
- Filter on URL parameter, type in Category.
- For the Items link to (URL or shortcut), type in:
ItemDetail?iProductCode={key_Id}&Category={ProductCategory}This uses the ItemDetail shortcut to link each item in the list to the product page. The particular item’s product ID and category are specified in URL parameters so that the correct product and related products are displayed in the resulting product page. - Click Save & Publish to complete the content record.
📘 Note
The Item Detail content record displays product pages in the Member sample site’s Shop. The product displayed is based on the value of the URL parameter iProductCode. iProductID.
Example: Display other users who have purchased a product
In this example, the Related Items content item is set up to display clickable profile pictures of other users who have bought a particular product. This example uses content installed for the sample Member site.
- Go to Page Builder > Manage Content.
- Click Core Content > Shop > StoreLayouts > Item Detail.
- Click Add content > ContentTypes > Utility > Related Items.
- For the Source query, click select. Navigate to $ > Samples > QueryProfilePictureList. Select Orders.
- Filter column drop-down, select ProductCode.
- Filter on URL parameter, type in iProductCode.
- For the Items link to (URL or shortcut), type in:
MBR/Party.aspx
This redirector web page looks for an ID in the URL parameter and then checks the ID’s party type and the user’s permissions to determine which content record to display. The user’s ID is appended to any URL specified in this field. - Click Save & Publish to complete the content record.
📘 Note
The Item Detail content record displays product pages in the Member sample site’s Shop. The product displayed is based on the value of the URL parameter iProductCode.
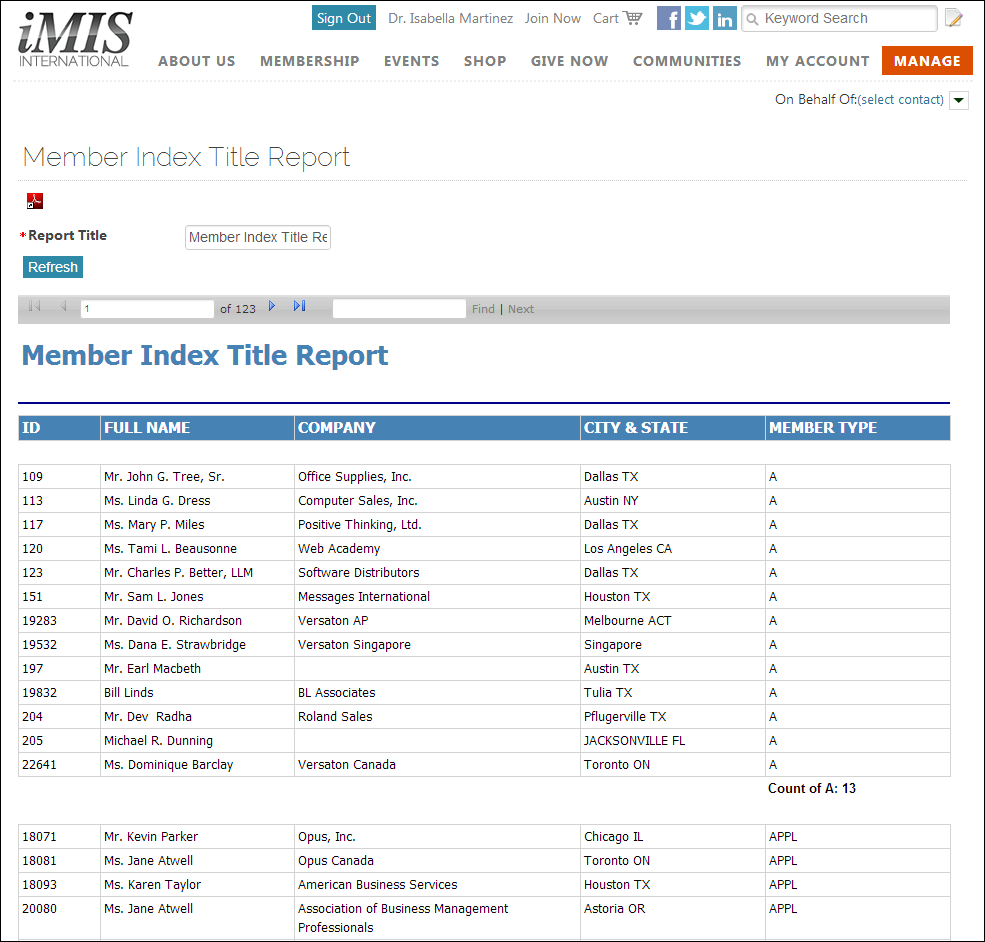
Report Display
The Report Display iPart displays an SSRS report using an RDL template stored in the iMIS Document system. This is different from the SSRS Report iPart, which requires you to begin with an IQA source query and requires an SSRS runtime object. The Report Display iPart permits you to create reports outside of iMIS or pull in already-existing reports by simply adding an RDL to the Document system.
📘 Note
The Report Display content item is designed to be on a page by itself. Adding the Report Display content item to a page with other content items will cause the page to break.
If the Limit users who can view data for other contacts option is enabled, the Report Display iPart checks for the existence of an ID parameter in the URL, and then determines whether the logged in user has read access for that ID. Authorized users include staff and Company Administrators for a group to which the contact belongs. If the Limit users who can view data for other contacts option is disabled, the system security settings determine whether a user must be logged in to view information for other contacts.
The Limit users who can view data for other contacts option requires the following:
- An ID parameter in the URL.
- An ID parameter in the report.
- The Inspect query string for parameters option is enabled.
Social Share
Users can easily bookmark or share pages with social networking sites such as Facebook, Twitter, and LinkedIn. Clicking a social share icon opens a separate browser to the selected social media site, and prompts the users to log in to their account. Clicking the email icon opens the users default email client.
With this content item on a page, it is easy for users to share your content across the web. For example, add the content item to a donation page so that donors can easily promote your cause to their friends.
SSRS Report
The SSRS Report content item lets you display the results of any IQA query on any page where you place it. SSRS Report uses the version 10.0 ReportViewer, which supports IE8 natively and, in IE8, adds a Print button on its toolbar. You can add the SSRS Report content item to any content page using CM: open the Utility folder and choose the content type SSRS Report.
This content item lets you customize whether to display the export buttons for PDF and Excel versions of the report. You can change the default design (layout, colors, fonts) of your reports by editing the SSRS parameters in the SystemConfig table.
How it works: The process engine specified by the content item loads a report template (.RDL file) from the document system and creates a report data source (a DataTable) based on an IQA query's SQL source; the report viewer then combines the template and query to generate the report's output. When you configure the content item, you specify the Document system path to the SSRS Report runtime, which must be a link to an SSRS Process Engine. Click the select link next to the textbox, then browse to your reports (such as $/Samples/ReportingServices), and pick one of the runtime entries.
📘 Note
Identify a process engine (run-time report) by the arrow on its icon!
Summary Display
The Summary Display content item displays a single row of query results in a form view. This content item can be seen on the out-of-the-box Giving tab on the Member site.
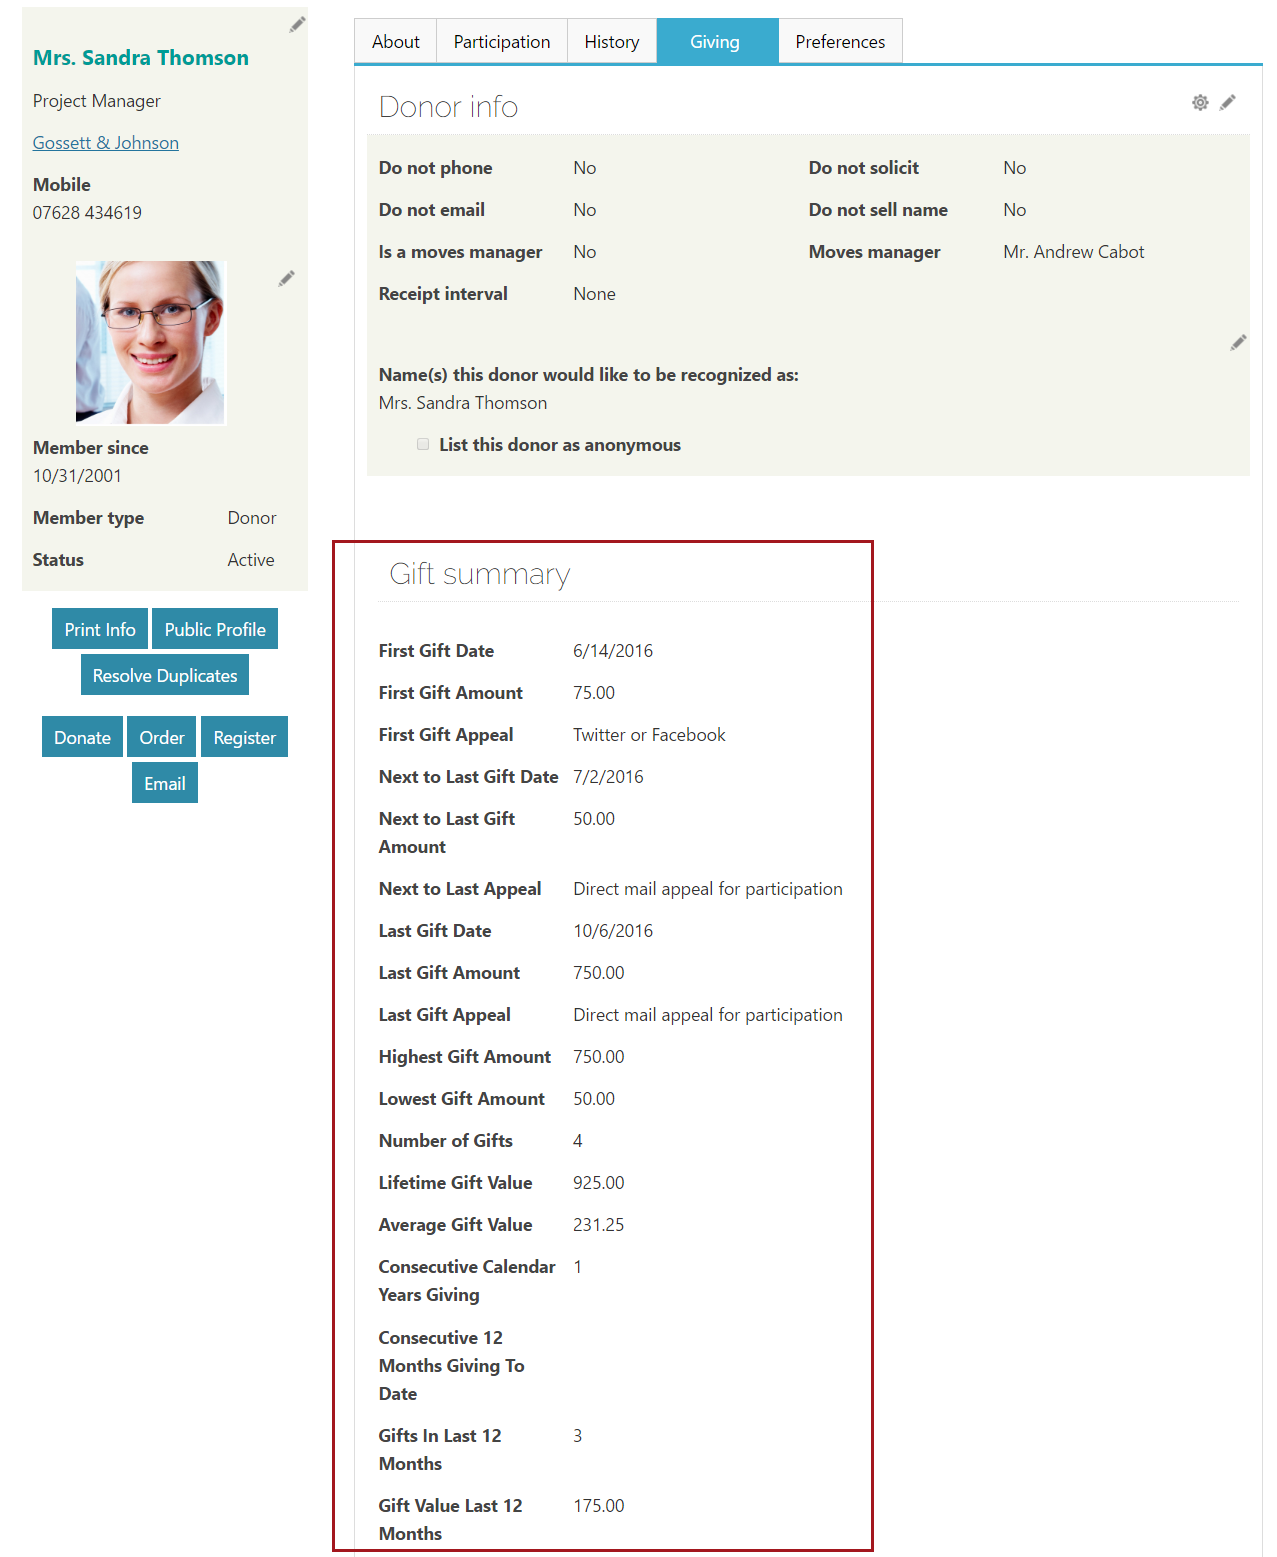
When creating a query that you want to display in the Summary Display content item, keep the following guidelines in mind:
- This content item only displays a single row of query results.
- If you connect the content item to a query that returns more than one row of results, only the first row is displayed.
- Selecting the Hide iPart when there is no data to display option hides the content item if no results are returned by the query.
- Fields without data can be hidden by selecting the option Hide individual fields with no data to display.
📘 Note
You can dynamically filter your query results by the currently logged-in user, a selected contact, or a date. See Adding dynamic filters to queries for more information.
YouTubeVideo
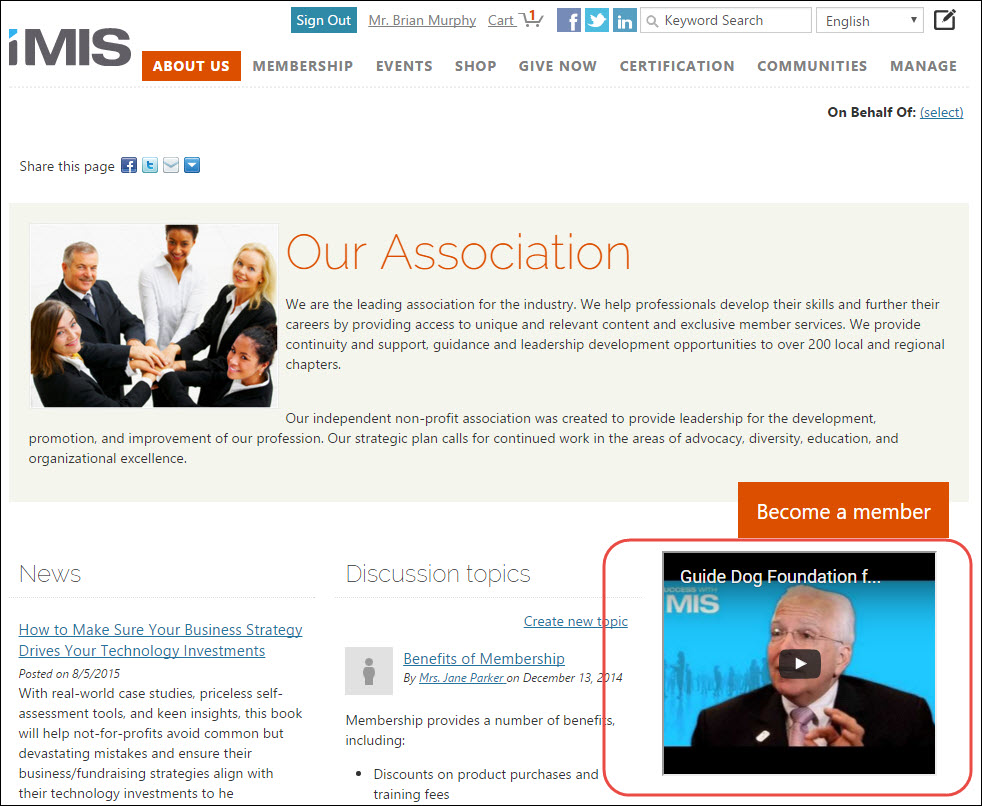
The YouTubeVideo content item displays a single YouTube video in an embedded video player. Users can configure the content item to play a video automatically, hide the embedded video player's controls, and define the height and width of the video when displayed in a content record.
In the content item configuration options, users can specify the URL to their YouTube video. The video URL should link to a single YouTube video (Public or Unlisted). Private videos are allowed, but viewers must sign in to YouTube in order to view the video. Viewers must have the Adobe Flash Player plugin in order to view the video.
📘 Note
Disable the Hide video player controls option to allow viewers to start and stop the video, control the volume, and turn captions on or off.