Defining basic campaigns
Campaign Management helps your campaign staff set up and manage "basic" campaigns easily. For the purposes of this document, basic campaigns:
- Contain few appeals and related solicitations
- Generally use only one or two source codes per appeal
- Use the Select and Send model – Select the target audience from the iMIS database or an external list, send communications to that audience, and track incoming responses
With Campaign Management, campaign staffers can:
- Plan and define basic campaigns
- Create and send appropriate communications material
- Monitor campaign performance
What must be done before you can start?
You cannot set up a basic campaign until the following setup tasks are complete:
- Define setup options for all campaigns
- Set up security groups for campaigns
Putting it all together
The process of basic campaign management includes the following actions:
- Plan the campaign
- Define the campaign
- Define source codes
- Define the appeals and solicitations in the campaign
- Specify communications efforts
- Monitor and measure performance
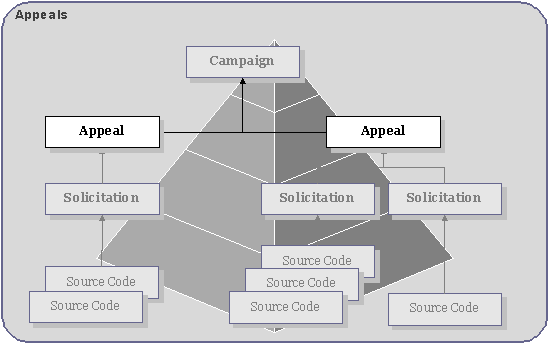
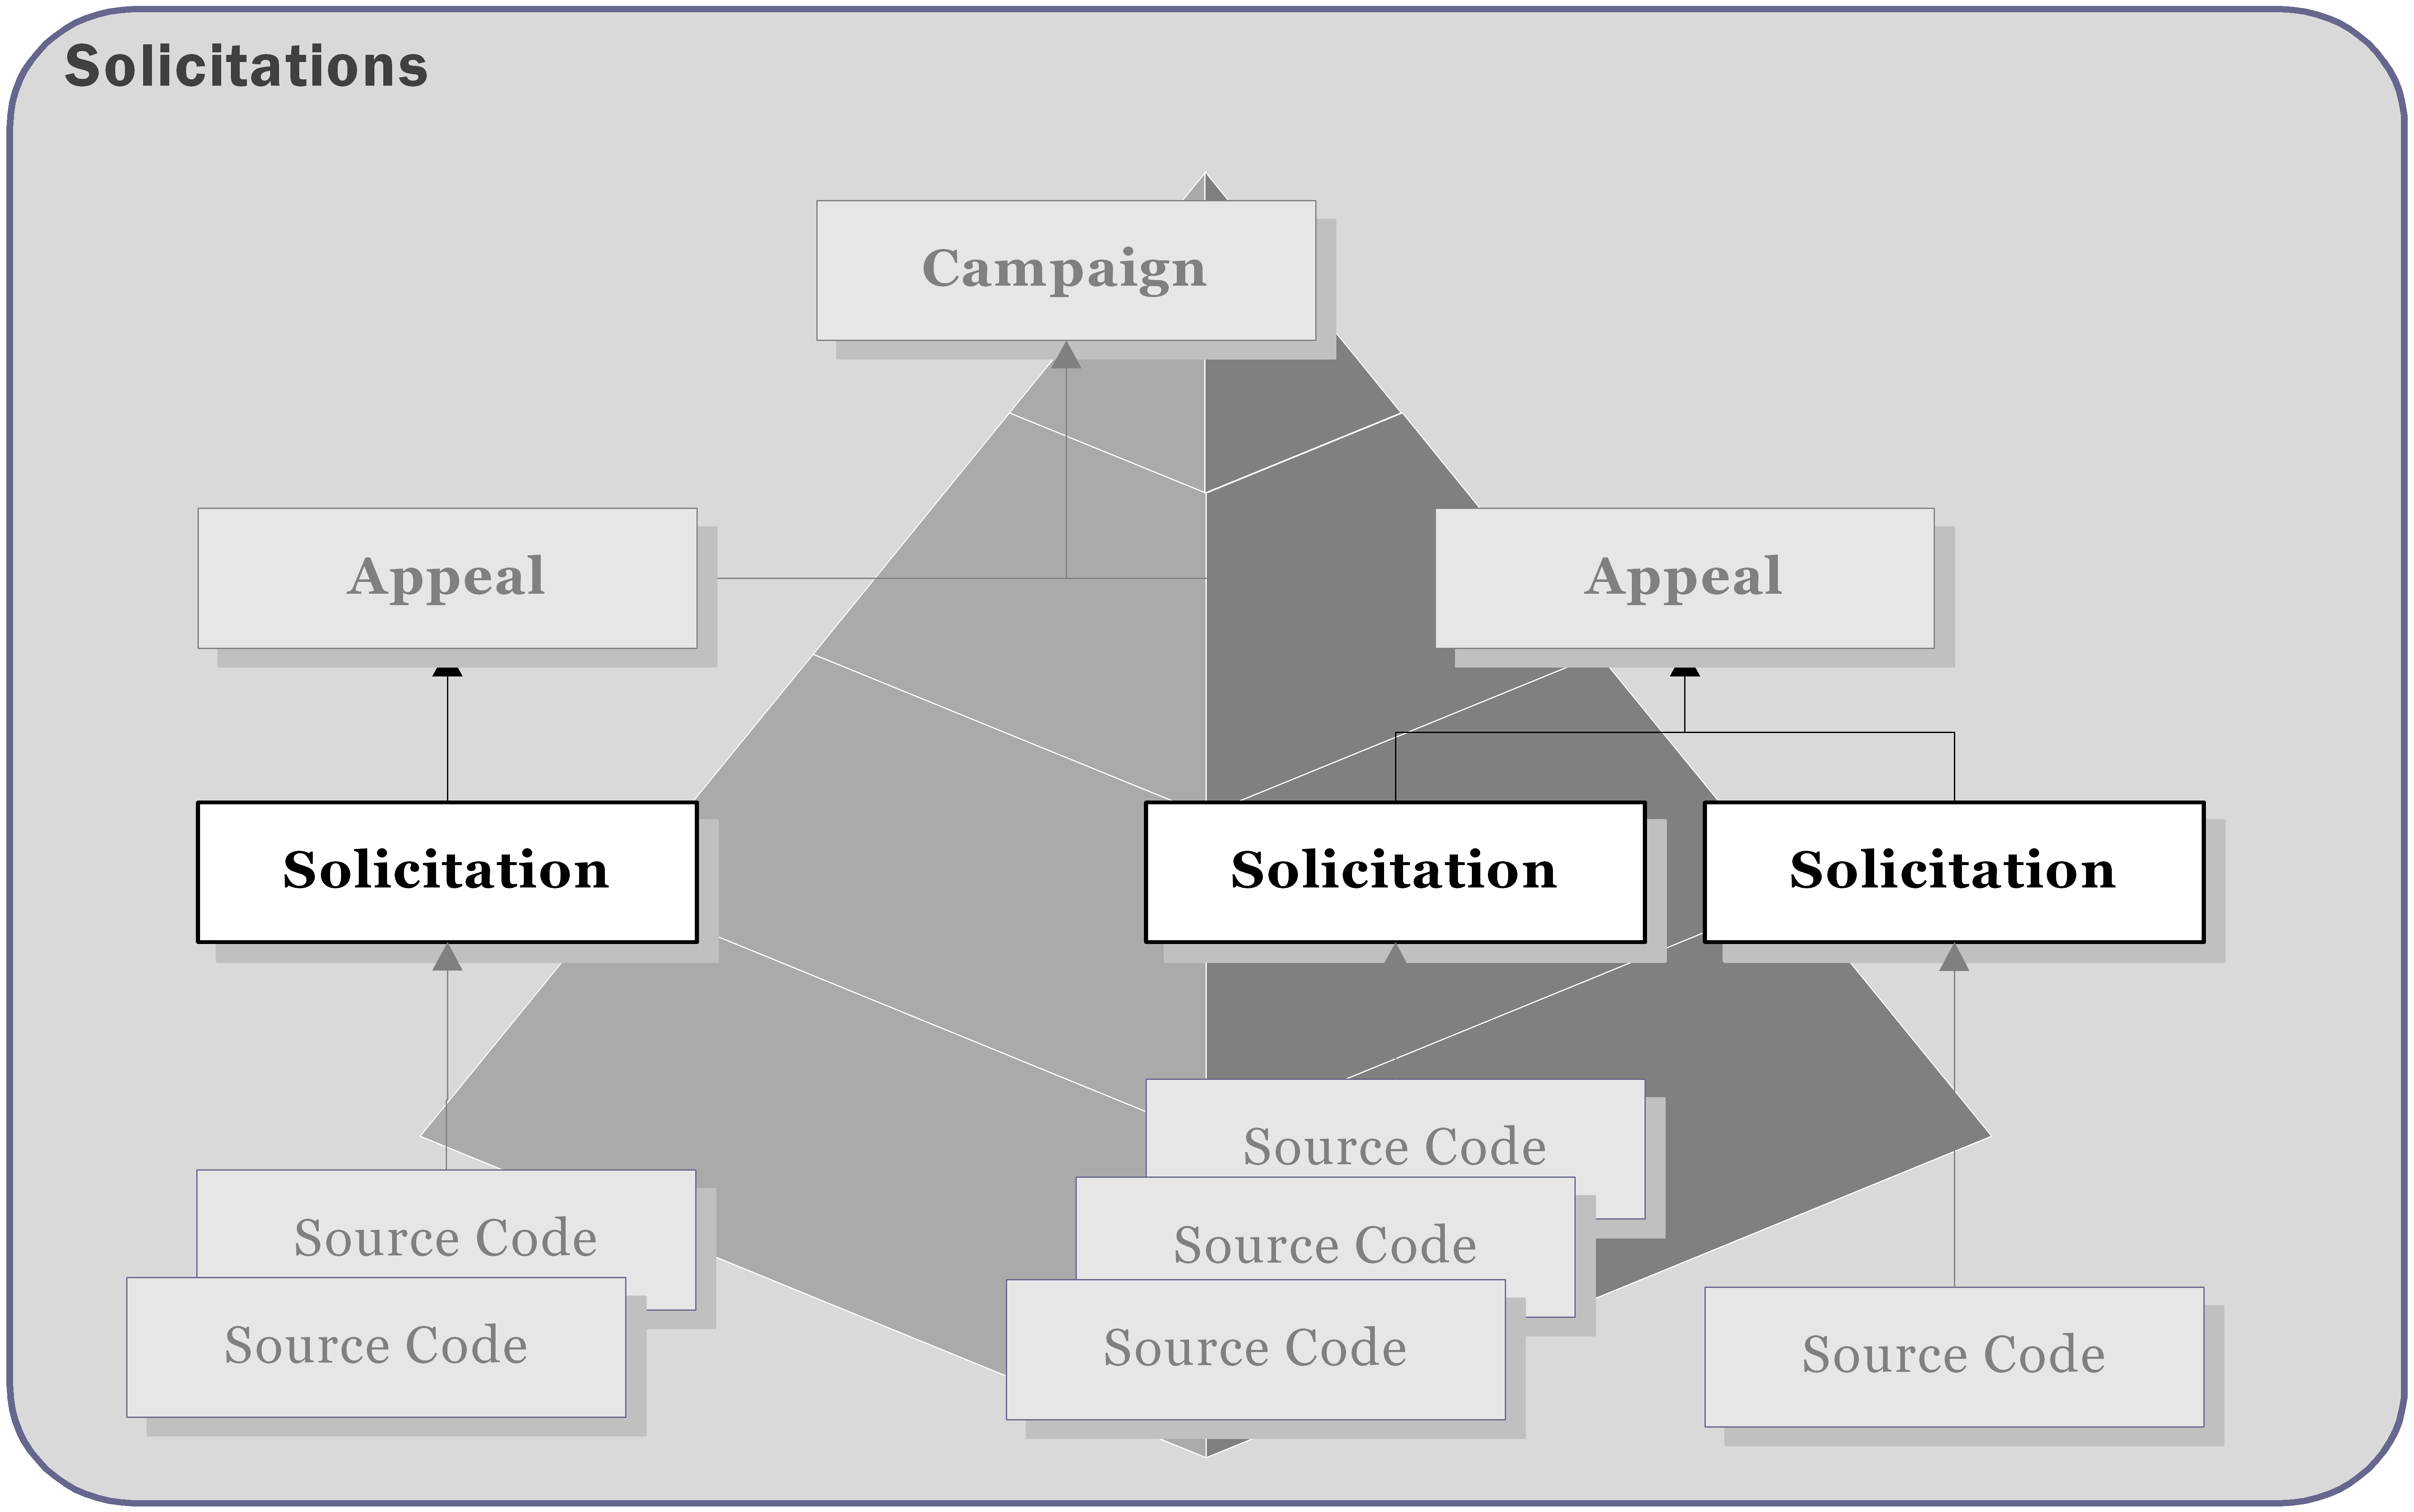
Campaign hierarchy
Campaign Management uses a hierarchical system to give you the flexibility to manage campaigns at the level of detail you require. The four levels are:
- Campaign – A strategy to accomplish a single marketing goal. The campaign is the highest level of organization and measurement.
- Appeal – Each major marketing effort of a campaign, usually associated with a drop date (the date the effort is sent out). Appeals are the building blocks of your campaign.
- Solicitation – A communication effort sent to a targeted group. Solicitations can be sent as letters, email messages, phone calls, or other means.
- Source Codes – Numbers assigned to each possible response for a specific solicitation (such as reply cards, phone calls, donations, or purchases). Your organization tracks responses with these numbers to measure the effectiveness of each solicitation. Source codes are the most granular level of measurement in a campaign.
Viewing campaigns
Campaign Management provides you the flexibility to view campaign information in a variety of ways. You can choose to:
- Filter campaigns by desired criteria
- Sort campaign lists by name or date
- Change the default sort order
- View the campaign structure to the level of detail you need
To filter campaigns by criteria
- From Marketing, select Campaigns > Define campaigns. By default, iMIS displays all Active campaigns for which you have security access privileges.
- Choose a query filter, if desired.
- Click a column header to sort by that column.
- Select the campaign you want to view. The campaign overview displays. The tabs along the top of the campaign display information about the campaign:
- The Summary tab displays general information about the campaign.
- The Profile tab displays general information for editing.
- The Source Code tab displays a listing of source codes used in the campaign and provides a link to create additional source codes.
- The Appeals tab displays the appeals associated with the campaign.
- The Security tab displays access levels for defined security roles.
📘 Note
To change the default sort order when appeals are listed, edit the query named "(Default)" in CampaignManagement/DefaultSystem/Queries/CampaignAppealsList/. However, you cannot edit the query to change sort order if solicitations or source codes are displayed.
To view campaign details
- From the Staff site, go to Marketing > Campaigns >Define campaigns
- Select the campaign you want to view.
- On the Summary tab, you can:
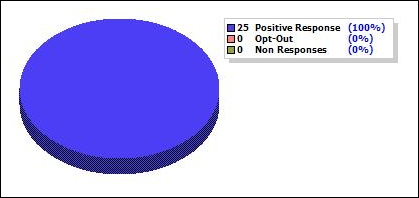
- View up-to-date statistics for total revenue collected, first and last response dates, average transaction amount, and the response rate.
- View a summary of basic information about the campaign included status, start and end date, dates of the first and last responses, and lowest and highest response amounts.
- View a pie chart of the types of responses.
- View responses by Source Code.
- Click the source code tab to access information about a specific source code.
Planning the campaign
By planning your campaign carefully, you and your staff can perform efficiently and effectively. The planning process includes:
- Setting goals for the campaign.
- Defining campaign components and hierarchy.
- Defining the budget and cost tracking, if any.
- Identifying targets.
- Specifying marketing efforts.
- Defining campaign performance measurement.
Your campaign might be an isolated, one-time-only campaign, or part of an annual or multiple-year strategic plan. Factor this into your planning.
Setting goals for the campaign
The goals and objectives for your campaign are unique to your organization. A goal is a simple statement that expresses what you want to do, such as:
- Increase the number of new donors
- Enroll new members
- Sell a new product
- Solicit advertisers for your periodicals
- Get a message out
An objective then states a measurable amount, such as:
- Increase new donor count by 5%
- Enroll 150 people
- Sell 2,000 units
- Increase ads placed by 15%
- Contact 15,000 prospects
You might set response rate goals, enrollment goals, sales goals, or budget goals. Knowing this information in advance can help you determine how best to set up your campaign.
Defining campaign components and hierarchy
A campaign is an organized set of appeals that you create to accomplish your marketing goal. The campaign can consist of one or many appeals and solicitations.
Tips on defining campaign hierarchy:
- Use appeals to split your campaign into major efforts.
- Define one or more solicitations for each appeal by target group, message, or delivery method.
- Assign one or more source codes to each solicitation to track responses.
- Create unique names at all levels: each campaign, each appeal within a campaign, each solicitation within an appeal, and each source code within a solicitation. The naming convention might be by department, type of campaign, year or quarter, or other meaningful methods.
Defining cost tracking data
In marketing campaigns, costs are tracked to calculate metrics such as Net Revenue, Cost per Thousand, Revenue per Thousand and Return on Investment. The cost of a campaign includes the overall operational costs of the campaign and the individual costs of each "package" that is sent.
Operational costs
Operational costs include any items that are applied to the entire marketing effort, such as:
- Paper
- Printing
- Letter shopping
You can track these costs at the appeal or source code level. In a basic campaign, you will probably define few source codes. In this case, it is effective to track operational costs at the source code level.
However, you may choose to track operational costs at the appeal level if you are managing a complex campaign with dozens or hundreds of source codes.
Package costs
Package costs include any items that are applied to the actual insert or package, such as:
- Postage
- Outer envelope
- Business reply envelope
- Business reply device
- Telemarketing costs
These costs are tracked at the source code level.
Identifying targets
Getting the right message to the right person at the right time is critical to the success of your campaign. With iMIS Marketing, you can target prospects with simple or sophisticated tools. By precisely defining target markets, you can refine campaign messages with great accuracy. And you can measure the response rate to the messages for specific groups of people.
Think about which factors should be included and which should be excluded for each targeted group. You will use these factors to define the segment of prospects that you will be targeting for each solicitation.
Plan for the cases where customers 'opt-in' and 'opt-out' of different marketing activities. After the targeted message is delivered, the prospect will or will not respond. iMIS Marketing gives you the power to define and manage processes for either case.
Some organizations use external lists to identify targets for their campaigns. External lists are brokered with individual list agreements that govern how the list can be used and for how long. Sometimes lists are given to the organization with all names and contact information attached. Other times, lists are used once and the organization only sees the contact information when the customer responds.
Planning communications efforts
Plan the efforts you will use to communicate with contacts or prospects. Each effort can be a combination of brochures, email messages, promotional goods, or whatever items you deem necessary. Define the contents and drop date for each package.
In addition, plan how you will communicate among the team and among your organization. Are there specific reports that will be useful for staff? Will you need to send email messages to the team upon completion of certain tasks?
Defining campaign performance
Measuring the success of your campaign will help improve your next marketing effort. Each time the cycle repeats itself, you become more efficient at honing your message and delivering the right message to the right person at the right time. As a result, you are able to set ever higher goals for your organization.
iMIS provides you with analysis, workflow design, and communications tools to optimize the marketing cycle throughout your organization. Effective analysis allows you to target your time, energy, and budget to those pursuits, which are most likely to be profitable.
The iMIS database stores all of your important transactional, historic, and demographic data, giving you the power to prioritize the data and present it to stakeholders in a meaningful manner.
Make sure you define how you will track data to determine performance. Some suggestions:
- Run counts and statistics on your database before you start the campaign to define your starting point.
- Specify your predicted response rate.
- Determine the metric you will use to show success.
- Synchronize responses regularly. This helps you stay up-to-date with metrics.
Defining marketing campaigns
After you plan the campaign, you are able to set up the campaign structure efficiently.
Business Goals
To define a campaign:
- Enter basic information such as name, status, and start date.
- Designate the general type of campaign. Use the defaults or custom types designed for your organization.
- (optional) Enter predicted information, such as end date and predicted response rate.
If there is an existing campaign in place, you can create a new campaign quickly by copying it (cloning it) and editing it. See To clone a campaign.
If you delete a campaign, appeal, solicitation, or source code, all the lower levels of the hierarchy will also be deleted, regardless of status.
To create a campaign
- From Marketing, select Campaigns > Define campaigns.
- Click Add a Campaign.
- Define the campaign:
- Enter a Campaign Name and Campaign Code.
- (optional) Enter a Status (Active or Inactive).
- If the status is changed from Active to Inactive, the status of all child entities is set to Inactive.
- If the status is changed from Inactive to Active, the status of child entities is not affected.
- The status of a child entity cannot be changed to Active if any parent entities have an Inactive status.
- The status of a source code cannot be changed to Active if the campaign has an Inactive status.
- Enter a campaign Type:
- None
- Annual – A campaign that occurs every year
- Designated – Funds generated by the campaign that are committed to a specific entity
- (optional) Enter a Start Date and an End Date.
- (optional) Enter a Predicted Response Rate (the estimated percentage of contacts that will respond to the appeal) and the Last Response Date.
- (optional) Enter a Description.
- Click Save.
To clone a campaign
A cloned campaign is an exact duplicate of the original campaign with the following exceptions:
- The Name and Campaign Code are different.
- The Created Date equals the copy date.
- The Created By field equals the user who copied the campaign.
- The Start Date,End Date, and Reminder Date are adjusted automatically for the copied campaign.
- The copy has the same structure as the original campaign, including all appeals, solicitations, and source codes.
- All copied source codes contain the same inserts and messages as the original campaign.
- Source lists are not copied.
- If Campaign Management is configured to assign source codes automatically, all new source codes are regenerated automatically.
- If Campaign Management is configured to assign source codes manually, all new source codes are formatted as 'Copy of (original code).' If this code already exists, the code is copied until a unique code is found: 'Copy (sequence #) of (original code).'
To create a new campaign quickly, you can clone an existing one and edit it.
- Select Marketing > Campaigns > Define campaigns.
- Select a campaign.
- Click Save As.
- Enter the new campaign Name, Campaign Code, and Type.
- Click Save.
To edit campaign security settings
Default campaign security settings are set up when iMIS Marketing is set up. However, if you are authorized, you can grant specific users and/or groups access to a campaign.
- Select Marketing > Campaigns > Define campaigns.
- Select a campaign.
- Click the Security tab.
- Select an Access Mode:
- Share (Everyone) – Grants everyone full control.
- Private – Grants full access to those assigned to the project.
- Advanced – Enables the Access Mode drop-down list and allows you to edit the access list. You can select one of the listed access areas or select Custom to choose from a list of defined security roles.
- Click Save.
Tracking costs for campaigns
To track costs at the Appeal level
- Select Marketing > Campaigns > Track campaigns.
- Click Show / Hide Appeals and open an appeal.
- (optional) Click the Profile tab and click the plus sign next to the Overhead Cost field.
- Add an additional cost and click Save.
To track costs for an insert
- Select Marketing > Campaigns > Define inserts.
- Select an insert.
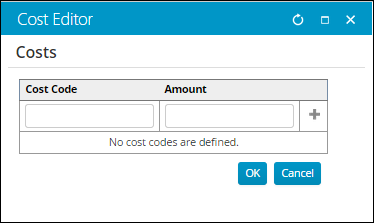
- Click the browse icon next to Total.
- Enter a value in the Cost Code and a cost per piece in the Amount.
- Click + for each cost code you want to add.
- Click OK to save the values. Confirm that the Total on the Insert window now shows the sum of the values entered on the Costs pop-up.
Tips
- Operational costs should be tracked at the Appeal or Source Code. The choice of tracking overhead costs at the Appeal or Source Code level is made in Marketing > Campaigns > Settings.
- Package costs include any items that are applied to the actual insert or package: Those are tracked with the insert costs.
- Overhead Costs refer to any cost that is applied to the mailing or marketing effort as a whole. These costs tend to be difficult to break down on an item by item or cost per piece basis. You want to be able to track the costs against the appeal as a whole rather than trying to break out the costs against different source codes. This is especially true when you have multiple source codes within a marketing effort.
- Some costs apply only to a particular Source Code or part of a marketing effort, such as list rental costs or the difference between different packages sent. Even if you choose to track overhead costs at the Appeal level in your Marketing > Campaigns > Settings, you still have the option to be able track those additional costs. They are tracked as part of the package attached to the source code.
Defining campaign appeals
The appeal level is the anchor that binds the different elements of a marketing campaign.
An appeal is the level of a campaign where you:
- Link specific products to the campaign
- Assign drop dates for media and other efforts
- Track costs, if desired
Important prerequisites to defining appeals:
- You must have a campaign set up before you can add an appeal.
- Make sure that all products are created before you link them to an appeal. The purchase of these products will be tracked to help you measure the campaign's success.
Business goals
To define appeals for your campaign, you will:
- Link specific products to the campaign. Your campaign might include physical products such as apparel, books, and documents or non-physical products such as event functions, gifts, and pledges.
- From the Staff site, set up the products in the appropriate area before assigning them to the campaign.
- Fundraising events: Events > Add event
- Gifts and pledges: Fundraising > Add gift item
- Physical products: Commerce > Add product
- Add the products to the appeals in the campaign.
- (optional) Set up minimum required gift amount to receive each product.
- From the Staff site, set up the products in the appropriate area before assigning them to the campaign.
- Assign drop dates.
- The definition of drop date depends on the media involved:
- Direct mail – Date the post office starts to deliver the mailing
- Telemarketing – Date the calls begin
- Media spots (TV, radio, webcast) – Date of airing
- Newsletters – Date of mailing, by issue
- Online campaigns – Date the email messages are sent
- Drop dates for other efforts can include:
- Mailing list generation
- Creative concepts/artwork complete
- Response management process set up
- The definition of drop date depends on the media involved:
- Track costs (optional). If your organization tracks operational costs at the appeal level, you will need to enter cost information when you set up the appeal.
Next step: You will define solicitations as the different messages or groups of responses.
To create an appeal
- Select Marketing > Campaigns > Define campaigns.
- Select the appropriate campaign.
- Click the Appeals tab.
- Click Add an Appeal.
- Define the appeal:
- Enter a Name.
- Select a Status (Active or Inactive).
- If the status is changed from Active to Inactive, the status of all child entities is set to Inactive.
- If the status is changed from Inactive to Active, the status of child entities is not affected.
- The status of a child entity cannot be changed to Active if any parent entities have an Inactive status.
- (optional) Enter an Overhead Cost, or click the plus icon to add multiple costs.
- (optional) Enter a Start Date and an End Date.
- (optional) Enter a response rate next to Predicted Response Rate (the estimated percentage of contacts that will respond to the appeal) and the Last Response Date.
- (optional) Enter a dollar amount for a Target Revenue value.
- (optional) Enter a Description.
- Click Save. The system displays the status on the Summary tab. Click on the link for more details.
To assign a product to an appeal
- Open a campaign.
- Click the Appeals tab and select an appeal.
- Click the Products tab.
-
Select a Query to view:
- All Products
- Products By Code
- Select the desired products. The added products display in the list of Selected Products.
- Click Save.
📘 Note
When you delete a product after it has been assigned to an appeal, the Products tab displays only the product code of the deleted product.
Applying a premium against an appeal
You can apply a premium against an appeal code to establish rules about which premium is given for a specific gift amount. For example, a gift of $10 will provide a key chain, a gift of $ 25 will provide a mug. Appeal premiums are created and assigned to products on the Appeal Premiums window in the Advanced Accounting Console.
Do the following to apply a premium against an appeal:
- In the Advanced Accounting Console, go to Settings > Fundraising > Set up tables > Appeals.
- Highlight an appeal.
- Click Premiums.
- Click New on the Appeal Premiums window.
- Enter a Product Code. This is the product associated with the Appeal premium. The Premium option must be enabled on the Manage Products window for the product to appear in this list (Home > Commerce > Enter and edit products).
- (optional) Select Automatic Premium. This controls options on the Enter and edit gifts window:
- If enabled, the premium will automatically attach.
- If disabled, the Show all premiums option is available and you can attach a general item from inventory.
- Click Save.
📘 Note
To display the Premiums button in the Appeals window, you must enable Allow Premiums as Products (Settings > Fundraising > Configure fundraising options).
Defining solicitations
A solicitation is an organizing function that allows you to track responses by targeted groups. The solicitation is a series of source codes that requests a response from contacts and prospects (such as a reply, donation, or purchase). Using source codes, you create solicitations to target a specific marketing appeal for different groups of contacts and prospects. Solicitations can be in the form of letters, phone calls, personal conversations, or other methods of contact.
Solicitations can be:
- Message-based – The message is divided into different letter contents or package concepts. For example, if a mailing has an inexpensive package that will be sent to contacts who are least likely to respond, you can set up one solicitation for the less expensive package and a separate one for the more expensive package.
- External group-based – Different messages are sent to targeted groups of contacts.
- Internal group-based – Different messages are sent by different groups within your organization.
Organizations with multiple source codes within their organization probably need to measure responses in groups of source codes as well as at the source code level itself. See Setting up complex campaigns.
To create a solicitation
Before you begin you must define one or more appeals before you define solicitations.
- Select Marketing > Campaigns > Define campaigns.
- Select a campaign and then select an appeal.
- Click the Solicitations tab.
- Click Add a Solicitation.
- Define the solicitation:
- Enter a Name.
- Select a Status (Active or Inactive).
- If the status is changed from Active to Inactive, the status of all child entities is set to Inactive.
- If the status is changed from Inactive to Active, the status of child entities is not affected.
- The status of a child entity cannot be changed to Active if any parent entities have an Inactive status.
- (optional) Enter a Start Date and an End Date.
- (optional) Enter a Display Predicted Response Rate (the estimated percentage of contacts that will respond to the appeal), Description, Reminder Date, and Last Response Date.
- Click Save. The system displays the status on the Summary tab. Click on the link for more details.
Tips
- Combine multiple source codes and list sources into a single solicitation.
- Use consistent naming conventions when creating solicitations.
Specifying communication efforts
Business goals
To define a communications effort for a campaign, you will:
- Define source codes.
- Create inserts.
- Create or select target groups (source list).
- Select a source list (who is selected to receive the message) and an insert (what will be sent) for each source code.
- Generate output.
Defining source codes
Source codes are the most granular level of measurement in Campaign Management. These codes are used to identify messages you send out and track the responses to these messages. Source codes are linked to reply devices such as postcards, website links, donations, and purchases.
Use sources codes to:
- Tag the marketing message for each targeted group and to track the responses.
- Use questions such as "How did you hear about us?" to identify the message or call to action that prompted the response.
- Set up codes for bounce-backs and responses that cannot be linked to a specific message.
There are three general kinds of source codes:
- Codes assigned to outgoing marketing efforts to track the incoming responses to the effort. Sometimes a contact receives more than one solicitation from your organization in a certain time frame.
- Generic codes that are assigned to ongoing passive ways in which a customer can support your organization, such as web transactions, word-of-mouth, or calls to action.
- Codes that are assigned to capture responses when the actual source code is not known.
Important prerequisites for defining source codes:
- Define one or more solicitations.
- Set up source lists.
- Create an insert for the source code.
Tips for defining a source code:
- Use consistent naming conventions when creating source codes. Your administrator can set up automatically generated source codes that follow your organization's standards.
- To ensure accurate response data, do not edit a source code after the responses are processed.
To create a source code
- Open a campaign, appeal, and solicitation.
- Click the Source Codes tab.
- Click Add a Source Code.
- Define the source code:
- Enter a Code (if not automatically generated).
- Select the Source Code Status (Active or Inactive).
- (optional) Enter a Description.
- Select the List Member Type:
- Contact – Queries contain the NetContact business object.
- Prospect – Queries contain the Prospect business object.
- (optional) Enter the Predicted Response Rate, Last Response Date, and Last Drop Date.
- (optional) Select the Source Code Type:
- RunOnce – The source code will be used only once.
- RunMany – The source code will be used more than once.
- ExternalList – The source list is an external file. Enter the External File Name and External List Count.
- Click Save.
To view a source code:
- Open a campaign.
- Click the Source Codes tab.
- Click a source code link. You can view information on two tabs:
- The Summary tab displays general information about the source code.
- The Profile tab allows you to edit information about the source code, such as code, status, target revenue, and description.
Defining inserts
Inserts are the physical items you send to contacts and prospects, such as letters, pre-printed collateral, and envelopes. After you create an insert, you can reuse it in other campaigns.
Typically, a source code is linked to each insert item. Multiple inserts (such as letter, brochure and envelope) are combined into a single package for delivery. All responses to the solicitation are then tracked by the source code. This is a useful way to perform market testing because you can choose the most effective creative package or target a test group to receive the package.
In addition, you can track the cost of each insert to determine the return on investment and to monitor budget amounts.
Output processes
To further customize an insert, you can assign queries and output processes that generate customized letters, email messages, faxes, labels, participant lists, and physical file formats in a specific order.
To create an insert
Make sure all applicable queries and output processes are set up.
- Select Marketing > Campaigns > Define inserts.
- Click Add an Insert.
- Define the insert:
- Enter a Name.
- (optional) Enter a Description.
- Click the Browse icon for Total cost information.
- (optional) Select the Status (Available or Unavailable) and Insert Type:
- None
- Brochure
- Envelope
- Form
- Postage
- Browse to select an Output Process.
- Click Save.
Tips
Merges used for inserts must use either the Contact or the Prospect business object as a source.
📘 Note
You can also create a new insert for a solicitation by clicking the New Insert button while viewing the solicitation. 📘 Note
When output is generated from Campaign Management using a project process engine, the query and source code specified in the campaign automatically override the query and source code specified in the project process engine definition.
Selecting target groups
Use one or more source lists to identify a targeted group for your message. Basic campaigns typically use one or more of the following types of source lists:
- Lists from previous campaigns – Stagnant lists for repeat audiences. You could use lists of all contacts who were solicited in a previous campaign or only those who responded.
- Queries – Dynamic lists that can change with criteria that you specify. You can choose from queries that are set up in your system or you can create new ones.
- External lists – Purchased prospect lists from other businesses or organizations.
Complex campaigns often use Segmentation to compile lists of contacts. See About Segmentation.
- Make sure all applicable queries are defined.
- Create all applicable segmentation jobs and definitions.
- Create multiple source lists for use with single source codes.
To create a source list
- Open the campaign.
- Select a source code.
- Click the Source Lists tab. (If the source code uses an external list, the Source Lists tab is not available.)
- Under Add Source List, choose the Select Type:
- Segment Definition – Select a segmentation job.
- Solicitation Response – Select a campaign.
- Query – Select a stored query.
- Click Save.
📘 Note
Throughout Marketing, NetContact is a required business object. Make sure that you include NetContact when you create source lists using queries.
Generating marketing output
Run output processes to generate customized letters, email messages, faxes, labels, participant lists, and physical file formats in a specific order. Running the output process also calculates the non-responses for each appeal. The following output processes are available:
- Email merge – Send email messages to contacts.
- Campaign list export – Generate a list of contacts for an external service or for mass email output.
- RFM definition – Rank records based on Recency, Frequency, and Monetary value.
- Project process outputs – Generate projects for further relationship building.
Important prerequisites for generating output
Before you run output processes:
- Make sure valid output process types are set up.
- We recommend you generate and check a test output to make sure the message and target group is correct.
Business goal
To run output processes, you will:
- Select the type of output process for the insert.
- Define the specific output process.
- Generate output.
- View the results.
To generate output
- Open a campaign, appeal, and solicitation.
- Click the Source Codes tab.
- Select a source code or create a new one.
- Click Save.
- Click the Inserts tab.
- Select an insert or create a new one.
- Click Save.
- Click the Source Lists tab.
- Select a source list or create a new one.
- Click Save.
- Click Generate Output.
- The system displays the status on the Summary tab. Click on the link for more details.
📘 Note
A new Type, Update campaign data, was added to the Actions tab in Process automation. This type can be used to create an automated task which can be set to run overnight, or fired manually, to update all related Campaigns, Appeals, Solicitations, and Source Codes after the Output generation occurs.
📘 Note
If the output is generated at a level higher than source code, output can be generated only once. If the output is generated at the source code level, output can be generated repeatedly.
Monitoring and measuring performance
Measuring the success of your campaign helps you improve your next marketing effort. Each time the cycle repeats itself, you become more efficient at honing your message and delivering the right message to the right person at the right time. As a result, you are able to set ever higher goals for your organization, such as acquiring more members, logging more donations, selling more products, or getting your message to a larger audience.
iMIS Marketing provides progress and performance feedback at many levels of the campaign. You can view a real-time summary of the campaign's performance, including:
- The progress of each solicitation, source codes that have been generated, and source codes that have been dropped
- The number and type of responses resulting from each solicitation
- The progress, response, and accumulated revenues/costs for each source code
- The actual revenues and costs compared to the target figures for each source code and appeal
- Performance information to guide future actions and campaigns
These powerful performance monitoring features are usually sufficiently rigorous for basic campaigns. For more complex campaigns, use RFM analytics.
Tracking responses
Campaign Management gives you the power to track different types of responses to a campaign. This allows your organization to:
- Maintain a history of all customer responses to marketing efforts and every message that was sent
- Define specific tasks that execute automatically when prospects respond or do not respond to solicitations
- Generate personalized emails, faxes, and letters based on user-defined settings
Responses to solicitations are captured automatically. All tracking areas are synchronized, upon command, to consolidate responses. This tracking information includes:
- Contacts associated with the source code
- Non-responses and opt-outs
- (optional) Financial transactions associated with the campaign (orders, events, gifts, pledges, billings)
Tip for tracking responses:
- If you plan to track product orders associated with the campaign, make sure all appropriate products are set up.
To track the responses to your campaign, you will:
- Enter orders and associate them with a source code.
- Synchronize responses.
- View the results file or the summary pie chart of each level of the campaign.
- (optional) Use communications tools to generate messages automatically when a response is received.
- (optional) Use Process Manager to kick off projects or processes associated with each type of response or target group.
Events responses
You can associate events with your campaign and track responses:
- Event responses are tracked through registration data, not through payment data.
- Registration for multiple event functions that have the same source code are counted as one response. Registrations for multiple event functions that have different source codes are counted as multiple responses.
Adding an event function to an event registration is counted as a response and affects all revenue and response attributes, such as response dates, response amounts, and response count.
Removing an event function from an event registration affects total revenue but does not affect other revenue and response attributes such as response dates, response amounts, and response count. Removing an entire event registration decreases response count and revenue.
Dues responses
You can associate payments with your campaign and track responses:
- Payments for multiple products that have the same source code are counted as one response. Payments for multiple products that have different source codes are counted as multiple responses.
- Cancelling a billing fundraising item decrements total revenue, but does not affect other campaign statistics.
If you change the source code for a payment after running response synchronization, the response is not updated.
Synchronizing campaign responses
Each time you synchronize responses, only those product sales that have occurred since the last time the process was run are processed.
If you synchronize responses for an inactive campaign, no responses are generated. If you change a campaign status to Active and then synchronize responses, only those responses entered after activating the campaign are recorded. iMIS ignores the responses entered when the campaign was inactive.
To synchronize responses:
- Select Marketing > Campaigns > Define campaigns.
- Click Sync. Responses.
- A status message displays noting that the responses are being synchronized.
- Go to RiSE > Workflow > Monitor processes to observe the synchronization's status.
📘 Note
Do not edit a campaign source code after processing responses for the source code.
Creating projects from Campaign Management
You can easily create projects that correspond to your campaign and manage them in Process Mgr. Create these projects by defining, editing, or selecting the following information for the new projects:
- A query
- A project process output
- A source code
To create projects from a campaign
- Select Marketing > Campaigns > Define inserts.
- Select an insert that already contains a project output process, or create a new one.
- Click the browse icon to select the Output Process or click the Processes tab and select New Insert to define a new process.
- For a new process, click the Sources tab and browse for the Source Data Query and Template Name. Click Save.
- Click OK.
- Click Generate Output.
- The system displays the status on the Summary tab. Click on the link for more details.
📘 Note
A new Type, Update campaign data, was added to the Actions tab in Process automation. This type can be used to create an automated task which can be set to run overnight, or fired manually, to update all related Campaigns, Appeals, Solicitations, and Source Codes after the Output generation occurs.
📘 Note
When output is generated from Campaign Management using a project process output, the query and source code specified in the campaign automatically override the query and source code specified in the project process output definition.
Acting on responses
You can easily set up your campaign so that specific tasks are generated when a prospect responds or fails to respond to a solicitation. This helps you to:
- Acknowledge positive responses
- Send a cross-promotional solicitation to positive responders
- Initiate reminders to prospects who do not respond to initial solicitations
- Make sure that prospects who opt out of the campaign do not receive further solicitations
To create a response stage
You can define response stages in the source code so a contact moves through campaign stages (solicitations) as they respond to solicitations.
- Open a campaign, appeal, and solicitation.
- Select the Source Codes tab and select a source code.
- Click the Source Lists tab.
- In the Add Source List area, Select Type of Solicitation Response.
- Select a campaign.
- For each campaign response stage:
- Select an Appeal.
- Select a Solicitation.
- Select a Source Code.
- Select a Comparison value (Equal or Not Equal).
- Select a response State:
- Solicited – Contact has been solicited but has not responded.
- SolicitedResponse – Contact has responded to a solicitation.
- UnsolicitedResponse – Contact has responded but was never solicited.
- OptOut – Contact has opted out of the solicitation and will be excluded from any future lists for this campaign, appeal, and source code.
📘 Note
If a source code is provided with the response, the system assumes the contact was solicited. - Click add.
- Select a Global Operator that applies to all solicitation state expressions (AND or OR).
- Click Save. The solicitation response displays in the Source Lists.
📘 Note
You can choose to automatically assign source codes to responses in Set up campaign module.
To view responses
Before you can view responses, you must:
- Create response stages
- Synchronize the responses
- Select Marketing > Campaigns > Record responses.
- Find the desired contact. The system displays a list of responses for that contact by source code, appeal, and campaign.
Example: Response actions
The following campaign is defined so that a response to Solicitation A (initial correspondence) automatically moves the contact into Solicitation C (thank you letter). After a period of time (or a non-response to Solicitation A), the contact automatically moves into Solicitation B (reminder). A response to Solicitation B automatically moves the contact into Solicitation C.
Basic campaign example: Professional conference
The following is an example of a basic campaign for a professional conference. This example follows the business goals for Campaign Management:
Planning the campaign
The ABBA professional society hosts a major conference each year. The goal of the Annual Conference Campaign is to recruit 20% more attendees than last year.
Overhead costs are tracked at the appeal level. For the first appeal, the first two solicitations have different creative concepts to test effectiveness. The more successful concept will be used for the brochure and conference signage. One source code is assigned to each solicitation.
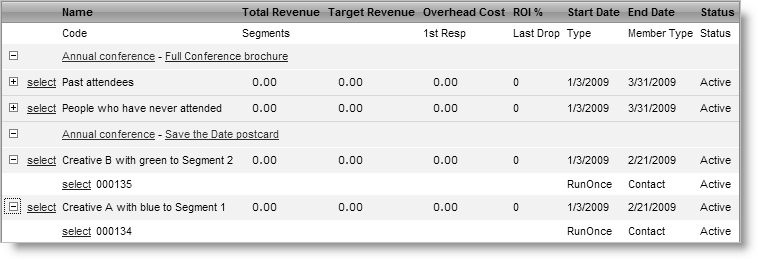
The hierarchy for this appeal is simple:
Campaign = Annual Conference
Appeal = Save the Date postcard
Solicitations = Creative A to Segment 1 (source code 000134), Creative B to Segment 2 (source code 000135)
First Mailing
The first mailing is a Save the Date post card. The goal is to get people to put the conference date on their calendar and to plan to attend. Because there is not a true call to action associated with this mailing, it is an ideal situation for testing a creative concept. There will be inquiries from:
- People who want to register right away
- Companies looking for sponsorship opportunities
- Companies looking for exhibitor opportunities
These inquiries indicate the more successful concept to be used throughout the campaign.
Second Mailing
After determining the more successful concept, ABBA incorporates the concept into the full conference brochure. The brochure contains sections on schedule, tracks, speakers, and entertainment options and is the most important mailing in the campaign.
The basic structure for this appeal is:
Click to view table
|
Campaign |
Appeal |
Solicitation |
Source Codes |
|---|---|---|---|
|
Annual Conference |
Full Conference Brochure |
Past Attendees |
000234: Attended last year 000235: Attended year before 000236: Attended earlier |
|
|
|
People who have never attended |
000334: Members 000335: Non-members |
So far, ABBA has a sound plan:
- The appeals help them separate out invoices for each mailing to determine the true return on investment for each one.
- Solicitations break down the mailings into logical and broad groups of records with varying estimated response rates. It is likely there will be a higher response rate from past attendees than from people who have never attended.
- Source codes further break down the groups for customized mailings and different estimated response rates. The source codes can be seen as declining levels of expected positive responses.
Defining the campaign
Campaign definition is straightforward:
- Name = Annual Conference
- Status = Active
- Start date = today's date
- Campaign type = Event
- Predicted end date = today's date + three months
Defining the appeals
Define each appeal:
- Name = Save the date postcard
- Status = Active
- Start Date = today's date
- End Date = today's date + three weeks
- Predicted Response Rate = 10%
- Name = Conference brochure
- Status = Active
- Start Date = today's date + 6 weeks
- End Date = today's date + 3 months
- Predicted Response Rate = 30%
Defining the solicitations
Define each solicitation similarly to the first one:
- Name = Conference Save the Date Postcard Creative A
- Status = Active
- Start Date = today's date + 1 week
- End Date = today's date + 1 month
- Predicted Response Rate = 5%
Specifying communication efforts
This is the point at which the target groups, inserts, source codes, and packages are defined.
- Select target groups
- ABBA will use the same lists as last year: Segment 1 and Segment 2.
-
Create inserts
- Create inserts for each mailing similarly to the first one:
- Name = Annual Conference Template_NS_Segment1
- Status = Active
- Insert Type = None
- Create inserts for each mailing similarly to the first one:
- Define source codes
- The inserts will be attached to a source code and combined as packages for each mailing. Set up source codes similarly to the first one:
- Code = 000134
- Description = Segment 1
- Status = Active
- Predicted Response Rate = 7.5%
- Target Revenue = $7500 (from attendees who want to register immediately)
- Source Code Type = Run Once
- List Member Type = Contact
- List Type = Segment Definition
- Add Segment 1
- Attach insert to a package: Add Conference Save the Date Postcard Creative A.
- The inserts will be attached to a source code and combined as packages for each mailing. Set up source codes similarly to the first one:
- Generate output
- Generate output for the first appeal to produce labels for the postcards and to ensure that responses will be tracked:
- Open the appeal and generate output.
- Output process = Postcard labels (from list of available choices)
- Repeat for the second appeal when appropriate.
- Generate output for the first appeal to produce labels for the postcards and to ensure that responses will be tracked: