Entering membership payments
As you enter a payment, iMIS automatically completes certain tasks:
- Updates the product open item (if any)
- Moves the Paid Thru date forward by a preset period (when paid in full)
- Creates the proper activity history records
Entering a full payment
You can apply full payments to the open balance line items in the product payment priority order.
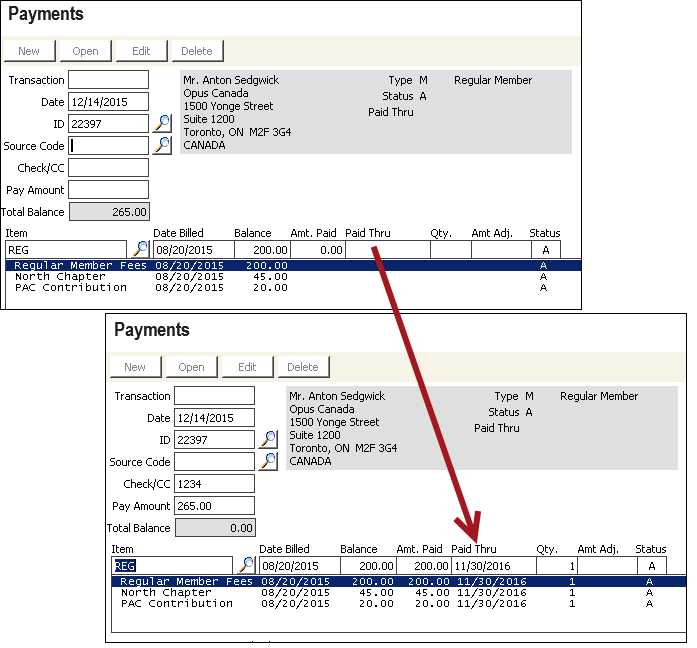
Entering a full membership billing payment
- In the Advanced Accounting Console, go to Membership > Payments.
- Click New.
- (optional) If batch control is enabled, select or create a new batch for the payment transaction. Close the Open Batches window.
- Enter the customer ID. If you do not know the customer ID, select the lookup icon in the ID field to look up the customer in the database. The window displays any line items associated with the customer ID and the total outstanding balance.
- (optional) Enter the Source Code that prompted this payment and press Tab.
- In the Check/CC field, enter the check or credit/debit card number, then press Tab. For credit/debit cards, enter the required card information.
- Enter the amount of the payment in the Pay Amount field, then press Tab.
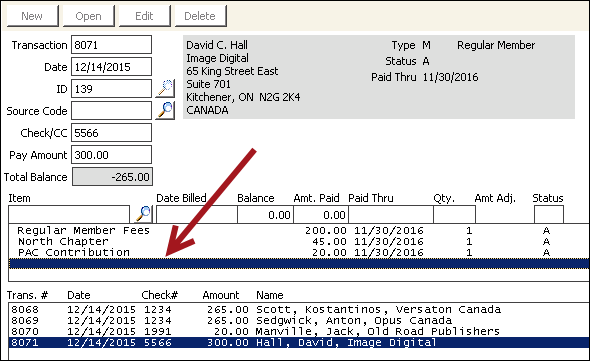
- Click Save. Verify that the payment information is updated on the member's content record:
- From the Staff site, go to the member's content record.
- Click the History tab.
- Review the Billing history.
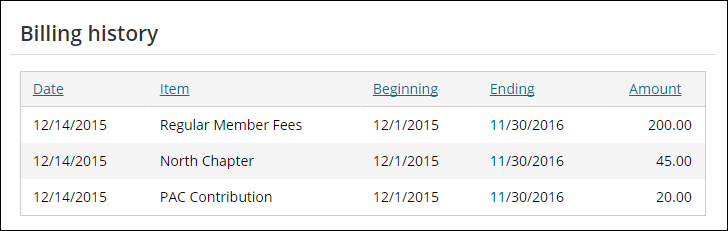
The payment amount is applied automatically to each open line item, beginning with the main customer dues product. As full payment is applied to a line item, the Paid Thru date field advances to the end of the bill term or beyond.
📘 Note
Complimentary or zero dollar items can be denoted by an asterisk (*) on the Payments window. The Paid Thru date advancement for complimentary billing items billed through Create Invoice follows the rule established by the billing cycle that is selected on the Bill membership fees window. To update the Paid Thru date for zero dollar items, double-click the line item.
Applying a payment to a different line item
The Advanced Accounting Console Payments window automatically applies the lump sum amount paid to the open balance line items in product payment priority order. Occasionally, the payment may need to be applied to line items other than the ones the payment window automatically selects. To apply a membership dues payment to a different line item, perform the following:
- In the Advanced Accounting Console, go to Membership > Payments.
- Click New.
- Enter the customer ID, or click the lookup icon to find the customer, then press Tab.
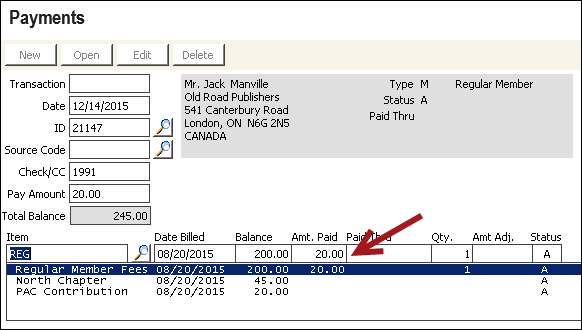
- Enter the payment information. The payment amount is applied automatically to the open (positive) line items according to the payment priority rankings assigned to each product code. In this example, the ranking is from highest to lowest, so the 20.00 Pay Amount was applied to the Regular Member Fees.
- Double-click the line item to remove the amount paid (in this example, the Regular Member Fees line item). You can manually override the amount applied to a line item by selecting the line and entering the desired amount in the Amt Paid field.
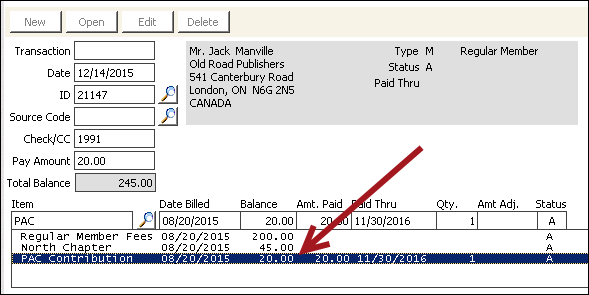
- Double-click the line item where the payment should be applied (for example, PAC Contribution).
- Click Save.
Entering an overpayment
Overpayments can be processed in one of three ways:
- Transfer open credit to AR/Cash so you can refund the overpayment, or apply the credit to current or future sales items
- Apply overpayment to offset next year's dues by using AVAIL_CREDIT
- Apply overpayment to another product credit by using _CREDIT
If an overpayment for dues is received, process the payment as described in Entering a full membership billing payment. Enter the amount of the actual payment in the Pay Amount field. The amount that is needed to pay the dues items (for example, the remaining balance) will be applied. The overpayment amount (amount not applied) displays in parentheses at the bottom of the window.
Transferring open credit to AR/Cash
If you transfer an open credit to AR/Cash, you can refund the over-payment or apply the credit to current or future sales items (such as an order or an event registration).
📘 Note
You cannot create an open AR credit unless the Cash Dues Over/Under Payments Create AR option is selected on the Set up general options window.
- In the Advanced Accounting Console, go to Membership > Payments.
- Click New.
- In the ID field enter the customer ID, or click the lookup icon to select a value.
- Enter the code for the marketing program or contact type that prompted this payment in the Source Code field.
- Enter the check or credit/debit card number in the Check/CC field, and press Tab. For credit/debit cards, enter the required card information.
- Enter the amount of the actual payment in the Pay Amount field. The amount needed to pay the billing items (for example, the remaining balance) is applied. The amount of the overpayment (amount not applied) displays in parentheses at the bottom of the window.
- Click Save. A system message is displayed asking you to confirm the creation of an AR item for the overpayment.
- Click Yes. This overpayment can be refunded on the Credit invoices window (from the Staff site, go to Finance > Invoices), or applied to other open balances such as meeting registrations or orders by using the *TAB feature.
Applying overpayment to offset next year's billing
Overpayments can be applied to a special credit product by using the _CREDIT product code. The _CREDIT product code retains credit balances and prints the billed amounts and credits separately.
- Set up a credit product. The following steps are required to process credits that print as separate line items on subsequent bills:
- Insert a product code that ends in _CREDIT on the Billing products window (from the Staff site, go to Membership > Billing products). Do not use AVAIL_CREDIT.
- Select the credit product on the scrolling list on the Billing cycles window (in Advanced Accounting Console, go to Settings > Billing > Billing cycles) so it will print on the renewal notice when an overpayment balance exists for a renewing customer.
- Enable the Maintain Prev. Balance option on the Billing window (in Advanced Accounting Console, go to Settings > Billing).
📘 Note
If your billing cycle sort method is by product rank, assign a large number to the credit product if you want the credit listed at the bottom of the line items. - Go to Membership > Payments.
- Depending on if the payment is already in iMIS, or still needs to be entered, do one of the following:
- If the unapplied payment is already in iMIS:
- Select the payment, then click Edit.
- Continue to step 4.
- If you still need to enter the payment:
- From the Payments window, click New.
- Tab to the ID field and enter the customer ID, and press Tab.
- (optional) Enter the code for the marketing program or contact type that prompted this payment in the Source Code field.
- Enter the check number or credit/debit card type in the Check/CC field. For credit/debit cards, enter the required card information.
- Enter the amount of the actual payment in the Pay Amount field. The amount that is needed to pay the dues items (for example, the remaining balance) will be applied. The amount of the overpayment (amount not applied) displays in parentheses at the bottom of the window.
- If the unapplied payment is already in iMIS:
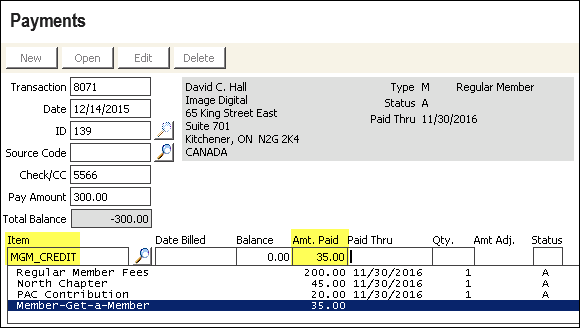
- Apply the overpayment to the special credit product code. For this example, we have inserted a product code of MGM_CREDIT:
- Select the empty space immediately below the last line item displayed.
- Select the Item field.
- Enter the product code for the special credit line (for example, MGM_CREDIT), or select the lookup icon and double-click the DUES_CREDIT product code.
- Tab to the Amt Paid field and enter the overpayment.
- Click Save.
The overpayment credit should appear as a separate, negative line item on the next bill generated for this customer. Credit line items must then be offset against positive line items manually on the Payments window. If the overall balance of the bill is positive, this manual offset process can occur when the payment is received and entered.
Entering a partial payment
Underpayments can be processed in one of three ways:
- By leaving underpayment balances in Billing
- By transferring underpayment balances to AR
- By adjusting residual balances
📘 Note
If Maintain Prev. Balance was selected on the Billing window (In the Advanced Accounting Console, go to Settings > Billing), you can leave underpayments in Billing, or you can adjust the balance.
If the Cash Dues Over/Under Payments Create AR option was selected on the Billing window (Settings > Billing), you can transfer underpayment balances to AR.
If both of these options are selected, the underpayment balances can be transferred to AR, left in Billing, or you can adjust the balance.
Leaving underpayment balances in Billing
If a partial payment is received, the unpaid balance appears in the Total Balance field, the Paid Thru date is not advanced, and the residual balance continues to be tracked as an open item in the Billing module. Since the Paid Thru date is not advanced, the remaining balance will print on subsequent Reminder Notices until full payment is received.
📘 Note
The remaining balances that print on Reminder Notices for billings with partial payments do not include VOL products.
- In the Advanced Accounting Console, go to Membership > Payments.
- Click New.
- Tab to the ID field and enter the customer ID.
- Press Tab.
- Enter the check number or credit/debit card type in the Check/CC field. For credit/debit cards, enter the required card information.
- Enter the amount of the actual payment in the Pay Amount field. iMIS automatically applies the amount paid to the open line items until the amount paid has been fully applied.
- Click Save.
Transferring underpayment balances to AR
Use the following steps to enter a partial payment, transfer the underpayment balance to AR, and show dues as paid in full:
- In the Advanced Accounting Console, go to Membership > Payments.
- Click New.
- Tab to the ID field and enter the customer ID, and press Tab.
- Enter the code for the marketing program or contact type that prompted this payment in the Source Code field.
- Enter the check number or credit/debit card type in the Check/CC field. For credit/debit cards, enter the required card information.
- Enter the amount of the actual payment in the Pay Amount field. In the following example, the balance due was 265.00 and we entered a single payment of 100.00.
- Select each line item and enter the full amount due for that line item in the Amt Paid field.
- Click Save. A message is displayed asking you to confirm the creation of an AR item for the underpayment.
- Click Yes.
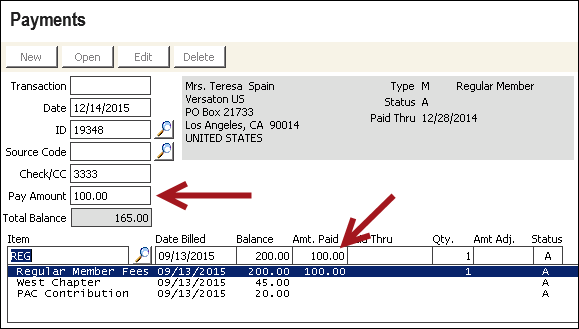
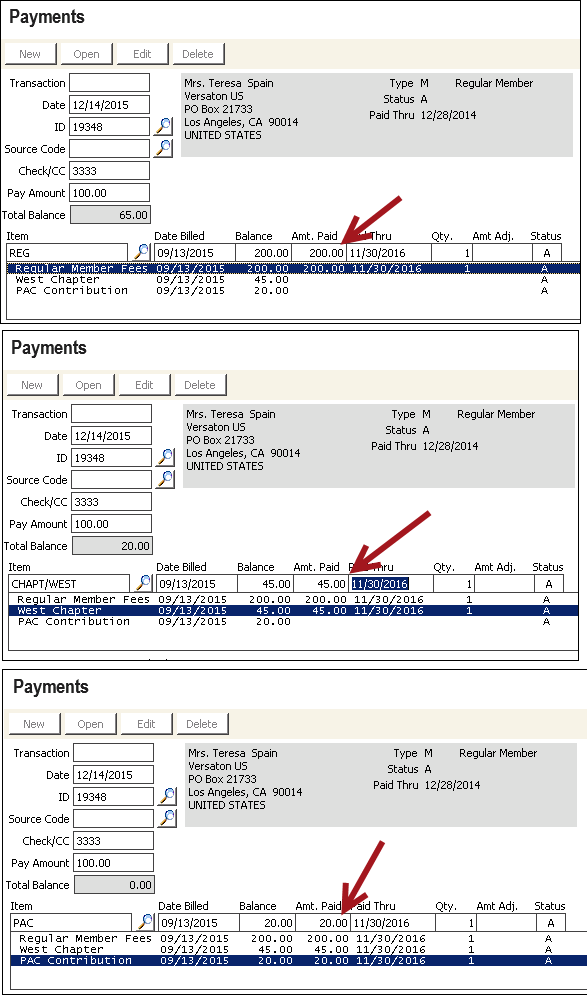
As you override the Amt Paid, the difference between the payment entered and the amount applied displays as an underpayment at the bottom of the window.
The remaining balance transfers to AR/Cash as an open receivable. The balance will appear on the AR statements instead of future Dues Billing Reminder Notices.
Adjusting residual balances
In certain cases, you may want to write off or reduce the residual balance left from an underpayment, particularly if the remaining balance is insignificant. You also may want to use the adjustment method to officially record decisions to award a post-billing discount for a line item.
📘 Note
Entering this adjustment makes no credit or debit entries into any accounts, including the write-off account.
- In the Advanced Accounting Console, go to Membership > Payments.
- Click New.
- Tab to the ID field, enter the customer ID, then press Tab.
- Enter the code for the marketing program or contact type that prompted this payment in the Source Code field.
- Enter the check number or credit/debit card type in the Check/CC field. For credit/debit cards, enter the required card information.
- Enter the amount of the actual payment in the Pay Amount field. For example, the balance was 75.00 and the payment was 60.00.
- Select the line item for which the Amt Paid (applied) is less than the balance.
- Enter the positive difference between the Balance and Amt Paid in the Amt Adj field.
- Click Save.
📘 Note
An activity tracking record will be generated even when no payment is applied (for example, when a full complimentary discount is being applied).