Upgrading iMIS
If you do not complete all pre-upgrade tasks, you risk a failed upgrade, duplicate activities, or damaged user records that you must redefine manually. Follow all processes carefully.
NoteYour system must be at version 15.2.1 before proceeding.
In addition to these cautions, review the New Features to evaluate the impact on your existing implementation.
The installer now removes any existing files for unsupported products, which includes e-CM, e-CM 5.1 publishing service, e-Series, and iBO for COM. All Actions and Constraints are removed from BOD, to support optimal performance and scalability. These products are deprecated and no longer supported in iMIS. Contact an ASI representative for more information.
If you added any actions or constraints to your own business objects, be aware that they will no longer run when your business object is used.
NoteIt is also required that after an upgrade, you republish all folders to regenerate a searchable index for content records.
Features and benefits of the iMIS installer
- Multiple versions of iMIS can be installed on a single machine.
- Users can install a newer version while retaining an older version of iMIS on a machine.
- Upgrades honor original application pools and configuration files. Users running in 32-bit mode will remain in 32-bit mode after upgrade.
- The application pools can be named by users. The iMIS installer also allows for multiple application pools. This allows older versions using a 32-bit application pool to run concurrently on systems where newer versions require 64-bit application pools.
📘 Note
New application pools are set to 64-bit mode by default. Users must set application pools to 32-bit if they want to run 32-bit operations.
Restrictions and caveats
- Allows for up to 25 instances of iMIS to be installed on a single host.
- Only one instance of com files is installed. This instance will be used for all desktop installs. Because only one instance of com files can be registered, subsequent installs of later com versions might not be compatible with older versions of iMIS (desktop client only).
- When installing on a system where iMIS uses the default web site, the installer will force an upgrade of the existing installation. After the existing installation is upgraded, additional instances can be installed.
- Modify and Repair options are not available when performing maintenance on installed instances.
- The installer requires access to a variety of files for the update process to be successful. If the installer encounters any required files that are locked, a dialog box will be displayed, notifying you that a reboot will be required to complete the process. Simply click OK. You do not need to take any action at this message.
- iMIS provides enhanced password hashing to secure all user login passwords. This enhanced password security complies with PCI 3.2 guidelines.
📘 Note
Versions 15.2.5.3815 and earlier are not compatible with the latest com components.
Upgrading existing iMIS instances created using the Multi-Instance Utility
The current iMIS Installer is not aware of existing iMIS instances created using the Multi-Instance Utility, available in previous versions of iMIS. The Multi-Instance Utility functionality is now part of the iMIS Installer. iMIS instances created using the Multi-Instance Utility cannot be upgraded using the iMIS Installer.
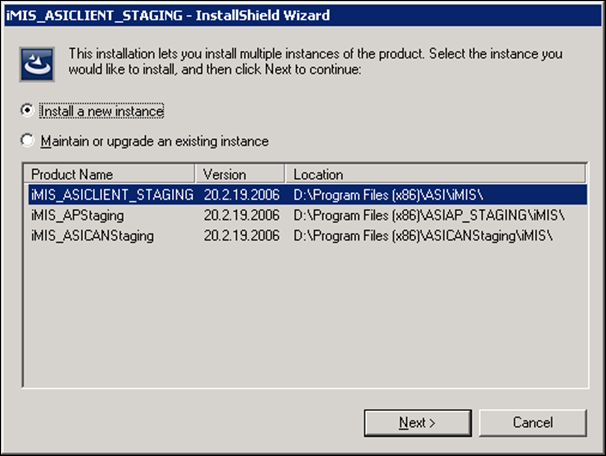
The following image shows an iMIS installation with three instances:
The following image shows how those instances will then appear in Programs and Features in the Control Panel:
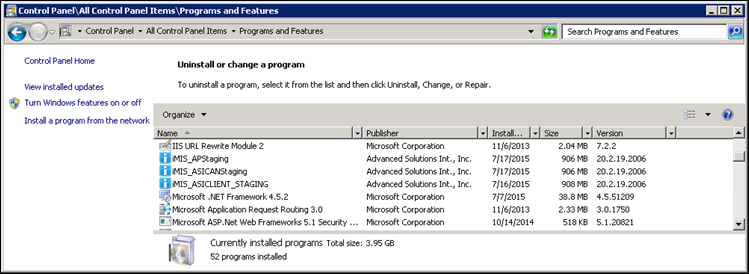
Additional instances, created using the Multi-InstanceUtility, are not available as Programs and Features entries, so they cannot be upgraded. However, the instance can be recreated using the iMIS Installer.
Upgrading or maintaining an existing instance of iMIS
The iMIS Installer enables you to upgrade or maintain existing iMIS instances.
Before you can perform maintenance of existing iMIS instances with the iMIS Installer, you must bring any existing instances of iMIS current with the iMIS Installer version.
📘 Note
You cannot perform maintenance tasks on an existing instance of iMIS if the instance is a release older than the iMIS Installer. You will be required to upgrade a non-current instance of iMIS before you can perform maintenance tasks on that instance. For more information, see Upgrading an existing non-current instance of iMIS.
Do the following to upgrade or maintain an existing instance of iMIS:
Review the README file that is included with the Production Release self-extracting zip file.📘 Note
Do the following to upgrade iMIS:
- Finish all tasks in Preparing database and servers and review the System requirements.
- Any Advanced Accounting Console navigation item that uses the Open the link in a new window option needs to be deselected prior to the upgrade. Otherwise, the site administrator will need to remove and recreate the navigation item and recreate it.
- Have all users log out of iMIS.
- (Multi-server installations) On your secondary servers, stop the AsiScheduler application pool while the Default server is being upgraded.
-
Uninstall iMIS if any of the following have been changed manually since the last upgrade:
- Database name
- Database server name or IP
- Virtual directory name
- Machine name
- Path to iMIS
- If you have Analytics installed, remove it to avoid triggering reinstallation and reconfiguration of a new analytics database and analysis server:
- Back up your Analytics files, for example:
- Go to Control Panel > Programs and Features.
- Open iMIS to access the installer options.
- Select Modify, expand Optional Components, and deselect iMIS Analytics.
- Select Next as needed.
- Click Finish. Proceed with the upgrade.
move "C:\Program Files (x86)\ASI\iMIS\Analytics" "C:\Program Files (x86)\ASI\iMIS\Analytics.bak"
- On your application server host, temporarily disable tools and settings that might interfere with the installation, including anti-virus software.
- Download the iMIS version from the Support site.
- Go to Releases > iMIS.
- Select the most recent version of iMIS and download the associated self-extracting zip file, for example, iMIS nn.n.n.n_Production_GA.zip.
- Select the most recent update to the release, if any, and download the zip file.
- Double-click the downloaded files to extract the files to their default locations on the C: drive.
📘 Note
Review the README file that is included with the Production Release self-extracting zip file. - Run the setup.exe file to initiate the installation.
- Select the instance you want to upgrade, then select the Upgrade Existing radio button.
- Click Next.
- A Ready To Upgrade window is displayed. Click Install.
- Click Finish when the upgrade process is complete.
- The iMIS Database Upgrader log is displayed. Review the upgrade logs to confirm database upgrade success and any additional post-upgrade needs. Scan the most recent IMISDBUpgrade.log file for the following error message, which indicates a failed database upgrade:
*** UPGRADE PROCESS ENDED WITH ERRORS !!! ***
If you find this error message, your database was not successfully upgraded. You must fix the data and upgrade again:- To locate the problem, identify which upgrade script failed. Scroll up through the log until you find the header stamp that immediately precedes the error message. Header stamps look like the following:
= iMIS x.x.x.x to iMIS x.x.x.x Database Upgrade Driver Script =
- Fix the data in the current version of the database. The process will upgrade from where it stopped.
- Restart the upgrade. In iMIS Database Upgrader, click Begin Upgrade.
- Manually recreate any full-text indexes that you dropped. See Preparing all databases and servers for upgrade.
- Reboot the server to ensure that logon handling is properly initialized. Failure to initialize might result in user passwords being openly displayed (unmasked) during logon.
- You must republish all content folders to regenerate a searchable index for content records.
- Go to RiSE > Page Builder > Manage content.
- Select all content folders, or select the root (@) content folder.
- Click Publish.
- Select the Publish Working Items, Regenerate Published Items radio button.
- Click OK.
- Check the Settings for any new fields and configure as desired.
- If you are using a standard Communities layout, you must reselect a layout for each community that points to the iCore folder:
- Go to Community > Communities.
- Edit an existing community definition.
- Click select for the Community Layout field to select the desired layout.
- Save the definition.
-
Failure to reselect a standard layout might result in the Community’s content being displayed outside of your website’s frame.
- Alternatively, do the following to make sure the Display within the template checkbox is enabled:
- Go to RiSE > Page Builder > Manage content.
- Select your community layout.
- Click Edit.
- Select the Properties tab.
- Check Display within the template.
- If your website uses an out-of-the-box master page, including Forest.master, Sapling.master, Planets.master, and Cities.master, you might notice that the copyright statement disappeared after upgrade.
- To resolve this, you must copy the sample Footer Copyright content record into your website’s ContentAreas folder.
- Once this has been completed and published, you will see the copyright statement at the bottom of your website. This will give you the ability to make changes to the copyright statement using the Edit tool.
If you already have an instance of iMIS at the same release level as the installer, you will see the following window:

As this instance is already at the same release level as the installer, there is no upgrade to perform. Select Install a new instance and click Next.
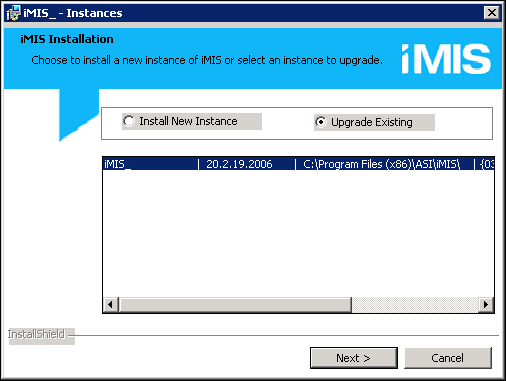
The following window is displayed, identifying any iMIS instances that are not at the same release level as the installer:
📘 Note
If there are no instances available for upgrade, this window will not be shown.
📘 Note
For multi-server installations, once the Default server has been upgraded, you can then upgrade your secondary servers. Upgrade the secondary servers one-at-a-time, restarting the AsiScheduler application pool on each server as the upgrade process is completed.
📘 Note
For multi-server installs, you must edit the web.config file on each secondary server to point to the Default publishing server's URL. In addition, the servers must have network authentication in order for Net.TCP to work. For more information, see Modifying the web.config file.
These changes to the web.config files will not be overwritten by subsequent updates.
To determine the Default publishing server, in the Staff site, go to RiSE > Maintenance > Publishing servers. The Default column will indicate which publishing server (if there are more than one) is the default. If the Default publishing server is changed , then you must restart both the new and the former Default publishing servers.
To regenerate a searchable index without affecting publish dates, do the following using the Staff site.
📘 Note
The Shared Folders content folder will appear empty until you republish this folder. 📘 Note
When creating a copy of a sample website, the copied website’s content will not be included in search results until the content has been published and the Default Website (for search) has been selected for the copied website’s content folder.
📘 Note
If you are using a standard Communities layout, you must update the default layout for each community to point to the iCore folder.