Setting up Join Now
You can set up easy-to-use membership products for your prospective members. These options are known as Join Now, and use a combination of customer types, billing products and cycles, and public-facing content records. These Join Now memberships can be customized for different member types. for example:
- Student
- Retired
- Associate
- Regular Member
The following will walk you through the process of setting up a Join Now Student membership:
Create dues item and any additional billing products
These products will be combined to create all of the membership and subscription options for your new Join Now membership. Typical products include dues, subscriptions to industry or organization publications, and giving opportunities. Unless otherwise noted as (required), billing products in the following documentation are optional, and are used to illustrate a robust Join Now membership. All optional billing product types can be used several times to create multiple options for memberships and subscriptions.
For more information about defining dues items and billing products, see Defining billing products.
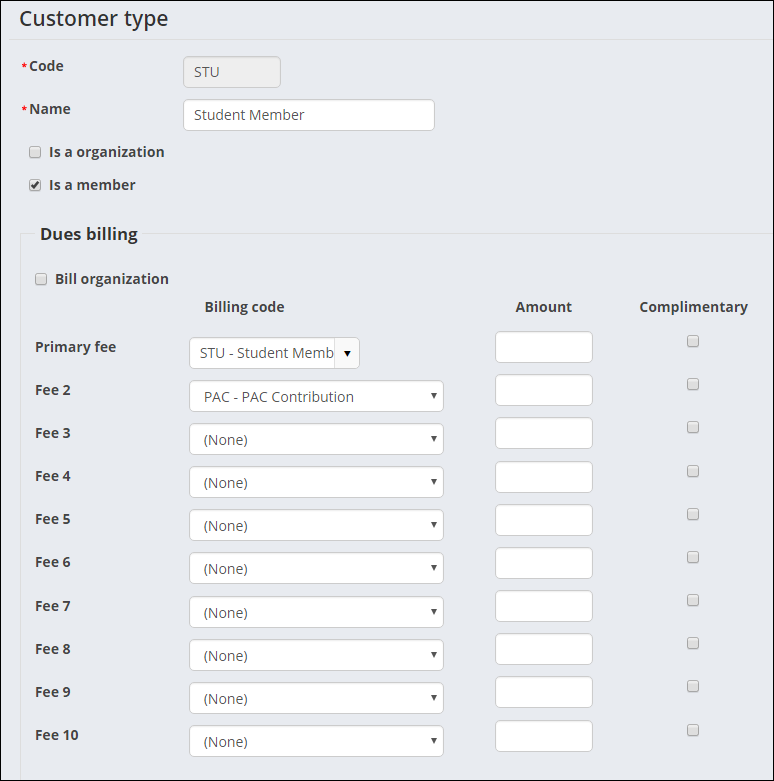
Create a customer type
Customer types define the categories to which you assign each customer record. These types designate the broad classification of customer categories. Assign a different type to each major customer class (Individual Member, Associate Member, Student Member, Hotel, and so forth) and at least one type to the Nonmember category. These membership categories define the membership levels and amount charged for membership or dues and subscriptions.
When you define a type through the table, be sure to indicate whether the type represents a customer and whether the type defines a company/entity or an individual. This helps iMIS differentiate between the different records.
Do the following to define a customer type:
- From the Staff site, go to Settings > Contacts > Customer types.
- Select Add new customer type.
- Enter a meaningful, unique Code to represent a specific grouping.
- In the Name field, enter the descriptive, full name of the customer type.
- (optional) If the customer type you are defining represents an organization or entity other than an individual, enable Is an organization. By enabling this option, iMIS will be able to maintain relationships between organizations and individuals for the purpose of maintaining current organization rosters and other related lists.
- (optional) If the customer type you are defining represents a member rather than a nonmember category, enable Is a member. By enabling this option, iMIS can distinguish between members and nonmembers regardless of how many types or categories you maintain. This provision lets you produce quick lists, reports, and counts by members or nonmembers.
- (optional) Configure the Dues billing (membership fees) options:
- Enable Bill organization if the parent is to receive the bill for customers of this customer type that are linked to it.
- Select the Billing codes. These entries dictate the membership fees that will be automatically billed for each customer type. Do not select optional products, or products that vary from customer-to-customer. All codes selected here display as membership fees for this customer type unless the line item bills at zero dollars, and the renewal notice option to suppress the printing of zero balance line items is active.
- From the Primary fee drop-down, select the primary membership fee product. The Primary fee product controls the advancing of the overall membership, and controls the advancing of the overall membership Paid Thru date.
- Enter the fixed Amount if a rate applies to all or most customers of this type.
- Enable Complimentary if the dues product will be provided at no charge for this customer type.
🚧 Warning
Unless all line items for the type are complimentary or are to be billed zero dollars, do not choose a Primary fee product that will have a zero price amount. When a product line item is billed and a zero amount has been set, the Paid Thru date will automatically advance. - Click Save & Exit. If you modified either the Is an organization or the Is a member options, confirm you want to change the company status and the membership status for all customers of this type.
📘 Note
You cannot add a customer type Name that is the same as an existing customer type Code when adding a new customer type.
📘 Note
If you modify either the Is an organization or the Is a member options for a customer type, and contacts currently exist for that customer type, the modification will change the company status and the membership status for all customers of this type. You will be asked to confirm you want to make this change when you click Save & Exit.
Create a dues billing cycle
The billing cycle is used to define the product the General Product Display content item displays on the web. The billing cycle determines which items are included in the Join Now product, as well as the Member Type to which the person will be set when they submit the cart to purchase the Join Now item:
- From the Staff site, go to Membership > Billing cycles.
- Select Add new billing cycle.
- Enter a descriptive Cycle name. The Cycle name will appear as the title of the product in the content. We will enter Member Student since we are creating a student Join Now membership.
- Select only one Member type to bill. This is the Member type of the person once they check out. For our Student Member example, select the STU member type.
- Choose which Categories to include. Select *ALL*.
- Select any Products to include in addition to the Member types items:
- Chapter Membership Fees (CHAPT) – Use this code for separate chapter membership dues. Chapter products are created when a new chapter is defined with Standard pricing.
- Membership Fees (DUES) – Use this code for all normal membership billing-fee items. This code normally is used for standard non-optional fee line items that are cross-referenced when creating or editing a Customer type.
- Miscellaneous Items (MISC) – Reserved for miscellaneous charges. Normally, special pricing rules dictate the conditions for charging for a miscellaneous item. For example, special pricing rules that are based on the Join Date.
- Sections and Specialty Groups (SEC) – Use this code for optional add-on section memberships such as professional specialty groups. Generally, this type would not be defined at the Customer type level, because SEC normally represents groups that are joined only by request. After a customer has subscribed to this product type, iMIS enables you to automatically bill for initial billing and renewals through cycle definition rules.
- Journals and Other Subscriptions (SUB) – Use this code for optional subscriptions such as journals and magazines. This product type would not be defined within the Customer type, because SUB items are optional. After a customer has subscribed to this product type, iMIS enables you to automatically bill for initial billing and renewals through cycle definition rules.
- Voluntary Contributions (VOL) – Use this code for non-mandatory contributions such as PACs or foundations. VOL typically will be cross-referenced when creating or editing a Customer type; however, open items of this product type will not appear on Reminder Notices unless non-voluntary items within the same cycle still have open balances. Voluntary contributions are editable; customers can edit the Amount of voluntary contributions before going to the cart.
- Select Billing types:
- Annual/Anniv. – Anniversary or Annual
- Cash/Accrual – Cash
📘 Note
To prorate the membership fee based on the date the member joins or to apply special user-defined prorating rules, you must bill on an annual basis. For more information, see Configuring billing options and Defining prorating rules.📘 Note
Join Now functionality supports only cash-based accounting. Using Join Now with an accrual dues system will still work, but iMIS will treat the dues as cash. Future renewal billings will be treated as accrual dues. - Enable Add member type items to designate the billing cycle as a dues billing. The billing codes defined in the Customer types window will also appear. For more information, see Defining customer types.
- Enable Use to display join item set and Use to display itemized renewals if you want to allow people to add or remove non member type items during renewals:
- Use to display join item set - This option determines whether the billing cycle can be used to allow new members to join. If this option is selected, the billing cycle is available to be used to join online.
- Use to display itemized renewals - If selected, each individual item in the renewal product is displayed. If not selected, you will see one product that contains the individual items.
📘 Note
For more information about these options, see Setting up billing cycles. - Click Save & Exit.
📘 Note
The billing cycle name should not have underscores in it, only spaces.
📘 Note
Do not include products that are already defined in the Member type.
Configuring Join Now from profile pages
Membership joins can be performed directly from non-member and inactive member profile pages. An inactive member is defined as someone whose member status is marked as “I” or “D,” and their paid-through and renewed-through dates are null or in the past.
In addition, staff users and company administrators can perform membership joins on behalf of non-members and inactive members. Company administrators can only perform membership joins on behalf of a contact in their company.
Do the following to allow “Join Now” functionality directly from user profile pages:
- From the Staff site, open the content record used for member and contact profile pages. Out-of-the-box, these pages are Account Page Staff and Account Page (@/iCore/Contacts/ContactLayouts).
- If the Invoice Payment Link content item already exists on the page, select Configure to open the content item for edit. If there is no Invoice Payment Link content item on the page, select Add content, and add the content item (Commerce folder).
- Select Enable join button for non-members and inactive members.
- Configure the following Join options:
- Display to staff users only - When enabled, the join button will display on non-member and inactive member profile pages, but the button will only be visible to staff users.
- Button text - Enter the text that appears on the button.
- Message - Enter text to be displayed above the button. For example, you could enter a message that explains to users what to expect when they click the button.
- Content or URL to link to - The content or URL selected is where users will be sent when clicking the join button.
- Click OK, and Save the changes.
📘 Note
This option is automatically enabled when the content item is added to a content record.
This option will only show for contacts that do not have any outstanding renewal invoices. If the contact does have outstanding renewal invoices and the Renewal option is enabled, then the join options will not appear.
Copying an existing Join Now page
Do the following to copy an existing out-of-the-box Join Now page:
- From the Staff site, locate a sample Join Now page and make a copy.
- Open the content record and click Edit.
- Configure the General Product Display content item.
- In Default product to display, enter the name of the billing cycle (Cycle Name) created previously, replacing spaces with underscores. This is the product code for the billing cycle. For our Student Member example, enter Member_Student.
- Save and Publish.
📘 Note
You can leave the Default product to display blank and use the same content record for multiple products. The product code (billing Cycle Name) should then be included as a URL parameter for iProductCode. - Add the content record containing the General Product Display content item with your Join Now product (STU) to an easy-to-find navigation.
- Navigate to the Join Now page you have just created to ensure that the Join process reflects the chapters, subscriptions, and details that you need.
Enabling joins for community administrators
When a user clicks the Join Now button from the account page, which uses the Invoice Payment Link content item to display the button, the ID of the selected user is passed in the URL. This enables users such as company administrators to join for other users without using On Behalf Of. If your join process uses an additional step to get to the join product, such as the membership benefits page, you will need to pass the link to the additional steps to ensure the correct user is joined.
If you want your company administrator to be able to join users you will need to include an ID in the URL that links to the Join Now product. This can be done in a number of ways including:
- Configuring the Data Showcase content item to include the ID in the URL
- Creating a query that includes the ID as a URL parameter in a link to the product