Implementing Friendraising
Friendraising adds social networking and peer-to-peer fundraising functionality to the iMIS Fundraising product line. Customers who add Friendraising to their iMIS solution can empower their constituents to reach out to new members and donors. Friendraising supports campaigns and special events that rely on fundraising among peers to succeed.
This entirely web-based service empowers both the organization and its supporters. Organizations are able to communicate directly with team captains, share fundraising tips and tricks, upcoming deadlines, success stories, and other key information for the campaign. The result is dramatically increased campaign and member recruitment and fundraising revenue built upon of the strength of one-to-one relationships.
Friendraising consists of two pieces:
- The Friendraising Administration Console (a third party application) provides you with a site where you can create online fundraising events, from which your supporters can sign up to participate, create their own personal pages, set up collection goals, raise funds, and promote their participation to their friends, family, and others.
NoteContact your AiSP about obtaining the Friendraising Administration Console, which is separate from the iMIS Friendraising interface. The console is a required component of the Friendraising feature.
-
The Friendraising Interface in iMIS provides the tools you need to import all activities from the Friendraising site into iMIS to create new contacts, event registrations, and donations. When a member clicks Sign Up on their Friendraising event home page, that transaction is considered a registration in the Friendraising system. During sign up, the member can add a Friendraising donation. iMIS uses a similar model to integrate transactions:
-
A Friendraising constituent is imported as an iMIS Contact.
-
A Friendraising registration is imported as an iMIS Event Registration.
-
A Friendraising donation or sponsorship is imported as an iMIS Donation.
Enabling Friendraising
iMIS comes with the Friendraising feature pre-installed, however, by default, it is hidden and must be enabled. This is accomplished by unhiding the Manage Friendraising navigation item.
📘 Note
The steps in this section are based on the default configuration of Friendraising. Your view of the product may not match these steps if your organization has implemented this feature in another way.
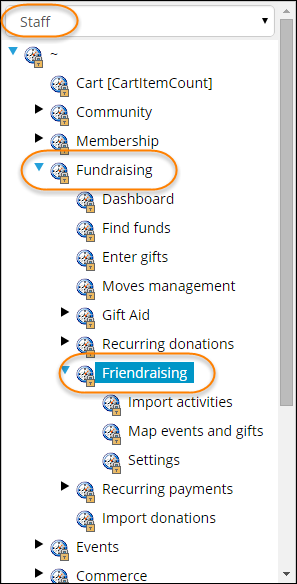
- From the Staff site, go to RiSE > Site Builder > Manage sitemaps.
- From the drop-down menu above the sitemap tree, select Staff.
- Reveal the Friendraising navigation item.
- In the sitemap tree, expand Fundraising.
- Select the Friendraising navigation item.
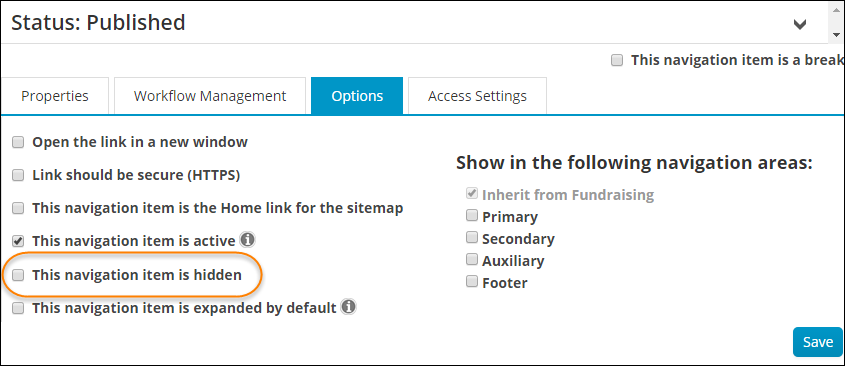
- Under the Options tab, clear the This navigation item is hidden checkbox.
- Save, and close the window.
- From the toolbar, click Publish.
- (optional) Set up on-demand imports using the Friendraising Importer content item:
- From RiSE > Page Builder > Manage content, edit the Friendraising Imports content record.
- Remove the File Importer For Web Services content item.
- Click add content > ContentTypes > Utility to find and select the Friendraising Importer content item.
- Click Save As, and save the content record in a Shared Content folder.
- Modify the Import Activities navigation to point to your new content record. For more information, see Using sitemaps.
The three Friendraising pages, Import activities, Map events and gifts, and Settings, are displayed.
📘 Note
To use this content item, your AiSP must help you set up the Friendraising Administration Console for on-demand exports.
📘 Note
By default, this is available from Core Content > Tools > Friendraising Imports, However, depending on your organization’s configuration selections, this content record could be elsewhere.
Setting up Friendraising
To start using iMIS Friendraising:
- Update the Staff sitemap and configure the Friendraising pages from Content Management.
- Define the settings required to use the Friendraising Bridge in iMIS.
- Map the events defined in the Friendraising Administration Console to events and gifts defined in iMIS.
- (optional) Create user-defined tabs for the Friendraising tables.
- (optional) Create the Team Participation report.
📘 Note
These settings are defined within the third party Friendraising Administrative console.
📘 Note
Contact your AiSP about obtaining the Friendraising Administration Console, which is separate from the iMIS Friendraising interface. The console is a required component of Friendraising.
Setting up the Friendraising pages in iMIS
Setting up the default member type of imported Friendraising contacts
Your system's default member type is assigned to any new contacts created when importing Friendraising transactions. If you have not already done so, select your default member type from Settings > Organization > The default Customer Type to use when creating new customers online.
Configuring the Friendraising pages
The Friendraising pages are built in iMIS using content records and iParts|topic=Concept: content records, iParts, and content types that you can configure for the needs of your organization. For information about how to configure content items, see Fields: Content Gallery. iMIS Friendraising is comprised of the following:
|
Description |
Default navigation |
Default content records |
Content items |
|---|---|---|---|
|
New node on the Fundraising tab to organize the Friendraising pages. |
Fundraising > Friendraising |
(none) |
(none) |
|
Staff can import and process Friendraising Export Files downloaded from the Administration Console. The Export File must be manually downloaded first before you can import it. |
Fundraising > Friendraising > Import activities |
@/iCore/Tools/Friendraising_Imports |
|
|
Staff can import Friendraising Export Files on demand from the third party Friendraising Administration Console, without the need to download the file first. If you prefer to use this import method, edit the Friendraising Imports content record and replace the File Importer For Web Services content item with the Friendraising Importer content item. Note: You must contact your AiSP to request that they enable your Friendraising Administration Console for exports to use this content item. |
(none) |
(none) |
|
|
Staff can map the events defined in the Friendraising Administration Console to gifts and/or events defined in iMIS. |
Fundraising > Friendraising > Map events and gifts |
@/iCore/Tools/Friendraising_Mappings |
|
|
Staff can define the settings required to use the Friendraising Bridge in iMIS. |
Fundraising > Friendraising > Settings |
@/iCore/Tools/Friendraising_Settings |
|
Defining Friendraising settings
To import Friendraising contacts, event registrations, and gifts, you must define your connection settings and map the Friendraising events to iMIS events and gift items.
- From the Staff site, go to Fundraising > Friendraising > Settings.
- Define the following Friendraising Settings:
- Update Name/Address: Enable this option if you want to update the name and address of Friendraising contacts in iMIS when differences are detected during an import. For example, if an existing contact registers for a Friendraising event using a new street address, their iMIS contact record is updated with the new address when you import the Friendraising transaction.
- Ignore Imported One-Time-Off-Line: Select this option if you do not want to import transactions marked as One-Time-Off-Line in Friendraising. This marker indicates that a transaction has been imported to the Friendraising Administration Console from an external source.
- To download your Friendraising Export Files to iMIS on demand via the Friendraising Importer content item, you must enter the following authentication information.
- Friendraising Service URL
- Friendraising Service Organization ID
- Friendraising Service User Name
- Friendraising Service User Password
- Define the following iMIS Settings:
- Payment Method: Enter an iMIS Cash Account Code that is a Cash type. Incoming Friendraising transactions are associated with this code. iMIS Cash Account Codes of other types (i.e. Credit Card) cannot be used, because the incoming transactions have already been billed via the payment gateway associated with your organization’s Friendraising account. We recommend that you create a distinct Cash Account of the Cash type to track Friendraising transactions (in the Cash accounts window in the Advanced Accounting Console at Finance > Options > Set up tables > Cash accounts), so that you can make sure these are reconciled separately from other iMIS transactions.
- If you want to capture address data from your imported Friendraising transactions, you must enter an iMIS Address Usage label for each Friendraising field listed below. You can find your Address Usage labels in Desktop from Customers > Set up module > General > Address and Notes.
- Home Address
- Home Phone
- Home Email Address
- Work Address
- Work Phone
- Work Email Address
- Mobile Phone
- Click Save.

This option does not affect new Friendraising contacts, which always generate new contact records in iMIS.
For example, when setting up a new Friendraising implementation, some users import donations into the console to maintain a historical record. These imported transactions are marked as One-Time-Off-Line in the console.
📘 Note
If you have not already done so, contact your AiSP to request that they enable your Friendraising Administration Console for on demand exports, so that you can enter the information below.
📘 Note
You can only record one phone number per each iMIS Address Usage label. Therefore, you must assign a unique iMIS Address Usage label to the Friendraising Home Phone, Work Phone, and Mobile Phone settings. 📘 Note
Similarly, you can only record one email address per each iMIS Address Usage label. Therefore, you must assign a unique iMIS Address Usage label to the Friendraising Home Email Address and Work Email Address settings.
Mapping events and gifts
To import registrations and gifts, you must first map each event defined in the Friendraising Administration Console to an event defined in iMIS. To map events, you need the Friendraising Event ID as well as the iMIS gift item, event, and function codes.
Each Friendraising event you create in iMIS must include at least one event function. The function fees are defined in the Friendraising Administration Console.
Each Friendraising donation is considered a single gift in iMIS. When a donor sponsors an event participant, the donation is imported as a single gift from the sponsor, but iMIS also records a soft credit in the iMIS Advanced Accounting Console on the event participant's record to show who is responsible for helping to obtain the gift.
- From the Staff site, go to Fundraising > Friendraising > Map events and gifts.
- Click + Add new record.
- Define the following Mapping elements:
- Event Id: The Friendraising event ID listed in the export file.
- Gift Item Code: The iMIS Gift Item Code to be assigned to imported gifts associated with this event.
- iMIS Event Code: The iMIS Event Code to be assigned to imported registrations associated with this event.
- iMIS Event Function Code: The iMIS Event Function Code to be assigned to imported event function registrations associated with this event.
- To save the event mapping, click Insert.
📘 Note
If a registration fee has been set up for the event in the Friendraising Administration Console, then you must map that event to an iMIS Event Function Code that has the same fee amount.
Setting up Friendraising user-defined tabs in iMIS Advanced Accounting Console
To record and display important information about Friendraising event participants in the iMIS Advanced Accounting Console, you must first run a SQL script that allows you to create user-defined tabs based on the Friendraising-specific tables.
📘 Note
If you are not self-hosted, you must contact your host for assistance running SQL scripts.
Do the following to enable the Friendraising tables for user-defined tabs:
- From the ~\AsiPlatform\Asi.Scheduler_iMIS\util folder located in your app server's installation directory, locate the RegisterFriendraisingUDTablesV10.sql script. The ~\AsiPlatform\Asi.Scheduler_iMIS\util path is relative to the root of your iMIS application.
- From SQL Server Management Studio, execute the RegisterFriendraisingUDTablesV10.sql script on your iMIS database.
- From iMIS Advanced Accounting Console, create user-defined tabs for the following Friendraising tables and fields:
- To create and edit the user-defined tables, go to iMIS Advanced Accounting Console and select Settings > Membership > Configure membership options > Additional Windows.
|
Description |
Table |
Fields |
|---|---|---|
|
Contains information about any teams a contact has joined as part of an event registration. |
Name_FRTeamInformation |
ID SEQN MEETING TeamID TeamName TeamType TeamGoal TeamCaptainAlternateId |
|
Contains information about a contact's event registrations. |
Name_FREventInformation |
ID SEQN MEETING LocationID RegistrationType ParticipantGoalOnline |
|
Contains survey questions and the contact's answers. |
Name_FRSurveyQuestion |
ID SEQN MEETING QuestionID AnswerID AnswerValue |
|
Contains the contact's mail and email opt out preferences. |
Name_FRAdditionalInfo |
ID HomeMailOptOut HomeEMailOptOut WorkMailOptOut WorkEMailOptOut |
|
Contains a record of each registration or donation that has been successfully imported for a contact. |
Name_FRTransactionLog |
ID SEQN TransactionID TransactionType EventID ConstituentID DateImported |
|
Contains a contact's AlternateId, which is the constituent ID in Friendraising. Note: Name_AlternateId is not a user-defined table specific to Friendraising, but does contain information useful for Friendraising purposes. |
Name_AlternateId |
ID SEQN IdType AlternateId |
Managing Friendraising transactions
Use iMIS Friendraising to import Friendraising event registrations, donations, and contacts via Export Files downloaded from the Friendraising Administration Console.
📘 Note
The steps in this section are based on the default configuration of Friendraising. Your view of the product may not match these steps if your organization has implemented this feature in another way.
Importing, processing, and posting Friendraising data
- Import the Friendraising export file manually.
- Manual download, using the File Importer For Web Services content item:
- Download the Friendraising export file from your Friendraising Administration Console.
- In iMIS, navigate to Fundraising > Friendraising > Import activities.
- Browse for the export file that you just downloaded, and then click Upload.
- The file is imported and shown under the Batch Name column.
- From the file list, click Process on the line of the file you imported.
- The Log Viewer will display Posted in the Status column.
- If the batch contained an error, then the Log Viewer will display Error in the Status column. If you want to correct warnings or errors in the data file, create a new file that contains data related to the warnings and errors. Do not include data that has already been successfully imported. Correct the file, then upload and process it again.
- From iMIS Advanced Accounting Console, navigate to Accounting > Processes > Manage batches.
- To review the imported Friendraising transactions, select the appropriate Auto-Created batch and click Print Selected.
- To post the batch, click Post Selected.
When you click Process, iMIS processes the registrations and gifts in the Friendraising export file, and it removes the import file from the File list. One of two scenarios may occur:
Imported Friendraising transactions are automatically placed in system-generated batches that are created based on the date the import took place. All of the transactions from a single day are placed in a batch named Auto-Created, created by AUTOBATCH. This batch may contain other auto-created transactions. If today's Friendraising batch is closed, and a new import takes place, a new batch is created with today's date.
Creating a Team Participation report
For easier querying and reporting, use the vFRParticipantTeamCaptain view, which unites team, team captain, and participant information. The view is created when you install Friendraising, and it contains the following columns:
- ID
- Meeting
- Team ID
- Team Name
- Team Type
- Team Goal
- Captain ID
To report on this information, create a Team Participation query based on a business object that uses this view.
Do the following to create the Team Participation report:
- Create the new business object.
- From the Staff site, go to RiSE > Business object designer.
- Select New > Design Business Definition.
- Name the object FriendraisingTeamInfo.
- Click Create Object.
- (Database tab).
- From the Tables section, click Add.
- Select the vFRParticipantTeamCaptain view and click OK.
- The Available Columns section is updated to list the view's fields.
- From the Available Columns list, select the fields you want to be listed as Properties of the business object and then click Add as Properties. The properties are added in the order you select them. Or you can Add All as Properties. If you add all fields as properties, the properties are added in alphabetical order.
- Click Save and then Publish.
- Define a query using the new business object.
- Create a report using the new query.