

iMove
iMove updates addresses for members that have moved.
- Performs updates in real-time. No need to export your entire database for processing.
- Uses the Datatech SmartSoft AccuMail Move software for real-time NCOALink change of address processing. It processes any moves made in the past 18 months.
- Reduces costs by only validating addresses you select.
- Generates documents required for resorted discount certification on USPS First Class and Standard Mail.
- Pricing is scaled to the number of addresses certified.
System requirements
The following system specifications are required to successfully run iMove:
- UDP port 1434 must be open on the SQL server
- Both inbound and outbound traffic must be allowed on port 443 to 173.45.128.38
- Windows 11 or higher
- iMIS must be installed to run iMove
- iMIS 20.2.66 or higher
- Microsoft .NET Framework 4.8
- SQL Server 2016 or higher
iMove first time installation
Do the following for installing iMove for the first time:
- Download the app from the Support Portal.
- Unzip the file to the intended installation location.
- Run the AccumailToolKit.exe to install the AccuMail Move Toolkit 2.0. Run through the setup wizard..
NoteThis ToolKit is refreshed on a consistent basis and you may get a Microsoft Defender Warning. More Info, then “Run Anyway”
- Click on iMove Setup 3.0.0.4.exe (or latest version). This will launch the Installer Wizard for iMove. Click Next in the dialogue box to begin installation.
- Select I accept the terms in the license agreement
- Click Next.
- Click Install. The Installation Wizard will let you know the progress of the installation.
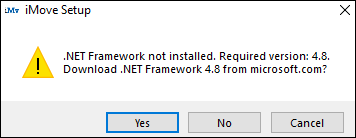
- If you do not have .NET 4.8 installed on your computer, you will be prompted to install from a Microsoft Web Page
- A dialog box will appear letting you know that iMove was installed successfully. Click Finish.
- Restart your computer if prompted by the installer.
Troubleshooting Installation
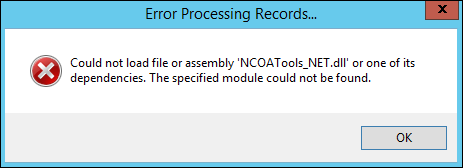
Error Message: "Could not load the file or assembly 'NCOATools_NET.dll' or one of its dependencies. The specified module could not be found."
- If you get this error message after launching iMove and logging in, you have some additional install steps.
- NCOA Toolkit is looking for files that are not present on your computer.
- You must download and install the "Visual C++ Redistributable for Visual Studio 2015" from here:
- https://www.microsoft.com/en-us/download/details.aspx?id=48145
- Click Download.
- Select vc_redist.x64.exe – if your computer is 64 bit
- Select vc_redist.x86.exe – If your computer is 32 bit
- After downloading double click on the executable file and follow the installation instructions.
- When finished installing, you must restart your computer.
- Run iMove again and login, you should no longer get the error message.
Upgrading iMove (in place upgrade) if your version is prior to 3.0.0
Note: It is best practice for all users to be on the same version of iMove.
- Login to the Portal at https://customer.csiinc.com and download iMove to your workstation.
NoteYou will need your CSI Website User Name and password. If you do not have this information, please contact support.
- Uninstall the existing version of the Accumail Move API 2.0 by going to Add/Remove Programs and finding Accumail Move API 2.0. Click on the three dots and select Uninstall.
- Run the AccumailToolKit.exe from the downloaded iMove to install the AccuMail Move Toolkit 2.0. Run through the setup wizard.
NoteThis ToolKit is refreshed on a consistent basis and you may get a Microsoft Defender Warning. More Info, then “Run Anyway”
- Unzip the downloaded zip file and right click to Run as Admin the iMove Setup 3.0.0.4.exe (or latest version) file.
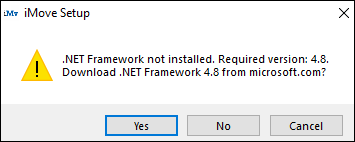
- If you do not have .NET 4.8 installed on your computer, you will be prompted to install from a Microsoft Web Page.
- iMove is now ready for use.
WarningBeginning with iMove 2.5.4, if your backup is exceptionally large, iMove will require it to be truncated before the program can proceed. You will be given the following warning and you must click OK in order to continue. This will purge the backup table and the product will ensure that the table will not grow excessively provided you have the Automatic Purge Setup under Tools - Options. CSI recommends this be set to no more than 3.
About the license key
When you first log into iMove, the license process will attempt to register your license key automatically by calling back to CSI to get your iMIS information. If the information that CSI has on record is accurate then you will not be prompted with any license key information. It will update your license information automatically.
If the process cannot call CSI or the license key information does not check out with what CSI has on record, then you will be prompted to enter a license key manually. You will need to obtain this key by contacting support. After the license key has been validated and entered, you will be able to use iMove on your iMIS database. Since the license key is stored in your iMIS database, you will only need to enter this key once per database. Installing iMove on a new computer will not require you to re-enter your license key.
NoteChanging the "Licensed To:" name for iMIS will require a new license key. If the license key detects a change in this, it will follow the same process as above trying to call back to CSI to verify your product information. In most cases, if you are prompted for license information it is likely that we do not have your updated iMIS information. Contact support with a screen shot of the current iMIS System Setup and a new key will be emailed to you.
- Log into iMIS as an administrator (manager).
- Click File > System Setup.
- Copy and send to support.
iMove Setup
Do the following to set up iMove:
iMove Launch and Login
-
Launch iMove from Start > All Programs > CSI Programs > iMove
-
Log into iMove using your iMIS user name and password.
- DSN represents your iMIS 10 ODBC server location.
NoteThis information is provided for archive purposes only. iMIS 10.6 is no longer supported as of version 2.3.21.
- The web server represents your iMIS 15 (and above) application server location.
-
The first time you log into iMove you will need to create new objects on the database. When prompted, click OK.
-
Enter your iMIS SQL server user name (usually SA) and its Password and click OK.
Setting up iMove
- When you purchase iMove, CSI places a PAF order with SmartSoft on your organization’s behalf. The License Key and Toolkit Key are generated by SmartSoft and sent to both you and CSI. These keys are required to set up iMove. Help can be found here: https://ncoa.smartsoftdq.com/pafms/Help/html/948e3bbd-a19f-4e10-8cd2-7c375f43a664.htm
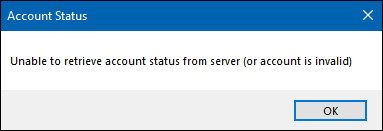
- The first time you log into iMove, you will receive the error below. This section walks you through setting up the PAF, so the error should not appear again.
- Go to Tools > NCOA > NCOA Setup > PAF Setup. A browser window will open and direct to https://ncoa.smartsoftdq.com/pafms/Account/Login.
- Click Register.
- Enter your username, license key (both provided by SmartSoft) and your email address. You can now log into the PAF Management System. Ensure your PAF is listed and has a status of Enabled.
- In iMove, go to Tools > NCOA > NCOA Setup > Account.
- Enter the user mame, web service license key, and toolkit license.
- Click OK.
- Click Refresh PAF List. The selected PAF dropdown and Account Statistics section populates.
- Run iMove.
Using iMove
On the iMove Data Pull screen, there are multiple options for selecting addresses to be sent for verification. Specific Member Types, Categories, Statuses, and Addresses can be selected. The values displayed are pulled from the iMIS database.
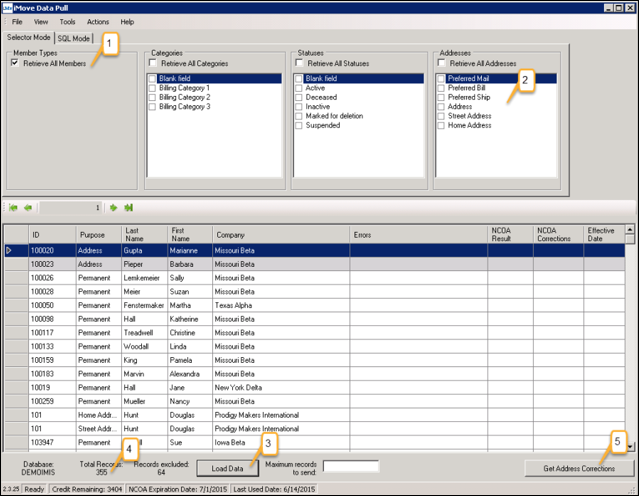
NoteOn the bottom bar of the interface, iMove displays when your NCOA credit account expires (NOTE: new PAFs only need to be remitted when there are changes to it; it will not expire). When applicable, the quantity of credits remaining will also display (i.e., if you do not have unlimited credits).
- Checking All or leaving all individual values unchecked in each section will select everything.
- Checking Mail, Bill, or Ship in the Addresses section will select the corresponding preferred address for verification.
- Click Load Data to return the records from your defined criteria.
NoteThe minimum record set for verification is 100. The current record count is displayed just below the Addresses section. Alternately, you may pull the addresses with a SQL statement. Refer to Handling Large Record Sets Using SQL Mode.
-
Click Get Address Corrections. You will be prompted to load the data first.
-
Click OK to load the data.
-
Click Get Address Corrections again.
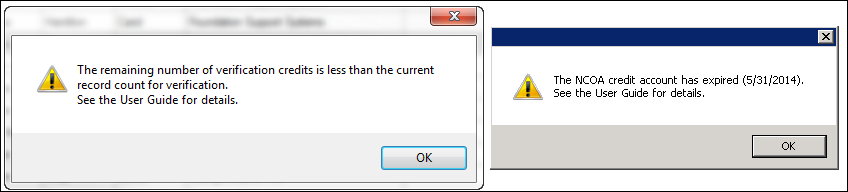
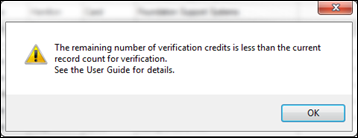
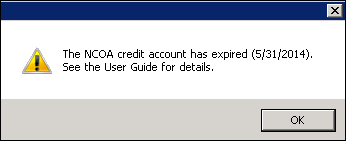
- If there are insufficient credits to send the data or if the NCOA credit account will expire soon, the below dialog box will display, respectively.
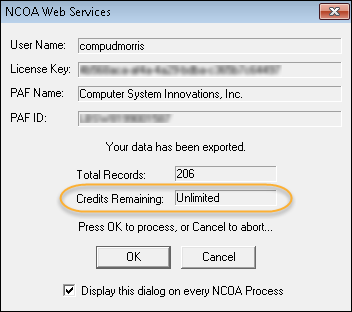
- An NCOA Web Services dialogue box will open displaying user name, license key, PAF name, PAF ID, the current record count for verification and the remaining number of verification credits on your account. If the address credits are running low please contact support to order additional credits. Click OK.
- The dialogue box will display the status of the verification process.
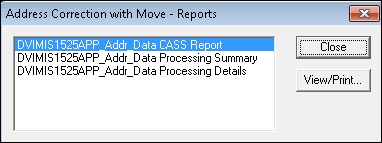
Once complete, you will receive a Web Services Results window that allows you to view NCOA results for you address data, if desired.
- These reports are saved automatically as PDF in a folder called NCOAOut. The folder is automatically created in the same path where you chose to save the comma separated value file previously.
- If desired, you may view the data prior to importing into iMIS by selecting the report you wish to view and clicking on View/Print.
- Click Close and the data import to iMIS will begin. A progress will display at the bottom of the iMove window.
- Click OK to continue once the import completes. The NCOA results will display in the iMove Data Pull window.
On the next few pages you will find a list of NCOA Result, Move Type, and NCOA Correction code definitions that correspond to the NCOA Result, NCOA Corrections, and Effective Date columns below. The NCOA address verification and import to iMIS is now complete.
Handling Large Record Sets Using SQL Mode
When verifying a large set of addresses, it is best to break them up into smaller groups. iMove should be able to handle up to 400,000 addresses in a single set. However, if you have a single member type/status combination that contains more than 400,000 records, you can use SQL Mode to split them up for processing.
To use SQL Mode, write a query in the space provided, or write it in Management Studio and paste it in the window. The query should only return two fields: the ID of the record and the address number field for the address you want to verify. Address number fields for the preferred mail, bill and ship addresses can be found in the iMIS Name table at: MAIL_ADDRESS_NUM, BILL_ADDRESS_NUM or SHIP_ADDRESS_NUM.
Here is an example query that would verify the preferred mail address for "C" member type records, with a status of "A":
Select ID,MAIL_ADDRESS_NUMFrom NameWhere MEMBER_TYPE = 'C' andSTATUS = 'A'
You can substitute member type and status values that apply to your organization, as well as add other types of filters to refine the query.
WarningPlease remember, the ID field is a varchar field and as such, will not work well when using between or greater than or equal unless you convert the field to integer. So consider "convert(INT,ID)" instead of ID when using ID in a where clause. For example: Select ID, MAIL_ADDRESS_NUM FROM Name where convert(int,ID)>100000 and convert(int,ID)<200000
Another method to break up a large record set in SQL Mode is by using the MODULO operator. The MODULO operator is expressed using: %. You can refer to the following link for more information on MODULO:
This operator is used to divide a number by another number and return the remainder of the division only. For example, if we take any sequence of numbers and divide them each by 3 using MODULO, the result will of each will always be one of three numbers: 0, 1, 2. Here is an example, using the query above:
SelectID,MAIL\_ADDRESS\_NUMFrom NameWhere MEMBER\_TYPE = 'C' andSTATUS = 'A' andconvert(int,ID) % 3 = 0
Using this pattern, you would run address verification, change the 0 to a 1 and run it again, then finally change the 1 to a 2 and run the final verification. This effectively divided the record set into thirds for processing.
iMove options
There are several options available for customization of iMove.
Click Tools > Options to open the Options window.
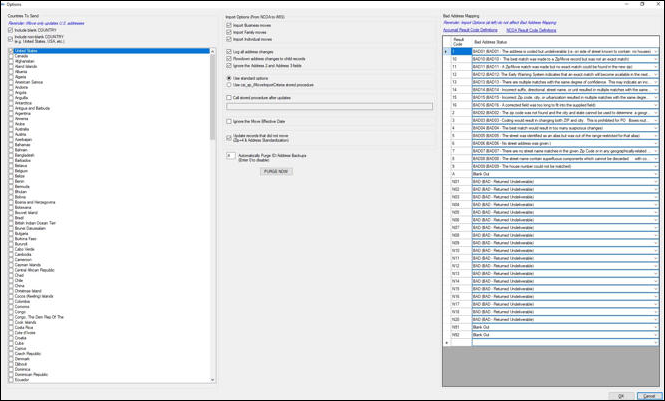
Countries To Send
Include Blank Countries – selects addresses where country is "blank" – most users should pick this option. Currently, NCOA processing can only occur on U.S. addresses. In the future, when foreign country processing becomes available, you may select additional countries from the checkbox list.
Import Options (From NCOA to iMIS)
| Option | Explanation |
|---|---|
| Import Business moves | NCOA Move code is "B" |
| Import Family moves | NCOA Move Code is "F" |
| Import Individual moves | NCOA Move Code is "I" |
| Log all address changes | All address changes will be logged regardless of which address tab they appear on. The Name_Log entries take the form: <ac:structured-macro ac:name="unmigrated-wiki-markup" ac:schema-version="1" ac:macro-id="97071683-af16-4791-b79b-3536c6d2d352">ac:plain-text-bodyName_Address.FULL_ADDRESS [Purpose] : [old address] -> [new address] Name_Address.BAD_ADDRESS [Purpose] : [old address] -> [new address] </ac:plain-text-body></ac:structured-macro> Entries are written as USER_ID = 'NCOAUPDATE' |
| Flowdown address changes to child records | This will force address changes from the first address tab (Address Number 1) parent record to flow down to child records, if the child record's first address tabs full address matches the parent record's full address. Please note, if you have this option on, avoid selecting child records, since the order of updates may result in the same child record getting updated by both flowdown and NCOA processing. |
| Ignore the Address 2 and Address 3 fields | Do not send Address 2 and Address 3 fields to SmartSoft. Address 2 and Address 3 will remain unchanged UNLESS: - There is a change of address OR - The address returned from SmartSoft is longer than 40 characters, then iMove will need to use Address 2 and 3 to store the address sent back from SmartSoft |
| Use standard options | Use default options to process address updates. If you choose to use standard options, you cannot use a stored procedure. |
| Use csi_sp_iMoveImportCriteria stored procedure | You will need to write this stored procedure for usage – see example in User Guide. Also note, if you select this option, the import Business, Family, and Individual moves options will be disabled, as well as the option "Update Records that did not move (Zip+4 & Address Standardization)". |
| Call stored procedure after updates | Allows for a user-written stored procedure to be called following the NCOA address updates. Enter the name of the stored procedure in the textbox provided. |
| Ignore Move Effective Date | If checked moves that occur in the future are imported – providing they meet the criteria below |
| Update records that did not move (Zip+4 & Address Standardization) | Enable this option to update ZIP+4, CRRT, BAR_CODE and DPB values for records that did not move, but a good match was found. Enabling this option is highly recommended. |
NCOA Backup Data Purge
iMove maintains its own backup table of all address corrections. As this table can grow quite large, we have added the ability to automatically purge older records from this table. To view the number of records you have in this table, you can run this statement (from SSMS)
select COUNT(*) From csi_Ncoa_backupdata
There will be a prompt, upon starting the iMove program (below), the first time iMove is run. The default setting retains the 2 most recent set of records only.
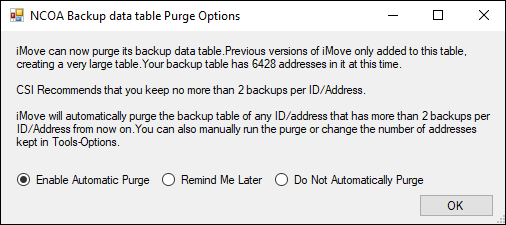
After opening iMove, this setting can be modified, or turned off, at any time. Go to Options, and change the number of record sets to keep by entering that number in the box (Automatically Purge ID/Address Backups). Entering the number 0 will turn this option off.
Clicking 'PURGE NOW' will display a window showing how many records it will be purging, before proceeding.
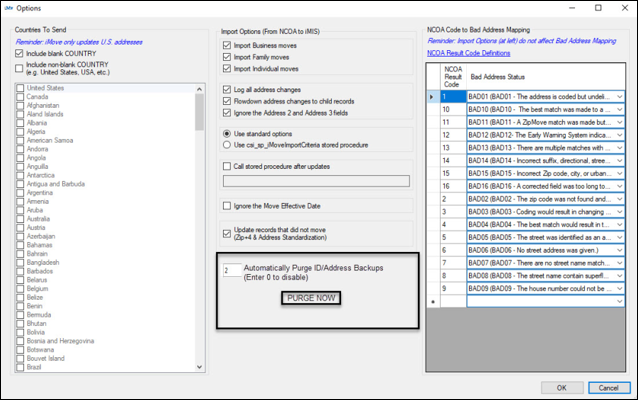
Bad Address Mapping
This feature is available to users who have the BAD_ADDRESS general lookup table in their iMIS database and have selected the "Use standard options" import option.
Use iMove to automatically update "bad" addresses in iMIS.
NoteIn order for this feature to work, you must have "Update records that did not move (Zip+4 & Address Standardization)" enabled.
During processing records are first checked against the Accumail Database to ensure they are a true mailable address. If the Accumail Result Code (see Accumail Result Codes) is a zero (0) then the address is then sent for National Change of Address processing. Therefore, any Accumail Result code other than zero (0) can be assumed to be a "Un-mailable Address" and could be marked as such.
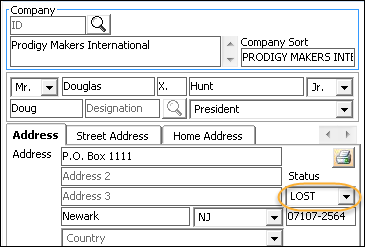
However, any address that does pass Accumail processing and is determined to be a mailable address, is sent to the National Change of Address database to see if the address has a move on file (Remember, only moves in the last 18 months are returned). NCOA Result Codes of A, N91, and N92 can be assumed to be a valid move and as such, if the address was marked LOST, it could now have this status cleared.
In the example below, an address is marked lost, and we would clear this Status if the NCOA Result Code of A, N91, or N92 was returned.
Configuration
Do the following to set the configuration:
-
Prepare the BAD_ADDRESS table:
-
Create BAD_ADDRESS, general lookup/validation table. This link may be helpful when attempting the setup: the iMIS Desktop documentation
-
Per your company business rules, populate BAD_ADDRESS with the relevant code(s). Now these values will be available in iMove.
NoteBad address mapping and using iMove to change the BAD_ADDRESS flag is a configuration that is specific to your needs. You should make the sure the results match what you are expecting by running on a smaller data set. In general, Accumail Result codes other than 0 indicate a non-deliverable address, and these will NOT be sent for National Change of Address processing. Only Accumail result codes of 0 are processed by the National Change of Address system. Therefore, a result code of 0 for Accumail should not be used.
-
Map Accumail and NCOA Result Codes to the BAD_ADDRESS table:
- In iMove, go to Tools > Options and enter a valid code in NCOA Result Code.
NoteSee Accumail Result Codes Definitions and NCOA Result Code Definitions (within this document) or, click the links on iMove’s Options to view descriptions for each code.
- To flag an address as bad based on the result code, select a status other than “Blank Out” from the Bad Address Status drop down list:
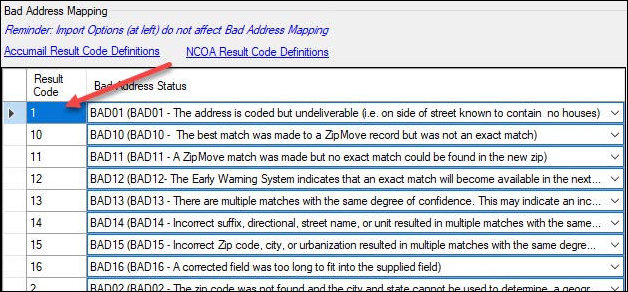 Note
NoteAfter new values are entered in BAD_ADDRESS, the Options window must be closed and reopened to refresh the Bad Address Status drop-down list.
- To unflag an address as bad based on the result code, select the status "Blank Out".
-
A sample of mapping of the Accumail Result Codes (see Accumail Result Codes above) might look like:
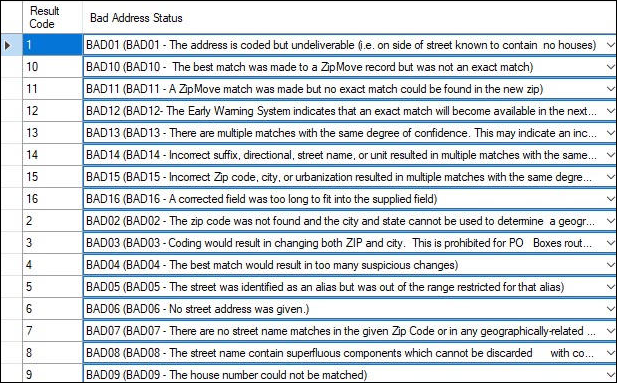
NoteNumbers 1-16 are Accumail result codes (see Accumail Result Codes) and indicate the address is not real or deliverable. They were and are not processed for NCOA.
- The NCOA Result Codes are listed in the section NCOA Result Codes (NCOA_COA_CODE). If your organization uses the BAD_ADDRESS field in iMIS and addresses are manually marked bad when mail is returned, then the recommendation is to blank out the BAD_ADDRESS field when the NCOA Result is A, N91, or N92.
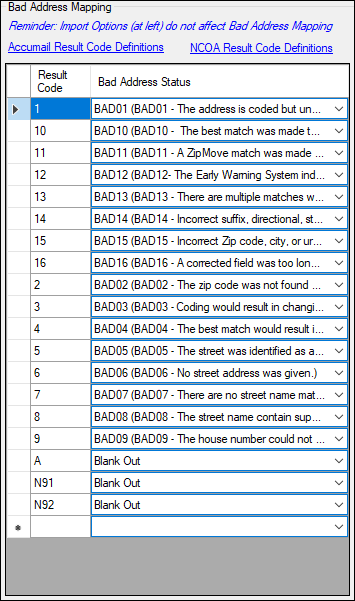
In the above example, we have created Bad Address status codes to let us know exactly why an address is bad - numbers 1-16 are Accumail result codes and indicate the address is not real or deliverable. Codes A, N91, and N92 reflect that the address is deliverable and that there was a move found as such, IF the BAD_ADDRESS flag was set in iMIS, we are blanking it out.
In Order to setup the above:
Mapping grid rows may be deleted by selecting the row header and then pressing the
Users choosing to use the “Use csi_sp_iMoveImportCriteria stored procedure” import option instead can still access the NCOA Code to Bad Address mapping by accessing the csi_iMoveNCOACodeBadAddressMappings table in their custom SQL.
Accumail and NCOA code definitions
The following are Accumail and NCOA code definitions:
Accumail Result Codes
This column will contain only one of the following codes for each address:
| Code | Explanation |
|---|---|
| 0 | The address has been successfully coded. |
| 1 | The address is coded but undeliverable (i.e. on side of street known to contain no houses). |
| 2 | The ZIP code was not found and the city and state cannot be used to determine a geographical area to search. |
| 3 | Coding would result in changing both ZIP and city. This is illegal for PO BOX and route type addresses. |
| 4 | The best match would result in too many suspicious changes. |
| 5 | The street was identified as an alias but was out of the range restricted for that alias. |
| 6 | No street address was given. |
| 7 | There are no street name matches in the given ZIP code or in any geographically-related ZIP code. |
| 8 | The street may contain superfluous components which cannot be discarded with confidence. |
| 9 | The house number could not be matched. |
| 10 | The best match was made to a ZIPMOVE record but was not an exact match. |
| 11 | A ZIPMOVE match was made but no exact match could be found in the new ZIP. |
| 12 | The Early Warning System indicates that an exact match will become available in the next database update. |
| 13 | There are multiple matches with the same degree of confidence. This may indicate an inconsistency in the USPS data. |
| 14 | Incorrect suffix, directional, street name, or unit resulted in multiple matches with the same degree of confidence. |
| 15 | Incorrect ZIP, city, or urbanization resulted in multiple matches with the same degree of confidence. |
| 16 | A corrected field was too long to fit into the supplied field. |
| 17 | Media Error. The database could not be read because of a hardware or system problem. |
| 18 | Process Fault. Processing was interrupted due to serious program error. Please contact technical support. |
| 19 | DPV No Match. The address was found in the Zip+4 data, but not matched in the DPV reference. |
NCOA_MOVE_TYPE
This column can contain exactly one of the following coded for each address:
| Code | Explanation |
|---|---|
| B | Business Move |
| F | Family Move |
| I | Individual Move |
NCOA Result Codes (NCOA_COA_CODE)
If the address passes the Accumail validity test (indicated by an Accumail Result Code = 0), the address is matched up against the National Change of Address (NCOA) database to determine if a change of address has occurred. One of the following result codes will be returned indicating the result of the attempted match:
| Code | Explanation |
|---|---|
| A | COA Match |
| N00 | NO Match |
| N01 | Found COA: Foreign Move |
| N02 | Found COA: Moved Left No Address(MLNA) |
| N03 | Found COA: Box Closed No Order(BCNO) |
| N04 | Cannot Match COA: Street Address with Secondary |
| N05 | Found COA: New 11-digit DPBC is Ambiguous |
| N06 | Cannot Match COA: Conflicting Directions: Middle Name Related |
| N07 | Cannot Match COA: Conflicting Directions: Gender Related |
| N08 | Cannot Match COA: Other Conflicting Instructions |
| N09 | Cannot Match COA: High-rise Default |
| N10 | Cannot Match COA: Rural Default |
| N11 | Cannot Match COA: Individual Match: Insufficient COA Name for Match |
| N12 | Cannot Match COA: Middle Name Test Failed |
| N13 | Cannot Match COA: Gender Test Failed |
| N14 | Found COA: New Address Would Not Convert at Run Time |
| N15 | Cannot Match COA: Individual Name Insufficient |
| N16 | Cannot Match COA: Secondary Number Discrepancy |
| N17 | Cannot Match COA: Other Insufficient Name |
| N18 | Cannot Match COA: General Delivery |
| N19 | Cannot Match COA: New Address not ZIP+4 coded, New address primary number not DPV confirmable or Temporary Change Of Address |
| N20 | Cannot Match COA: Conflicting Directions after re-chaining |
| N66 | Daily Delete |
| N91 | COA Match: Secondary Number dropped from COA |
| N92 | COA Match: Secondary Number dropped from input address |
| EM | Expired Move (Address change was found, but is older than 18 months and therefore no change has been made) |
NCOA_CORRECTIONS
This column can contain zero or more of the following codes for each address:
| Code | Explanation | Code | Explanation |
|---|---|---|---|
| A | Normal street match | S | Urbanization corrected |
| B | PO BOX match | T | ZIP+4 corrected |
| C | Route type match | U | House number corrected |
| D | 'Unique ZIP' match | V | Unit number corrected |
| E | 'Small town' match | W | Secondary unit designator corrected |
| F | Alias match | X | Firm corrected |
| G | 'Highrise alternate match | Y | Street swapped with firm |
| H | Firm match | Z | Street swapped with alternate |
| I | Highrise match | 0 | Dual address changed to PO BOX |
| J | Highrise default match | 1 | Dual address street match |
| K | Route default match | 2 | Input city is not preferred but is acceptable |
| L | Street name corrected | 3 | Street standardized |
| M | Street suffix corrected | 4 | Unit not verified |
| N | Predirectional corrected | 5 | Leftovers found |
| O | Postdirectional corrected | 6 | ZIPMOVE match |
| P | City corrected | 7 | LACSLINK match |
| Q | State corrected | 8 | SuiteLink Match |
| R | ZIP corrected |
Choose Save Directory
Use this option to set up the folder where the newly created address files from NCOA will be stored.
Stored Procedure example
This stored procedure imports all records with move updates that have already occurred as long as they are a successfully coded match or an EWS (Early Warning System) match.
CREATE PROC [dbo].[csi\_sp\_iMoveImportCriteria] (
@id VARCHAR(10),
@addrNum INT,
@firstName VARCHAR(20),
@lastName VARCHAR(30),
@company VARCHAR(80),
@streetAddr1 VARCHAR(40),
@streetAddr2 VARCHAR(40),
@streetAddr3 VARCHAR(40),
@city VARCHAR(40),
@stateProvince VARCHAR(15),
@zip VARCHAR(10),
@ncoaEffectiveDate DATETIME,
@ncoaResult VARCHAR(2),
@ncoaMoveType VARCHAR(2),
@ncoaCorrections VARCHAR(40),
@ncoaCoaCode VARCHAR(5),
@errorMessage VARCHAR(255) OUTPUT
)
AS
-- From NCOA Documentation (codes omitted for brevity)
DECLARE @recordMoved BIT; -- Set to 1 if there was a move of any type, otherwise 0
SET @errorMessage = '';
-- Was there a "MOVE Update"?
SET @recordMoved = 0;
IF @ncoaMoveType <> ''
BEGIN
SET @recordMoved = 1; -- Set Move Here
END;
-- See above for what these codes mean
IF @ncoaResult NOT IN (0, 12)
BEGIN
-- Only allow successful or Early Warning updates
SET @errorMessage = 'Return code is not a match or an EWS match';
GOTO ErrorExit;
END;
-- Check to see if move has occurred
IF @ncoaEffectiveDate > GETDATE() AND @ncoaEffectiveDate IS NOT NULL
BEGIN
-- The person is probably moving but it has not happened yet; do not update record
SET @errorMessage = 'Move code was returned but this move has not occurred';
GOTO ErrorExit;
END;
ErrorExit:
RETURN;
GO
GRANT EXEC ON [csi\_sp\_iMoveImportCriteria] TO IMIS;
GO
Another stored procedure example can be found below.
SET ANSI\_NULLS ON;
GO
SET QUOTED\_IDENTIFIER ON;
GO
-- =============================================
-- Author: Justen
-- Create date: 3/5/2015
-- Description: Sample stored procedure to run after iMove completes.
-- This is a simple example and should be used as a template.
-- =============================================
CREATE PROCEDURE csi\_sp\_RunAfterImoveSample
AS
BEGIN
-- Prevent extra result sets from interfering with SELECT statements.
SET NOCOUNT ON;
-- This will update the initiation dates for members within a specific university.
UPDATE Demo\_Individual
SET IN\_INITIATION\_DATE = GETDATE()
WHERE IN\_INIT\_UNIVERSITY = 'Example University';
-- Insert into the name\_log table for event logging.
INSERT INTO Name\_Log
VALUES (
GETDATE(),
'CHANGE',
'CHANGE',
'999999',
0,
'Changed by iMove after run stored procedure'
);
END;
GO
Setting up iMove on a second machine
Since iMove requires some files to be created as part of the setup of the system, including the PAF file, Customer Info, and FTP information. This information may need to be transferred to a different machine so you can have 2 or more machines with iMove on them. To do this, follow the following procedure.
- On the machine that you originally set up iMove, and submitted your PAF files (Processing Acknowledgement Form), locate your iMove NCOA Toolkit directory. C:\Smartsoft\NCOA.
- In this directory there will be many files…copy the following files:
- By default, these directories are hidden. In order to copy the 3 Bin files to their new location, you will need to change your folder options to 'Show hidden files'.)
- NCOACustInfo.bin
- NCOASetup.bin
- PAF.pdf
- PAFData.bin
- Install iMove on the second machine.
- Locate the iMove NCOA Toolkit directory on the second machine directory: C:\Smartsoft\NCOA
- Ensuring iMove is closed, copy the files you copied in step 1 to the appropriate directory.
- Open iMove on the second machine.
- Once logged in, verify your settings have transferred.
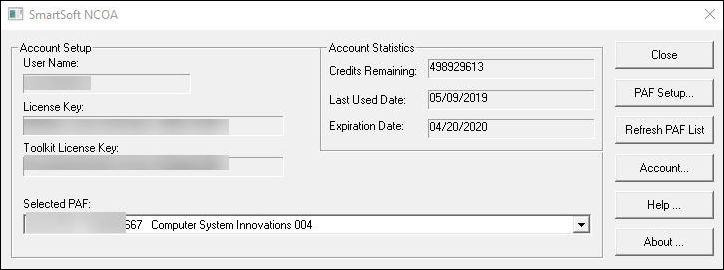
- Click Tools > NCOA > NCOA Setup.
- Verify your User Name, License Key and Toolkit License Key and the PAF selected from the drop down are correct.
Remitting a PAF form
PAF forms must be signed and remitted when new accounts are created or when information on the PAF changes. Do the following:
- Go to Tools > NCOA > NCOA Setup…> PAF Setup.
- Login to the Smart Soft website.
- From the PAF Management System Dashboard, create a New PAF. You cannot modify an existing form.
- Complete the PAF form.
- Click Save.
- Sign the PAF form (digitally or handwritten).
Digital signature option
- Click Sign Now.
- Sign your name (requires all capital letters).
- Specify if you are a List Owner or a Broker/List Administrator.
- Click OK.
- Remit the form. You may print the form out and fax it to SmartSoft, but most iMove users will send the form to [email protected] with the subject of “Revised PAF from for [Company x]”.
Handwritten signature option
- Click Print Interim Copy. The PAF form will open.
- Print and sign the form.
- Remit the form. You may print the form out and fax it to SmartSoft, but most iMove users will send the form to [email protected] with the subject of “Revised PAF from for [Company x]”.
Once completed, return to iMove:
- Open Tools > NCOA > NCOA Setup.
- Click Refresh PAF List.
- Select your new PAF
Warning notifications
The remaining number of verification credits is less than the current record count for verification
If there are insufficient credits to process the requested records a notification will be displayed. Please contact CSI, Inc. at support if you need more address credits added to your account.
The NCOA credit account will expire soon
Contact support to purchase additional address credits or update the account.
The NCOA credit account has expired
Contact support to purchase additional address credits or update the account.
Updated 3 months ago