Using FRease
Do the following to launch and run FRease:
- Launch the FRease application from the Windows Start Menu or desktop shortcut.
- You will be prompted for a user name and password. Log into FRease using your iMIS username and password.
- The web server represents your iMIS application server URL. This URL is the same as the one that is displayed when you log in to the iMIS Desktop.
Setting up FRease Activity Type
In order to see FRease activity types in iMIS, you must have the activity type defined in iMIS.
-
In iMIS, navigate to Customers > Set Up Module > Activity Type and select New.
-
Fill in the fields as they are shown in the screenshot below.
NoteIt is not recommend to enable Allow User Edit.
-
Apply any access keywords that your fundraising staff has in place so that they are the only ones that can see this activity type.
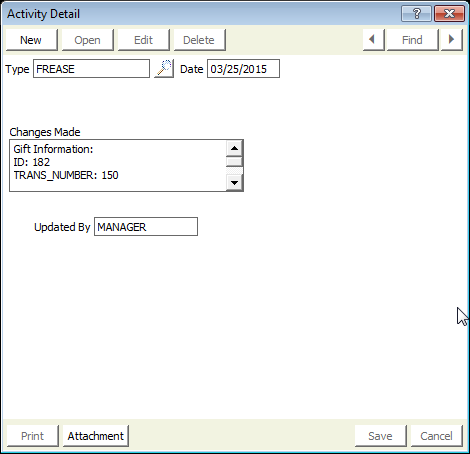
When you click on the FRease Activity detail on a record, it will now look like this:
Access Keywords
To Create or Add a New Access Keyword:
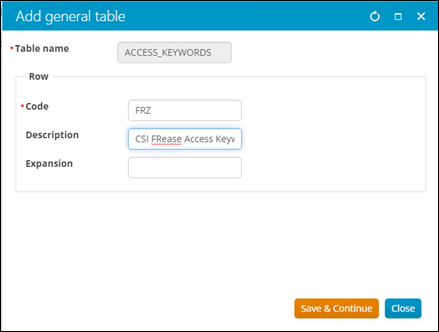
- Open iMIS and navigate to Customers > Set up tables > General Lokup/Validation.
- Choose the ACCESS_KEYWORDS table from the drop-down menu
- Click New and enter FRZ for the Code, then click Save.
In the Staff Site, it will look like this:

To Apply an Access Keyword:
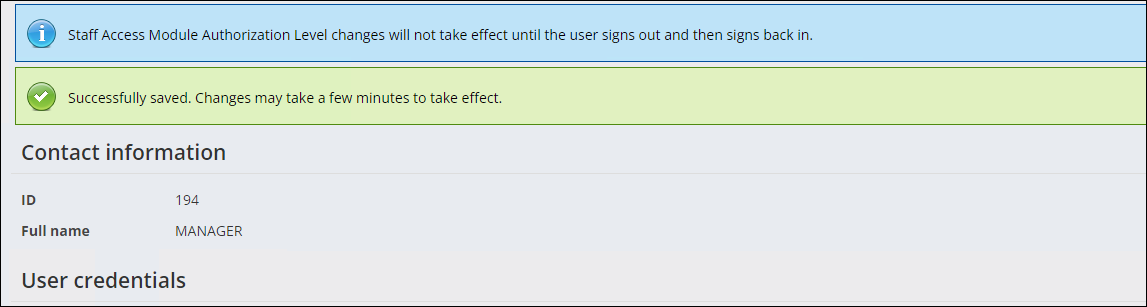
- Go to Customers module and find the user that you want to add the FRZ Access Keyword. Then click User Credentials.
- Then scroll to the bottom (you may have to expand Staff access to see the Access Keywords). Then click on Add access keyword.
- Click the checkbox next to FRZ and click OK. Click Save.
In the Staff Site:
- Go to Community > Security > Users and find the user you would like to add the FRZ access keyword to.
- Scroll down to Staff Access and expand that to see the Access Keywords settings.
- Find where it says Add access keyword and then select the checkbox for FRZ and hit OK.
You will get these warnings in both iMIS Desktop as well as the iMIS Staff Site:
We recommend waiting 30 minutes to 1 hour for the changes to take effect!
Finding donations
-
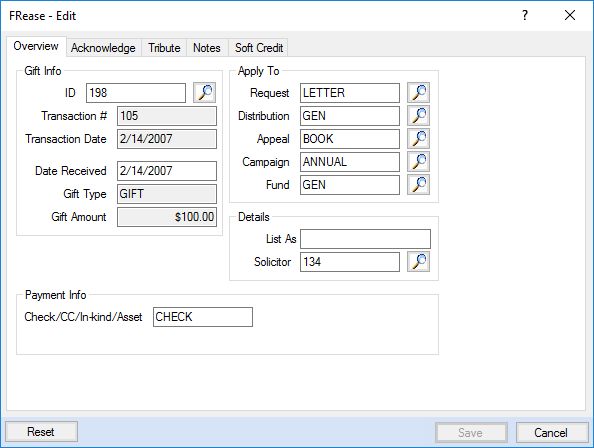
Enter a criteria search in the Gift/Pledge Info section. You can enter the Donor iMIS ID, the Transaction number, the Transaction Date, Distribution, Appeal, Campaign, and/or Fund.
NoteThese criteria are cumulative. For example: if you enter a Donor ID of 101 and a Transaction Date of 7/18/2005 FRease will return all the donations for the iMIS user ID 101 filtered for that transaction date.
-
Select a transaction by clicking on a row in the Transaction Results grid, and click Edit to open the Editor window.
-
If you know the name, but not the Donor ID, you can open the Contact Search window by clicking on the magnifier icon next to the Donor ID text box.
- The Contact Search window offers more search criteria to find a Donor ID.
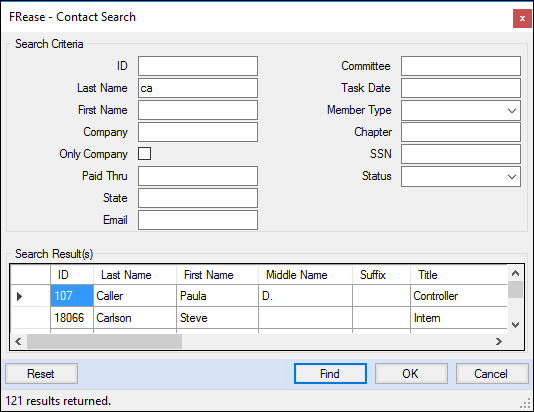
-
Enter a search criteria and click on the Find button, then select a donor from the Search Result grid by clicking on a specific row and click OK to return to the main window.
Changing Basic Information
To Change the Donor ID:
- Select the Overview tab on the Edit window.
- Click the magnifier icon next to the ID textbox to open the Contact Search window.
- Find the new Donor ID from the Contact Search window.
- After selecting the new Donor ID and returning to the Overview tab, click OK.
- Click Save to apply the changes. A confirmation message will display once the changes are applied saying "The gift has been updated".
NoteYou can also enter directly the new Donor ID in the Gift Info instead of using the Contact Search window.
To Change the Solicitor ID:
- A. Enter a Solicitor ID into the Solicitor field in the Details section of the Overview tab
- Alternatively, click the magnifier icon next to the Solicitor field from the Details section of the Overview tab: it will open the lookup window selection.
- Click OK to validate the selection.
To Change the Date Received:
- Enter a new date in the Date Received field from the Gift Info section of the Overview tab (Do not forget to click Save to apply the changes).
To Change Pledge Installment Dates
- Select the Installments tab from the Edit window.
- Enter the new Installment Date and Amount in the last row of the grid.

- To remove an existing installment, select the corresponding row of the installment to remove by clicking on it to highlight it.
- Click Delete Selected.
NoteIf there is corruption with the installment dates (i.e. duplicate installment dates), FRease will pop up a general warning 'Installment date 01/01/2018 appears to have an error, please check the Database for any data corruption.', when attempting to click the INSTALLMENT tab. If this error is shown, it is recommended that the installment dates be reviewed, to see if there are any duplicate dates. This would have to be fixed outside of FRease.
To Adjust All Installment Dates At Once
- Use the Move Billing panel.
- You can add/remove a day or month.
- You can also set the dates to be last day of the month.
To Change Unpaid Pledge Installment Amounts
- Select the Installments tab from the Edit window.
- Adjust the amounts as desired and add/delete as necessary.
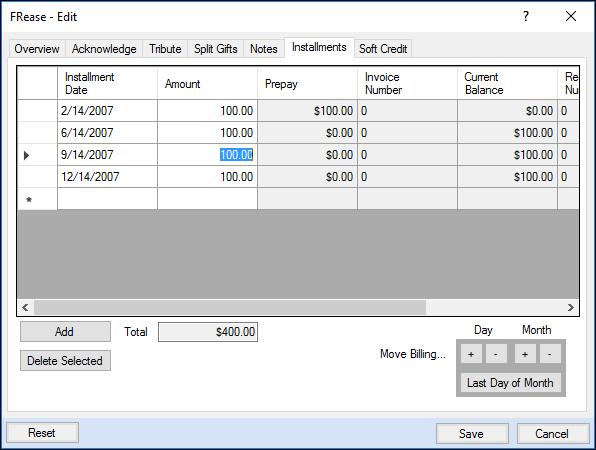
- Click save when done. FRease will report if the unpaid amounts do not total correctly.
Important notes about changing pledge amounts.
- Only un-paid pledge installments can be adjusted
- The total of the un-paid installments cannot be changed and must match
- If the Pledge has has a Debit Memo or Credit Memo posted to it, the unpaid installments cannot be changed. It is recommended that you change the installments before entering a Debit Memo or Credit Memo against the pledge.
To Change Fund and Distribution Codes
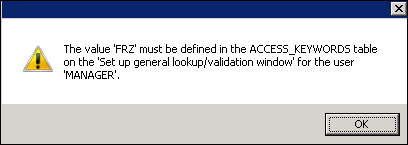
The access keyword FRZ must be defined for the iMIS user logging in to change the fund or distribution codes. If not, FRease will display the following warning message:
To Change the Fund:
- Enter the new code in the Fund field on the Apply To section of the Overview tab.
- Click on the magnifier icon next to it to select a valid Fund value.
- Select the new fund and click OK to validate.
NoteThe fund cannot be edited for split gifts.
To Change the Distribution Code:
- Enter the new code in the Distribution field on the Apply To section of the Overview tab or click the magnifier icon next to it to select a valid value.
- Select the new distribution code and click OK to validate.
NoteThe distribution code cannot be edited for split gifts.
To Change the Check Number:
Enter the new check number in the Check/CC/In-kind/Asset field on the Payment Info section of the Overview tab.
NoteIf the check# is grayed out then it is linked to a Cash Table and therefore cannot be edited by FRease.
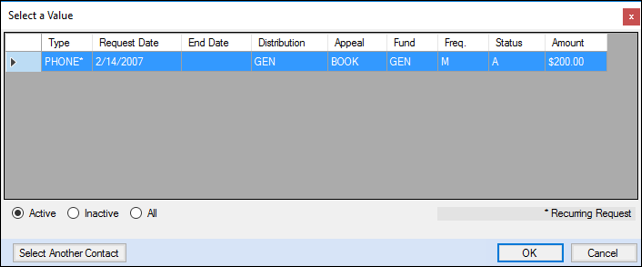
To Change the Request
Either click on the Magnifier Glass icon next to the Request input field to open the request selection window and then select a request record (row) by highlighting the line and clicking the OK button.
Either highlight the current text of the Request input field and hit the Delete button or Backspace button to clear out the current value to indicate you want to release the associated Request activity with the current gift.