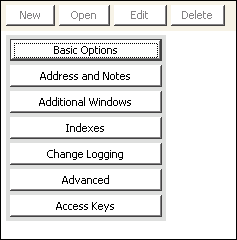
Configuring membership options
NoteSeveral of these configuration options are now accessible from the Staff site (Settings > Membership > General). See Membership and Contacts for more information. Additional configuration options that are not accessible through the Staff site are described below.
Staff users can configure a wide range of membership options from the Advanced Accounting Console, including maintaining your customer data according to organizational requirements for:
- Basic customer options
- Customer addresses and notes
- Lookup information for searching with the Find window
- Fields in the Change Log
- Advanced customer options
NoteWhere you see the (Desktop only) notation, refer to the Classic Desktop documentation for more information.
Working in the Configure membership options window
In the Advanced Accounting console, go to Settings > Membership > Configure membership options.
Basic Options
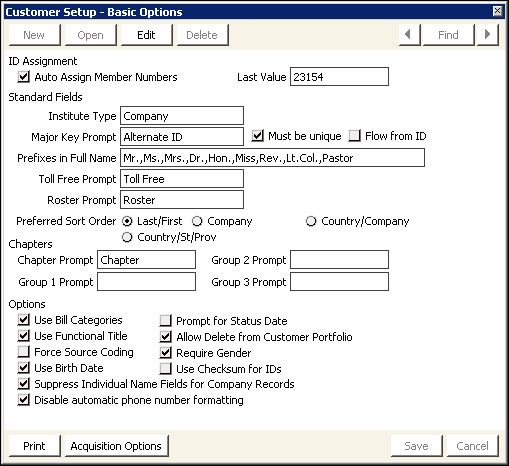
In the Advanced Accounting Console, go to Settings > Membership > Configure membership options and click Basic Options.
ID Assignment
Auto Assign Member Numbers - When selected, iMIS assigns a unique customer identification number (ID) to each new customer. This option is required if you allow users to create new accounts.
Standard Fields
Institute Type
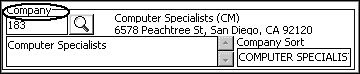
Assigns a label to the standard company field. The default label is Company. If you assign a different label, that label is used in various reports and windows. You might want to assign this label according to the types of customers you serve. For example, if your customers are hospitals, assign Hospital.
Example of Institute Type with the Company label assigned
Major Key Prompt
(optional) Specifies a primary field through which you can retrieve records. Enable the option by entering a prompt (label) in the field. iMIS then makes the field available for referencing and searching for customer records throughout the system. Useful reference keys are certificate numbers, license numbers, and old customer ID numbers.
📘 Note
The data entered in this field displays in parentheses next to the main ID on most customer reports.
Flow from ID
When selected, links the Major Key Prompt field with the Id field, populating the Major Key Prompt field with the user's ID.
Toll Free Prompt
Specifies a label for toll free numbers. This customized prompt is displayed on several iMIS windows.
Roster Prompt
Specifies a heading for rosters.
Preferred Sort Order
Designates the sort order of search results as one of the following:
- Last/First - Results are sorted by last name, first name.
- Company - Results are sorted by the designated company sort, last name, first name.
- Country/Company - Results are sorted by country, state/province, company sort, last name, first name.
- Country/St/Prov - Results are sorted by country, state/province, last name, first name.
📘 Note
The sort options use the labels you configured for Institute Type (by default Company) and State/Province (by default St/Prov).
With the exception of certain types of searches for which the default sort order would not be appropriate, results are sorted according to the sort order chosen. The following types of searches override the default sort order:
- Name - Results are sorted by last name, first name, then if prospects are included in searches, whether the person is an existing customer or a prospect.
- Company/Company Only - Results are sorted by the designated company sort, then the preferred sort order.
- Task Date - Ignores the preferred sort order. The data is not sorted.
- Ad Hoc - If the ad hoc search uses company ID as a criterion, the results are sorted by the designated company sort field. Otherwise, the preferred sort order is followed.
📘 Note
The Company search (which includes personal records that are associated with company records) adds prospect status as the final sort column.
Options
Use Bill Categories
When selected, establishes a sub-grouping of customers. Its primary purpose is to sub-categorize customers for billing purposes.
Use Functional Title
Not implemented.
Force Source Coding
When selected, requires a source code entry for income-oriented transactions.
Use Birth Date
Select to display the Birth Date field.
Suppress Individual Name Fields for Company Records
When inserting a new company record, the fields in the Name area are dimmed (unavailable) and cleared of any values as soon as the Customer Type field is set to a company customer type. When a record is saved as a company record, the data is refreshed so that the company fields shift to the top of the area and the Name area is no longer visible.
📘 Note
If a customer type is later changed from a company to an individual, the fields in the Name area of the record are restored; however, any values that existed for those fields are not restored.
Prompt for Status Date
When selected, iMIS prompts the user to accept or override the customer's status date (not recommended for most users).
Allow Delete from Customer Portfolio
(Desktop only) When selected, authorized users can delete customer records directly by clicking Delete on the Customers area (Customers > Manage customers). A warning box prompts the user to verify the deletion.
📘 Note
Disabling this option offers a safeguard against the accidental deletion of records. To delete customer records, mark them for deletion with D (or a code-string beginning with D) in the Status field of Customers > Manage customers (recommended).
Require Gender
(Desktop only) This option does not automatically require a gender (M or F) be entered in the field. iMIS automatically populates the Gender field based on the entry in the Prefix field of the Customers area. Prefixes that do not indicate gender (such as Dr.) will not be automatically populated, and the entry will need to be made manually.
Use Checksum for IDs
When selected, adds checksum digits to IDs that are automatically generated for Name records.
📘 Note
This checksum digit will only apply to IDs automatically generated for Name records. It is not used for other automatically assigned IDs.
Generates and sends a system setting report to your report destination.
Acquisition Options
(Desktop only) Opens the Customer Setup - Acquisitions Options window, where you can specify the member types to use when converting prospect record to Name records.
📘 Note
This button is displayed when iMIS is licensed for Acquisition Management in iMIS Desktop.
Address and Notes
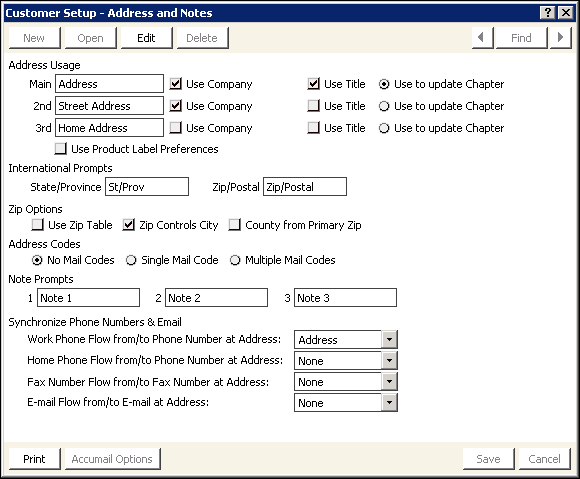
In the Advanced Accounting Console, go to Settings > Membership > Configure membership options and click Address and Notes.
Address Usage
Use Company and Use Title
Enable these fields to designate whether or not to print an individual's title and company name. For example, enable both options to include the title and company for a business address. For a home address, disable one or both options, as appropriate. If you use small (1-inch) labels, you might need to disable these options so that the address fits within the five-line limit.
📘 Note
You can toggle the Use Company or Use Title fields between special purpose label runs. For example, if you normally include titles on your larger labels but today need to run a set of 1-inch labels, temporarily disable the Use Title field.
Use to Update Chapter
Enable these fields to automatically update the chapter when inserting and editing an address.
📘 Note
You will need to populate the Zip_Code.CHAPTER field using SQL for each zip code, or a range of zip codes, in the table before this option will automatically update the chapter. You must also enable the Use Zip Table and County from Primary Zip options located under Zip Options. This functionality is only available in the Desktop and Advanced Accounting Console. Chapters will not be updated when a zip code is modified using the Staff site or a public-RiSE site.
Use Product Label Preferences
Select to allow selecting specific label preferences for any mailing label on a per-customer basis. For example, you might want to mail a social invitation to a customer's home address instead of the default office address.
📘 Note
You can also use this feature to assign specific label addresses for billing products on a per-customer basis.
International Prompts
Specify labels for address information that varies depending on your locale.
State/Province
Specifies the appropriate label (prompt) for the state or province fields. For example, if most of your customers live in the United States, label the field State. If most live in Canada, label the field Province.
Zip/Postal
Specifies the appropriate label (prompt) for the zip code or postal code fields. For example, if most of your customers live in the United States, label the field ZIP. If most live in Canada, label the field Postal Code.
📘 Note
The Customer Management system comes with a table of U.S. ZIP codes with their corresponding cities, states, and counties. Using this table, iMIS offers a variety of ZIP Code look-up features that you can activate.
Zip Options
Use Zip Table
When selected, speeds up the initial data entry process by automatically filling in the city and state values when a ZIP code is entered. With this option enabled, iMIS auto-fills the city and state when those fields are left blank.
Zip Controls City
When selected, causes ZIP code look-up to override and correct any city and state values that don't match the city/state table values for the ZIP code. This correction only occurs when you enter or edit a ZIP code.
📘 Note
If you enable the Use Zip Table and Zip Controls City options, you can still override the city name after you enter the zip code, if necessary. To do this, enter the zip code for the address; the city and state fields display default values. Replace the city name with the value you want and save the record (tabbing through the zip code field will not change the city back to the default). To revert to the default city, delete the city, state, and zip values. Then save and edit the record, and re-enter the zip.
County from Primary Zip
Select to fill in the county field from the ZIP code.
📘 Note
If you are licensed for AccuMail and have enabled the AccuMail option Update County/Congressional District, that AccuMail option will override the County from Primary Zip option.
Address Codes
The Mail Code is a special-purpose field that comes into play at bulk mailing times, such as subscription mailing. It provides special groupings within a mailing: the mail code field allows a higher level sort for ZIP-sorted labels and printouts. With this feature, you could segregate all first-class mail recipients at the end of a label run by giving the first-class records a consistent mail code while leaving the regular mail records uncoded.
No Mail Codes
(Desktop only) Select this field if you do not need the Mail Code field. This deactivates the Mail Code field in Customers > Manage customers.
Single Mail Code
(Desktop only) Select this field if you want to use the Mail Code field but only need a single mail code to apply to any of the available three addresses. This activates the single Mail Code field in Customers > Manage customers, although it will be used with all of the customer's addresses.
Multiple Mail Codes
(Desktop only) Select this field if you want to use the Mail Code field and need a distinct mail code for each alternative address. Choose this option if you have special groupings to apply to customers only when a certain address is specified, such as a business versus a home address.
📘 Note
To use the Single Mail Code and Multiple Mail Codes options, the MAIL_CODE lookup/validation table must be set up.
Note Prompts
Note 1, 2, and 3 - Label the note fields to standardize their purpose or usage for all customers. For example, you could reserve one for internal-use notes or reminders, one for text to display in the customer directory, and the last to record directions to a customer's office.
Used to generate and send a system setting report to your report destination.
Accumail Options (QAS Options)
Opens an options window for your address verification software (either AccuMail or QuickAddress).
Indexes
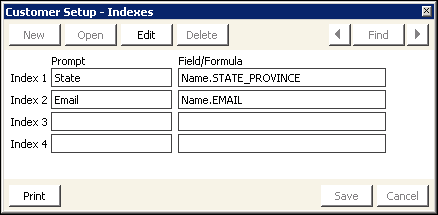
In the Advanced Accounting Console, go to Settings > Membership > Configure membership options and click Indexes.
The Customer Setup - Indexes window enables you to specify up to four additional indexes. Beginning at the top, fill in the fields for Index 1, and continue for as many of the four available indexes as you need.
When you make a change in this window, you must update the parameters for Report Specs (go to Utilities > Report Specs) to make the parameters be the same order as your indexes.
Index 1, 2, 3, and 4 Prompts
Use these fields to enter the prompts (labels) to represent the indexes in the Find window. If an index is based on a single field (rather than a field combination or formula), use the same label that represents that field on other windows or reports.
Index 1, 2, 3, and 4 Field/Formulas
Use these fields to define the indexes to be maintained by specifying the exact field name or formula based on one or more field names. The field name to specify here is the internal system name for the field versus the label that displays for that field on windows and reports.
To use the fields, you have to format the field names exactly. These names need precise capitalization and punctuation: File_Name.FIELD_NAME. File names display with initial capitals (with underscores as needed), field names display in all capitals (with underscores as needed), and the two parts are connected with a period.
📘 Note
You can only assign indexes to fields in the Name and single instance user-defined tables.
Print button
Used to generate and send a system setting report to your report destination.
Change Logging
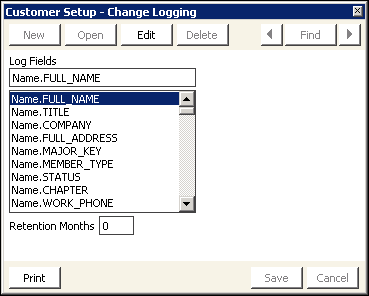
In the Advanced Accounting Console, go to Settings > Membership > Configure membership options and click Change Logging.
Log Fields
Lists the existing fields for which to track change log history.
Retention Months
Specifies the number of months you want to retain the change log history for a particular field.
Generates and sends a system setting report to your report destination.
Advanced
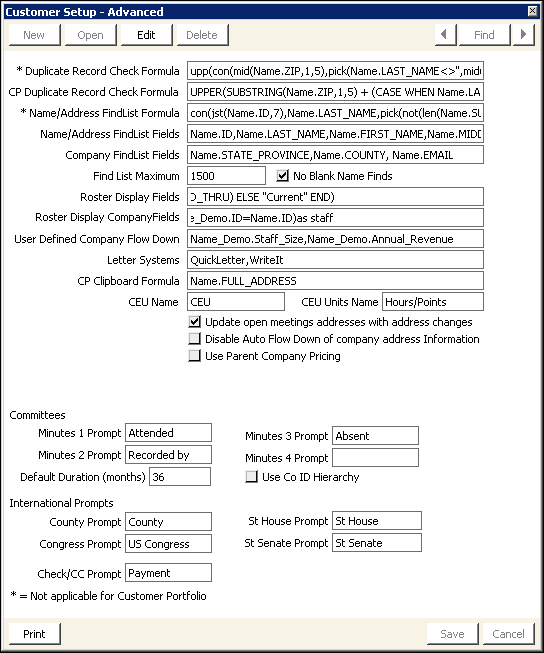
In the Advanced Accounting Console, go to Settings > Membership > Configure membership options and click Advanced.
Duplicate Record Check Formula
(Desktop only) Prevents duplicate records from being entered in iMIS by specifying an Omnis duplicate match key formula.
📘 Note
The Duplicate Record Check Formula does affect Customers. The CP Duplicate Record Check Formula governs duplicate checking within that area.
CP Duplicate Record Check Formula
(Desktop only) Prevents duplicate records from being entered in Customers > Manage customers by specifying a SQL duplicate match key formula.
📘 Note
To maintain data integrity, the two duplicate record check formulas must be equivalent. If the two formulas are not equivalent, duplicate record checking in Customers does not detect duplicates of entries made outside of Customers and duplicate record checking in areas other than Customers does not detect duplicates of entries made in Customers.
Name/Address FindList Formula
(Desktop only) (required) Specifies, along with Name/Address Find List Fields, what is displayed in each line in the Find window. These lines are composed of the contents of specified fields from the Name table. This formula specifies the format for how those fields are displayed in each line.
📘 Note
To have a field displayed in the Find window's display lines, include it in both the list formula and the list field. 📘 Note
This field does not apply to Customers > Manage customers.
The default formula combines ID, customer name, customer type, title, and company (entity) name on each line. To improve the appearance of the output, it has provisions to print certain fields only when they have a value. If you change this formula, keep in mind that the character limit is 255. To create space for fields you want to add, remove other fields such as Name.MIDDLE.
Name/Address FindList Fields
(Desktop only) Specifies the fields that are displayed in the Results tab and the Record History tab of Customers > Manage customers. When you enter fields in the Name/Address FindList Fields field, use a comma to separate the fields. For example, enter Name.ID, Name.LAST_NAME, Name.FIRST_NAME, Name.TITLE, Name.COMPANY, Name.MEMBER_TYPE, Name.COMPANY_SORT to display the ID, Last Name, First Name, Title, Company, Member Type, and Company Sort for each customer record in the Results tab.
📘 Note
The following fields are required in the Name/Address FindList Fields field: Name.ID, Name.FIRST_NAME, Name.LAST_NAME, and Name.MEMBER_TYPE.
Name.ID must be the first field shown in the list, and must be included even if you do not intend to display it. 📘 Note
Only fields from the Name table can be entered in the Name/Address FindList Display Fields field. 📘 Note
You must restart iMIS for your changes to take effect.
Company FindList Fields
(Desktop only) Specifies the fields that are displayed in the Company Find window in Customers > Manage customers.This can be especially useful when you want to find a particular branch of a company.
📘 Note
To include additional fields in the Results and Record History tabs, you must add the field names to the Name/Address FindList Fields configuration option, not the Company FindList Fields configuration option.
Find List Maximum
(Desktop only) Specifies the limit on how many records the Find window locates before it stops the search. This provides a practical limit to boost performance. This maximum only comes into play when you enter non-specific selection criteria for the search that could return many or all records in the database.
No Blank Name Finds
(Desktop only) When selected, this option prevents blank-space searches from being performed. For example, when the option is enabled, searching for a name through the Find window requires that you enter a letter or series of letters in the Name field. When the option is cleared, searches can be completed without entering search criteria. Blank searches return all records.
Roster Display Fields
(Desktop only) Specifies the display fields for member records viewed in the Roster tab.
- If a customer record does not contain a value for a field specified in the Roster Display Fields field, a value will not exist for the field and the next value in the list is displayed.
- Only fields from the Name table can be entered in the Roster Display Fields field.
- You must restart iMIS for your changes to take effect.
Roster Display CompanyFields
(Desktop only) Specifies the display fields for company records viewed in the Roster tab.
CP Clipboard Formula
(Desktop only) Specifies the fields that are copied to the clipboard when the Clipboard icon is clicked in Customers > Manage customers.
CEU Name
Specifies a label for iMIS CEU (Continuing Education Units) fields.
📘 Note
For iMIS to create activities for the label you enter in the CEU Name field, you must create an activity type with the same name on the Activity types window.
CEU Units Name
Specifies the label for the units awarded for continuing education. For example, Hours or Points. This label displays in appropriate CEU-related windows and reports.
Update open meetings addresses with address changes
Allows customer address changes to flow to open events.
Disable Auto Flow Down of company address Information
Disables the flow down of company (parent) address information to linked (child) records when selected.
Minutes 1, 2, 3, and 4 Prompts
Specifies the labels for options that are active in the Membership > Committees > More > Minutes window.
📘 Note
The options are active in the Minutes window only when a label is entered in a Minutes Prompt field.
Default Duration (months)
Specifies the number of months that you want iMIS to use when calculating the default through date in the Membership > Committees window.
📘 Note
To indicate that the committee appointment does not expire, leave this field blank or set it to zero.
Use Co ID Hierarchy
When selected, links a committee to the ID of a company record. A subset of customers associated with the company branch of the committee is created. For example, a committee called Awards has been set up. Your association has 25 branches with their own Awards committees. Normally, you would create 25 separate Awards committees with a different name for each branch. Now, you can create 25 company name records that represent each branch. You can then open the Membership > Committees window and set the filter to work with only one of the 25 branch company IDs. This feature also enables you to create separate customer rosters for each branch or a report of all Awards committee members regardless of branch.
You will see a Filter by Company ID option on the Membership > Committees window once the Use Co ID Hierarchy field has been enabled. Select Filter by Company ID to open the Find window to allow selecting a company record that represents a special division of your organization. When you make a selection in the Find window, the ID and name of the organization display in the top of the Membership > Committees window.
The Filter by Company ID option also filters the committee members. When an ID has been selected and is displayed in the top row of the window, inserting a new member to the committee will add the member to that company's committee.
County Prompt
Specifies the label for the County field.
Congress Prompt
Specifies the label for the US Congress field.
St House Prompt
Specifies the label for the St House field.
St Senate Prompt
Specifies the label for the St Senate field.
Check/CC Prompt
Specifies the label for the Check/CC field for all iMIS payment windows.
📘 Note
The length of this field is limited to ten characters.
Generates a system setting report and sends it to your report destination.
Access Keys
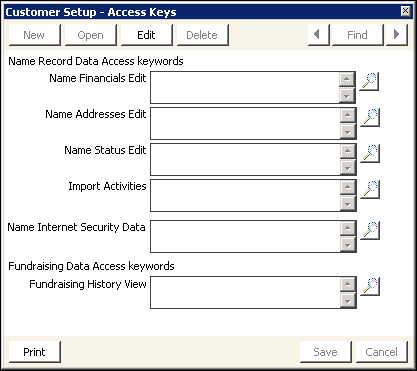
This window defines access keys that an administrator can assign to selected iMIS users, authorizing the users to view and edit customer information, such as fundraising or financial information.
📘 Note
(Desktop only) Please refer to the Classic Desktop documentation for more information.