Defining an event
Configuring and managing an event is simple and easy to do. From the Staff site you can manage program items, registration options, accounting, pricing, and more!
All event related tasks that can be configured in the Staff site should be performed in the Staff site. The only tasks that should be performed in the Advanced Accounting Console or the Desktop should be the ones that are still exclusively performed in the Advanced Accounting Console or Desktop. See Additional options from the Advanced Accounting Console for more information about the AAC/Desktop specific tasks.
For more information about other event configuration options, see the Event Display content item.
Creating an event
📘 Note
While creating your event, use the Show in search fields to hide your unfinished event from public users.
- From the Staff site, go to Events > Add event.
- Select one of the following options:
- Create a new event
- Choose a template - From the Template drop-down, select an event template. Fields defined in the event template will automatically populate for the new event. To learn more about event templates, see Working with event templates.
- Copy existing event - Select an event to copy and use as the basis for the new event. All information including registration options, program items, and questions will be copied into the new event. Begin typing the event name, or select an event from the drop-down. Clicking the down arrow will load more results that you can scroll through.
📘 Note
Member-type and stored-procedure pricing are not copied to the new event if the existing event was created using the iMIS Desktop.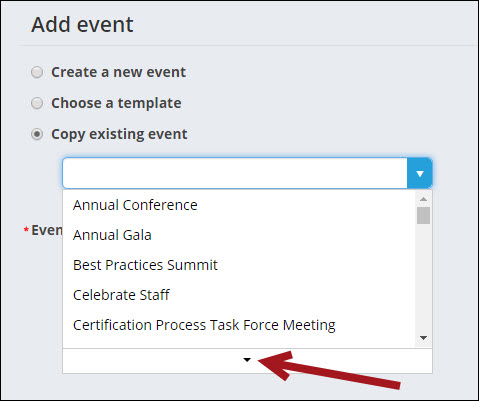
- Enter the Event code. The code must be alphanumeric, contain no spaces, and be unique among all events.
- Click Next.
- (Info tab) General information:
- (required) Enter the Event name.
- From the drop-down, select an event Category.
Category options
- Chapter
- Conference
- Education
- Expo
- Fundraising
- Regular Event
- Seminar
- Online
If the Category appears with an (undefined) tag, then the Category was manually entered in the Advanced Accounting Console, and has not yet been added to the MEETING_TYPE general lookup/validation table. To properly define custom Category values, see General lookup tables.
- Enter a Description of the event.
- Specify the Start/End dates and times.
- Select a Country from the drop-down.
- Specify the event Address, City, State or County / region, and Postal code.
- Select an Event contact if you want to list a primary contact for the event. This contact can be used in reporting, included in queries, and referenced in communications by using the CsEvent.Contact Id business object property. For an example of this contact being used in a communication, see the BCC field in the sample Event Confirmation communication template.
- Enter a Capacity if you want to limit the number of registrations to accept.
- Select an image from the Image drop-down, or browse to Upload new image.
- Specify the Show in search Beginning and Ending dates and times. The time displayed for the date and time fields is determined by the system Time zone setting:
- If these fields are left blank, the event will display in search results and on the calendar for non-staff users to see.
- If the date range includes the current date, the event will display in search results and on the calendar for non-staff users to see.
- If the date range does not include the current date, only staff users will see the event in search results and on the calendar.
- When an event date is changed, each of the associated program items will need to be reconfigured as well.
- Select a Default program sort to set the initial sort order of the event’s program items. You can choose Day, Category, Track, or View all. Website users can change the program items’ sort order when viewing the event.
- The Event Showcase Layout fields allow you to display separate event content records to public and Staff users. Select the content record to display for each view, or enter a shortcut. The default view for public users (Default) is the event Showcase (~/EventDetail), and the default view for Staff users (Owners) is the event Dashboard (~/EventDashboard). See Configuring system content for more information.
📘 Note
These options will only be used when the event is reached through the Event.aspx redirector.
📘 Note
The contact is only visible when in the Edit Event window. -
Registration section:
- In the Registration opens and Registration closes fields, enter the registration date and time range. The registration date and time range is based on the system Time zone setting.
- In the Registration closed message field, enter a message to display on the event Showcase page after the registration has closed to public users. The default message is Registration is closed.
- Enable Allow registering others to allow users to Register Someone Else.
- When Registering Someone Else, Staff and authorized members are able to search for an existing contact to register, or add a new contact.
- The ability to add a new contact when Registering Someone Else is not configurable. If you select Allow registering others, staff and authorized members can always add a new contact.
- The user who pays for the registrant's event fees is listed as the Bill To party on those registrations. All accounting and invoice transactions are tracked under the Bill To ID.
- If you have an event for which this is appropriate, enable Allow adding guests. When enabled, the registrant can add a new contact and register that person as a guest for an event via the Add a guest link. When you register someone as a guest, their registration is linked to the current registration.
- To allow users to change their program items after checkout, enable Allow itinerary changes after checkout. If there is a cutoff date for changes, enable Cutoff date for itinerary changes.
- If Allow itinerary changes after checkout is enabled for the event and the Cutoff date for itinerary changes has not passed, public users can still change program item registrations even after the event registration has closed, with the following exceptions:
- Fundraising program items
- Program items with a promotion discount applied
- Cancelled registrations
- If Allow itinerary changes after checkout is enabled for the event and the Cutoff date for itinerary changes has not passed, public users can still change program item registrations even after the event registration has closed, with the following exceptions:
- Enable time-based itinerary conflicts in program items by default - When enabled, all new program items for the event will have the option Enable time-based itinerary conflicts selected by default. When registrants register for program items containing conflicting time schedules, they will be alerted. The warning will appear in the event registration window and again in the cart.
- Allow non-staff registrants to complete registration with conflicts in their itinerary - When enabled, registrants are allowed to checkout of the cart even when itinerary conflicts are present. If this option is not enabled, registrants will not be able to checkout until the conflict is resolved.
📘 Note
Staff users and system administrators can always register themselves and other contacts for the event, regardless of the date or time.Click for details
📘 Note
Make sure that the contacts available in your Register Someone Else query (configured in the Event Display content item) are also included in the Contact security query for All authenticated users. Otherwise, users who attempt to register someone else could receive an error if they do not have access to the contact they are trying to register.📘 Note
The Relationship types EVTGUEST and EVTGUESTOF must be added. See Adding the event guest relationship types for more information. - Additional information - Enter HTML text in the editing panel. There is no limit on size.
- Click Save.
Working with event templates
Using event templates is a great way to guarantee similar events contain consistent information, recurring events are ready for registration in seconds, and minimal time is spent on event creation. Once an event template is created, it can be saved for future use as the basis for a new event.
🚧 Warning
Once an event template is created, it cannot be deleted.
Event templates can be managed in the Staff site from Events > Manage templates:
- To edit a template, click the event template Name, then click Edit.
- Click Add new template to create a new event template.
- Questions, program items, registration options, and any other event features can be defined and saved in a template.
📘 Note
Any changes made to a template will not apply to existing events using the template.
Defining event pricing and registration options
You must define at least one registration option or program item for users to be able to register for your event. For example, you might choose to create several registrations to include different options for your members, students, vendors, staff members, guests, and presenters. Each registration option allows you to set a price and registration cut-off date.
Open the event for edit:
- (Pricing tab) Define the specified pricing options:
- From the drop-down, select a Financial entity to be associated with this event. If this option is left blank, the default Financial entity will be used.
- (if VAT is enabled) Specify the Canadian or VAT taxation rules to apply.
- If your organization uses the Canadian taxation method with either GST or GSTINC as the taxation authority, enter the Tax Authority.
- Organizations using the GST tax authority can also choose to Tax by Address.
- If your organization uses the VAT taxation method, specify the VAT rule.
Click for details
If you have enabled Canadian taxation or VAT taxation, you can specify the taxation rules to apply. The taxation method is set up for your default organization (from the Staff site, go to Settings > Finance > Financial entities).
See Taxation for more information.
- Enter the Early Cutoff date and Regular Cutoff date for the registration prices, if applicable. The dates entered are inclusive. For example, Early Cutoff date is the last day for the early discount price.
- If you have entered a cutoff date, save the event before adding registration options.
- In the Registration options section, select Add:
- (Info tab) Enter the general information for the registration option:
- Enter a Registration option code and a Registration option name. The code must be alphanumeric, contain no spaces, and be unique among all registration options and program items in the event. After you save the Registration option code, you are unable to change it.
- Enter a Description, Start date and time, End date and time, and Capacity for the registration option.
- Enable Print tickets to allow tickets to be printed for registrants of this registration option. When enabled, a Print tickets button appears on the Dashboard for the event. You can print tickets With badges or Without badges.
- Enter a Category, Track, and Sort sequence for the registration option.
- Award continuing education units to attendees when event is closed - Select to define continuing education unit types and the number of units to be awarded. See Defining and marking CEU attendance on the web for information on setting up CEUs and marking attendance.
- Continuing education type - Select a CEU type from the drop-down. This drop-down will not display if no CEU types have been defined.
- Units to award - Enter the number of units to be awarded.
- Select an image to display for the registration option.
- (Pricing tab) Set the prices and availability for the registration option.
Click for details
- If Allow adding guests is selected in the event definition, the following can be defined:
- Available to guests - Select this checkbox if you would like the Registration option to be available to guests of an event attendee. If there is only one guest registration option defined, that option is automatically selected.
- From the Staff site, go to Settings > Contacts > Relationship types.
- Add the Event Guest and Event Guest of relationship types:
- Select Add relationship type:
- Relationship type - EVTGUEST
- Description - Event Guest
- Reciprocal type - EVTGUESTOF
- Enable Use dates.
- Click Save.
- Select Add relationship type:
- Relationship type - EVTGUESTOF
- Description - Event Guest of
- Reciprocal type - EVTGUEST
- Enable Use dates.
- Click Save.
- Select Add relationship type:
- Also available to primary registrants - Select this checkbox if you would like the Registration option to also be available for the person registering for the event.
Adding the event guest relationship types
You will receive the error Not a valid role when attempting to checkout in the Cart if the guest relationship types are not added to the Relationship types table. To add these relationships, do the following:
- You can set both Default and Members price fields so that your members can enjoy the benefit of a reduced fee. Note that the Default price you enter auto-fills the Members price. You can leave it to prevent any discounting, or override the price. When your members view an event, they will see only the appropriate fee.
- You can also set additional Pricing Groups for both registration options and program items. These pricing groups allow you to define a regular price, along with early and late pricing for specific groups.
- If you entered an Early Cutoff date for your event, the Early Price fields will be available. If you entered a Regular Cutoff date, Late Price fields will be available.
- To make the registration option complimentary, select the Comp option.
If the Registrant Class Determination is enabled for Member type (in the Advanced Accounting Console), then all of the pricing options should only be configured through the Advanced Accounting Console. You will still be able to define the registration option pricing options via the web, but they won't behave the way you expect, and may show up as undefined for some registrants.
To make sure web pricing options appear correctly, in the Advanced Accounting Console, go to Events > Define an event. Select the event, then click Edit > More > Web Options > Edit and enable Member / Non-Member for the Registrant Class Determination.
- If Allow adding guests is selected in the event definition, the following can be defined:
- (Accounting tab) Review the settings and make any required changes for the item.
Click for details
- From the drop-down, select a Financial entity to be associated with this registration option. If this option is left blank, the registration option will use the Financial entity defined for the overall event.
- If you are configured for Canadian or VAT taxation and want to specify specific tax options for this registration option, select Taxable:
- For Canadian taxation - If your organization uses the Canadian taxation method with GST as the taxation authority, and the registration option is taxable, select GST/HST or PST.
- For VAT taxation - From the drop-downs, select the Tax mode and VAT tax code you want to use for this registration option.
- Charitable item - Enable this option if you would like this registration option to be considered a gift. The fees for the registration option will appear in the registrant’s Giving History.
- Fair market value - Only registration options marked as charitable items can have a Fair market value. This value defines the value of the benefit (if any) that a donor is receiving in exchange for purchasing the Charitable item with which the Fair market value is associated. For event registrations, the tax-deductible amount is often calculated as the amount of the registration fee minus the Fair market value of any benefits that the registrant receives for their registration. Currently, this value is not included in any of the receipting logic.
- Income - Choose the GL account to assign to the registration option. The Default option will use the system default account for events.
- Deferred income - If you are licensed appropriately, define the Deferred income account. For an event, the Deferred income is recorded during the month in which the event occurs.
Click for details
See Taxation for more information on setting up Canadian and European (VAT) taxation methods in iMIS.
📘 Note
Be sure to use a charitable financial entity for registration options that are considered gifts.📘 Note
These accounts are defined in the GL_ACCOUNT general lookup table. See General lookup tables for more information. - (Questions tab) Click Add new to include Registration Option-specific questions:
- Type in your question.
- Select the checkbox if you would like to indicate that an answer to the question is Required.
Select the answer type from the drop-down.
- Numeric integer – The registrant can enter only whole numbers (positive or negative).
- Numeric decimal – Registrant can enter any number with up to 4 decimal places. If more are entered, they will be truncated to the fourth place (not rounded).
- Multi-line text – The registrant can enter lengthy answers in a multiple-line text box.
- Single-line Text – The registrant can enter an answer of only one line in a text box.
- Yes/No – The registrant can only choose "Yes" or "No".
- Dropdown list – The registrant can select one of several listed options.
Event organizers configure drop-down lists either explicitly, defining each option manually, or by query, defining a static group of list options for an individual question through a pre-arranged query.
The Display Value field determines the text seen by registrants. The Data Value field is only used in the database. For example, if you chose to display long sentence answers to registrants, the Data Value field would enable you to record abbreviated versions of those options in the database.
- Click Save.
Modify the question as needed.
- To adjust an existing question, select a row and click Edit selected.
- To hide a question from registrants, select the Hidden checkbox in the Questions configuration area.
- To change the presentation order of your questions, click the up and down arrows on the questions tab.
- The modifications made to questions determine the content viewed by registrants after they have selected a Registration option.
- If a SysAdmin makes changes to questions while a registrant is completing a question, it is possible that either the question or the registrant response will be lost. Ensure that your changes and updates are conducted at a time that few people will be registering.
📘 Note
Event questions responses can be reported on using the FormDefinitionFieldData and FormFieldResponseData business objects. - (Program options tab) From this tab, you can configure how each program item will display for this particular registration option: Display and allow user to add/remove, Display and do not allow user to add/remove, or Do not display. You can also enable Register by default? so that the program item is automatically selected when the registrant chooses this particular registration option. To define program items, see Adding program items to an event.
- (Info tab) Enter the general information for the registration option:
- Click Save & Close, then click Save & Exit.
If needed, you can define additional registration options so that registrants can choose between different options. In order for responses to each group of questions to be saved, registrants must select Save Response before checking out.
Adding program items to an event
Program items are specific itinerary options that registrants can choose from once they have selected a registration option. These itinerary options can be configured to only appear once specific registration options are selected, or for all registration options. They can also be configured to be automatically selected once a registration option is selected. To define program items, do the following:
- Navigate to the event Showcase tab.
- In the Program area, select Add.
- (Info tab) Enter in the general information for the program item:
- Enter a Program item code and Program item name. The code must be alphanumeric, contain no spaces, and be unique among all registration options and program items in the event.
- Enter the Description of the program item.
- Enter the Start date and time and the End date and time for the program item. The date and time range is based on the system Time zone setting.
- Enable time-based itinerary conflicts - This option will be automatically selected for new program items if Enable time-based itinerary conflicts in program items by default is enabled for the overall event (event definition). When enabled, people registering for program items containing conflicting time schedules will be notified of the program item time conflicts. The warning will appear in the event registration window and again in the cart. If you want registrants to be able to checkout even with itinerary conflicts, make sure Allow non-staff registrants to complete registration with conflicts in their itinerary is enabled in the event definition. Deselect this option if you do not want time-based conflicts to apply to this program item.
- Add or select Conflict codes as an alternative or an addition to time-based conflicts. For example, use conflict codes for program items that do not have time-based conflicts, but do have an overall scheduling conflict.
- Add a new conflict code when you want to start a new conflict that will eventually be added to other program items. To add a conflict code, type your desired code in the Conflict code field, then select Add conflict code. Continue adding as many conflict codes as necessary.
- Select conflict codes when there is already an existing program item with a defined conflict code for which you want to create a conflict with.
🚧 Warning
Conflict codes are exclusive to each event, and are not shared between events. To permanently delete a conflict code from the list, make sure it is not being used by any program item, then save the program items. Reopen the program item, and the conflict code will no longer display. - Legacy conflict code - This read-only field will appear if there are legacy (Desktop or AAC) conflict codes associated with an existing program item. Legacy conflict codes are independent from conflict codes created on the Staff site. To continue using legacy conflict codes and associating them with new program items, you will need to edit the program items in the Desktop or AAC. It is recommended that you transfer over all legacy conflict codes to the Staff site.
- Enter values for Capacity, Max quantity per registrant, Category, or Track.
- Capacity – If you set a maximum capacity, once that limit is reached, iMIS disables relevant registration buttons and links and prompts registrants to review any registrations pending in the cart, if affected. Entering no value allows unlimited registrations.
- Max quantity per registrant – If the Max quantity per registrant attribute for this event was set to greater than 1, you can add a number of guests to your registration. For example, if the attribute was set to 4, you can specify up to a maximum of four registrants as part of your registration (yourself and three guests).
- Category – Designates one or more terms, separated by semicolons, as being relevant categories for this function. For example, if the function targets both intermediate and advanced practitioners, you might enter Intermediate;Advanced.
- Track – Designates one or more terms, separated by semicolons, as being relevant tracks for this function. For example, if the function serves both managers and technologists, you might enter Management;Technical.
- Enable Print tickets to allow tickets to be printed for registrants of this program item. When enabled, a Print tickets button appears on the Dashboard for the event. You can print tickets With badges or Without badges.
- If there are multiple program items with the same start date and time, you can enter a Sort sequence to determine what order they appear in the program. Program items with the same start date and time will be sorted by this value, lowest to highest (items with a value of 0 will be the first in the order). The date and time range is based on the system Time zone setting.
- Award continuing education units to attendees when event is closed - Select to define continuing education unit types and the number of units to be awarded. See Defining and marking CEU attendance on the web for information on setting up CEUs and marking attendance.
- Continuing education type - Select a CEU type from the drop-down. This drop-down will not display if no CEU types have been defined.
- Units to award - Enter the number of units to be awarded.
- To display an image with the program item listing, choose an Image from the list or browse to Upload New Image.
- To include Additional information, enter HTML text in the editing panel; there is no limit on size.
📘 Note
A program item ending at 10 a.m. and another program item beginning at 10 a.m. are not recognized as time conflicting. If there is no ending time for a program item, a time-based conflict will not be recognized.Click for details
The program item's capacity, including the quantity selected per registrant, counts toward the event's total capacity.
📘 Note
This limitation can be overridden by staff.📘 Note
The Max quantity per registrant attribute cannot be greater than 255. - (Pricing tab) Set the prices for the program item:
- You can set both Default and Members price fields, so that your members can enjoy the benefit of a reduced fee. Note that the price you enter auto-fills the Members price. Leave it (to prevent any discounting) or override the price by lowering the amount, or selecting Comp for those members to not be charged a fee. When your members view an event, they will see only the appropriate fee.
- If you entered an Early Cut-Off date for your event, the Early Price fields will be available. If you entered a Regular Cut-Off date, Late Price fields will be available.
- To make the program item complimentary (or to include it as part of the event registration), select Comp for Default or Members prices, or both.
- (Accounting tab) Review the settings and make any required changes for the item:
- Financial entity - From the drop-down, select the financial entity to be associated with this program item. If this option is left blank the program item will use the financial entity defined for the overall event.
- If you have enabled Canadian taxation or VAT taxation in iMIS, you can select the Tax category.
- If you have enabled Canadian taxation or VAT taxation in iMIS, you can select the Tax category. The Tax category specifies the taxation rules to be applied. The taxation method is set up for your default organization (from the Staff site, go to Settings > Finance > Financial entities).
- If your organization uses the Canadian taxation method with GST as the taxation authority, select GST/HST or PST. If the program item is non-taxable, do not select an option. If the program item is taxable, select one or both options.
- If your organization uses the Canadian taxation method with GSTINC as the taxation authority (generally countries in the Asia-Pacific region), select Taxable or Non-Taxable.
- If your organization uses the VAT taxation method, select Taxable or Non-Taxable. If the program item is Taxable, enter the VAT Tax Code you want to apply.
📘 Note
See Taxation for more information on setting up Canadian and European (VAT) taxation methods in iMIS.
Click for details
- Charitable item - Enable this option if you would like this program item to be considered a gift. The fees for the program item will appear in the registrant’s Giving History.
- Fair market value - This amount is the value that a donor receives for making a Gift .
- Income - Choose the GL account to assign to the program item. The Default option will use the system default account for events. If needed, you can also choose a Deferred income account to assign to the program item. The Deferred income option is available if you are licensed appropriately.
📘 Note
Be sure to use a charitable financial entity for program items that are considered gifts. - (Questions tab) Select Add new to include program-item specific questions. If you would like to adjust an existing question, select a row and click Edit selected.
- Type in your question:
- Select the checkbox if you would like to indicate that an answer to the question is required.
- Select the answer type from the drop down.
- Yes/No – The registrant may only choose "Yes" or "No".
- Numeric integer – The registrant may enter only whole numbers (positive or negative).
- Numeric decimal – Registrant may enter any number with up to 4 decimal places. If more are entered, they will be truncated to the fourth place (not rounded).
- Single-line text – The registrant may enter an answer of only one line in a text box.
- Multi-line text – The registrant may enter lengthy answers in a multiple-line text box.
- Dropdown list – The registrant may select one of several listed options.
- Modify the question as needed.
- To adjust an existing question, select a row and click Edit selected.
- To hide a question from registrants, select the Hidden checkbox in the Questions configuration area.
- To change the presentation order of your questions, click the up and down arrows on the questions tab.
- The modifications made on the Questions tab determine the content viewed by registrants after they have added a program item to their itinerary.
- If a SysAdmin makes changes to forms while a registrant is completing a form, it is possible that either the question or the registrant response will be lost. Make your changes and updates at a time that few people will be registering.
- Click Save.
There are six different answer types available:
Event organizers configure drop-down lists either explicitly, defining each option manually, or by query, defining a static group of list options for an individual question through a pre-arranged query.
The Display Value field determines the text seen by registrants. The Data Value field is only used in the database. For example, if you chose to display long sentence answers to registrants, the Data Value field would enable you to record abbreviated versions of those options in the database.
In order for responses to each group of questions to be saved, registrants must select Save Response before checking out.
Click for details
- (Registration options tab) Configure the program item to only appear for certain registration options.
- Edit a program item and select the Registration options tab.
- For each registration option, choose how the current program item should display when a registrant chooses this registration option:
- Display and allow user to add/remove – The current program item displays the registration option, and the registrant can register for it. This option is available only if the item allows registration.
- Display and do not allow user to add/remove – The current program item displays for the registration option, but the registrant cannot register for it.
- Do not display – The program item does not display for the registration option.
- (optional) Enable Register by default?. When Register by default? is selected and either Display and do not allow user to add/remove or Do not display are chosen, registrants will be auto-enrolled for that program item.
- When you have chosen display options for each registration option, click Save & Close.
- Click Save & Close.
📘 Note
Event questions can be reported on using the FormDefinitionFieldData and FormFieldResponseData business objects.
Click for details
As an event planner, you can easily customize how program items should display for each registration option. You can define the display options from the context of a specific registration option or a specific program item. For example, you can configure the guest registration option to only display the guest-allowed program items.
Setting up event pricing groups
The pricing tab for both registration options and program items allows you to add multiple pricing groups with unique names. Each of these pricing groups has a regular price and can have early and late prices if pricing cut-off dates are defined for the event. When you create a pricing group, it can be reused for other events or for additional registration options and program items in the same event.
For example, you could create a pricing group for the president of your Board of Directors. If you have established that your Board president gets an exclusive rate as a benefit, you can designate that members of the board who have the role of president receive a special price. iMIS can take group pricing a step even further: Contacts in the Board of Directors group could have access to an event price that is different from those who are not part of the board group. Similarly, you can designate that all members of a particular group type, like committees, with a particular role, all receive the same price, unique from other registrants. If a registrant qualifies for more than one pricing group, they will receive the lowest price for which they qualify.
A pricing group can be defined as:
- Members of all committees or all chapters
- Members of all Committee groups who have certain role(s)
- Members of certain Committee group(s) who have certain role(s)
- Members of certain dynamic group(s)
- Contacts with certain member type(s)
Creating an event pricing group
- Create a new event or select an event and edit.
- Navigate to the event Pricing tab.
- Add a new registration option or edit an existing registration option.
- Navigate to the registration option Pricing tab and Add Pricing Group
 .
.
📘 Note
You can also add pricing groups for program items. Find and open the event, and in the Program area, click Add or open an existing program item. To add a pricing group, select the Pricing tab and follow the directions below.
📘 Note
To enable Add Pricing Group, you must save the registration option or program item.
- Pick one:
- Use existing pricing group
📘 Note
The Use existing pricing group option is only available if you have previously defined at least one pricing group.
- Choose a pricing group from the drop-down.
- Click OK.
- Add new pricing group
- Enter a Display name for your new pricing group.
📘 Note
Enter a name that is descriptive of the pricing group and can be reused (e.g., Board of Directors).
- (Optional) Choose a Group type.
- (Optional) Choose a Group. You can select multiple Groups.
- (Optional) If you specify a Group type or Group, you can also choose a group member Role. You can select multiple Roles.
📘 Note
You must select at least one of the options available (i.e., at least one Group type or Group) to create a pricing group. The options filter down to create a pricing option for a specific group or role. For instance, if you select a Group type, the groups available will reflect only that Group type. If you do not select a Group type, all groups will be available to select.
- View your selections in the preview area.
- Click OK.
- View your new pricing group in the registration option or program item Pricing tab.
Additional options from the Advanced Accounting Console
An event can be created and configured entirely through the Staff site, however some features are exclusively configured in the Advanced Accounting Console. Your Advanced Accounting Console includes an Events page with additional access to often-used features (Events > Define an event). For more information, see Accessing the iMIS Advanced Accounting Console from a Web Browser.
Evaluating speakers
(optional) You may wish to enter evaluation data for a speaker's activity record before closing an event. The data used to generate the activity records consists of the evaluation criteria that you define within the speaker's group. This evaluation criteria displays on the Event Function Definition - Speakers window and is indented underneath the group's heading.
To set up the speaker evaluation using event resources
You can enter several speaker evaluations for a given function, one for each speaker resource group defined on the Event resources window.
To set up speaker groups
- Go to Settings > Events > Set up tables > Event resources.
- From the Event resources window, click New.
- Enter a resource Type (for example, SPEAKER).
- Enter a Group (for example, 1, for day 1 of your event).
- Do not enter a code.
- Enter a Group Sort Order (for example, 3. This value helps numerically sort all groups listed in the Current Resources).
- Do not enter an Item Sort Order.
- (optional) Choose Id for the Field 1 Usage, so you can enter the speaker's Id number.
- (optional) Choose Text for the Field 2 Usage so you can enter comments.
- Click Save.
To set up speaker evaluation criteria
- Go to Settings > Events > Set up tables > Event resources.
- From the Event resources window, click New.
- Enter a resource Type (for example, SPEAKER).
- Enter the Group code of your speaker group (for example, 1).
- Enter a resource Code for the criteria (for example, EVAL-1).
- Enter the name of the evaluation criteria for the Title (for example "Connected with group?").
- Enter the Group Sort Order of the speaker group (for example, 3).
- Enter an Item Sort Order (for example, 2. This number helps numerically order your evaluation criteria within the speaker group).
- (optional) Select a Field 1 Usage (for example, you could choose Qty, so that you can score that part of the criteria numerically).
- (optional) Select a Field 2 Usage (for example, select Text to enter notes).
- Click Save. Repeat for as many criteria as you would like.
To enter evaluation data
- Open an event.
- Double click the function you want to edit.
- Click More and select Speakers to open the Event Function Definition - Speakers window.
- From the list, select the speaker group for which you want to enter evaluation data.
- Click Edit.
- Enter the Id of the speaker (use the lookup icon to search for an Id).
- In the text box below the Id field, enter any identifying information, such as a presentation title.
- From the list, select the first evaluation criterion.
- In the Qty field, enter the numeric score you calculated from the evaluations (record digits with up to two decimal places).
- In the text box below the Qty field, enter any additional comments.
- Repeat the process for the remaining group evaluation criteria.
- Click Save.
Speaker activity records
Speaker activity records can be viewed in the Desktop. See Speaker activity records for more information.
Viewing and assigning event function staff
Use the Event Function Definition - Staff window to:
- View all event staff roles as defined by your organization.
- View any staff members that have been assigned roles for an event function.
- Assign staff to an event function.
To create staff groups
- Go to Settings > Events > Set up tables > Event resources.
- From the Event resources window, click New.
- Enter a resource Type (for example, STAFF).
- Enter a Group (for example, 1, for day 1 of your event).
- Do not enter a code.
- Enter a Group Sort Order (for example, 3. This value helps numerically sort all groups listed in the Current Resources).
- Do not enter an Item Sort Order.
- (optional) Leave Field 1 Usage set to None.
- (optional) Set Field 2 Usage to text so you can add notes.
- Click Save.
To create staff roles for event functions
- Go to Settings > Events > Set up tables > Event resources.
- From the Event resources window, click New.
- Enter a resource Type (for example, Staff).
- Enter the Group code of your staff group (for example, 1).
- Enter a resource Code for the criteria (for example, ROLE-1).
- Enter the name of the staff role for the Title (for example Setup).
- Enter the Group Sort Order of the staff (for example, 3).
- Enter an Item Sort Order (for example, 2. This number helps numerically order your roles within the staff group).
- (optional) Select a Field 1 Usage (for example, you could choose Id, so you know who is in charge of the task).
- (optional) Select a Field 2 Usage (for example, select Text to enter notes).
- Click Save. Repeat for as many criteria as you would like.
To assign staff to an event function
- Open an event.
- Double click the function you want to staff.
- Click More and select Staff to open the Event Function Definition - Staff window.
- Select a staff role from the list. Once a role is highlighted, the Id field appears at the bottom of the window.
- Click Edit.
- Enter the ID in the Id field, or use the lookup icon to locate the individual. When you locate the staff member, double-click the name to assign it to the event function.
- Once you select a member, their name will appear next to the event function.
- Click Save.
📘 Note
If the Id field does not appear, return to the Settings > Events > Set up tables window, select the staff role you wish to assign, and make sure that Id has been selected in the Field 1 Usage option.
To view staff assigned to an event function
- Open an event.
- Double click the function you would like to view.
- Click More and select Staff to open the Event Function Definition - Staff window.
Hotel Room Block Management
iMIS Hotel Room Block Management is an extension of iMIS Events and enables you to book hotel room blocks quickly and efficiently for specific events.
This section provides information on the following topics:
- Defining hotels and room availability for your events
- Booking rooms through the event registration process
- Setting up rooms for registrants to share
- Cancelling reservations and overbooking rooms
The rosters included in your Standard Reports from iMIS Desktop provide a list of persons assigned to each room per night, so hotel personnel can manage the reservations according to their needs and policies. Additional output and inquiry information helps event managers track room reservations and room availability.
Defining hotels
You will need to create a list of available hotels for each event. If no ID exists for a hotel, you can enter the hotel contact and address information directly through the Hotels window.
To enter hotel information
- Open an event.
- Click Hotels to open the Hotels window.
- Click New.
- Enter the hotel information:
- If the hotel's record links to an associated customer record, enter the customer's Id number, and the contact name, hotel name, address, and telephone data automatically populate the appropriate fields on the Hotels window.
- If you have not created a record for the hotel, manually enter the hotel's information.
- Click Save.
- Click New for each additional hotel you want to define, and then repeat the process.
📘 Note
To locate your hotel records easily, maintain a customer type specifically for them.
To define hotel room inventory
- Open an event.
- Click Hotels to open the Hotels window.
- Select the hotel for which you need to set up a room inventory.
- Click Rooms to open the Room Types window.
- Click New.
- Enter a code for the Room Type (for example, DOUBLE or SINGLE).
- Accept the default Description, or enter another Description for the room type.
- For each reservation date, enter the date in the Date field and the number of rooms needed in the Contract field. To add dates, select the empty line directly below the last table entry, and then enter Date and Contract information for that date.
- (optional) If you also will be billing registrants for their hotel room reservations, enter the amount (per night) in the Rate field for each room type and the GL account into which the charges will be booked. This GL account may represent a liability account (for example, payable to the hotel) or an income account.
- If VAT is applicable to the room rate, enable the Taxable option and enter the appropriate tax code.
- Click Save.
- To define additional room types, click New, and repeat the process.
📘 Note
The Reserved quantity updates automatically as rooms are booked. The Avail quantity equals the contracted quantity minus the number of room nights reserved (available = contracted - reserved).
Managing reservations
Use the Register for an event window's Other tab to enter and cancel hotel reservations, check availability, and enable room sharing options.
To enter hotel reservations
Hotel reservations are entered through the Register a customer window's Other tab.
- Go to Events > Register for an event.
- From the Register for an event window, click Open or Find to search for a constituent that has already registered.
- Enter the Event code (use the lookup icon to search for the event), and Tab to the registrant ID field.
- Enter the registrant's ID (use the lookup icon to search for the registrant) and press Tab.
- Select the Other tab.
- Click Edit.
- To reserve a hotel room, select a hotel room from the Function drop-down list.
- The Hotel and address, and Room Type will auto-populate.
- Enter a non-zero number in the Qty field (defaults to 1) for the number of rooms needed.
- Enter the room Rate.
- Enter the Confirmed date of the reservation. This is the date the reservation is made on.
- Enter dates in the Arrival and Departure fields. The number of Room Nights calculates and displays.
- (optional) Enter any other relevant registrant information that the hotel will need in the Hotel Note and General Note fields.
- The Other Fields are user-defined fields and only display if they have been set up in the Configure event options window (from Settings > Event > Configure event options).
- Click Save.
📘 Note
If your reservation is for multiple-nights, treat the reservation as a single unit. For example, a hotel reservation for four nights would display with a Qty of 1 and Room Nights of 4. The hotel reservation lists as a single order with the cost calculated for each reserved night.
iMIS alerts you if the Arrival date is equal to or later than the Departure date or if you book a room for a date that is sold-out or undefined in the Room Types window. However, iMIS will allow you to overbook and reserve a sold-out room. Click Available to open the Hotel Availability window to determine hotel room availability.
To determine hotel room availability
- From the Register for an event window, click Open or Find.
- Enter the Event code (use the lookup icon to search for the event).
- Enter the registrant's ID (use the lookup icon to search for the registrant).
- Select the Other tab.
- Click Available to open the Hotel Availability window.
- Select the View option to narrow your search.
- Click Refresh to view real time registration.
- Click OK.
To use room sharing
- Register the primary registrant for a room.
- From the Register for an event window, Open the record of the registrant who will share the room with the primary registrant.
- Select the Other tab.
- Click Sharing to open the Room Sharing window.
- Enable the Sharing option.
- Enter the Primary Room Holder Registration Number (use the lookup icon to locate the primary registrant).
- Double-click on the roommate's name. The registration number of the primary registrant will display, and the primary registrant's name will display in the RoomMates field.
- Click Ok.
When you return to the Register for an event window's Other tab, note that nothing displays in the function list for hotels. The room only appears in the primary room holder's function list because it is a shared room.
To cancel a reservation
To cancel a room reservation, simply edit the registration and change the room quantity of the cancelled reservation to zero.
Cancel and change rooms manually (rather than allowing iMIS to automatically change when a registrant changes a room) so registrants can register for two or more room types.
To overbook rooms
An overbooked room will display as an amount in parenthesis (1) in the Hotel Room Bookings Availability Report. The Reserved Rooms inventory will reflect this also by adding the quantity to its total.
Each time you overbook, the quantity is added to all of the totals just as with a regular booking, except that the Availability number appears in parentheses to signify a negative number. The Contract totals will be less than the reserved quantity for this room type.
Specifying the Registrant Class Determination method for pricing
Do the following to access the Registrant Class Determination options:
- Go to Events > Define an event.
- Select an event and click Edit.
- Select More > Web Options. Note that the Show this event on the Web? option must be enabled in order for the Registrant Class Determination options to be displayed.
Specify which Registrant Class Determination method to use for pricing your functions.
- Member type - Bases pricing on the registrant’s member type; if the member type is not set or found or the price is undefined, iMIS uses the default pricing.
- Member/Non-Member - Bases pricing on the registrant’s member status, using the configured price; if the member or non-member price is not found or the price is undefined, iMIS uses the default pricing.
- Stored Procedure - Bases pricing on the registrant class returned by a stored procedure. Such stored procedures let you implement complex pricing promotions, such as 50% off additional registrants from a given company. If iMIS cannot find the stored procedure specified or if it fails, default pricing applies.
Your stored procedure must take one parameter but could take two. If your procedure takes one parameter, iMIS passes in the registrant ID only; if it takes two parameters, iMIS passes in the registrant ID and the event ID, in that order. Using both parameters lets you manage multiple events in the same procedure.
Your stored procedure must contain all logic needed (including the Use Parent Company Pricing rules) to return a registrant class. Here is a simple stored procedure that uses both parameters and returns a specific registrant class:
CREATE PROCEDURE [dbo].[asi_TestGetRegistrantClass]
@RegistrantID varchar(10),
@EventID varchar(10)
AS
BEGIN
SELECT case @EventId when ‘SPRCONF’ then ‘M’ else ‘NM’ ENDEND
Here is a simple code to test this stored procedure
exec asi_TestGetRegistrantClass ‘146’, ‘SPRCONF’