Enter and edit orders window - Simple order entry
Commands and display information:
- New - Click New to enter in a new order. See To enter an order for step details.
- Open - Click Open to open an existing order. Enter the order number in the Order field, or click the lookup icon to select a value. See To find/view existing orders for more information.
- Edit - Click Edit to edit the order information.
- Delete - Click Delete to delete an order.
- Find - Click Find to search for and view an order. In the Order field, enter the order number or select the lookup icon to select a value. If a customer has multiple orders, you can use the left and right arrows to scroll through the orders.
- Customer - Displays the iMIS ID, name, company or organization title, and member status of the customer.
- Bill to Address - The Bill to Address information defaults to the preferred billing address in the customer's record.
- Ship to - Displays the iMIS ID, name, and company or organization title of the customer.
- Ship to Address - The Ship to information defaults to the preferred shipping address in the customer's record. You can modify the Ship to ID and/or address by clicking the Ship to Info tab.
Overview tab:
Order Summary:
- Order - This field displays the order number. The system automatically enters the order number when an order is entered. You can specify an order number in this field when searching for a specific order that was previously entered.
- Order Type - The only Order Type available in Simple Order Entry is CASH.
- Bill to ID - Enter the customer ID to whom this order will be billed, or use the lookup icon to select a value. The Bill To information defaults to the preferred billing address in the customer's record and cannot be modified (updated or changed).
If you leave the Bill to Id field blank, a blank Order Entry - Add New Member window displays where you can enter the Customer Type, name, address, and phone number for a new customer.
- Order Date - The system automatically defaults to the current system date. You can override this date by selecting the field and entering the date.
- Invoice # - If there is already an invoice for the order, the invoice number is displayed
- Purchase Order - If the customer provides a purchase order or other reference number that should appear on the invoice, then enter that number (or alphanumeric combination) in this field or Tab past this field.
If you would like a brief description to display on the AR statement, you should enter that description here when a purchase order number is not given (maximum number of characters = 15).
- Source - Optional unless Force Source Coding is enabled on the Customer Setup - Basic Options window (from Customers, select Set up module > General, and click Basic Options).
Using this field may be valuable in tracking a code for an advertising or marketing program. Use the lookup icon to select a value.
All valid Source code options must be added to the SOURCE_CODE table on the Set up general lookup/validation window (from Customers, select Set up tables > General lookup/validation, and select SOURCE_CODE from the drop-down list).
Shipping Summary:
- Shipping Method - Specifies the desired ship method; the system default ship method is UPS. You can accept the default, enter the desired ship method, or use the lookup icon to select a value.
NoteYou can only use a defined ship method. To define a ship method, from Customers, select Set up tables > General lookup/validation to display the Set up general lookup/validation window. Select SHIP_METHOD from the drop-down list and click New. Enter the new ship method Code, Expansion (optional), and Description (optional), and then click Save.
- Ship Date - Only applies in the iMIS Full Order Entry module.
- Total Weight - (read only) Total shipping weight.
Tax Summary:
- Tax Authority - From the drop-down, select a pre-defined Tax Authority.
General:
- Status - The system automatically defaults to the current IN PROCESS status.
- Terms - The Terms code typically represents the number of days from the invoice date that a customer has to make a payment on the order. The description related to the Terms code prints on the invoice document. Use the lookup icon to select a value. Terms are defined in the Set up terms window (from AR/Cash, select Set up tables > Terms).
- % Discount - Applies in the Full Order Entry module only.
- Priority - Applies in the Full Order Entry module only.
- Inv. Date - Applies in the Full Order Entry module only.
Cost Summary:
- Product Total - (read only) The total cost of the product.
- Freight - (read only) The cost for shipping the product.
- Handling - (read only) The cost for handling the product.
- Restock - (read only) The cost for restocking the product.
- Tax - (read only) The total Tax applied to the product.
- Order Total - (read only) The total amount of the order.
- Paid - (read only) The amount that has already been paid.
- Balance - (read only) The remaining balance.
Line Items:
Displays the Items, Product, Description, Order, Ship, Back, Price, % Disc.,and Extension information for each item:
- Item - Displays item number of the currently selected item.
- Product - Repeat data entry for all products and/or comment lines that are associated with the order. Enter a Product, or use the lookup icon to select a value.
NoteIf you leave the Product field blank, you can enter a comment in the Description field; this comment will be printed on the invoice document.
- Description - The system automatically fills in the Description for the product. You can click in the Description field and make changes if needed.
- Quantity - Enter the quantity of the requested product.
- Ship - Automatically populated with the value entered in the Order field.
- Back - Applies in iMIS Full Order Entry module only.
- Price - After you enter the order, iMIS defaults to price and automatically fills in the product's unit price if a price has been defined in the Set up products window (from AR/Cash, select Set up tables > Products). You can override the Price field manually by selecting the field and reentering the price.
- % Disc. - Applies in the Full Order Entry module only.
- Extension - The system calculates the Extension by multiplying the Quantity order by the Unit Price.
Print:
Opens the Select Report window, where you can select Order to print an Order detail or Invoice to print an Invoice and to mark the order complete.
Order Details tab:
-
Date scheduled - Enter an order's scheduled delivery date. The date you enter is for information only and is not used for processing an order.
-
Salesperson - Enter the name of the salesperson who took the order. The name you enter is for information only and is not used for processing an order.
-
Commission Rate - Enter a salesperson's commission rate for an order. The commission rate you enter is for information only and is not used for processing an order.
-
Hold Code - Select an order hold code from the drop-down list; hold codes are defined on the HOLD_CODES general lookup/validation table.
-
Hold Comment - Enter a comment about why the order is on hold.
-
Notes - Enter any additional comments about an order.
NoteDo not enter special characters (such as square brackets) in the Notes field. Entering special characters generates an error message and does not allow an order to be completed.
- Manual Handling - Add a handling charge or override the automatic handling charges generated for an order. You must disable the Auto Calc Handling option to enter a manual handling charge.
- Auto Handling - Only applies in the iMIS Full Order Entry module.
- Auto Calc Handling - Only applies in the iMIS Full Order Entry module.
- Manual Freight - Only applies in the iMIS Full Order Entry module.
- Auto Freight - Only applies in the iMIS Full Order Entry module.
- Auto Calc Freight - Only applies in the iMIS Full Order Entry module.
- Print - Prints the order details as of the current date and time.
NoteThis button is inactive until you click Save.
Ship to Info tab:
Displays all of the shipping information for the customer. Click Edit to modify the information. For example, you can perform the following tasks:
- Change the ID, or use the lookup icon to select a value.
- Modify/change information in all the fields.
NoteIf you change the Ship To ID or address on the Order Entry - Name/Address window and then return to the Enter and edit orders window, the Ship To field should now be updated with the new shipping information.
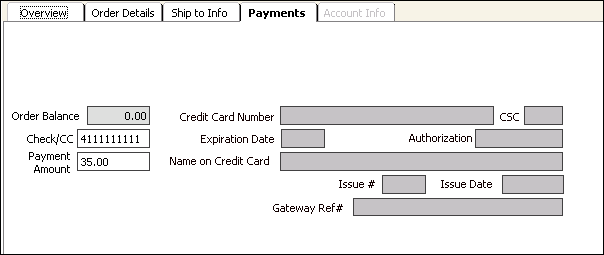
Payments tab:
Account Info tab:
This tab is inactive until the order has been invoiced (from the Overview tab, click Print > Invoice). You can review the invoice details from the Transaction Ledger window. For more information see Account Info window for Simple Orders.
To enter an order
NoteYou must select the batch that will contain the new order or adjustment. If a batch is not already selected, the Open Batches window will appear when you enter or edit an order. Either highlight the desired batch or create a new batch, close the window, then proceed.
- From AR/Cash, select Enter and edit orders to open the Enter and edit orders window.
- Click New.
- Enter the customer ID in the Bill to Id field.
- Enter the order information in the Enter and edit orders window.
- Click Payment to open the Order Payment window.
- Enter the check number or credit card code and payment amount in the Order Payment window.
- Click OK.
- Click General to open the Order Entry - General Information window and enter the general information.
- Click OK and the system returns to the Enter and edit orders window.
- Click Address to open the Order Entry - Name/Address window and make any needed changes.
- Click OK and the system returns to the Enter and edit orders window.
- Click Save.
- Click Print to Invoice the order.
To find/view existing orders
You may need to find existing orders for one of the following reasons:
- Edit/correct order data (or delete an order) before the order is invoiced.
- Repeat print an invoice document.
- Review the accounting transaction and status.
The primary method for finding an existing order is to search by either Order or Bill To Id.
To find an existing order by order number
- From AR/Cash, select Enter and edit orders to open the Enter and edit orders window.
- Click Open.
- Enter the order number in the Order field, or click the Lookup icon to select a value.
To find an existing order by Bill to ID
- From AR/Cash, select Enter and edit orders to open the Enter and edit orders window.
- Click Open.
- Enter the Bill to ID number in the Bill to ID field, or click the Lookup icon to select a value.
- If there are multiple existing orders for the Bill to ID number, the Order Selector window opens.
- Select the desired order number and click OK.