Hands-on exercise: Set the number of days to save a report
In this exercise, you will set the number of days to save the Member Index report in the Print Manager.
- Open iMIS.
- Select Utilities > Report Specs to open the Report Specifications window.
- Select MEMBERSHIP-Rosters-Member Index (Class).
- Click Edit.
- Click Parameters to open the Detail Report Parameters window.
- Enable the Save Report option. When this option is enabled, a new field displays.
- Enter 30 as the number of days for the Print Manager to store the report.
- Click Save, and close the Detail Report Parameters window.
To run a saved Crystal report
When you run a Crystal report with the Save Report option enabled, the report displays on the Crystal Preview window, and the data is exported and stored to a file labeled asi#.rpt. The location of the stored report file (asi#.rpt) is designated on the System Setup window (select File > System Setup). All stored reports are kept in the Job_Record table.
- Open iMIS.
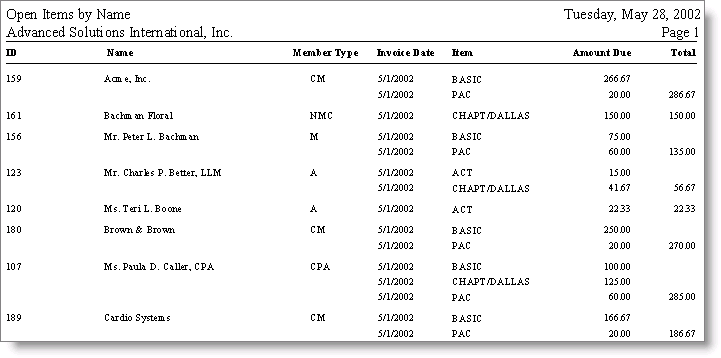
- Select the report. For this example, we selected Billing > Generate reports to open the Generate reports window. We then selected the Open Invoices report type, and selected Open Items by Name (Crystal) from the Available Reports area.
- Click Set Report Destination, select the appropriate destination, and click OK.
- Click Run.
- Select a date range.
The Crystal Preview window opens with the data displayed. While the data is exported to the asi#.rpt file, the system displays an Exporting Records window.
Brief descriptions of the buttons, menus, and items shown on the Crystal Preview window are shown in the following example.
- To print the report, click Print.
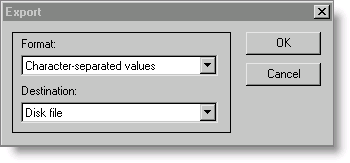
- To export the data to a specific format, click Export. The Export window opens to allow you to select the Format and Destination of the export file.
- Close the Crystal Preview window.