
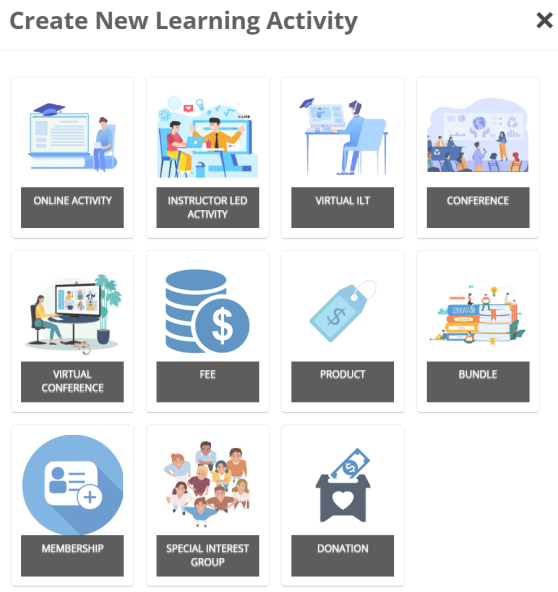
Creating an online activity
An Online Activity is a type of virtual class. It includes students, instructors, and online course materials. A user can be enrolled in any number of activities/classes as either a student or an instructor, and online course material can be assigned to any number of classes. Online activities provide the medium through which student users access online course material.
Do the following to create an online activity:
- Go to Activities and Learning > Learning Activities.
- Click Create.
- Choose Online Activity.
General Details

From the General Details tab, enter the following details:
- Code – Enter a unique identifier for the activity (for example, ON_ACT_1).
- Title – Enter the name of the activity as it should appear to learners.
- Partition – Select the partition that determines which users and administrators have access to this activity.
- Associated Image – Upload or select an image to display for the activity in the catalog.
- External ID – Enter an identifier used for reference in external systems, if applicable.
- Source – Indicate the source of the activity (for example, “TopClass,” “Imported,” or a third-party provider).
- Description – Provide a brief summary of the activity. The description is included in keyword searches and helps learners find the course in the catalog.
- Course/Activity Information – Enter the learning objectives or course overview. This information appears in the catalog and helps learners understand what they will gain from the activity.
- Blended – Enable if the course includes a requirement to attend an Instructor-Led Training (ILT) session. When selected, this requirement is highlighted to learners in the catalog.
- Disable Progress Bars – Enable to remove progress bars from the activity. This can be useful for standalone resources or informational content that does not require tracked progress.
- Training Hours – Enter the average amount of time it takes to complete the online activity. This is displayed in the catalog for informational purposes only.
- Max Students – Specify the maximum number of learners who can enroll in this activity.
- Enable Re-Enrollment – Allow learners who have previously completed the activity, or whose valid period has expired, to re-enroll and retake the activity.
- Re-Enrollment Delay – Define the number of days a learner must wait after completing the activity before they can re-enroll.
- Enroll Period – Set the start and end dates and times during which learners can enroll in the activity.
- Valid Duration – Specify the duration (in days) that the learner has to complete the activity after enrollment. Once this period expires, the learner will no longer be able to complete it.
- Valid Period – Set the date range during which the activity is available to learners, regardless of when they enrolled.
- Default Policy – Choose how the next certification cycle should begin:
- From expiry date – Starts the next cycle from the expiry date of the previous certification.
- From current date – Starts the next cycle from the date the learner attains the certification.
- Recertify Within – Enter the number of days a learner has to re-certify after their certification from this activity expires.
- Owner – Choose the owner of the activity. By default, the person creating the activity is selected.
Click Create to expose the remaining settings.
Catalog Options
Use the Catalog Options tab to configure how the activity appears and behaves in the catalog. These settings determine where the activity is listed, how learners can enroll, and what pricing applies. You can assign the activity to one or more categories and set specific enrollment rules. Pricing options are available only if you use the eCommerce module.
The following options are available on the Catalog Options tab.

NoteAll sections in Catalog Options are optional.
Browse and Search
- Hide Activity in Catalog for Anonymous Users – Enable if you do not wish for this activity to be visible to non-registered users. You might use this feature if you are adding a new offering to the catalog but want to make furhter changes to it before makign it visible to anonymous users browsing the catalog.
- Allow Users to add to their Wishlist – When this option is enabled, users can add the activity to their wishlist from the catalog. When doing so, they can include comments explaining their interest. The list of users who have added the activity to their wishlist is stored with the activity, allowing you to review their details, add your own comments, remove users from the wishlist, or enroll them directly in the activity. These actions can be managed from the Wishlist tab of the activity.
- Resources URL – If you want your learners to go to a specific website as part of this activity, enter it here and then click the Verify button to ensure it opens correctly.
- Category – When users browse the catalog, it is ordered by categories. Add a category to make the learning activity easy to locate. Without a category users can still search for it by name. Click the Add button to add a previously created category.
- Hide from Catalog - Enabling this setting will hide this activity from the Catalog, certain Learning Streams, and Widgets, even if the activity is published. Activities that are Published and Hidden from the Catalog will still be available for purchase or enrollment through other areas of the product (e.g., Certification Programs or Equivalent Activities).
- Hide Activity in Catalog for Anonymous Users – If the offering should not be displayed in the catalog at this time, select this check box to hide the offering from anonymous users only. You might use this feature if you are adding a new offering to the catalog but want to make further changes to it before making it visible to anonymous users browsing the catalog.
- Allow Users to add to their wishlist – When turned on, if a user is interested in the activity they can add to wishlist via the Catalog. When adding to wishlist, they can enter comments that explain the reason for their interest. The list of users who have registered interest is associated with the online activity so you can review details of all users who have expressed interest and decide to add further comments of your own to theirs, remove from their wishlist or enroll them in the activity. This can be done from the Wishlist tab of the activity.
- Resources URL – Enter the URL for any additional online material associated with the offering. Click Verify to open the URL in a separate browser window to ensure you have entered the correct URL.
- Categories – When users browse the Catalog, they see activities organized by category. Activities that are not assigned to categories will not be visible to users browsing the catalog, but they can still be found using the search.
- Keywords – Enter in keywords that will assist your learner in locating the activity when searching.
- Group Access – You can assign your activity to a specific group; however, it will only be accessible to those assigned to the group. It will not be visible to anyone outside of the group. Click the Add button to add a previously created group.
eCommerce and Pricing
- Currency – Change the drop-down menu to reflect one of the available currencies you wish for your activity to be listed in, if your activity comes with a price/fee.
- Setup the different pricing options. Note you need to check the box beside additional price options if you want them enabled for this activity. New price options can be configured by the system administrator under Price Plan maintenance.
- Sales Tax Rule - To select which tax rate, if any, is applicable for this offering, select one of the following:
- No Tax - No tax is charged on the activity.
- User Location - The tax rate is determined by the user's billing location.
- Fixed - The tax rate is determined by the server location as per system settings.
- Purchase Credit – If users should be allowed to purchase credit for this offering, enable this option. This allows users to purchase coupons for one or more enrollments in this offering and to pass the coupons on to other parties.
Promotion and Marketing
- Early Bird Percentage Discount – To offer a discount on the offering price to users who register before a certain date, enter the percentage discount and select the date in the Early Bird Expiry Date field.
- Early Bird Expiry Date – The date your discount will end.
- Feature Learning - Determines if this item is highlighted as Feature Learning for Students. If a date is set, it remains visible only until that date. Notes on Featured Learning:
- Students will be shown up to 12 Featured Learning Activities.
- Items with an expired Featured Until Date will are not displayed.
- The Featured Learning will be displayed in the order specified. Reorder by dragging/dropping.
- To always display Learning Activities as Featured, leave the Featured Until Date empty.
- Up to 30 Learning Activities can be added here as Featured.
- Expired, unwanted items need to be removed before additional/new items can be added.
- A warning that this limit has been reached will be displayed if more than 30 items exist.
- Cross Sell – Promote other associated offerings in the catalog and optionally offer discount pricing on these offerings to users requesting enrollment in the current offering by associating up-sell items with the current offering.
- Alternative Delivery Options – To offer the online activity in different formats (for instance if you also offer this learning activity you are creating as an instructor led activity), you will do this here. Click the Add button to complete this.
- Featured Activity Date – To have this activity also be listed in the Featured tab of the catalog, enter in a date to have it featured until.
The final step is to adjust the features Publish and Disable Enrollment toggles. Navigate to the top of the page and:
- Publish to have your Learning Activity in the catalog for use. Once the learning activity is created, toggle the Published to ON to signify it is ready.

- Disable enrollment to stop learners from enrolling without deleting the learning activity.
Click Save.
Resources

Contents
- Auto Mark Pages Complete – If set to Yes, Pages (and Folders/Sections with no child contents) will automatically be marked complete when the student makes their first visit to the item while taking a Course, and views (by scrolling, if necessary) at least 85 percent of the item contents.If set to No, the user will need to manually acknowledge that they have completed the item by clicking a button.
- Expand Course Contents (default) – If toggled to Yes the course content hierarchy within the Content Navigation Pane will be expanded by default for all sections and folders. If you do not wish learners to see this view, toggle to No.
- Enforce Content Order – Yes means your learners will need to complete the content in the order it is given. Select No to turn this off for your learners.
- Default course material – Link the course content you have created or imported to your online activity. More than one course can be linked. You can create a course from here, or import a course on the fly. The course will import in the background while you continue your setup.
Instructors
Set up the list of instructors for the online activity. Only users who have been defined as instructors are available to select. One of the instructors should be specified as the default instructor for the class.
To add an instructor, do the following:
- Click Add.
- A list of all instructors is displayed. Search for and select the instructors.
- Click Submit.
- From the Instructors table, select the Default radio button for the default instructor.
- To remove an instructor, enable the checkbox next to their name, then click Remove.
Attachments
Add attachments that are to be download prior and after enrollment:
- Prior to Enrollment - All attachments uploaded here are available to the learner when they view the course in the catalog. The attachments can be downloaded and used as a decision whether you want to enroll or purchase the course.
- After Enrollment - All attachments uploaded here will be available to the learner upon enrollment unless hidden. You may specify whether the attachments should be viewable from the Current tab, the Completed tab, or both in the Learning Center. You may also choose to limit access to individual attachments to the student's Valid Period.
Certificate
Configure whether a certificate will be able to be printed by the learner for the activity from their Completed tab in their Learning Center. If the certificate is turned on, you can choose a background image. The fields are fixed positions so refer to the boilerplate example provided as a basis for designing your background.
Toggle Use Certificate to On for your learners to receive a certificate upon completion of the learning activity.
You can then select to keep the default certificate as shown or click Choose to select a certificate from the populated list. You can also Remove the selected certificate. Then click Preview to see what your certificate will look like to your learners.
Once done, click Save.
Branding
To create a personalized look to your Learning Activity, add your logo, specify height and colors, and verify appearance on desktops, tablets, and mobile devices. Follow the onscreen instructions to customize each. Be sure that once you are done, click Save.
Notifications
Setup custom text which is embedded into the notifications which are sent relating to this learning activity. The text will be specific to this Learning Activity. Also configure the rules for when reminder/re-certification and pre/post work notifications are sent.
- Suppress notifications - Enable to suppress all notifications for this activity.
- Language of Notification - Set your language for notifications. If you set a language, all notifications will be sent in the selection, regardless of the learner’s preference. Currently available choices are: UK English, US English, French, German, Spanish, CA French, and Chinese.
Enrollments & Submissions
All users enrolled in the activity are listed here. You can add new users to the activity here, and they will see it on the Learning screen. You can also chose to edit details of the enrollment, such as setting the validity period or specifying a one to one instructor for a specific learner.
Status of students for this activity:
- Not Started
- In Progress (with Progress Bar)
- Satisfied, or Completed, or Satisfied & Completed
Other status options:
- Override: Override the status and manually set it. The screen is reloaded on completion.
- Rebuild: Recalculate the progress data for the student. Reloads the screen on completion.
- Peer to Peer: Online activities marked as Peer Review require manual intervention to mark the student as Satisfied and Completed if they have met all satisfying criteria for the online activity. If the student has not met the passing criteria, select Completed when updating the status. This can be done by clicking on the Override button for each enrollee.
Under Submissions & Accommodations, select View to see all attempts, submissions and accommodations. Super Administrators can do the following:
- Click Override to update the status of a test to Satisfied & Completed.
- If a limit has been set for test attempts, use Set Additional Attempts to allow the student to re-take the test.
Gradebook
- Enable Gradebook - If set to Yes, the gradebook feature will be enabled via the Gradebook tab and screen for this Online Activity. If set to No, the Gradebook feature is disabled for this Online Activity.
Once the Gradebook is activated, you will be able to review scores for pre/post work, completion status, the date the activity was completed (once completed), if a valid period has been set, the date the learner last accessed the course, and the ability to hide users either once they are completed with the learning activity or if abandoned.
WarningWhen the gradebook is enabled, students with an In Progress or Completed status for the activity prior to the gradebook activation will not be displayed. Contact WBT for further information. Add actions are not applicable for the gradebook.
TipBest Practice is to enable an activity at set up prior to learners being able to enroll.
Advanced Options
Hovering over Advanced Options will provide a drop-down menu.
Credits
From here you may set up a list of credit types and values that this Learning Activity will award a learner upon completion.
NoteCredit types must be activated via the checkbox for the learner to receive the credits. Credits are only awarded if both active and assigned a value at the time the learning activity is completed.
Equivalent Activities
From this screen, you may add learning activities that may be considered Equivalents in Designation Certification Paths. For example, an online activity may be considered the equivalent of an ILT for the purposes of achieving a learning objective in this scenario.
Prerequisites
Set up one or many pre-requisites for this activity. If a pre-requisite is set, learners will not be able to enroll in the activity unless they have satisfied the pre-requisite
Pre/Post Work
Configure pre-work or post-work for the activity. This consists of Content/Tests which are to be taken before or after the Learning Activity.
Assignments
Assign the Learning Activity to groups of users or to individual users. This will cause the activity to appear on the Learning Plan of the user.
- Recertification – If the learning activity has a certification that expires, set your time to recertify here.
- Groups – Assign the assignment to specific groups or leave this blank to be assigned to any learner that takes the course.
- Users – Assign the assignment to specific users or leave this blank to be assigned to any learner that takes the course.
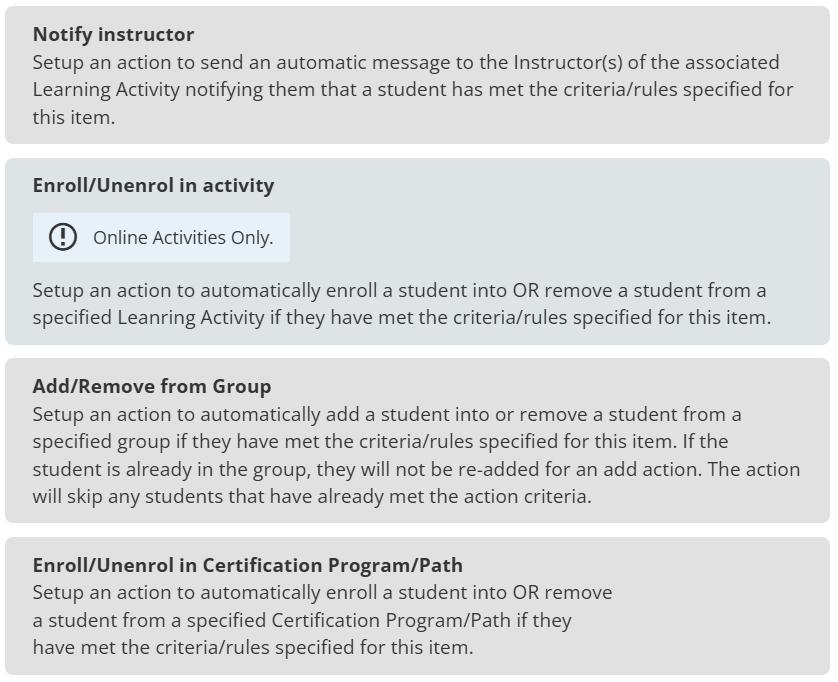
Policy Rules
Set up all the policy rules for the Learning Activity. This includes Roll up rules and Actions which will fire when the Activity is completed by the learner.
- Approval Policy – If applied, all enrollments will need to be approved by either a Manager, a TopClass user, or a Pool Group.
- Rollup Rule – Create a rollup rule as needed. (For more information see the help document on Rollup Rules)
- Apply an Action to be completed – For example:
Wishlist
Review and process the list of users who have expressed interest in this Learning Activity. From this screen you can choose to enroll the user in the activity.
Discussion Forums
Link this learning activity to one or many restricted discussion forums.
This will mean that all learners enrolled in the activity will have access to the discussion forum and all its threads.
Ratings / Reviews
From this tab you may enable/disable User Ratings/reviews for this specific Learning Activity or Product and decide whether individual Ratings/reviews are made public or hidden. Toggle to Allow user ratings/reviews.
Weighting
From this screen you may choose to assign a weighted percentage to each Test in this activity OR to a Test Type. The weighted percentage will be calculated against the Passing Score Percentage to determine if the activity has been satisfied.
Interests
Setup one or many Interests for this activity. Interests should be assigned to provide relevant learning recommendations for students. Students choose Interests via their student profile.
Extra Info
Extra Info for this Activity (use only if needed).