Processing orders
In iMIS, orders are processed through stages to completion. There are several possible order stages through which an order must be processed, but the number and type of stages through which an order is processed depends on the order's type. Different order types require different processing stages.
The available order stages are:
- Issue quotes (PRINTQUOTE)
- Convert quotes (QUOTEREADY)
- Print shipping papers (SHIPPAPER)
- Ship orders (SHIPMENT)
- Generate invoices (INVOICE)
- Release backorders (BACKORDER)
- Cancelled orders (CANCELED)
- Completed orders (COMPLETED)
Each order stage lists any orders currently at that stage. Each conversion process moves an order to its next succeeding order processing stage. You convert each order through its appropriate stages until the order is complete.
Issuing quotes
Issue quotes is used for generating sales quotes for pro forma orders only. The Issue quotes option allows you to generate sales quotes without affecting product inventory or account status. You can generate sales quotes and then send the quotes to requesting customers.

Do the following to generate sales quotes:
- Go to Commerce > Process orders > Issue quotes.
- Select one of the Send options:
- Email – Sends an email communication with a sales quote when you click Issue Quotes to advance the order to the next stage.
- Print – Prints a PDF of the sales quote when you click Issue Quotes to advance the order to the next stage.
- Select a Quote template. You can customize the sample communication template or create a new template to use without needing to copy the staff site content.
- (optional if Print is selected and the selected template includes an attachment) Deselect Print the template attachment only to print the body of the email in addition to the attachment. This option is selected by default.
- Search for pro forma orders for which you want to generate sales quotes:
- Select a query to focus your search. Queries are stored in $/OrderManagement/DefaultSystem/Queries/Issue quotes.
- Enter other search parameters.
- Click Find. The search results include orders at the PRINTQUOTE stage only.
- (optional) Click the Order Number to open the Order Details page for the order. For more information, see Reviewing orders.
- Select the pro forma orders for which you want to generate sales quotes.
- Click Issue Quotes. A success message is displayed, and the orders are set to QUOTEREADY. You can review the Logs tab to view results or print the invoices:
- Select the Logs tab.
- Search for the orders you advanced to the QUOTEREADY stage for which you want to print a quotation. Enter search parameters and click Find.
- Select the orders for which you want to print the quotation and click Print.
The sample template can be found at $/Common/Communications/Templates/Samples/Pro forma quotes. You can create your own Quote template in $/Common/Communications/Templates/Processes/Pro forma quotes.
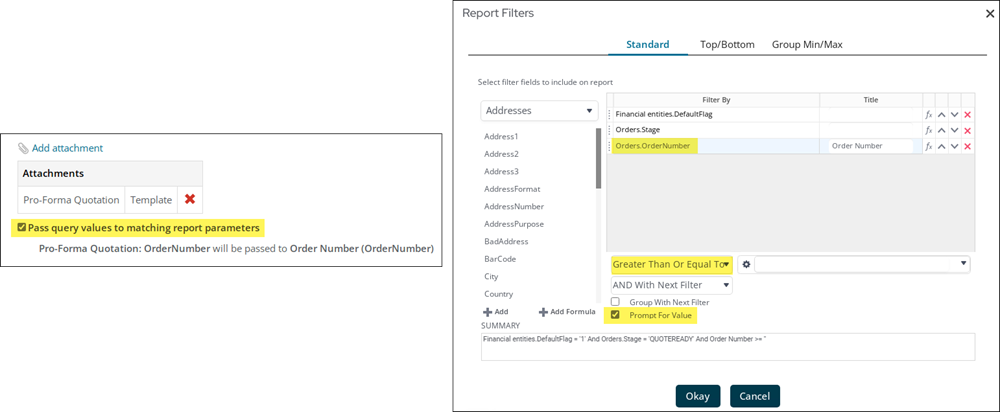
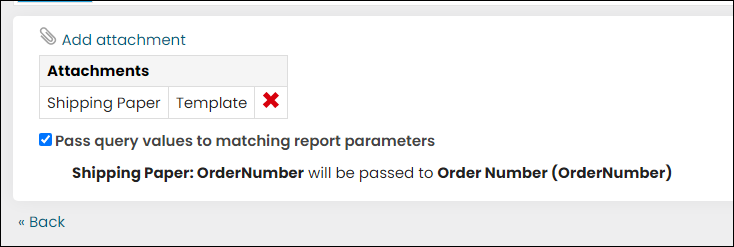
📘 Note
When creating a custom template with an attached Report Writer report, the Pass query values to matching report parameters checkbox must be enabled and the report must have Order Number as the passed parameter. This filter should have Prompt for Value enabled, and be configured such that no results are actually filtered out. For example, setting the filter to Order Number Greater or Equal To 0 (or Order Number Not Equal To blank) ensures that the passed in value is included in the report’s results. See Attaching a Report Writer report to a communication template for more information.
Converting quotes
The Convert quotes option is used to convert pro forma orders to standard orders. This includes any orders at the QUOTEREADY stage.
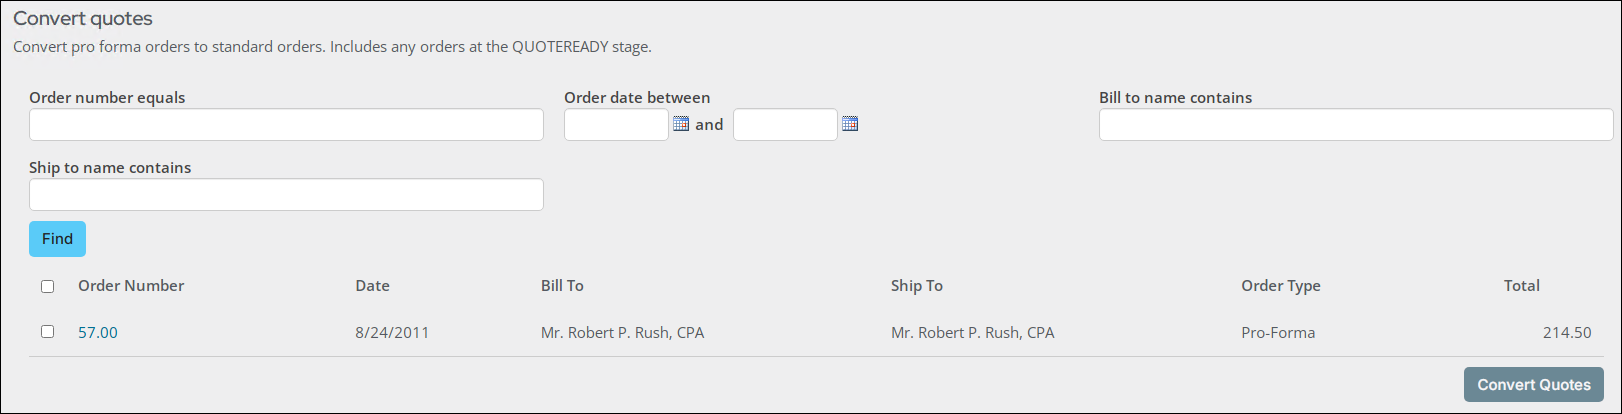
Do the following to convert pro forma orders to standard orders:
- Go to Commerce > Process orders > Convert quotes.
- Search for pro forma orders for which you want to generate sales quotes. Enter search parameters and click Find.
- (optional) Click the Order Number to open the Order Details page for the order. For more information, see Reviewing orders.
- Select the pro forma orders that you want to convert to standard orders.
- Click Convert Quotes. A success message is displayed, and the orders are set to the SHIPPAPER stage.
The search results include orders at the QUOTEREADY stage only.
Printing shipping papers
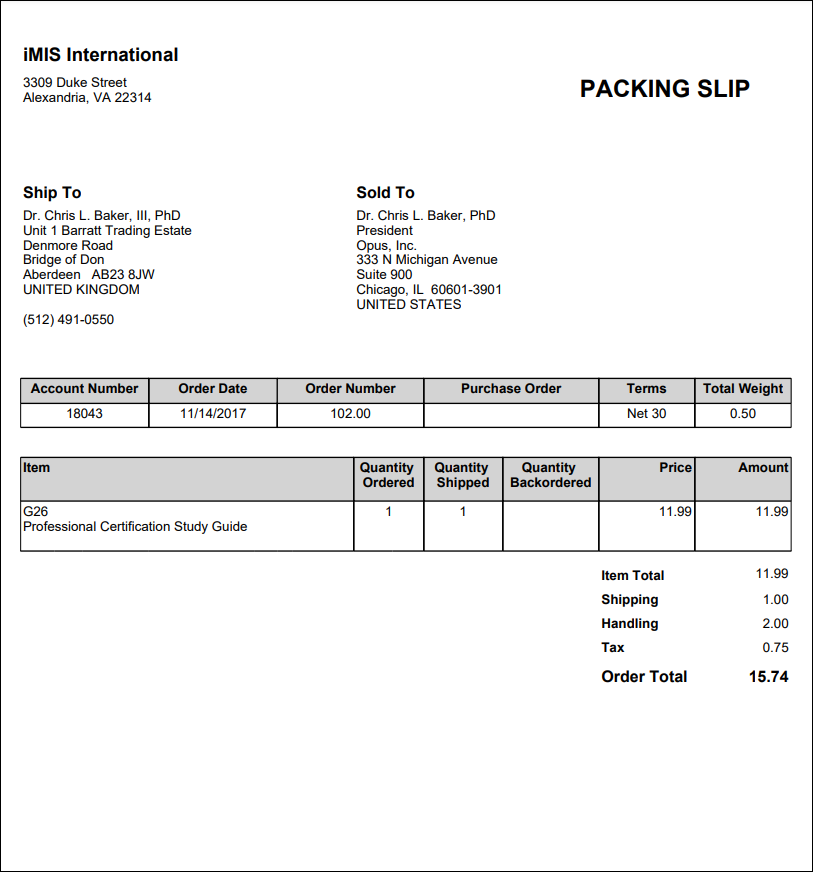
The Print shipping papers option is used to generate a shipping document known as a Packing Slip for the selected orders. The selected orders are then advanced to the SHIPMENT stage.
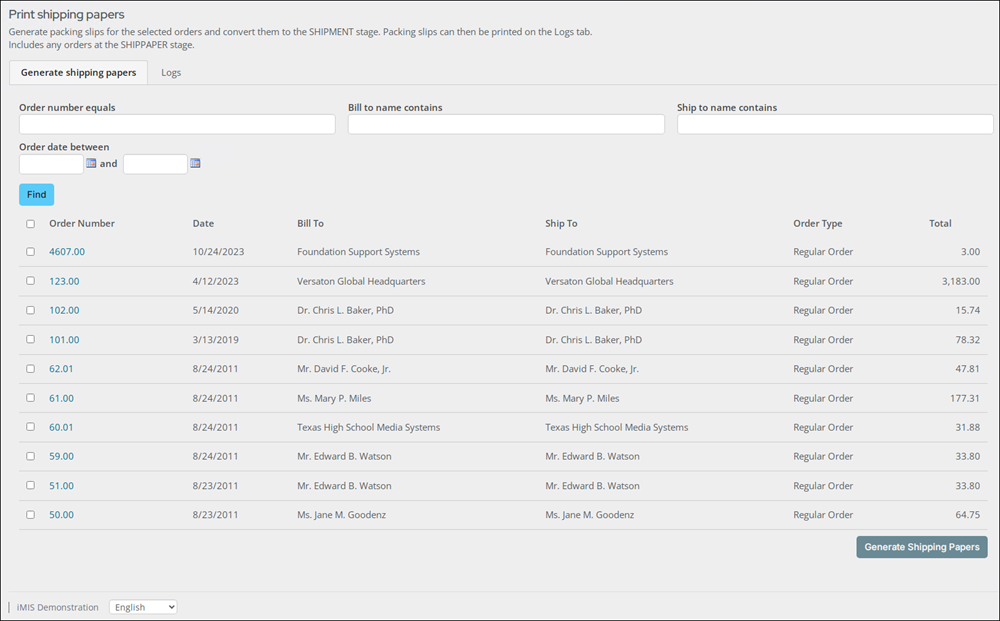
Packing slips can then be printed from the Logs tab.
Generating the packing slip
Do the following to generate a packing slip:
- Go to Commerce > Process orders > Print shipping papers.
- Search for orders for which you want to generate a packing slip. Enter search parameters and click Find.
- (optional) Click the Order Number to open the Order Details page for the order. For more information, see Reviewing orders.
- Select the orders for which you want to generate a packing slip.
- Click Generate Shipping Papers. The order is advanced to the SHIPMENT stage.
- (optional) Print the packing slips:
- Click the Logs tab.
- Search for the orders in the SHIPMENT stage for which you want to print a packing slip. Enter search parameters and click Find.
- Select the orders for which you want to print the packing slip and click Print.
The search results include orders at the SHIPPAPER stage only.
Customizing the Packing Slip
To use a custom packing slip, you should work with a copy of the out-of-the-box SSRS Shipping Paper report (Reports > Commerce reports), then make modifications to the copied report. When ready, add the report to iMIS. Alternatively, you may create a custom Report Writer report to add as an attachment to the packing slip. Be sure to review Attaching a Report Writer report to a communication template for more information.
After the custom report is available in iMIS, do the following:
- Go to Marketing > Communication templates.
- Navigate through the following folder path: $/Common/Communications/Templates/Samples/Shipping papers
- Copy the Shipping paper template (Organize > Copy).
- Navigate through the following folder path: $/Common/Communications/Templates/Processes/Shipping papers
- Paste the Shipping paper template (Organize > Paste).
- Double-click the template.
- Click the Body tab.
- Scroll down to the Attachments section. Remove the current attachment, then add the custom report you created.
- Enable Pass query values to matching report parameters. Make sure the Order Number is the passed parameter.
- Click Save.
📘 Note
iMIS first looks for a template in the $/Common/Communications/Templates/Processes/Shipping papers folder. If no template exists, the template in the $/Common/Communications/Templates/Samples/Shipping papers folder is used.
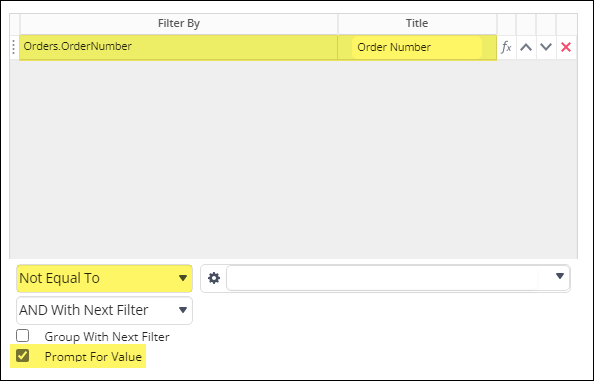
📘 Note
In order for the Pass query values to matching report parameters checkbox to work with Report Writer reports, the report must have a filter for the property that is being passed in as the value. This filter should have Prompt for Value enabled, and be configured such that no results are actually filtered out. For example, setting the filter to Order Number Greater or Equal To 0 (or Order Number Not Equal To blank) ensures that the passed in value is included in the report’s results.
If your custom report template does not appear in the Printing shipping papers area, try purging cache in About iMIS.
📘 Note
Although the packing slip is an attachment to a communication template, no email is ever sent to the contact from the Commerce > Process orders > Print shipping papers window. iMIS uses the communication engine to generate and print reports (the attachment to the template).
Shipping orders
The Ship orders option is used for shipping orders and is the only order processing stage that does not generate printed output. You can record an order's Ship date and Shipping method.
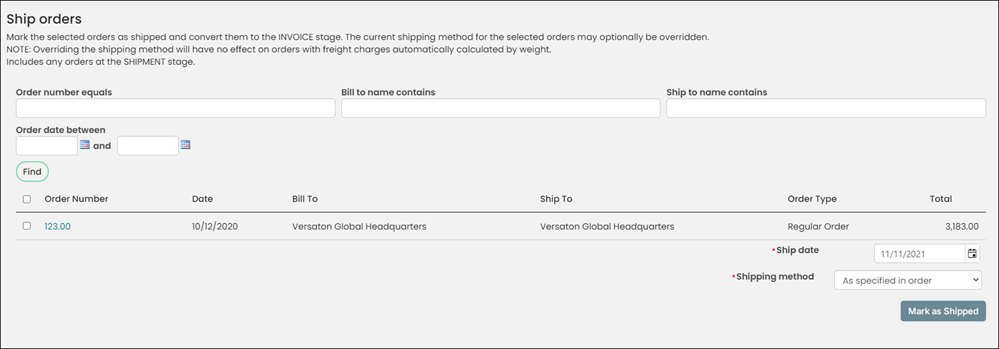
Record selected orders as shipped:
- Go to Commerce > Process orders > Ship orders.
- Search for orders you want to record as shipped. Enter search parameters and click Find.
- (optional) Click the Order Number to open the Order Details page for the order. For more information, see Reviewing orders.
- Select the orders you want to record as shipped.
- Enter a Ship date. This field defaults to today's date.
- Select the Shipping method by which the order was shipped. Defaults to the shipping method As specified in order.
- Click Mark as Shipped. The orders are advanced to the INVOICE stage
The search results include orders at the SHIPMENT stage only.
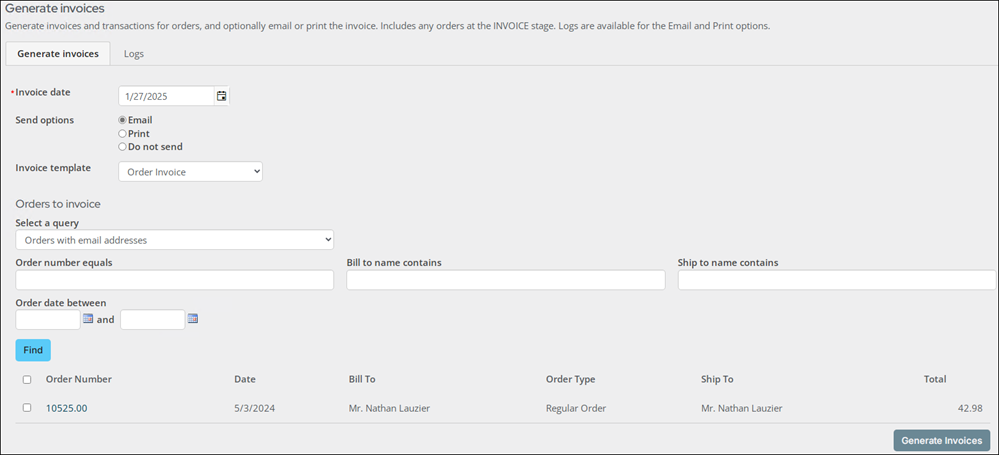
Generating invoices
The Generate invoices option is used for mass posting selected sales transactions. Generating an order invoice also creates an accounting entry, affects product inventory, and generates an activity record for a customer.
Staff users (Orders: 4 module authorizations or above) and system administrators can generate invoices and transactions for orders in the INVOICE stage, with an option to email the invoices to the Bill To contact or print the invoices.
📘 Note
Once invoices are generated for an order, the order cannot be cancelled. To reverse order invoices, see Adjusting and reversing order invoices.
Updating the Order Invoice template
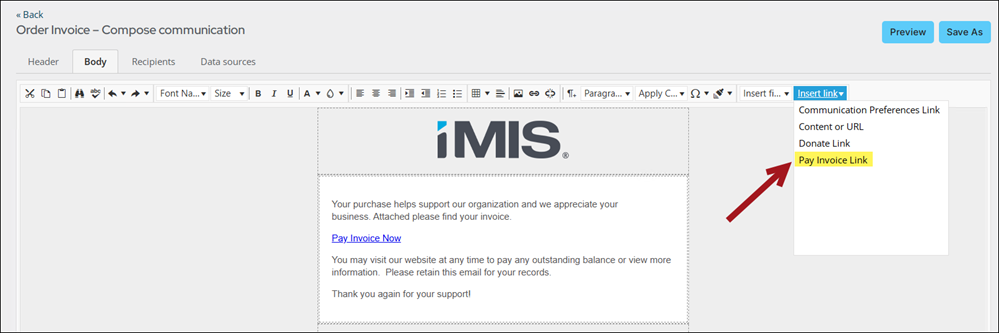
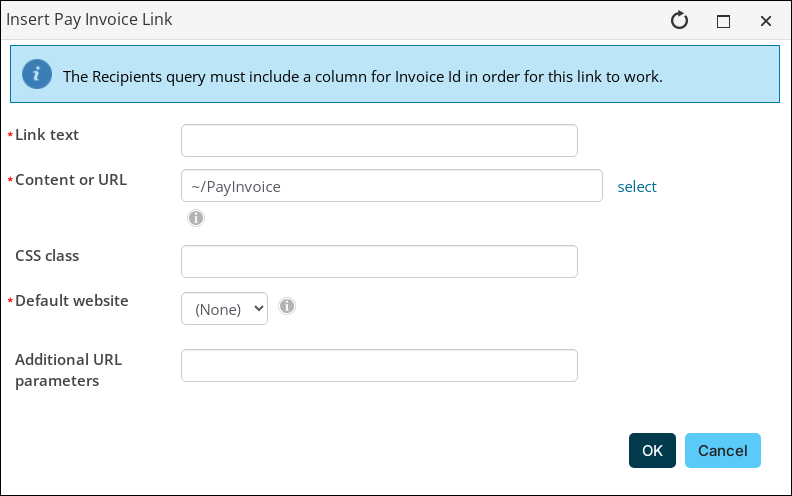
Before emailing invoices, you must create an Invoice template or make a copy of the out-of-the-box Order Invoice template and apply customizations. The sample Order Invoice and Order Invoice Report Writer templates are located at $/Common/Communications/Templates/Samples/Order invoices. Create a copy of the Order Invoice or Order Invoice Report Writer template: 1. Go to Marketing > Communication templates. 2. Go to the $/Common/Communications/Templates/Samples/Order invoices folder. 3. Select the Order Invoice or Order Invoice Report Writertemplate. 4. Select Organize > Copy. 5. Paste the copy in the Order invoices folder.6. Open the new template, and make the desired edits, such as removing and updating all of the ASI and iMIS sample information. 7. Update the Pay Invoice Now link to point to your public website. 1. Highlight the Pay Invoice Now link, then, from the Insert link drop-down, select Pay Invoice Link.📘 Note
In order for the template to appear in the Invoice template drop-down, the template must be in the Order invoices folder.
 2. Select the Content or URL and the Default website.
👍 Tip
Out-of-the-box, the ~/PayInvoice shortcut points to the invoice payment content record.
 Alternatively, you can delete this link from the template as needed. For more information on the Pay Invoice Link, see Paying invoices using a direct link.
8. Save the template.
Alternatively, you can delete this link from the template as needed. For more information on the Pay Invoice Link, see Paying invoices using a direct link.
8. Save the template.
📘 Note
If you are using a custom order invoice report (SSRS or Report Writer), remove the existing report and add your report. If using a custom Report Writer report for order invoices, the report is required to have an OrderNumber filter with Prompt For Value enabled. See Attaching a Report Writer report to a communication template for more information.
Generating order invoices
To mass generate invoices for orders, do the following:
- Go to Commerce > Process orders > Generate invoices.
- Enter an Invoice date. When the invoices are processed, a new batch is always created, and the Invoice date is used as the Batch date.
- Select from the list of Send options:
- Email – Communications are sent to the Bill To contact for each order with the Order Invoice report attached, filtered to that order. The email includes a PDF attachment of the invoice that was generated, unless a custom Invoice template without an attachment is selected.
- Print – A PDF containing all generated invoices is downloaded. If the selected Invoice template does not have an attachment, the body of the template is printed for each order and Bill to contact.
📘 Note
If you selected either Email or Print, the resulting communication can be found in the communication log and on the contact’s interaction log.
- Do not send – No email is sent, and no PDF is downloaded to the browser.
📌 Note: When selected, no entry is recorded in the Logs tab.
- (unavailable if Do not send is selected) Select an Invoice template. You can customize the sample communication template with an existing Order Invoice report attached. The sample template is located at $/Common/Communications/Templates/Samples/Order invoices.
- (optional if Print is selected and the selected template includes an attachment) Deselect Print the template attachment only to print the body of the email in addition to the attachment. This option is selected by default.
- Search for the order for which you want to generate an invoice. You can Select a query to focus the results that are displayed. The queries are located in the $/OrderManagement/DefaultSystem/Queries/Generate invoices folder.
- Click Find. A list of results is displayed.
- Select the invoices for which you want to generate invoices. You can select any invoice from the filtered list to invoice, or you can choose to select all orders.
- (optional) Click the Order Number to review order details. For more information, see Reviewing orders.
- Click Generate Invoices. This button is disabled if no records are selected. A success message is displayed, and the orders are set to COMPLETED. You can review the Logs tab to view results or print the invoices. Logs are only available for Email and Print options.
- A new batch is always created for orders generated from the Generate invoices window:
- Go to Finance > Batches.
- Select the Batch Number. The Batch date reflects the Invoice date, and the Created By field always displays AUTOBATCHINVOICE.
- Click Post Batch.

Releasing backorders
When inventory is adjusted, backorders are automatically released. The Release backorders option allows for releasing backorders manually without adjusting the inventory first, for example, to release a backorder even if inventory is not actually available in the system.
If any items in an order are unavailable, then the whole order is placed on backorder. Staff users can place orders above the available quantity for inventory items.
If a product's inventory remains insufficient for filling all backorders after posting receipts, the receipts are applied to orders in priority order, according to the Priority value first and then from oldest to newest based on order date and then order number.
When you release backorders, iMIS applies the product received in stock to items with a backorder status based on the Priority entered for the order.
Releasing backorders manually
The Release backorders window enables you to find all backorders, with the ability to select and manually release multiple backorders.
You can also release a backordered collection of items.
Do the following to manually release backorders:
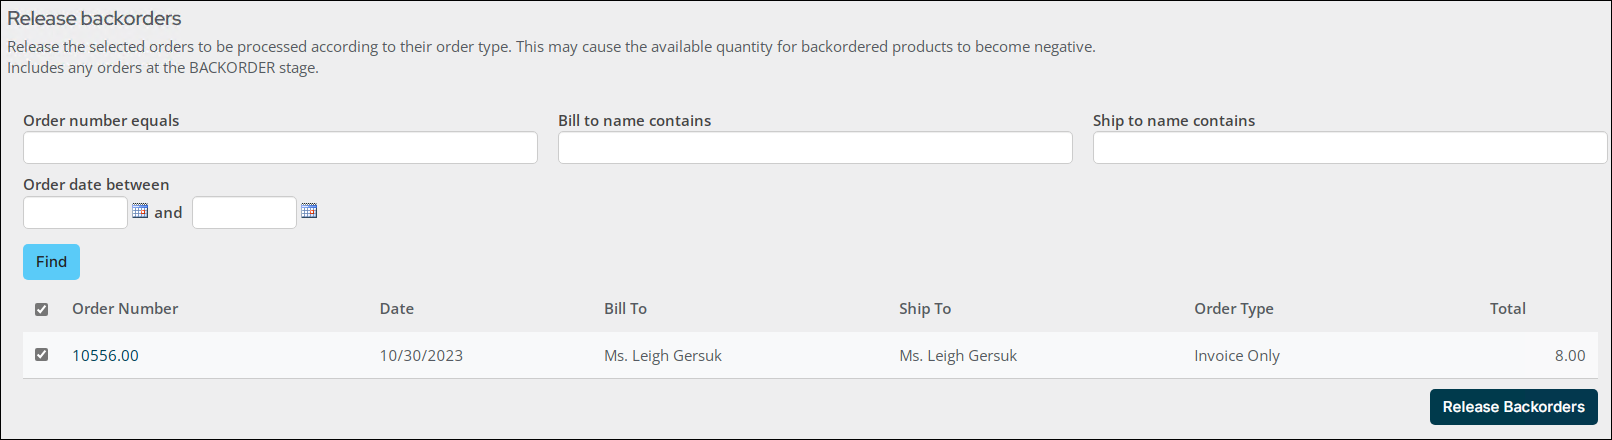
- Go to Commerce > Process orders > Release backorders.
- Search for backorders you want to release. Enter search parameters and click Find.
- Select the backorders you want to release.
- (optional) Click the Order Number to open the Order Details page for the backorder. For more information, see Reviewing orders.
- Click Release Backorders. The order is advanced to the default order stage.
The search results include orders at the BACKORDER stage only.
Releasing backorders automatically
When inventory receipts or adjustments are submitted, the product inventory is adjusted accordingly. If the inventory is adjusted enough to fill one or more backorders, those backorders are released. The backorder is re-evaluated as a new order with the available quantity put into Quantity Shipped and the order stage set according to the order type.
If the quantity ordered exceeds the quantity available for a released backorder, the remainder should be put into quantity backordered just as for a new order.
If a product's inventory remains insufficient for filling all backorders after posting receipts, the receipts are applied to orders in priority order, according to the Priority value first and then from oldest to newest based on order date and then order number.
When backorders are released automatically, the inventory receipt is updated with information about the backorders that are released.
