Using Rules
NoteThe following information requires a Forms - Premium license. For more information, contact your AiSP or ASI Technical Support.
NoteRules are only available in Drag and Drop forms. If a Drag and Drop form is converted to an Advanced form, the rules are removed from the Advanced form.
The Form Rules Editor allows you to define specific rules for your form based on the state of any individual form element or section.
Overview
Rules are powerful commands that you can add to your form to perform additional validation and dynamically change and render your form based on responses to user input. A rule is a simple statement that combines a condition with an action.
- Condition – Form Builder constantly assesses the state of Form Elements where rules are defined. When the form is loaded or a user changes a value so that a defined condition is met then an Action is triggered.
- Actions – are changes on the form defined by the rule. In general, these changes will show or hide form elements, change their state from required to not required (or vice-versa) and/or set values on fields as appropriate.
Available Rules combinations
The table below shows the available conditions and actions that are available within Form Builder. Each Form Element type supports different conditions and actions based on its specific attributes. For example, A checkbox can be assessed to see if it is True or False (condition). A currency value can be assessed to see if it is Greater than $100 or less than $1,000,000 (condition). A text field can be set to read only (action). A new section can be revealed on the form with additional questions and information (action).
Click to view table
| Form Element | Available Conditions | ||||||||||||||
|---|---|---|---|---|---|---|---|---|---|---|---|---|---|---|---|
| Equals | Greater than | Less than | Less than, Equal | Not Equal | Contains | Does not contain | Is Empty | Is Not Empty | Is one of | Is not one of | Is True | Is False | Is Visible | Is Not Visible | |
| Button | Yes | Yes | |||||||||||||
| Checkbox | Yes | Yes | |||||||||||||
| Currency | Yes | Yes | Yes | Yes | Yes | Yes | Yes | ||||||||
| Date, Time or Date Time | Yes | Yes | Yes | Yes | Yes | Yes | Yes | Yes | Yes | ||||||
| Document | Yes | Yes | |||||||||||||
| Heading | Yes | Yes | |||||||||||||
| Integer, Number and Currency | Yes | Yes | Yes | Yes | Yes | Yes | Yes | ||||||||
| Number | Yes | Yes | Yes | Yes | Yes | Yes | Yes | ||||||||
| Sections, Heading and Textareas | Yes | Yes | |||||||||||||
| Text (Lookup) | Yes | Yes | Yes | Yes | Yes | Yes | Yes | Yes | Yes | ||||||
| Text (Multiselect) | Yes | Yes | Yes | Yes | |||||||||||
| Textarea | Yes | Yes | |||||||||||||
| Textfield (includes text, URL and Email) | Yes | Yes | Yes | Yes | Yes | Yes | Yes | Yes | Yes | Yes | Yes | Yes | Yes | ||
| Form Element | Available Actions | |||||||
|---|---|---|---|---|---|---|---|---|
| Set Required | Set Not Required | Hide Elements | Show Elements | Set Default Value | Set Value | Set Value from URL | Set Read Only | |
| Button | Yes | Yes | ||||||
| Checkbox | Yes | Yes | Yes | Yes | Yes | Yes | Yes | |
| Currency | Yes | Yes | Yes | Yes | Yes | Yes | Yes | |
| Date, Time or Date Time | Yes | Yes | Yes | Yes | Yes | Yes | Yes | |
| Document | Yes | Yes | ||||||
| Heading | Yes | Yes | ||||||
| Integer, Number and Currency | Yes | Yes | Yes | Yes | Yes | Yes | Yes | |
| Number | Yes | Yes | Yes | Yes | Yes | Yes | Yes | |
| Sections, Heading and Textareas | Yes | Yes | ||||||
| Text (Lookup) | Yes | Yes | Yes | Yes | Yes | Yes | Yes | |
| Text (Multiselect) | Yes | Yes | Yes | |||||
| Textarea | Yes | Yes | ||||||
| Textfield (includes text, URL and Email) | Yes | Yes | Yes | Yes | Yes | Yes | Yes | Yes |
NoteSet Required, Set Not Required, Hide Elements, and Show Elements have unique behaviors. Review Understanding Set Required, Hide Elements, and Show Elements rules.
Use cases
Here are some typical examples of how rules can be deployed on a form:
Table 3: Viewing use cases
| Condition (user input) | Action (Form changes) |
|---|---|
| Select drop-down value of International | - Set Country to *Required* - Display International Information text area - Display Section with international questions |
| Set annual company sales to $5,000,000 | Change billing category to Medium Company |
| Check to indicate that they hold tax exempt status | - Reveal the Tax Exempt entry field - Set the Tax Exempt field to *Required* |
| User does not select a four-year undergraduate program | - Set checkbox marking application for special attention by staff - Show additional fields to capture more education details |
Rules Editor
The Rules Editor is a special zone in the Drag and Drop Form Designer and can be found in the Form rules drop-down.
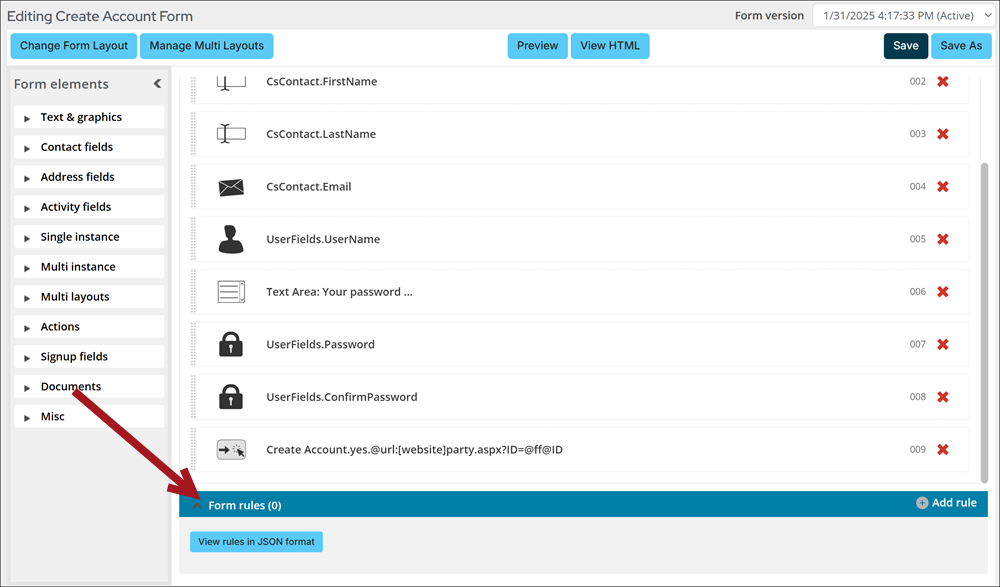
Adding a new rule 
Do the following to add a new rule:
- Go to RiSE > Form library and click either Add new form or an existing drag-and-drop form.
- From your drag-and-drop form, click Add Rule next to Form Rules.
- Under Conditions, use the drop-down to choose which conditions you want the rule to follow. Each Form Element has an index number, for example (016) which is shown in brackets to differentiate between fields that may have similar names or types.
- Under Actions, use the drop-downs to decide which action you want the rule to perform and which condition the action relates to.
NoteThe available operators for each Condition and Action are defined based on the Form Element type.
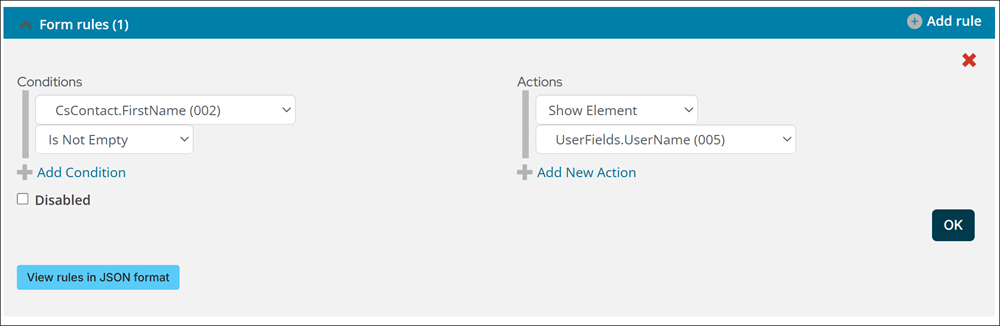
- Select Add Condition or Add New Action to add additional rules.
- Click OK and then click Save.
Once rules are created they can be reviewed. The Rules Editor shows a formatted statement for each rule in force to allow you to review the rules defined and enabled on your form. In the example below, the first rule will hide a Document field if a checkbox is selected.
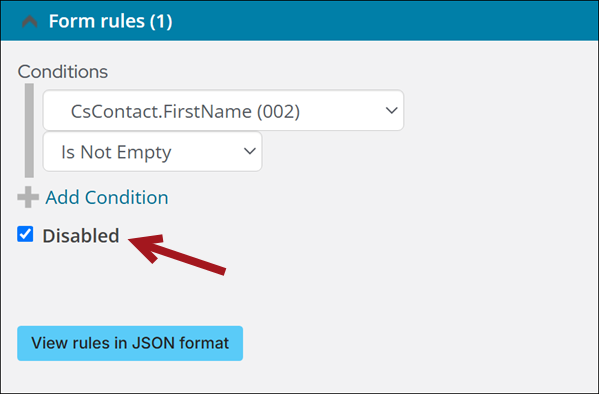
Correcting disabled rules
When a field is removed from a form, any rules that used the removed field are disabled, even after the field is re-added to the form. In order to re-enable the rule, do the following:
- Add the missing field back to the form.
- Click the Edit icon in the Form rules section.
- Deselect the Disabled checkbox to re-enable the rule.
- Click OK and then click Save.
Rules construction
Each rule must have at least one condition and one action in order to be valid; however, a rule can have multiple conditions or actions as needed.
When more than one condition or one action is defined they are always treated as "AND" operators. To add an "OR" condition you will define a separate rule for each "OR" that is applicable.
WarningRules using the Set Required/Set Not Required and Show Element/Hide Element actions have unique behaviors. Review Understanding Set Required/Set Not Required and Show Element/Hide element rules for more information.

Understanding Set Required/Set Not Required and Show Element/Hide element rules
Before defining rules, review the following behaviors of Set Required/Set Not Required and Show Element/Hide element rules:
- Default behavior – If conditions for rule are not true, the opposite behavior occurs by default.
- Importance – When multiple rules apply to the same action, the rule defined last determines the default behavior of the element.
- Combining rules – For best performance, use the Is One Of operator to combine rules that apply the same element.
Default behavior
If conditions for a rule are not true, the opposite behavior occurs by default. You do not need to define additional rules for the opposite behavior.
- Show Element – The element is hidden by default and revealed when the condition is met.
- Hide Element – The element is shown by default and hidden when the condition is met.
- Set Required – The element is optional by default and required when the conditions are met.
- Set Not Required – The element is required by default and options when the conditions are met.
When multiple rules apply to the same element, the rule defined last determines the default behavior of the element.
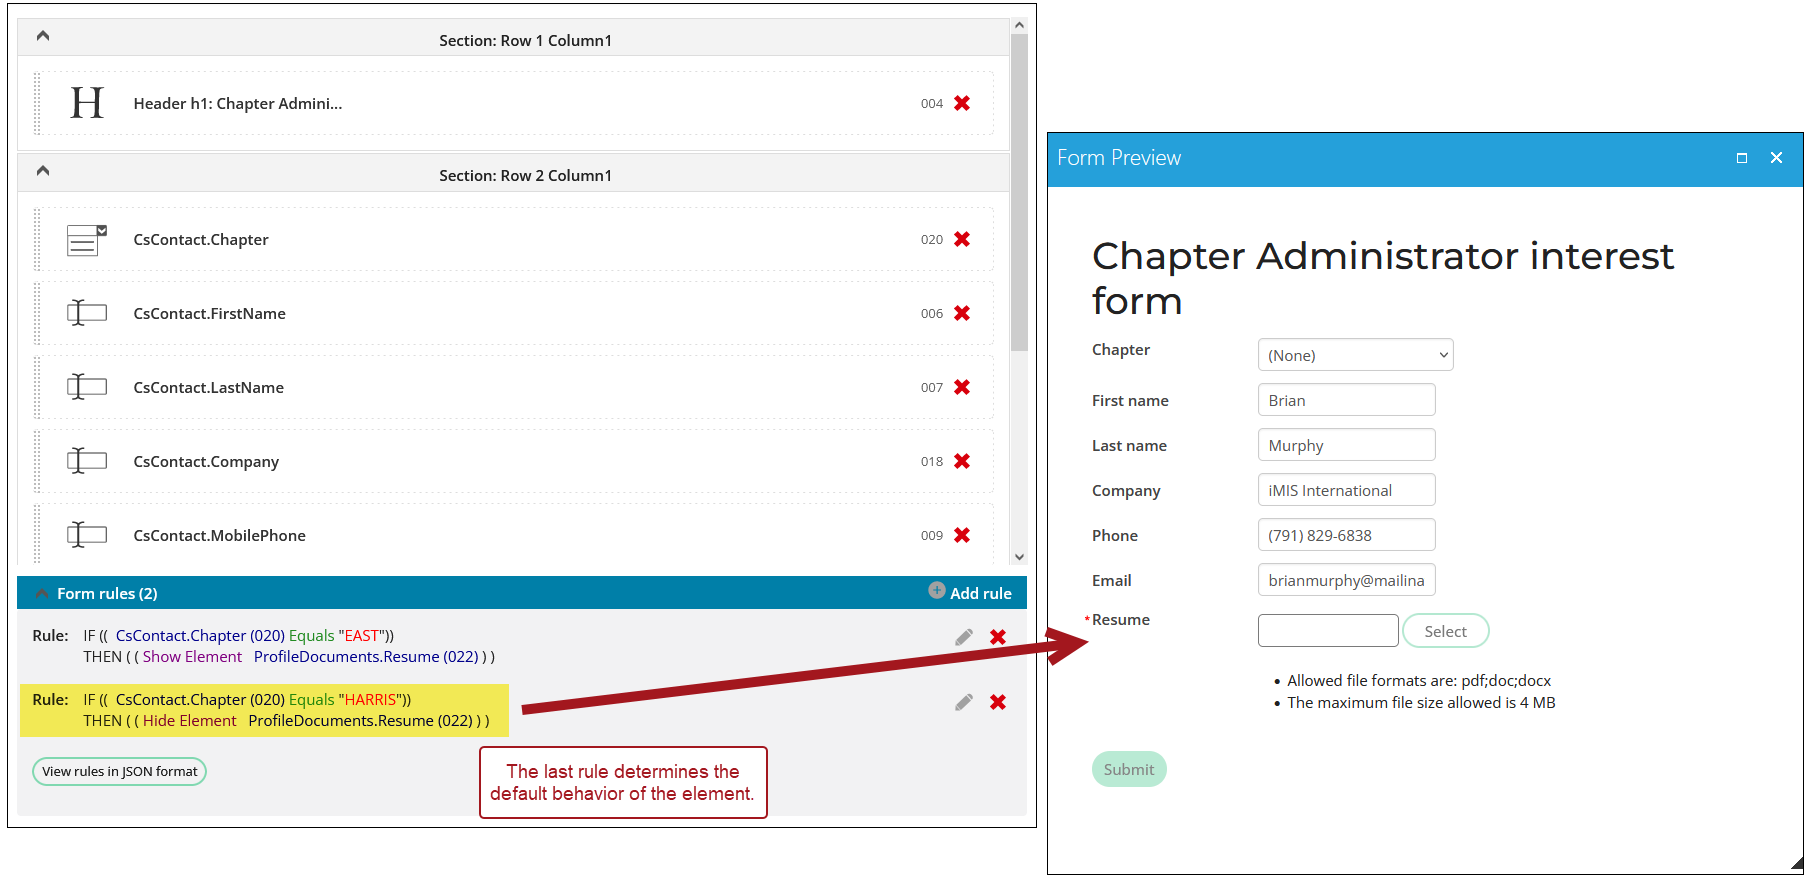
ExampleThe following two rules apply to the ProfileDocuments.Resume element:
- One rule shows the ProfileDocuments.Resume element when users select the East chapter.
- A second rule hides the ProfileDocuments.Resume element when users select the Harris chapter.
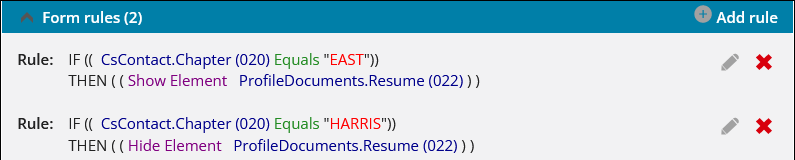
In this example, the resume element is shown by default. This is because the last rule defined hides the resume element when the Harris chapter is selected, implicitly showing the resume element when the Harris chapter is not selected.
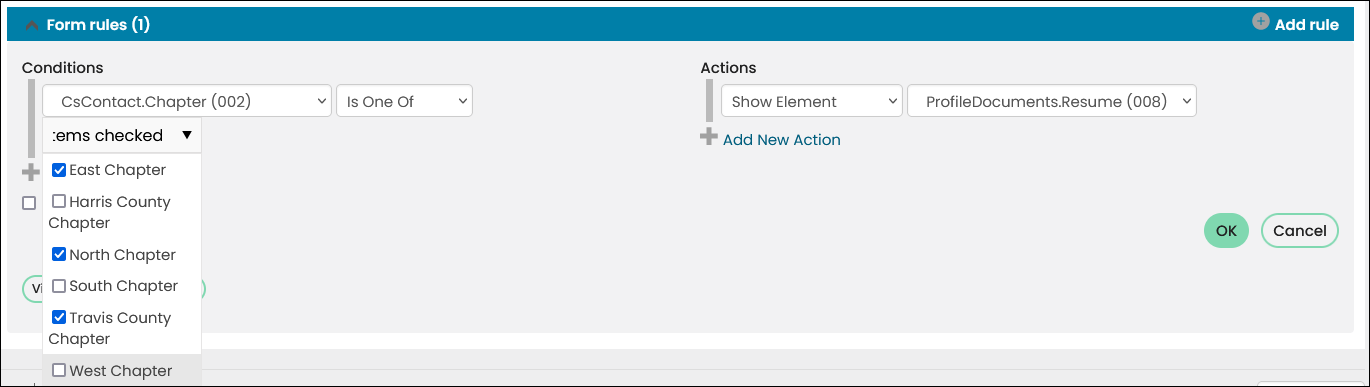
Instead of using separate rules for the resume element, it is recommended to combine the rules using the Is One Of operator. For example, the following rule hides the ProfileDocuments.Resume element by default, and shows the element when users select the East, North, or Travis County chapters:
IF (( CsContact.Chapter (002) Is One Of "EAST;NORTH;TRAVIS"))
THEN ( ( Show Element ProfileDocuments.Resume (008) ) )
ExampleAn organization wants to create a form for members to propose speakers for their annual conference.
The form should prompt users to select the number of speakers they would like to propose.
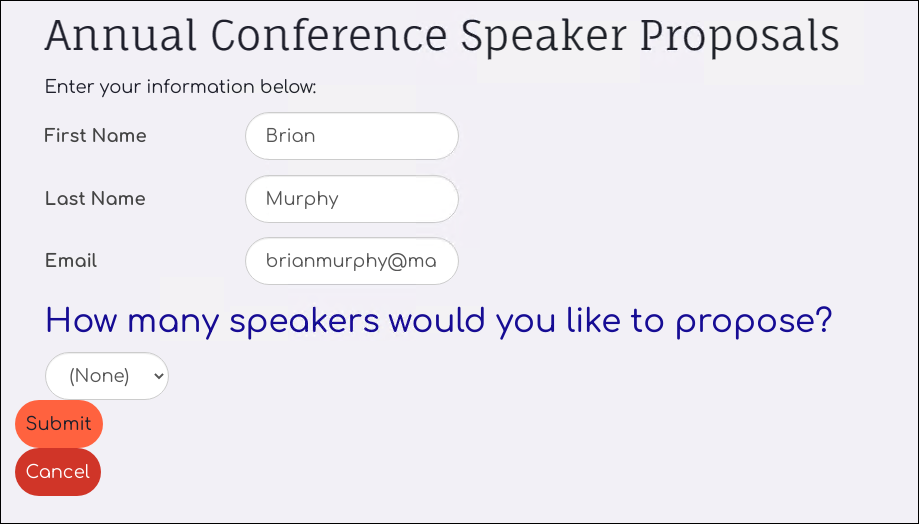
Once the user selects the number of speakers, the form should display a correlating number of fields.
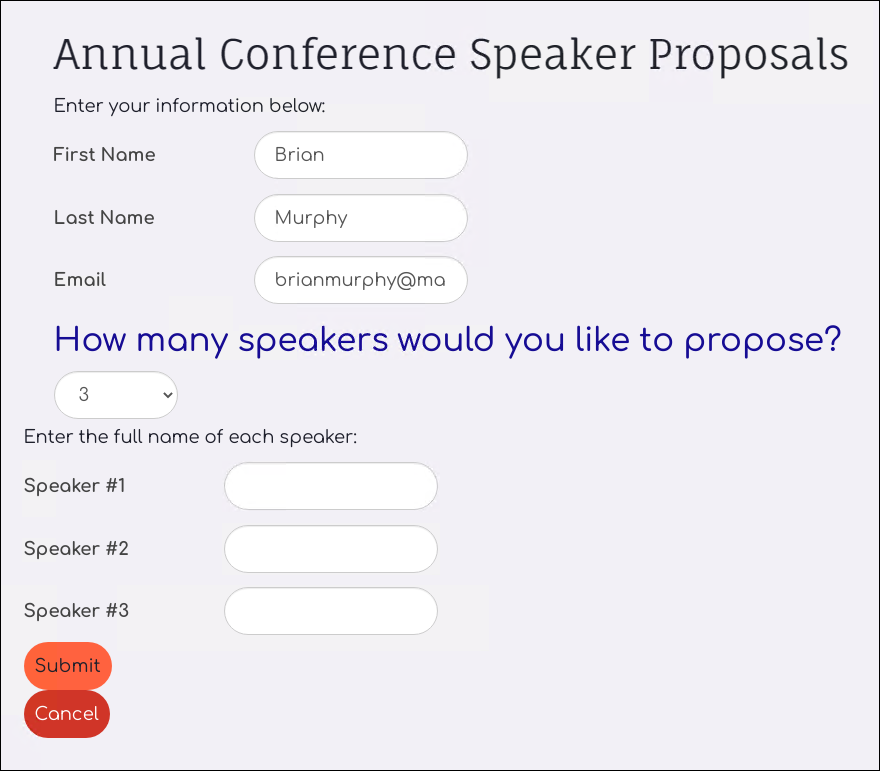
For best performance, create one Show Element rule for each speaker field. Use the Is one of operator to define all scenarios for which the field should show.
Do the following:
- Create a new panel source for the form to reference:
-
Name the panel Annual Conference Proposed Speakers, select Contact as the Parent type, and select Single instance as the Panel type.
-
Create a source called ProposedSpeakers.
-
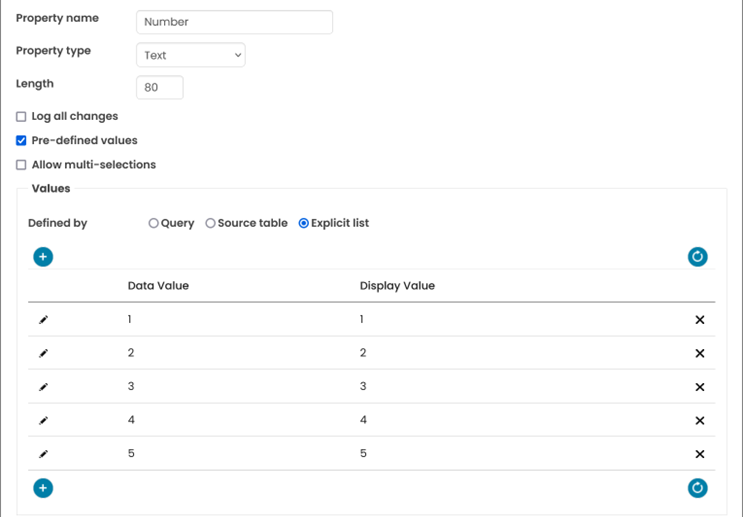
Select Add property and define the first property:
- Property name – Number
- Property type – Text
- Pre-defined values – Enabled
- Values – Select Explicit list and add values 1, 2, 3, 4, and 5.
-
Click Add & Continue and define the second property:
- Property name – Speaker1
- Property type – Text
- Pre-defined values – Disabled
-
Click Add & Continue and define the third property:
- Property name – Speaker2
- Property type – Text
- Pre-defined values – Disabled
-
Click Add & Continue and define the fourth property:
- Property name – Speaker3
- Property type – Text
- Pre-defined values – Disabled
-
Click Add & Continue and define the fifth property:
- Property name – Speaker4
- Property type – Text
- Pre-defined values – Disabled
-
Click Add & Continue and define the sixth property:
- Property name – Speaker5
- Property type – Text
- Pre-defined values – Disabled
-
Click Add & Close.
-
Drag the fields to the layout area. You can also double-click a property to add it to the next available space in the layout area.
-
Save the panel.
-
- Go to RiSE > Form Builder > Form library.
- Select + Add new form.
- Name the form Annual Conference 2023 Speaker Proposals.
- Click Add.
- (Optional) Click Change Form Layout to change the layout of the form. The one column layout is used by default.
- Drag-and-drop the following Form elements onto the form canvas:
- Contact fields:
- FirstName
- LastName
- Single instance:
- ProposedSpeakers.Number
- ProposedSpeakers.Speaker1
- ProposedSpeakers.Speaker2
- ProposedSpeakers.Speaker3
- ProposedSpeakers.Speaker4
- ProposedSpeakers.Speaker5
- Actions fields:
- ProposedSpeakers.Number
- ProposedSpeakers.Speaker1
- ProposedSpeakers.Speaker2
- ProposedSpeakers.Speaker3
- ProposedSpeakers.Speaker4
- ProposedSpeakers.Speaker5
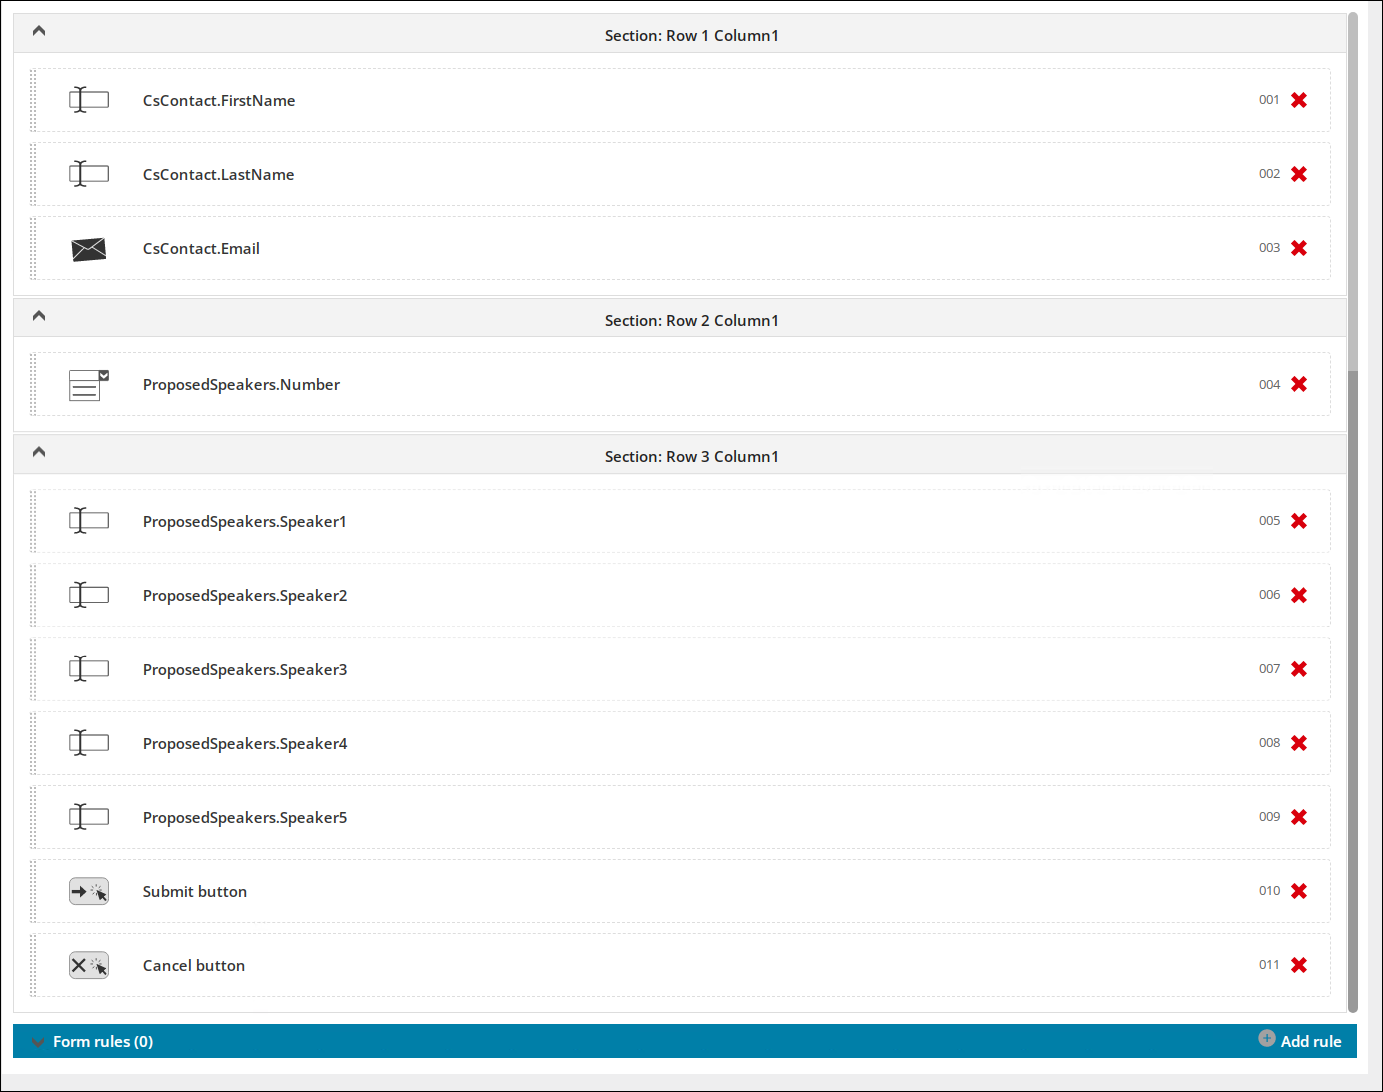
- Contact fields:
- (Optional) Customize the form:
- Add any text or header fields to improve the look and feel of your form.
- Click each element to adjust its label or other settings. See Understanding the form elements.
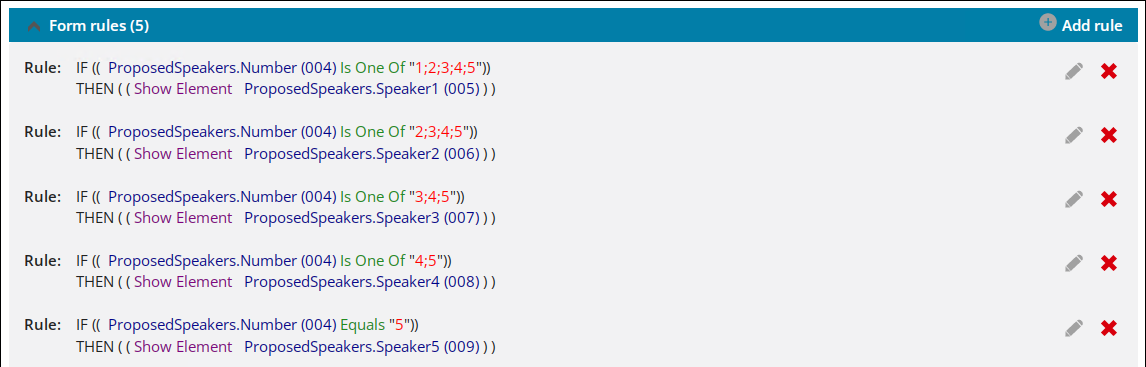
- Select + Add rule and define the first rule:
- Conditions:
- Element – ProposedSpeakers.Number
- Condition – Is One Of
- Values – 1, 2, 3, 4, 5
- Actions:
- Action – Show Element
- Element – ProposedSpeakers.Speaker1
- Click Ok.
- Conditions:
- Select + Add rule and define the second rule:
- Conditions:
- Element – ProposedSpeakers.Number
- Condition – Is One Of
- Values – 2, 3, 4, 5
- Actions:
- Action – Show Element
- Element – ProposedSpeakers.Speaker2
- Click Ok.
- Conditions:
- Select + Add rule and define the third rule:
- Conditions:
- Element – ProposedSpeakers.Number
- Condition – Is One Of
- Values – 3, 4, 5
- Actions:
- Action – Show Element
- Element – ProposedSpeakers.Speaker3
- Click Ok.
- Conditions:
- Select + Add rule and define the fourth rule:
- Conditions:
- Element – ProposedSpeakers.Number
- Condition – Is One Of
- Values – 4, 5
- Actions:
- Action – Show Element
- Element – ProposedSpeakers.Speaker4
- Click Ok.
- Conditions:
- Select + Add rule and define the fifth rule:
- Conditions:
- Element – ProposedSpeakers.Number
- Condition – Equals
- Values – 5
- Actions:
- Action – Show Element
- Element – ProposedSpeakers.Speaker5
- Click Ok.
- Conditions:
- Click Save.
- After you have created your form and are ready to display it on a page for user access, add the Form content item. See Displaying a form for more information.