

Event reports
Access requiredTo access the Events Dashboard, you must be a system administrator or a staff user with Events: 2 module authorization.
The Run Reports button displays several event-specific reports that can be immediately run for any event. To use these reports, do the following:
- Go to Events > Find events.
- Search for and open the event.
- Click the Dashboard tab.
- Click the Run reports button.
Print badges
Displays a report containing registrant badge information. The badges display the full name, informal name, title, organization, city, state/province, and country of each registrant. This report is configured to print badges on Avery 5392 badge stock. To configure the Print Badges report results, you can adjust the following parameters:
- Event
Code: The unique event identification code determined during your initial event set up. - (optional) First Name begins with: Enter a first name to display badges only for people with that name.
- (optional) Last Name begins with: Enter a last name to display badges only for people with that name.
- Include Guests: Select Yes or No from the drop-down list. If you select Yes, guests are grouped together with the primary registrant and their badge will display only their name and a note that they are a guest of their primary registrant.
- PDF and Excel icons: Select an icon to export the report as the designated file type.
Print confirmations
Prints event confirmation notices for the selected event, including line item prices and amount due. To configure the Print confirmations report results, you can adjust the following parameters:
- Display Organization Logo: Select Yes or No from the drop-down. If you select Yes, the organization’s logo will be included on the report.
- Display Organization Name: Select Yes or No from the drop-down. If you select Yes, the organization’s name will be included on the report.
- (optional) Registrant ID: Enter the ID of an event registrant to display a confirmation for that individual.
Registrant directory
Displays a report that lists all event registrants and their information. To configure the Registration Directory report results, you can adjust the following parameters:
- Event: The name of the event.
- Include Cancelled: Select Yes or No from the drop-down list. If you select Yes, cancelled registrations are included in the report and are distinguished by an asterisk (*).
- Include Guests: Select Yes or No from the drop-down list. If you select Yes, guests are grouped together with the primary registrant and their badge will display only their name and a note that they are a guest of their primary registrant.
- Include Email: Select Yes or No from the drop-down list.
- Include Full Address: Select Yes or No from the drop-down list.
- Include Phone: Select Yes or No from the drop-down list.
- PDF and Excel icons: Select an icon to export the report as the designated file type.
Registration option registrants
Displays a list of registrants and the organizations they belong to for each registration option. To configure the Registration Option Registrants report results, you can adjust the following parameters:
- (optional) Report Title: Enter a descriptive title for your report.
- Event: The name of the event.
- Show Registrants for: Select either Registration Options or Program Items in order to display the registrants that are listed for each option.
- Include Cancelled: Select Yes or No from the drop-down list. If you select Yes, cancelled registrations are included in the report and are distinguished by an asterisk (*).
- Include Wait List: Select Yes or No from the drop-down list. If you select Yes, guests are grouped together with the primary registrant and their badge will display only their name and a note that they are a guest of their primary registrant.
- PDF and Excel icons: Select an icon to export the report as the designated file type.
Program item registrants
Displays a list of registrants and the organizations they belong to for each program item. To configure the Program Item Registrants report results, you can adjust the following parameters:
- (optional) Report Title: Enter a descriptive title for your report.
- Event: The name of the event.
- Show Registrants for: Select either Registration Options or Program Items in order to display the registrants that are listed for each option.
- Include Cancelled: Select Yes or No from the drop-down list. If you select Yes, cancelled registrations are included in the report and are distinguished by an asterisk (*).
- Include Wait List: Select Yes or No from the drop-down list. If you select Yes, guests are grouped together with the primary registrant and their badge will display only their name and a note that they are a guest of their primary registrant.
- PDF and Excel icons: Select an icon to export the report as the designated file type.
Print certificates
Prints certificates of completion for each attendee of the selected event. To configure the Event certificates report results, you can adjust the following parameters:
-
(optional) ID: Enter the name of the event.
-
(optional) Title: Enter a descriptive title for the type of certificate: for example, a Certificate of Completion.
-
(optional) Completion Text: Enter the completion text.
-
Display Event Name: Select Yes or No from the drop-down. If you select Yes, the event name will be included on the report.
-
Display Event Dates: Select Yes or No from the drop-down. If you select Yes, the date of the event will be included on the report.
-
Include Financial Entity Logo: Select Yes or No from the drop-down. If you select Yes, the logo of the Financial Entity will be included on the report.
NoteThe Include Financial Entity Logo parameter uses the logo of the Financial entity for the selected event, if there is one defined. If there is no Financial Entity defined for the event, the logo parameter uses the Meetings entity. If there is no entity defined for Meetings, the entity defined as the default Financial Entity for the system will be used.
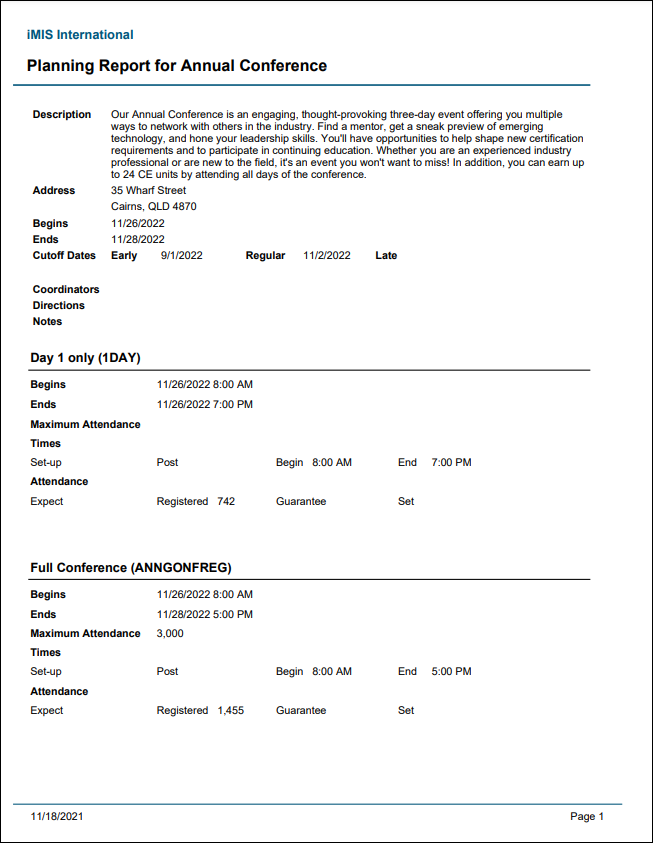
Planning report
Displays a summary of the event definition, with an option to include function summaries. The function summaries display time, date, and attendance information, as well as the space, resource, speaker, and staff requirements defined in the function Plan.
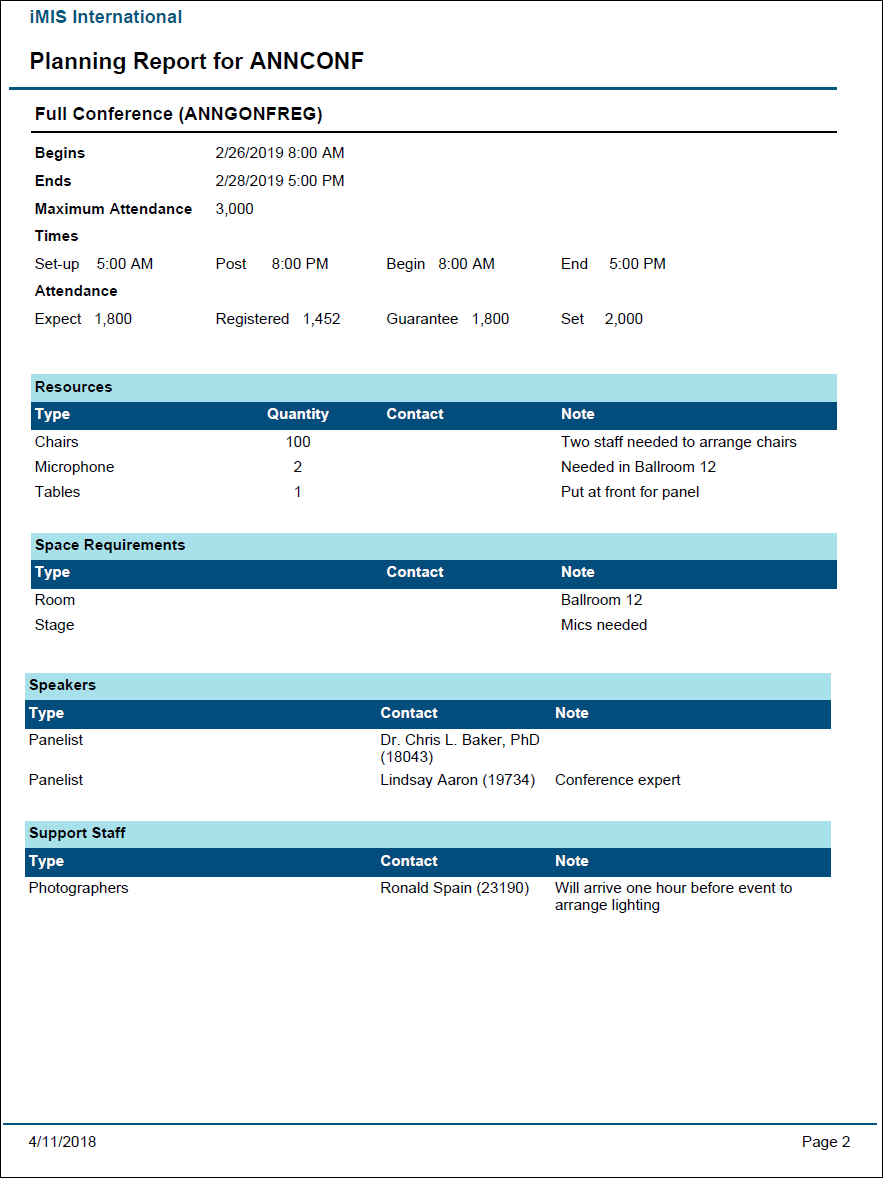
See Specifying resources for an event for more information.
Weeks out report
Displays the number of registrants for the selected event by the number of weeks prior to the event’s begin date. Select an Event from the drop-down to display registrant information.
View invoices
Displays a query menu that allows you to view results of event-specific invoices. These results can be refined by choosing All invoices or Open invoices from the Select a query drop-down. The following parameters are also available:
- Generated on between: Enter a date range
- Invoice number: Enter a value for invoice number
- Registrant name contains: Enter a value for the registrant name
- Registrant ID: Enter a value for ID of the event registrant
- Bill to name contains: Enter the Bill to name for the event registration
Query results can be exported in the following file formats: Word, Excel, PDF, CSV and XML.
An Event Invoice report, which includes all the invoices for the selected event, can then be printed using the Print All Invoices button. This report can be exported as a PDF or Excel file.
Updated 28 days ago