

Communications Getting Started & Best Practices
Use this tutorial to understand how to create or edit communication templates, send the communications, and review best practices when working with communication templates.
Setting up the required communication templates
Before you go live with iMIS, you must make sure the out-of-the-box communications you intend to use have been properly updated and no longer contain sample ASI and iMIS information.
The next step is to update the related settings that use these templates. At a minimum, you must update the following templates and the associated settings:
Order Confirmation
The Order Confirmation template is sent to users when they purchase something from your site. You must tailor the order confirmation template before contacts begin purchasing items from your site.
Tailoring the order confirmation template
When creating a tailored Order Confirmation template, you can copy the sample template or create a new template.
Do the following to tailor the Order Confirmation template:
- Go to Marketing > Communication templates. Navigate to Templates > Samples.
- Select the Order Confirmation template.
- Edit the template as needed, for example, ensure that the From address is the correct email address.
- Click Save As and enter a Name for the template.
Note
Be sure to save your template to the Templates folder.
When copying the sample Order Confirmation template or creating a new template the following information must be configured in the template:
-
The From address
-
The To address defined as
{#party.Email} -
Type = Billing
-
The
{orderdetailsblock}placed within the body. This placeholder will be replaced with a grid containing order details such as the order number, shipping address, item lines, and transaction totals.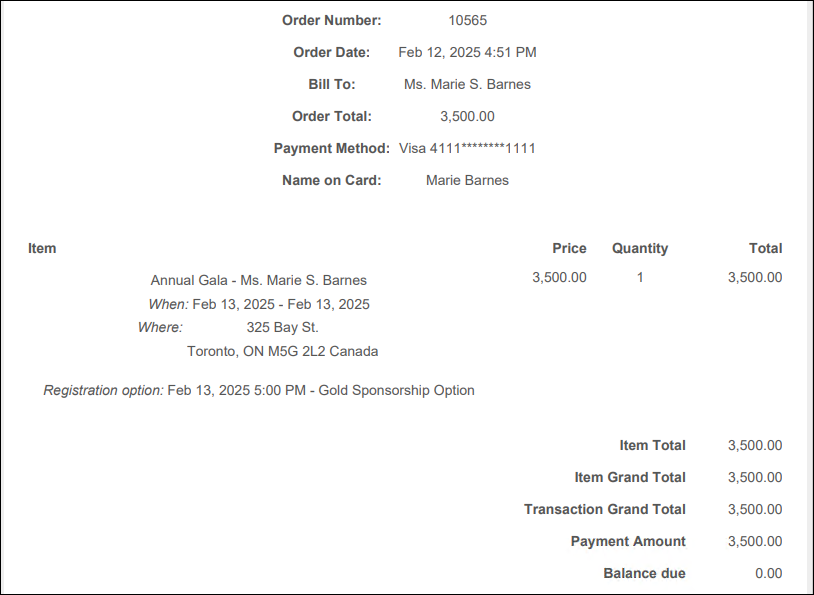
Notes
- When previewing the Order Confirmation template on the Staff site, the
{orderdetailsblock}will display an error. This error is not displayed when an order confirmation is sent. - When resending an order confirmation, the CC and BCC addresses are ignored.
- Multiple attachments can be added to the same communication template using the [Add attachment](../../../Features/Marketing/Communications/Working with communication templates.htm#Body_tab) function, but the template must be saved after every five attachments.
Managing the order confirmation template
Default communication template
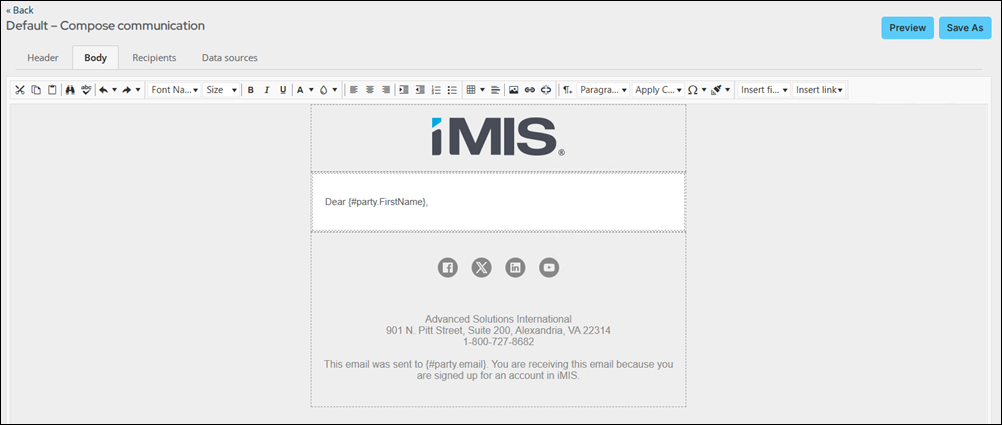
The Default template automatically opens when composing new communications or when sending a communication directly to an individual.
Creating a custom Default template
Do the following to define a custom Default template:
-
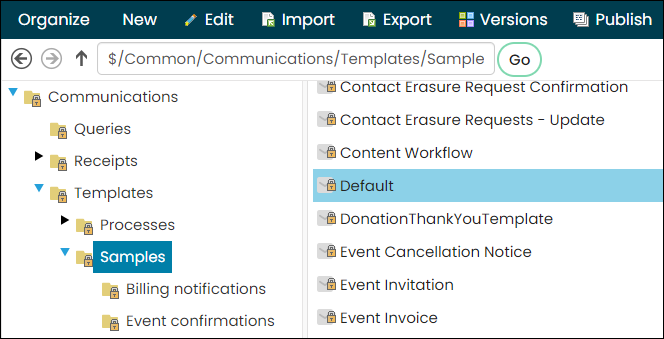
Go to Marketing > Communication templates > Templates > Samples.
-
Select the Default template.
-
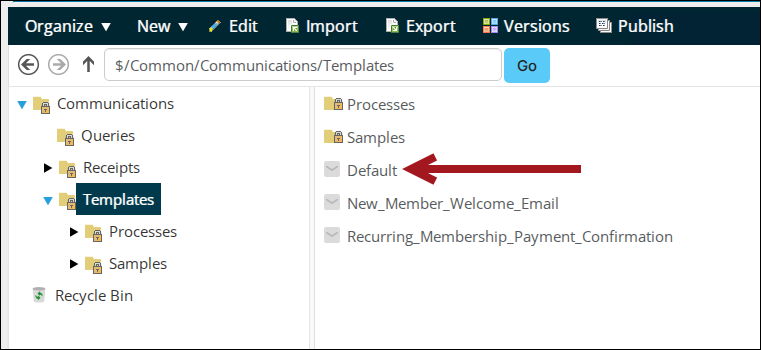
Copy and Paste the template to the Templates folder in order to avoid having your template overwritten during an upgrade. If a Default template is not defined in the Templates folder, the standard message will be used for new communications.
- Edit the template as needed, such as removing the sample ASI and iMIS content.
Warning
Do not rename the template. In order for the template to be set as the default template, it must be titled “Default.” There should only be one template titled “Default” within the Templates folder. If there are multiple templates entitled “Default,” then the most recently created default template will be used.
- Save the template.
- Select New > Communication to view your new default communication template.
Event Invoices
See Event invoices for more information.
Account Statement
Send this communication to those who have an outstanding balance with your organization. Account statements can be emailed to contacts by attaching the Account Statement or Account Statement Report Writer reports to the communication template.
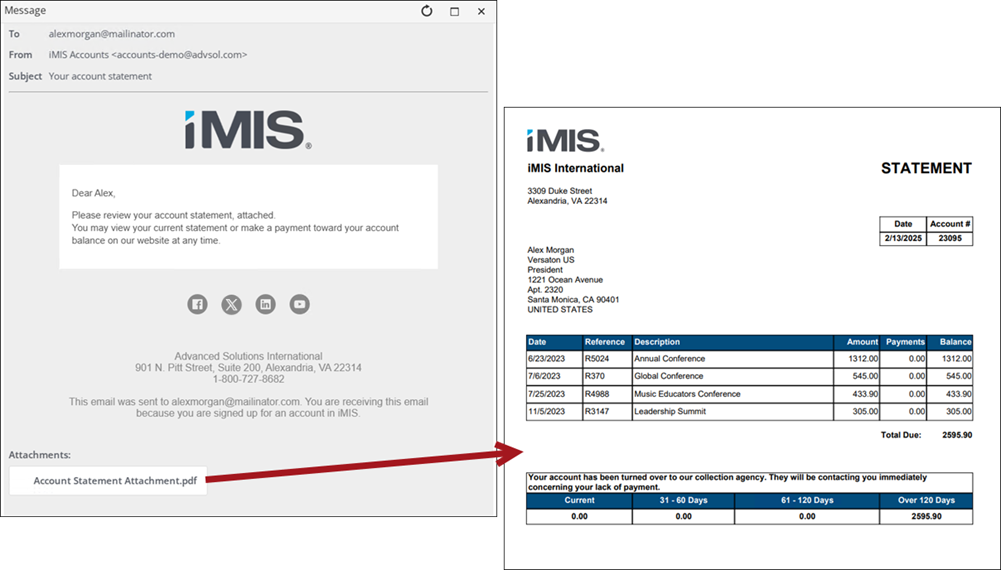
Out-of-the-box, the Account Statement and Account Statement Report Writer communication templates comes preconfigured with the Account Statement or Account Statement Attachment report attached. Before emailing account statements, you must create your own account statement template. The actual communication template must be tailored, but the attached Account Statement or Account Statement Report Writer report does not need to be tailored.
To create a tailored Account Statement communication template, do the following:
- Go to Marketing > Communication templates > Templates > Samples.
- Select the Account Statement or Account Statement Report Writer template, then select Organize > Copy.
- Select the Templates folder, then select Organize > Paste.
- Open the new template, and make the desired edits, such as removing and updating all of the ASI and iMIS sample information.
- Click Save.
The Account Statement and Account Statement Report Writer reports contain information defined in the Financial Entity, such as the organization name and address. Before sending this report, make sure your financial entity information is updated and does not contain the sample ASI and iMIS information. For more information, see Financial entities.
Membership renewal notices
Renewal notices are communications that are sent to members, reminding them that their fees are due soon. These reminders are sent after billing renewals are generated.
Order Invoice
The Order Invoice and Order Invoice Report Writer communication templates are used and sent to contacts when order invoices are generated.
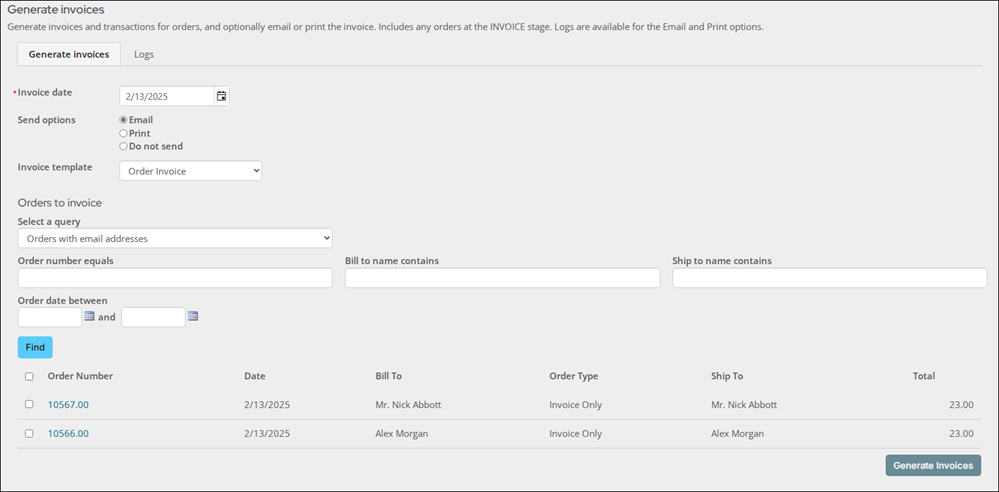
See Processing orders for more information.
Membership Cancellation Notice
This out-of-the-box communication template is used to inform members that you have cancelled their membership renewal.
To create a tailored Membership Cancellation Notice communication template, do the following:
- Go to Marketing > Communication templates > Templates > Samples.
- Select the Membership Cancellation Notice template, then select Organize > Copy.
- Select the Templates folder, then select Organize > Paste.
- Open the new template, and make the desired edits, such as removing and updating all of the ASI and iMIS sample information.
- Click Save.
Event Cancellation Notice
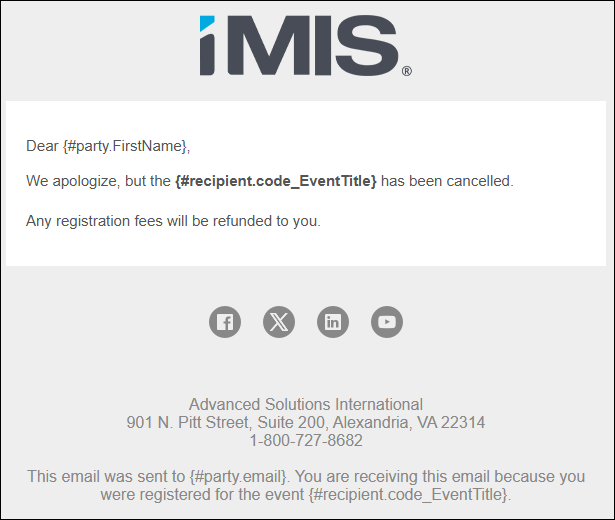
The Event Cancellation Notice is used to inform event registrants that an event was cancelled. There is a pre-built scheduled task associated with this communication template that also must be updated before you begin using it.
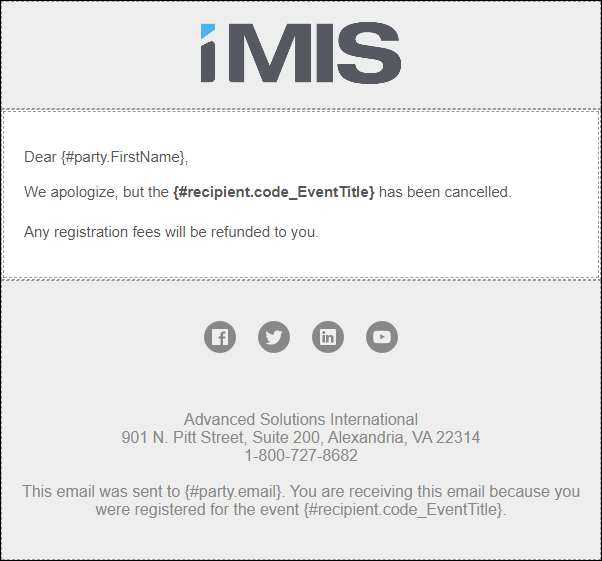
To use the Event Cancellation Notice communication template and the related scheduled task, do the following:
For more information about scheduled tasks, see Creating and editing scheduled tasks.
Event Waitlist Confirmation
If you plan to send automatic emails to contacts when they are removed from an event waitlist, then you must update the related communication template and process automation task.
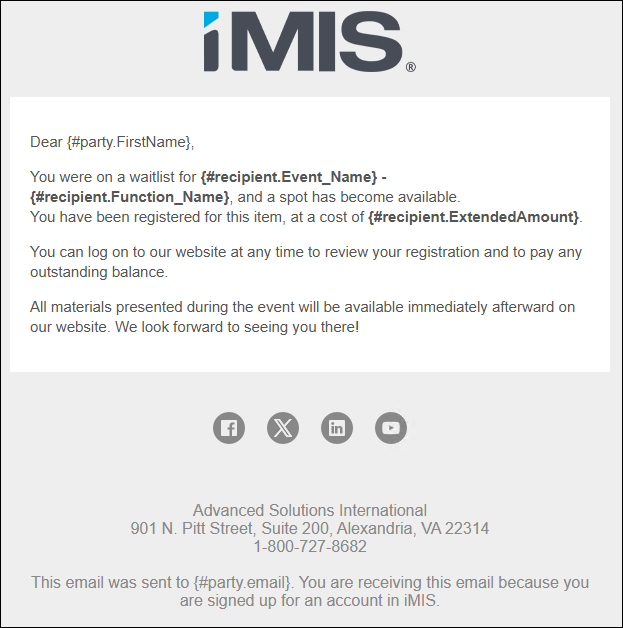
If you plan to send automatic emails to contacts when they are removed from an event waitlist, then you must update the related communication template and process automation task.
To use the out-of-the-box Event Registered from Waitlist Notification communication template and related task, see Waitlisting for an event.
Contact erasure communications
The following contact erasure communications are available:
-
Contact Erasure Request Confirmation - The communication sent to contacts when they have requested to be erased from your system.
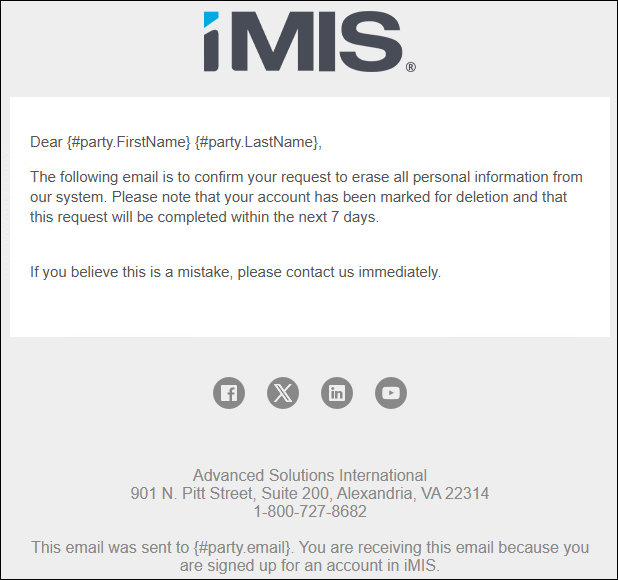
-
Contact Erasure Request Update - The communication sent to system administrators detailing how many contact erasure requests are pending and how many contacts are marked for erasure.
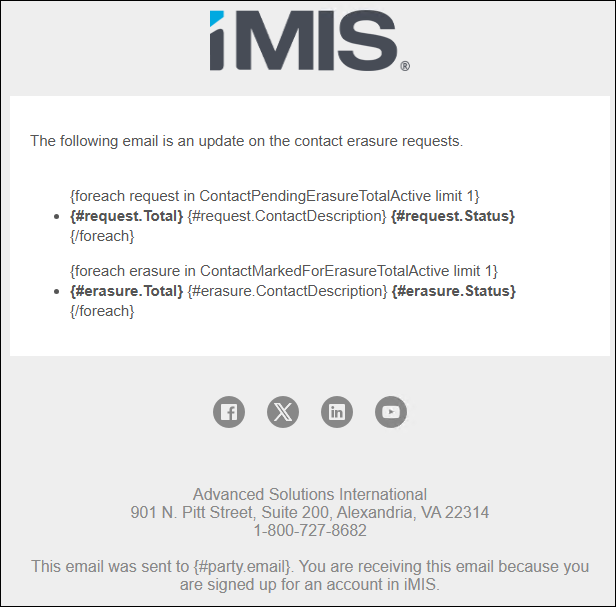
See Erasing a contact's personal data for more information about contact erasure.
Each communication is associated with a process automation scheduled task. Do the following before using the communication templates and scheduled tasks:
- Go to Marketing > Communication templates > Templates > Samples.
- Select the Contact Erasure Request Confirmation template, then select Organize > Copy.
- Select the Templates folder, then select Organize > Paste.
- Repeat steps 2 and 3 for the Contact Erasure Request Update template.
- Open the new templates, and make the desired edits, such as removing and updating all of the ASI and iMIS sample information.
- Click Save.
- Go to RiSE > Process automation.
- Locate the Contact erasure request confirmation task, and open it for edit.
- Click the Actions tab.
- Select the pencil icon.
- From the Communication line, Remove the existing template, then Select your copy of the Contact Erasure Request Confirmation template.
- To enable the task and begin sending out emails immediately, select Enabled.
- Save the task.
- Repeat steps 8-13 for the Contact erasure requests - Update email task and associated Contact Erasure Request Update communication template.
Invoice Notice
The Invoice Notice and Invoice Notice Report Writer communication templates are another template in iMIS that comes out-of-the-box with an attached report. In order to properly email an invoice directly from iMIS, there must be a connection from the invoice query to the communication's query. This communication is designed so that you can easily send an invoice to a contact without needing to create that connection yourself. The Invoice Detail or Invoice Notice Report Writer report is attached by default.
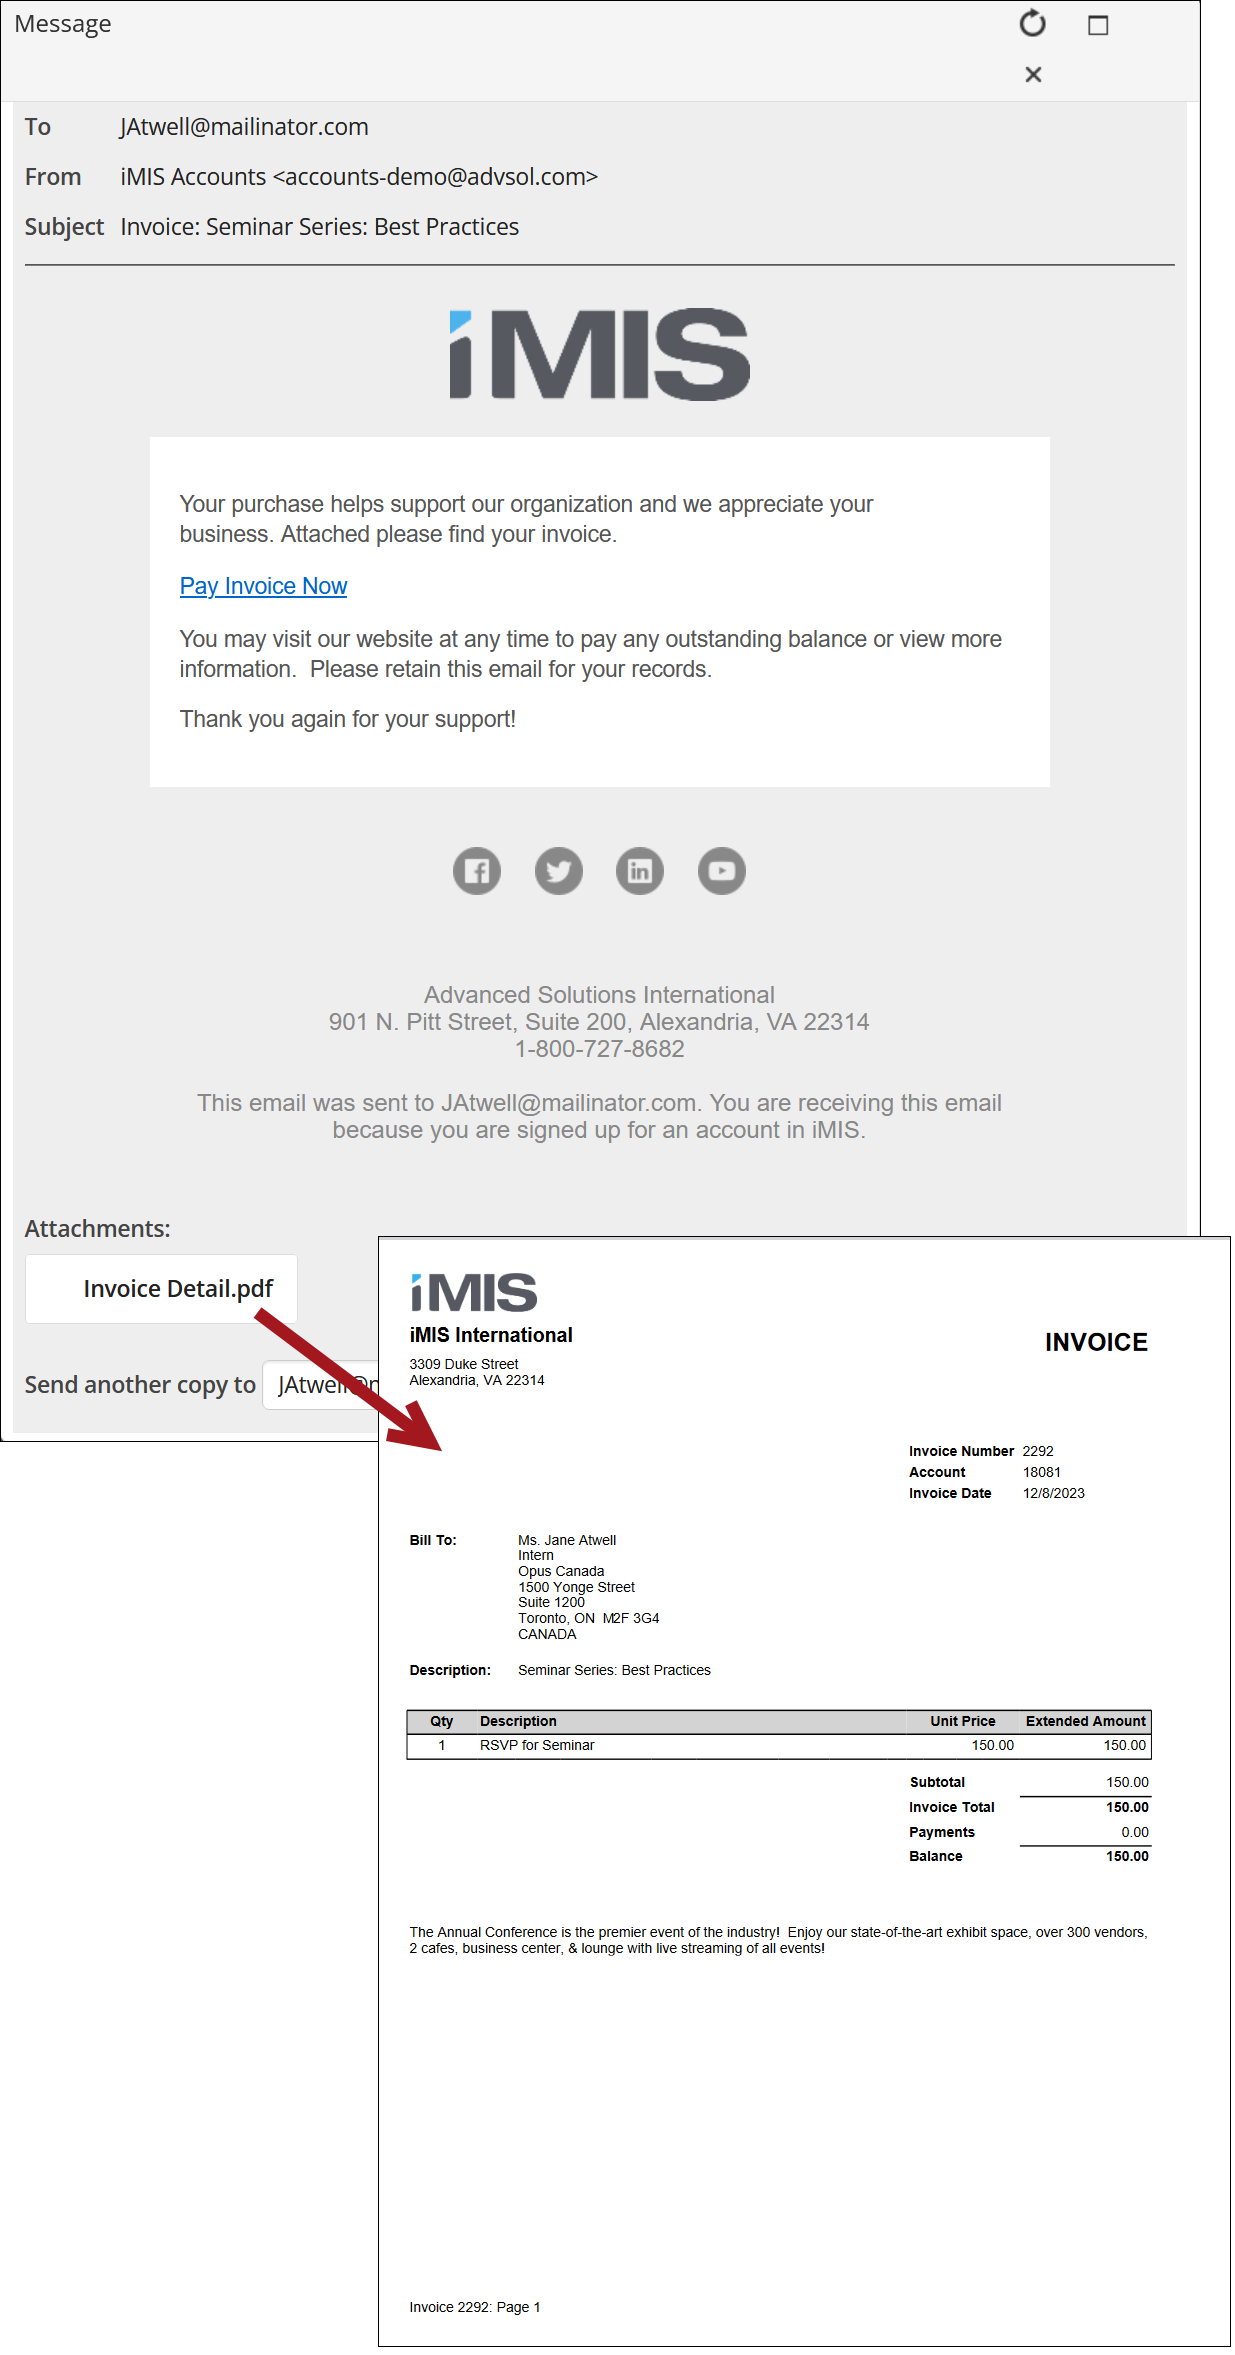
Before you can use and send the Invoice Notice or Invoice Notice Report Writer communication template, do the following:
-
Go to Marketing > Communication templates > Templates > Samples.
-
Select the Invoice Detail template, then select Organize > Copy.
-
Select the Templates folder, then select Organize > Paste.
-
Open the new template, and make the desired edits, such as removing and updating all of the ASI and iMIS sample information.
-
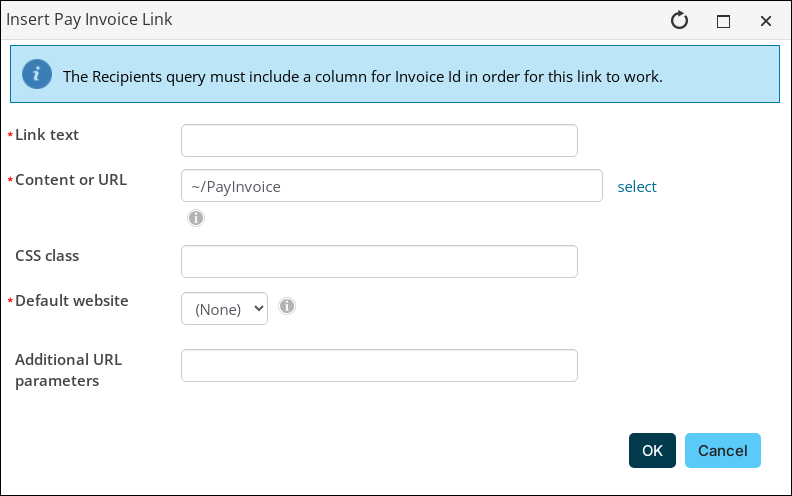
Update the Pay Invoice Now link to point to your public website.
a. Highlight the Pay Invoice Now link, then, from the Insert link drop-down, select Pay Invoice Link.
b. Select the Content or URL and the Default website. -
Click Save.
The Invoice Detail report contains information defined in the Financial Entity, such as the organization name and address. Before sending this report, make sure your financial entity information is updated and does not contain the sample ASI and iMIS information. For more information, see Financial entities.
TipOut-of-the-box, the ~/PayInvoice shortcut points to the invoice payment content record.
Alternatively, you can delete this link from the template as needed. For more information on the Pay Invoice Link, see Paying invoices using a direct link.
Using and sending communication templates (emails) throughout iMIS
Out-of-the-box, iMIS ships with many different sample communication templates that your organization or association can use as a starting point for your communication templates. These templates are responsive, and can be located by going to Marketing > Communication templates > Templates > Samples.
For a list of out-of-the-box sample communication templates, see Sample communication templates.
Using the Email button to send a communication
Communication templates are often sent through the Email button, found throughout iMIS, such as on dashboards or a list of contacts, or from Marketing > Communication templates. This button enables staff users to send emails to contacts returned from an IQA query. Common places in iMIS where communication templates are used include the following:
- Finding contacts
- Finding invoices
- Finding registrations
For example, do the following to send an invoice:
- Go to Finance > Invoices.
- Under the Select a query drop-down, choose All open invoices.
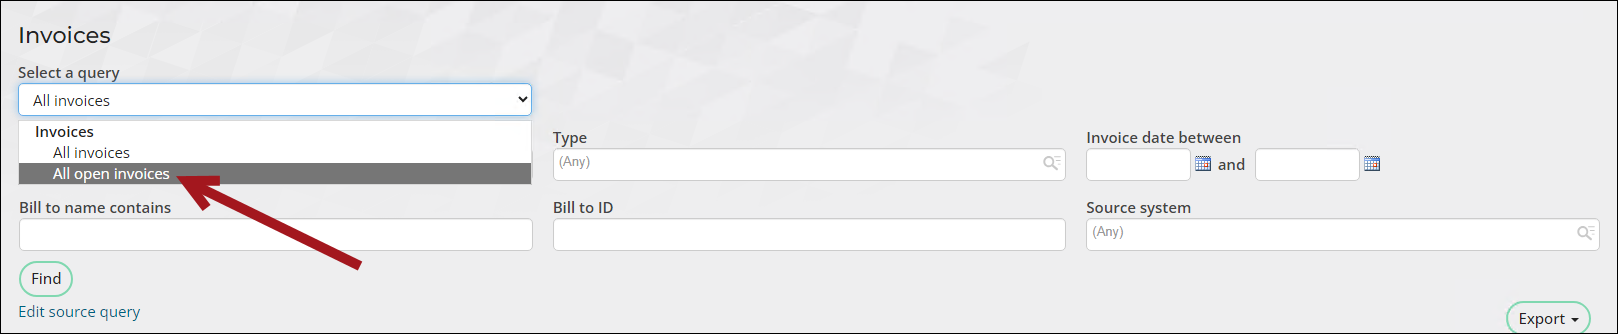
- Scroll to the bottom and click Email.

- Edit the communication as needed and click Send.
Creating an email from a communication template
Do the following to create an email from a communication template:
- Go to Marketing > Communication templates.
- Open an existing template, or select New > Communication to create a new template.
- Click the Recipients tab to select the contacts to whom you will send the email.
- Click Select to select the query you want to use as the primary data source. This query retrieves the contacts to whom you will send email. By default, the SelectedContact query, which retrieves the selected contact (that is, the contact you are signed in as or working on behalf of) is the primary data source. See Creating a list of contacts to email for more information.
NoteThe query must have a column that identifies the contact’s ID. Also, if the query contains filters with required or optional prompts, it must have default values because they cannot be changed when the email is sent.
- Deselect the names of any contacts you do not want to receive the email.
NoteIf the query contains filters with required or optional prompts, you cannot deselect recipients from the list.
- Click the Body tab to continue composing your email template.
Composing and sending the email
Do the following to compose and send the email:
- Once you have created the email communication, compose or review the email content:
- From the Header tab, enter the From, Subject, Type, and email message.
- If the communication Type allows unsubscribing, select a Website for unsubscribe link. This site is used by email clients to generate a one-click unsubscribe option within their interface. For more information, see Enabling one-click unsubscribe for communications.
NoteThis option is not available for Advanced Emails.
- If needed, click the Cc or Bcc links under the To field, so you can enter Cc and Bcc email recipients. In addition, when sending a Standard email using the iMIS mail service, the same email address cannot appear in more than one of the To, Cc, or Bcc fields. If an address is repeated, it will be included only once, with precedence given in the order of To, Cc, and then Bcc.
NoteChanging the To field from {#party.Email} to hard coded email addresses will only send the email to the hard coded email addresses; however, everyone in the recipient query will still have the communication recorded in their communication log on their account page.
- From the Body tab, select Add Attachment to include an XML or RDL (SSRS report), or Report Writer (static report) attachment to the email.
NoteReport Writer reports are found in the $/Common/Report Writer/Reports folder. For more information about adding attachments and reports, see Creating a communication with an attached report.
For more details about composing communications, see Creating a new communication template.
📘 NoteIf you want to include additional addresses to which the communication can be sent without sending additional copies and creating additional interaction log entries, enter those addresses in the Cc or Bcc field. Any addresses entered in the Cc or Bcc fields are included on each copy of the communication but will not cause additional copies to be sent.
For example, if you enter both {#party.Email} and [email protected] in the To field, one copy of the communication is sent to the recipient’s primary email address, and a second copy is sent to [email protected]. The recipient will also have two different entries in the communication log for the two copies of the communication. To send only one copy of the communication with one interaction log entry, enter {#party.Email} in the To field, and add any additional email addresses in the Cc or Bcc fields.
- Click Preview to view a preview of the email for each recipient. Click Prev or Next to review the email for each recipient. Ensure that any merge fields in the email appear correctly.
Notes
- You must enter From and To addresses to preview the email.
- The preview will stop showing after the 18th record.
- Send the email communication. To review the status of your communication job, go to the Communication logs (Marketing > Communication logs). For more information, see Communication logs.
NoteIf any emails bounce, check to see if the email contains invalid characters. For more information, see Regular expression to validate email addresses.
- (optional) To save the email as a draft for future use, select Save As. By default, the email message draft is stored in the $/Common/Communications folder of the Document system.
- All information in your email is included in the saved drafts including the recipient list, attachments, and message content.
- Make sure to label your communications carefully. Saved email drafts include all information from the saved communication, including the contact list query. It is recommended to use a naming convention to identify your query in any saved email drafts. For example, enter All Members Thank You Communication instead of Thank you communication to avoid any confusion about the content of the draft.
Figure 1: Validation of communications sent from imis
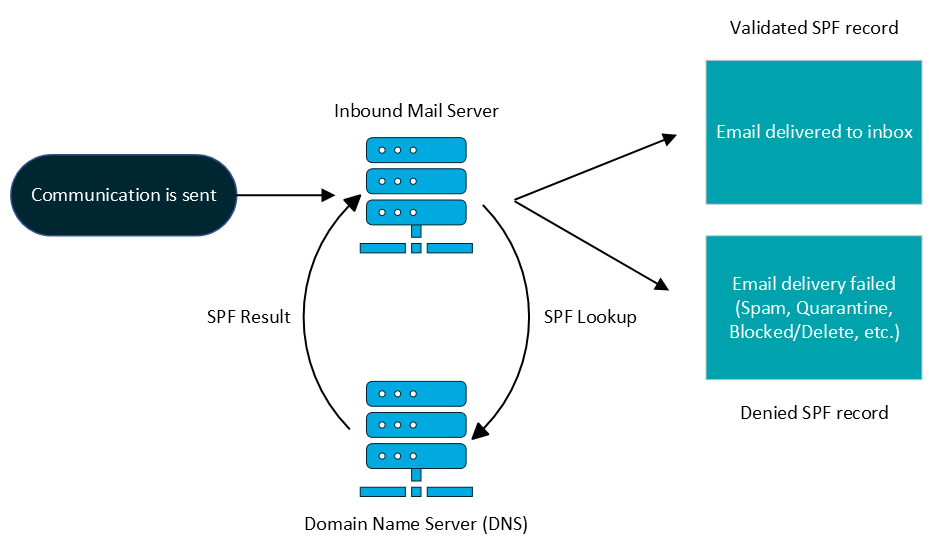
See Sending communications to contacts for more information.
Advanced email
Advanced Email makes interactions with your constituents efficient and effective. It enables you to send email more reliably, track the effectiveness of individual emailed communications, and apply what you learn to continually improve your communication approach.
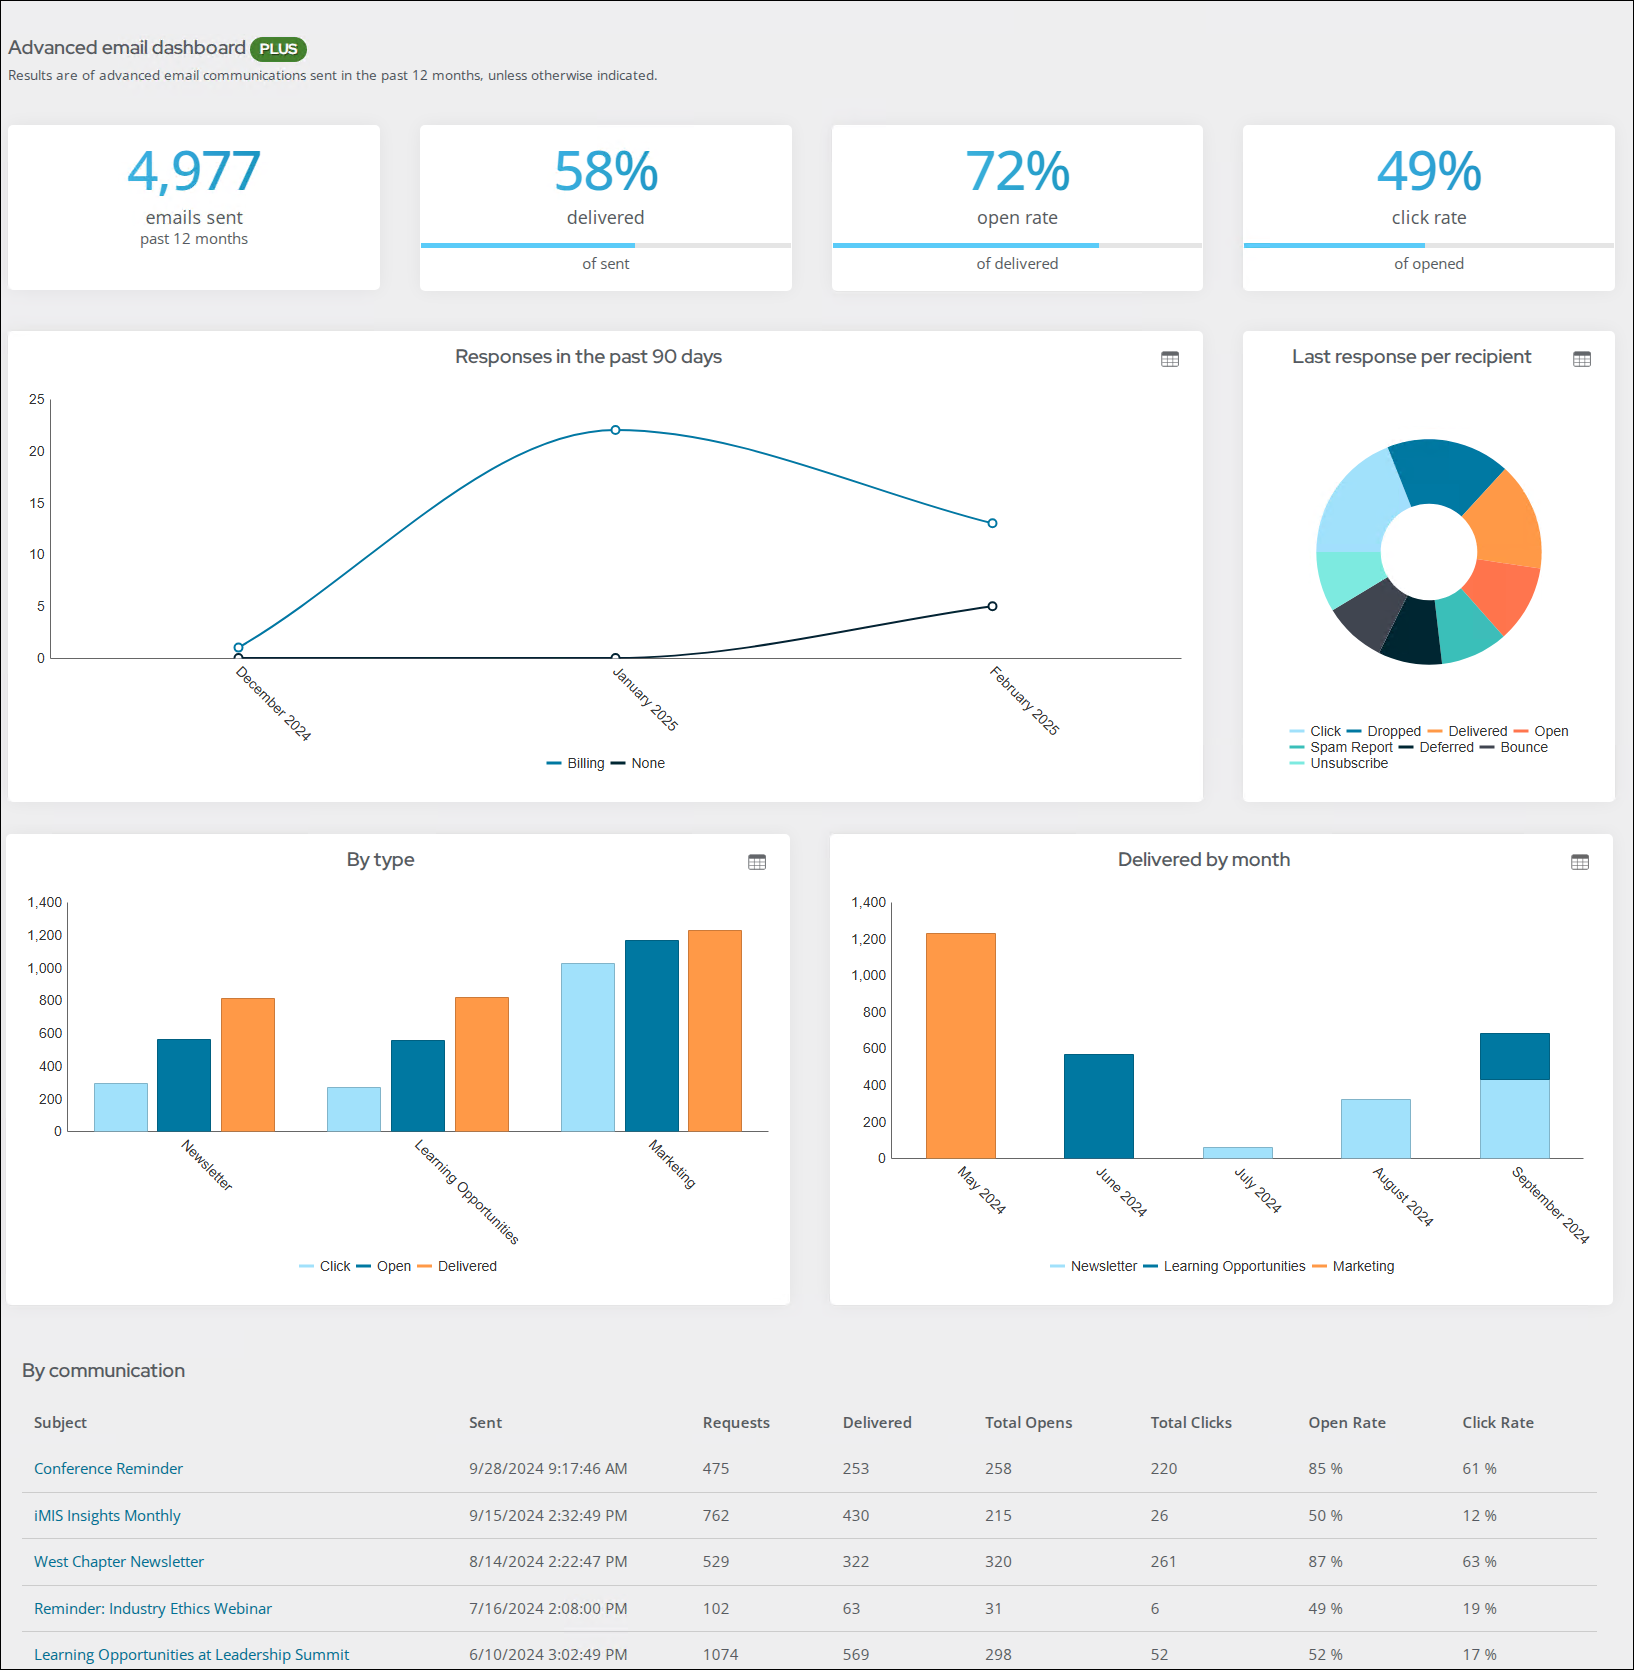
For more information, see Advanced email.
Using Process Automation to send emails on a regular schedule
You can automatically send pre-created communications at regular intervals on the dates and times you specify. For example, you can send the following types of communications on a regular schedule:
- New member welcome
- Event and product promotions
- Upcoming event reminders
For more information, see Sending scheduled communications.
Testing communication templates before they are sent
Testing a communication by sending it to a small group or to certain staff before distributing it to the entire contact list is a crucial step in any email marketing campaign. Review the following articles for details on how to test communications before they are sent:
- Testing emails: Sending an email to a subset of contacts first
- Testing Process Automation communication templates
- Testing Process Automation communication triggers
Additional Resources
The following resources give you more information on other things you can do with communication templates:
- Creating a communication with an attached SSRS report
- Attaching a Report Writer report to a communication template
- Tracking email interactions with contacts
- Communication logs
- Managing communication preferences
- Customizing the salutation of a communication
Best Practices
Review the following best practices when working with iMIS communication templates:
Do not delete the default query on the Data sources tab
Never delete the default query found on the Data sources tab on a communication template because it is required. If it is deleted, you can add it back.
See Working with communication templates for more details.
Best practices for using the Communication log
Review the following best practices when working with communication logs
Verify your email was successfully sent
To check if your communication was successfully sent, you can check the Communication log.
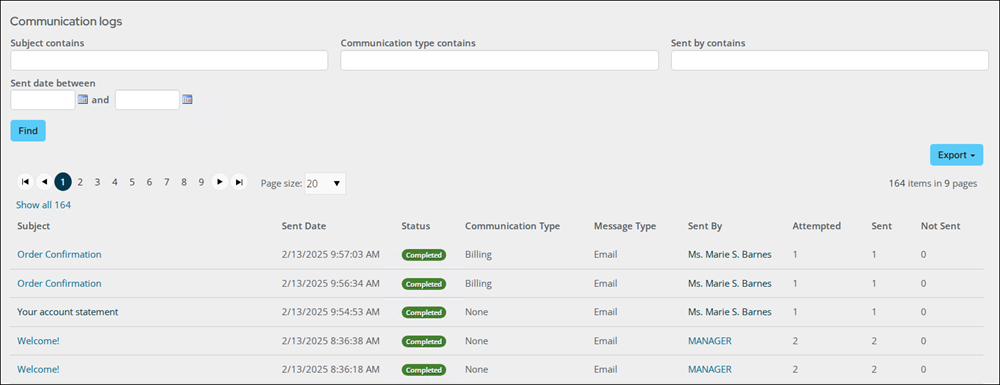
Wait to see if you email was successfully sent
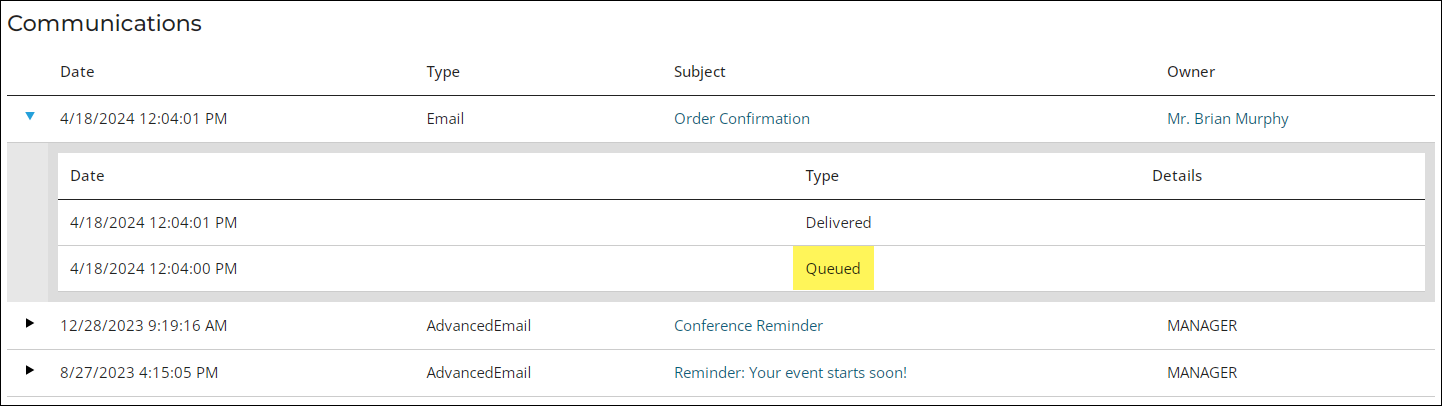
After emails are sent, wait a few minutes before checking the Communication log and Communications area of a user’s account page. Sent emails may show a status of Queued for a while even though they were successfully sent.
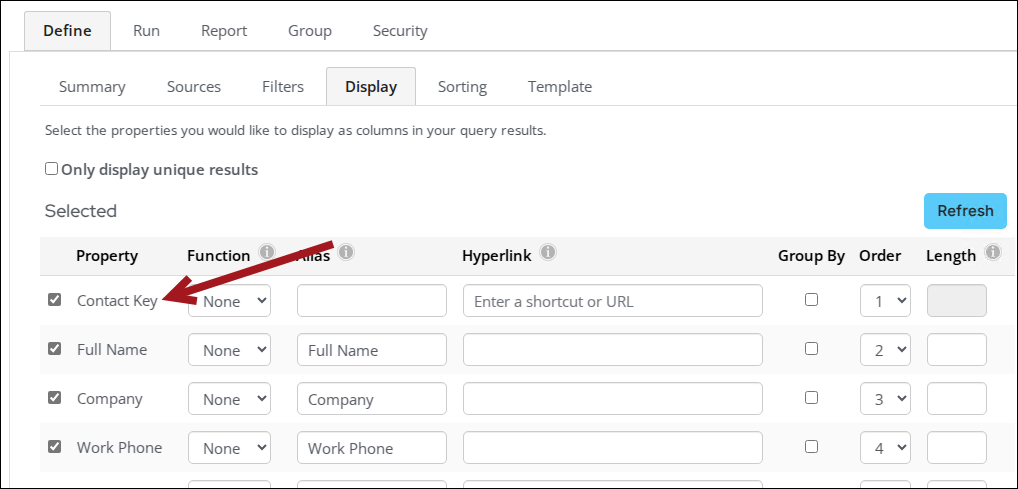
Remove the Contact Key property from the query to see successfully sent emails
If you do not see a record of a successfully sent email in the Communication log, remove the Contact Key property on the Display tab of the query and recheck the Communication log.
Best practices for testing communications
Review the following best practices when testing communications
Send communications to yourself before sending it out to others
To see if a communication attachment was sent correctly, send it to yourself or another staff user first before sending it out to the group.
Test the communication template before sending to large groups of contacts
To see if a communication attachment was sent correctly, send it to yourself or another staff user first before sending it out to the group.
See Testing emails: Sending an email to a subset of contacts first for details.
Contact your IT department to verify that CC or BCC addresses are being received
To ensure emails with addresses added to the CC or BCC fields are being received by the recipients, contact your IT department or email administrator to do the following:
- Verify that your iMIS App server’s sending IP address has been added to your SPF record.
- Ensure that your iMIS Sending IP address is also added on your company's email White List.
- When sending a Standard email using the iMIS mail service, the same email address cannot appear in more than one of the To, Cc, or Bcc fields. If an address is repeated, it will be included only once, with precedence given in the order of To, Cc, and then Bcc.
Wait 30 minutes between sending Advanced Email Campaigns
If sending an Advanced Email Campaign, wait 30 minutes before sending another to ensure the first campaign is fully sent.
For more best practices regarding Advanced Email, see Advanced Email.
Ensure recipient queries contain the required elements
Recipient queries are IQA queries defined in the Recipients tab of communications to identify the contacts who will receive an email.
Recipient queries must meet the following criteria:
-
Include a recognized ID column – The query must contain a column identifying the contact’s ID. From the Display tab of the query, select one of the following recognized ID properties as a column or use one of these terms as an alias:
-
PartyId
-
codePartyId
-
ContactId
-
codeContactId
-
CustomerId
-
codeCustomerId
-
ImisId
-
codeImisId
-
StudentId
-
codeStudentId
-
Id
-
codeId
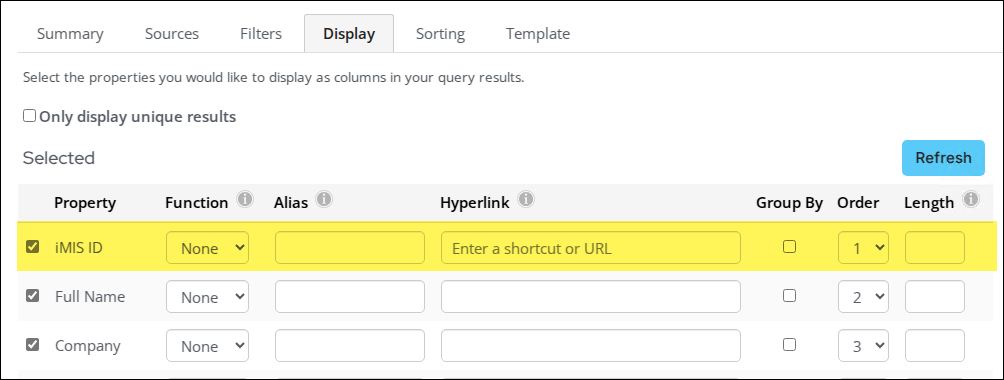
Additionally, the ID column should NOT include the following:
-
Do not use ContactKey as an alias.
-
ID columns should not contain spaces; avoid names like Contact Id, Customer Id, or iMIS Id.
-
Set default values for filters – If the query contains In Search? filters that are Required or Optional, ensure these filters have default values. You cannot deselect recipients from the list before sending an email if these filters are in place:
-
If additional filtering of the intended recipient set is desired, the recipients query should be defined with additional joins, to limit the intended recipients upfront.
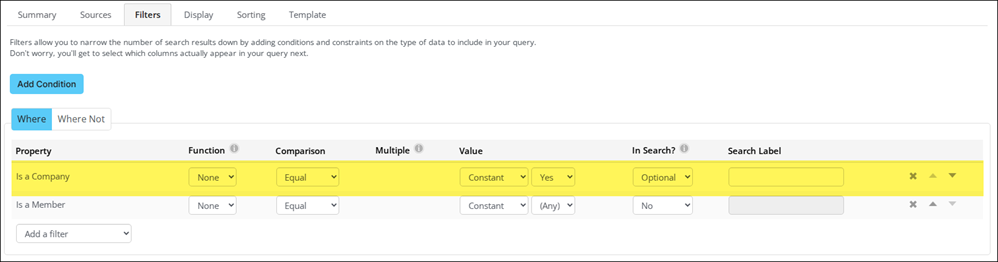
NoteThe following error will appear if the query has Optional or Required filters: Viewing and selecting recipients is not available because the current query contains filters.
If this is a shared query that is used in various places throughout iMIS, it is not recommended that the query is modified; instead, copy the query and remove or populate the filter values. Update the template with the copied query.
- Do not limit results – Make sure the Limit the number of results returned field (Filters tab) is empty. This ensures that all intended recipients are included in the communication.
NoteThe Preview does not take this setting into account.
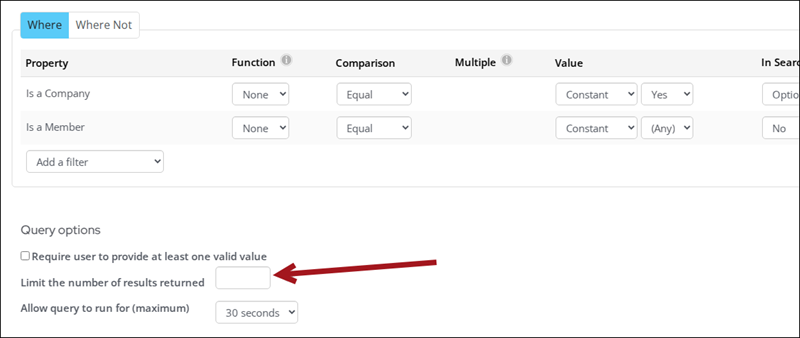
For more information, see Creating recipient queries for communications
Updated 13 days ago