

Upgrading an on-premise iMIS 2017 database to iMIS EMS (20.3)
This article goes over the full process of upgrading an on-premise iMIS 2017 database to iMIS EMS (20.3).
Review all documentation
It is important that all documentation is reviewed before you begin the upgrade process:
- Considerations before beginning an upgrade
- iMIS Desktop to Staff site: Migrated features
- Testing iMIS EMS
- Pre-upgrade checklist
- Post-upgrade checklist
- Database Validation Scripts
Run the pre-upgrade analysis scripts
Each linked article has important details about the scripts. Review the article content, then run the attached scripts. Be sure to analyze the results carefully:
- List Non-iMIS Database Object Names (Customizations)
- List Customizations No Longer Supported
- Additional Complexities
- List Customizations That Reference Obsolete Schema
Run the pre-upgrade scripts to avoid publishing issues post-upgrade
The following script clears all TaskQueue tables and prevents post-upgrade publishing issues:
Delete TaskQueueAdvancedEmailEventDetail
Delete TaskQueueAdvancedEmailSendDetail
Delete TaskQueuePublishingDetail
Delete TaskQueueTriggerDetail
Next, run the following:
Delete TaskQueueReview the web.config settings
There have been many settings migrated from the web.config file to the Staff site; however, not all web.config settings were migrated. Many of the web.config settings now have default values in the System Config table.
iMIS EMS does not allow users to migrate the web.config file to the new site. After the upgrade, compare the pre-upgrade web.config with the post-upgrade web.config and manually update the remaining settings you need updated.
Enter a DNS entry
Enter the following for your DNS entry:
- IP of the server
- URL of the website
Installing iMIS EMS
ImportantYou MUST have the KEK moved over before the upgrade can complete or it will fail with a message similar to the following:
"Upgrade to 20.3.107.54605 failed on: 2022-06-09 11:54:06 with error Unexpected contents in KEK file."
Copy the KEK from C:\AsiPlatform\Asi.Scheduler_iMISClient\App_Data. Have it accessible on your new server where you are installing iMIS EMS. Once the installer completes, an instance folder for the new install should exist in File Explorer. While the upgrade is running, go to C:\Program Files (x86)\ASI\iMIS_Instance\TenantData\Tenants\iMIS\SystemData and rename the existing file from kek to kek1, then move over the desired KEK.
Do the following to install iMIS EMS:
-
Copy the installer to the app server.
-
Right-click the Setup.exe and click Run as administrator.
-
Select Install a new instance, then click Next.
-
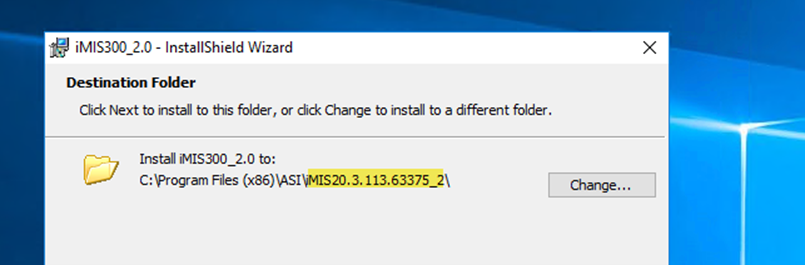
The Destination Folder name is optional, but only change the highlighted part if you want to make changes.
-
Click Next.
-
Fill out the database information:
- SQL Server name: SQL server the DB is installed on
- Database name: Exact DB name
- Username: Username from the SQL server
- Pw: Password for the SQL user
- Select Use an existing DB
-
Fill out the Application server info:
-
IIS Site name: This is the exact name of the instance as it will appear in IIS. Make sure it starts with a letter. Example:
iMIS20.3.113 -
External Domain: This is the actual website URL. Make sure it is valid, such as
advsol.imiscloud.com -
Site SSL certificate: This needs to be a valid SSL associated with your URL
-
Allow TLS termination: Enables support for TLS termination in any hosted environment where TLS (HTTPS) encryption is handled by an external service (such as an Azure Application Gateway, Cloudflare, or another reverse proxy). When this setting is enabled:
-
Automatic HTTP to HTTPS redirection in the web.config file is disabled.
-
TLS traffic is expected to be terminated at the edge of your network, with unencrypted HTTP traffic routed internally to your iMIS VMs.
WarningBy default, this checkbox is disabled and should typically remain so for self-hosted or on-premises deployments, where TLS termination is not handled externally. This setting should only be used if you fully understand your network architecture and are confident that unencrypted HTTP traffic cannot be accessed from outside your internal network. Improper configuration may expose your iMIS deployment to security risks.
This is useful in configurations where you do not want to manage TLS certificates directly on the iMIS virtual machines, such as when using a reverse proxy with its own certificates to offload TLS duties. In these cases, external tools (like Cloudflare) handle certificate generation and renewal, simplifying infrastructure management.
-
-
-
Click Next.
-
Click Install. The installer takes about 15 minutes to complete. This part of the installation is installing the actual version of iMIS (the upgrade has not started at this point).
-
After the installation is complete, click Finish. The iMISservice page will load once complete and will signify the upgrade has started. From this step, the DB upgrade can take hours to fully complete; the time varies depending on the size of the database. During this time, it is extremely important that you do not perform any resets, recycles, or relaunch the iMISservice page.
Click on Tenant ID > Database Information on the iMISservice page to see the Current Upgrade Status. The status changes as steps are completed. Wait until it completes.
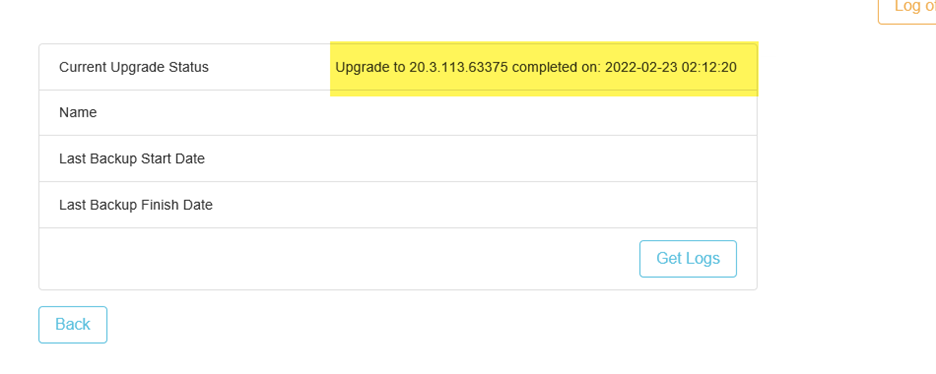
When the upgrade has completed, the Current Upgrade Status will display a completed message (as seen in the following screenshot):
-
(Important!) View the iMISservice log (
C:\AsiPlatform) to ensure the UD tables migrated successfully. Search on UD table migration to view when the migration starts in the logs, which will be post upgrade. If there are any errors migrating UD tables, do NOT move forward with the upgrade. Please enter a ticket with technical support if you aren't able to resolve the errors and redo the upgrade. -
Once the upgrade has completed and the UD table migration was successful, ensure publishing is complete. Log in and go to RiSE > Maintenance > Publishing servers to ensure publishing completes without issues.
-
Review and complete all the necessary Post-upgrade tasks for iMIS EMS (20.3) on-premise.
Troubleshooting
Review the troubleshooting tips below.
Error: You must install SQL Server client tools before you can run the upgrade
All client tools must be installed on the app server where the upgrade is performed (the App Server where the iMIS Service page runs). The client tools must be installed separately from the SSMS download.
Download the client tools using the following link: https://go.microsoft.com/fwlink/?linkid=2142258
The following must be installed on the app server and the path where the upgrade runs:
- OSQL.EXE - Not installed by default with SSMS 18.x, which is why SSMS 17.x is required to be installed. The dependency on OSQL is being removed currently, and some future version (post 20.3.131) will no longer require this.
- SQLCMD.EXE
- BCP.EXE
500.19 Error When Feature Delegation Is Set to Read Only
If you receive a 500.19 error, check that Feature Delegation is set to Read/Write:
- Open IIS.
- From the top-most entry in the tree view, click the IIS Server Name.
- Double-click Feature Delegation.
- From the list, locate Modules.
- Right-click Modules, then set to Read/Write.
Updated about 3 hours ago