Configuring and troubleshooting OIDC settings in iMIS
After configuring Entra ID or Okta, configure iMIS with the Open ID Connect settings (Settings > Contacts > Open ID Connect).
iMIS prerequisites
Before configuring OIDC, confirm the following are configured in iMIS:
-
Ensure the OpenID Connect license appears in Settings > About iMIS. If you do not see the license, contact ASI Technical Support.
-
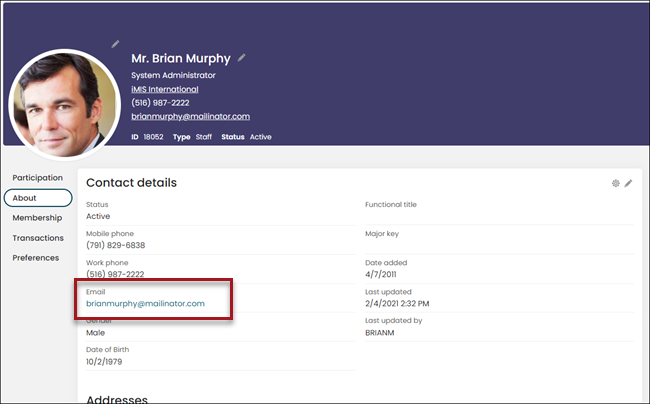
OIDC does not update the staff user’s iMIS username and instead uses their email address. Verify staff users have their OIDC email address on their iMIS account page.
-
To use the website with OIDC, the site Access settings must be set to All Staff Full Control.

Configuring OIDC
You must be a system administrator to configure OIDC.
Entra ID
Do the following to configure iMIS with Entra ID:
-
Go to Settings > Contacts > Open ID Connect.
-
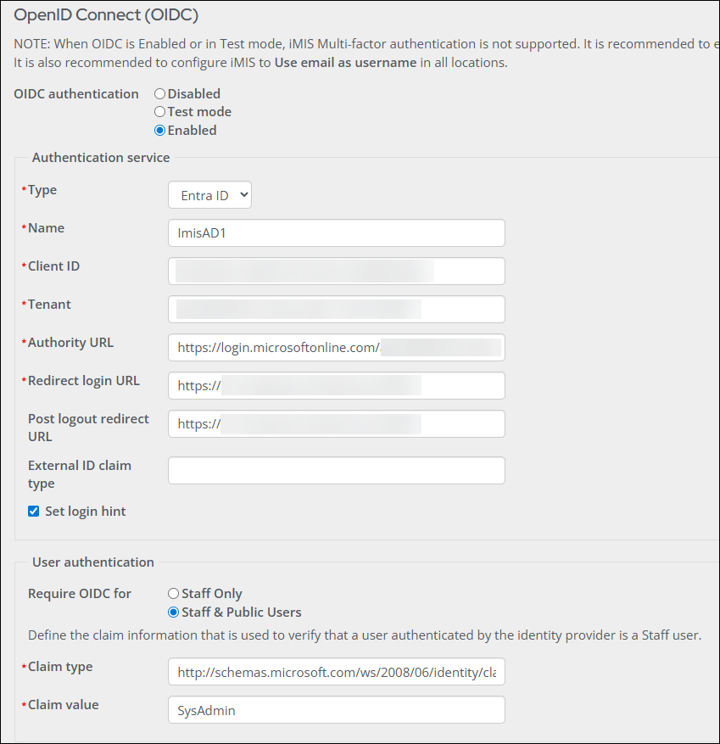
Select one of the following OIDC authentication options:
NoteTo avoid disruption for staff users, it is recommended to test and configure OIDC during non-business hours.
- Disabled – Select to disable OIDC. When selected, users can only log in with their iMIS credentials.
- Test mode – Select when testing the connection with iMIS and the external directory. When selected, staff users can sign in with their iMIS or external directory credentials.
- Enabled – Select to enable Entra ID. When selected, Entra ID is the only sign in option for staff users. System administrators can still sign in with their iMIS credentials.
-
Enter the Authentication service:
NoteSome of the Authentication service values are in your organization’s external directory portal (such as the Azure portal). You must have access to the specific tenant to find these values. See Microsoft's Application configuration options documentation for more information.
-
Type – Select Entra ID.
-
Name – Enter the Name of the Entra ID configuration (for example, ASI OpenID Connect).
-
Client ID – The Application (client) ID from the Entra ID app registration.
-
Tenant - The Directory (tenant) ID from the Entra ID app registration.
-
Authority URL: Enter
https://login.microsoftonline.com/<tenant>/, where<tenant>is the string entered in the Tenant field. Common authority URLs are available for reference in Microsoft's Entra ID application configuration options.Examplehttps://login.microsoftonline.com/ae2d240f-abc1-def2-ghi3-jklmnop45678 -
Redirect login URL – The redirect URL of your app, where authentication responses can be sent and received by your app. A redirect URI is the location where the authorization server sends the user once the app has been successfully authorized and granted an authorization code or access token. For many users, this will be their iMIS URL, such as
https://example.imiscloud.com/. This URL must match exactly with the Redirect URI defined in Entra ID. For more information about the Redirect URI, see Microsoft's Redirect URI documentation. -
Post logout redirect URL – The URL that the user is redirected to after they log out of iMIS. If the Post logout redirect URL field is blank, users remain on the Entra ID sign out page after signing out.
NoteIf the URL in the Post logout redirect URL field is different from the URL in the Redirect login URL field, you will need to add a separate Redirect URI to your Entra application for the Post logout redirect URL.
- External ID Claim - When set, this custom claim enables you to assign a unique identifier to users that is not their email address. The value entered in this field must correspond to your active directory configuration. See Configure optional claims for more information.
- Set login hint – When enabled, the staff user only needs to enter their email address in iMIS. When the staff user is redirected to the OIDC provider, their email address is automatically populated in the OIDC authentication interface.
-
-
In the User authentication section, define the claim information that is used to verify that a user authenticated by the identify provider is a staff user:
-
Require OIDC for - Select Staff Only or Staff & Public Users to restrict OIDC logins for specific users. If Staff & Public Users is selected, all users are authenticated by the external provider, with no exception.
NoteWhen Staff Only is enabled, OIDC syncs staff user email addresses from the external directory, while public user email addresses continue to sync according to the Email address setting. If Staff & Public Users is enabled, all synchronization comes from the external directory.
-
Claim type - The URI (Claim type) for the associated Claim value. The app Role is used as the Claim value, so the Claim type URI is the following:
http://schemas.microsoft.com/ws/2008/06/identity/claims/role
ImportantIf you are not using the app Role to verify the user's authentication, review the Microsoft list of claim types to determine which claim type URI is right for your configuration. It is important that the URI is copied exactly as it appears in the Microsoft list of claim types. The URI must begin with http and cannot begin with https.
-
Claim value - Enter the Value of the previously-created app role.
NoteSee Microsoft's Customize SAML token claims documentation for more information about custom claims.
-
-
Under the Forgot username or password email section, enter the Email body that is sent to a staff user when they use the Forgot my username or Forgot my password forms in a website other than the staff site.
ImportantThe Email body should indicate that the staff user must sign in to iMIS using the staff site with a link to your organization’s staff site.
-
Click Save. If the OIDC authentication is set to Enabled, a confirmation displays after clicking Save. Confirm that signing in with a standard iMIS username and password will no longer work for the specified user types, except for system administrators.
Okta
Do the following to configure iMIS with Okta:
-
Go to Settings > Contacts > Open ID Connect.
-
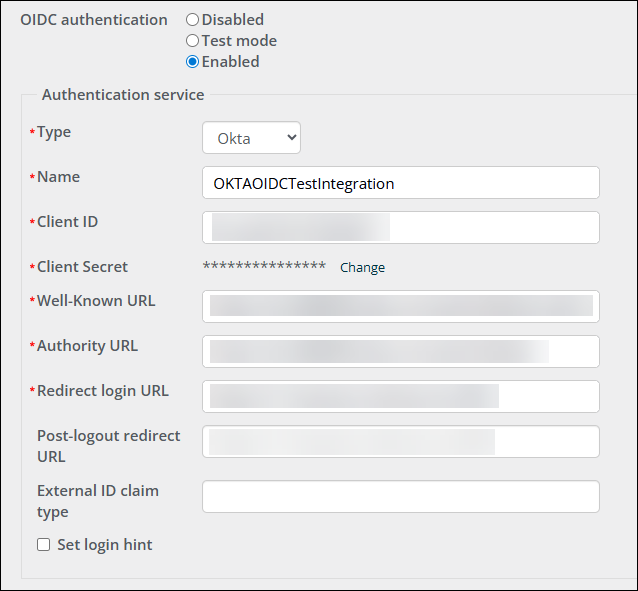
Select one of the following OIDC authentication options:
NoteTo avoid disruption for staff users, it is recommended to test and configure OIDC during non-business hours.
- Disabled – Select to disable OIDC. When selected, users can only log in with their iMIS credentials.
- Test mode – Select when testing the connection with iMIS and the external directory. When selected, staff users can sign in with their iMIS or external directory credentials.
- Enabled – Select to enable the external directory. When selected, the external directory is the only sign in option for staff users. System administrators can still sign in with their iMIS credentials.
-
Enter the Authentication service:
NoteSome of the Authentication service values are in your organization’s external directory portal (such as the Azure portal). You must have access to the specific tenant to find these values. See Microsoft's Application configuration options documentation for more information.
-
Type – Select Okta.
-
Name – Enter the Name of your Okta application (for example, ASI OpenID Connect).
-
Client ID – The Client ID from the General tab of your Okta application.
-
Client Secret - The Client Secret from the General tab of your Okta application.
-
Well-Known URL - The Metadata URI located on the Settings tab of the default Authorization Server.
-
Authority URL: The Issuer or Okta URL from the Settings tab of the default authorization server in the Okta developer portal.
-
External ID Claim - When set, this custom claim enables you to assign a unique identifier to users that is not their email address. The value entered in this field must correspond to your active directory configuration. See Add custom claims for more information.
-
Redirect login URL – The redirect URL of your app, where authentication responses can be sent and received by your app. A redirect URI is the location where the authorization server sends the user once the app has been successfully authorized and granted an authorization code or access token. For many users, this will be their iMIS URL, such as
https://example.imiscloud.com/. This URL must match exactly with the Redirect URI defined in your external directory. For more information about the Redirect URI, see Microsoft's Redirect URI documentation. -
Post logout redirect URL - The URL that the user is directed to after they log out of iMIS. If the Post logout redirect URL field is blank, the user is redirected to the Okta sign-in page.
ImportantIf you have configured the Post logout redirect URL field, you will need to add a Sign-out redirect URI in your Okta application for the URL.
- Set login hint – When enabled, the staff user only needs to enter their email address in iMIS. When they are redirected to the OIDC provider, their email address is automatically populated in the OIDC authentication interface.
-
-
In the User authentication section, define the claim information that is used to verify that a user authenticated by the identify provider is a staff user:
-
Require OIDC for - Select Staff Only or Staff & Public Users to restrict OIDC logins for specific users. If Staff & Public Users is selected, all users are authenticated by the external provider, with no exception.
NoteWhen Staff Only is enabled, OIDC syncs staff user email addresses from the external directory, while public user email addresses continue to sync according to the Email address setting. If Staff & Public Users is enabled, all synchronization comes from the external directory.
- Claim type - This field is not required for Okta configuration but is required to have a value. Enter
http://schemas.microsoft.com/ws/2008/06/identity/claims/roleto populate the field. For more information on Okta claims, see the Okta documentation. - Claim value - Enter a value, such as SysAdmin.
-
-
Under the Forgot username or password email section, enter the Email body that is sent to a staff user when they use the Forgot my username or Forgot my password forms in a website other than the Staff site. It is important that the Email body indicates that the staff user must sign in to iMIS using the Staff site with a link to your organization’s Staff site.
-
Click Save. If the OIDC authentication is set to Enabled, a confirmation displays after clicking Save. You must confirm that signing in with a standard iMIS username and password will no longer work for the specified user types, except for system administrators.
Reviewing the OIDC logs
Any activity through the OIDC service is logged and only available to system administrators. The logs contain detailed information about requests that are sent or received through the service or any error messages.
Do the following to review the OIDC logs:
- Go to Settings > Contacts > Open ID Connect.
- Click the Logs tab.
- Use the Level drop-down to filter the logs based on the type of message.
- Use the Message contains field to filter the logs based on a part of a message.
- Use the Occurred between fields to filter the logs based on the date the log occurred.
- Click Find.
Troubleshooting OIDC
Use the following troubleshooting tips while configuring OIDC.
Cannot log into the staff site
If you've enabled OpenID Connect and can no longer log into the staff site, do the following:
- Navigate to a RiSE website that is not the staff site, such as a public member site.
- Log into that site.
- Once logged in, update the URL to the staff site URL.
You should now have access to the staff site.
Error messages
| Error message | Try this |
|---|---|
| Error: response_type id_token is not enabled for the application | Ensure the Access tokens and ID tokens are enabled on the application. |
| Is not a staff user in the OpenID provider, according to the staff claim configured in the settings. | Configure the staff claim to be identical to the group claim for staff users in the external identity provider. For Okta, see Adding claims. For Entra ID, see Assigning the role. |