Importing contacts from a spreadsheet
IDMS iImport allows you to bring data into iMIS using a spreadsheet. Use iImport to add new records, update existing records, or do both at the same time.
Preparing the contact spreadsheet for import
Review the following before importing a spreadsheet:
- The first row must contain column headers. iImport uses this row automatically to populate the mapping screen.
- Do not map every column. It is okay to have extra columns in the spreadsheet as long as they are not mapped. Unmapped columns do not affect the success of the import process.
- Scan column A for non-data rows, such as blank rows, subtotals, section labels, or notes, and remove them before importing. Each remaining row should contain one record. Misplaced headers, notes, or blank lines can cause errors or incorrect imports.
- For required fields, ensure the following:
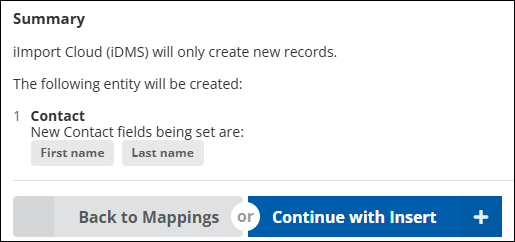
- First name and Last name are required when inserting new contacts. iMIS will not create a record without it, and iImport will show a red warning in the summary if they are not mapped.
- An iMIS ID is required when updating an existing record by ID. If an iMIS ID is not available, use the matching option instead.
- Match-on fields (for example, email, first name, and last name) must be present and populated when using matching or update actions.
Testing the import
Do the following to validate the mapping and options before running a full import.
Starting with a small dataset
Before running a full import, test with three-to-five rows. This verifies that the mapping, match logic, and options are configured correctly without affecting a large number of records. Do the following to test with a small set of contacts:
- Copy three to five rows from the full spreadsheet into a separate test file.
- Choose records that produce the expected outcome: one new contact, one existing contact to update, and one that should not match.
- Run the import and compare the result in iMIS.
Validating the data
Before scaling up, verify the following in the test results:
-
Each row shows the correct iMIS ID in the log, confirming the right record was matched.
-
The actions listed in the log match what was intended.
-
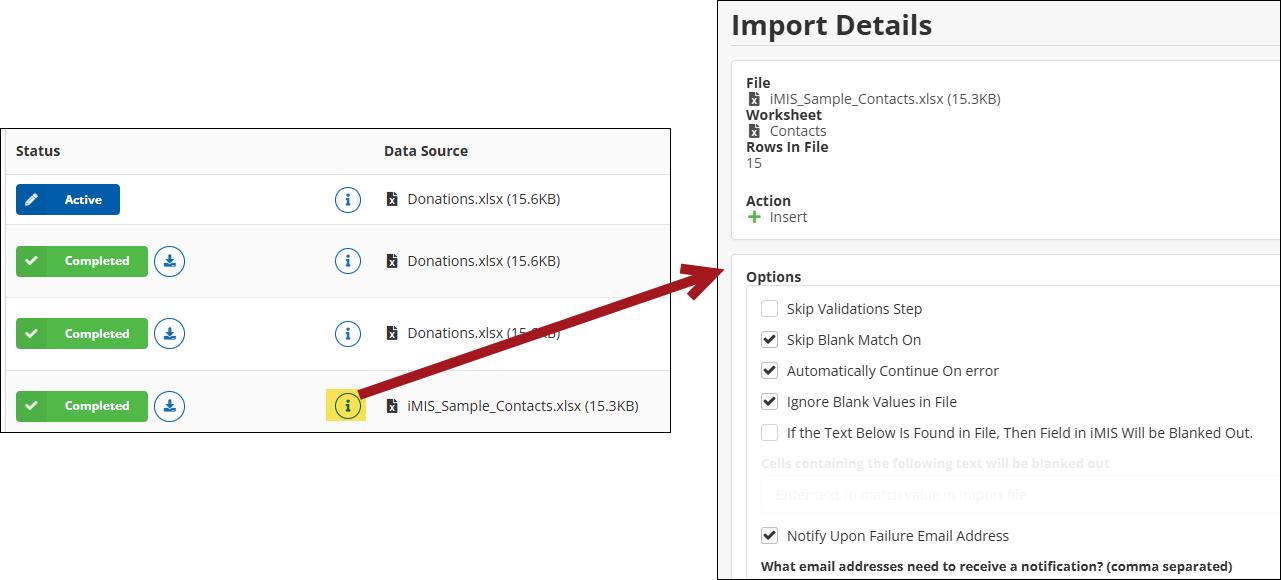
Click the information icon on the dashboard and confirm that the file, mappings, and options match the intended test configuration from Import Details.
-
Search for the contact in iMIS and check that the fields were populated correctly.
NoteLook for fields that should remain the same. If Ignore blank values was not checked, blank cells in the spreadsheet may have overwritten existing data in iMIS.
Scaling up gradually
Once the small test is successful, keep testing several times, using larger numbers of contacts each time instead of importing the entire spreadsheet immediately after the first test. Do the following to continue testing:
- Run a batch of 20 to 50 records next.
- Review the import history log for any skipped rows or errors.
- Download the failed records file if any rows did not process, correct those rows, and rerun just those records.
- When results are consistent and clean, proceed with the full file.
Importing a contact spreadsheet
Once all tests have been successful, import the full contact spreadsheet.
Do the following:
-
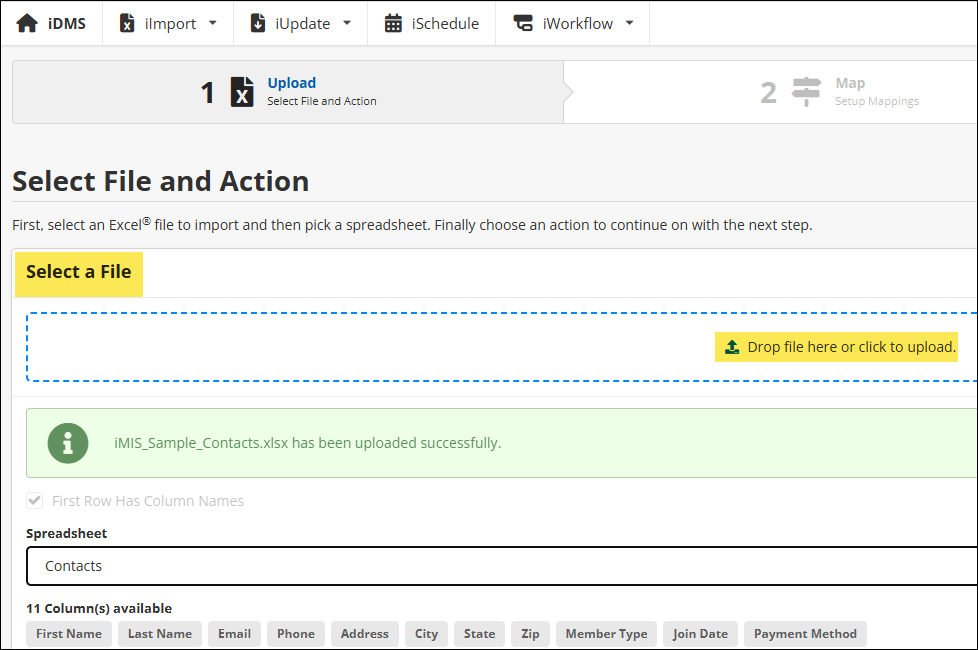
From the Cloud Dashboard, click iImport.
-
Drag the spreadsheet to Select a File or upload it. The first row of the sheet is automatically used as column headers.
-
Under Spreadsheet, verify that Contacts is selected.
-
Click Insert.
-
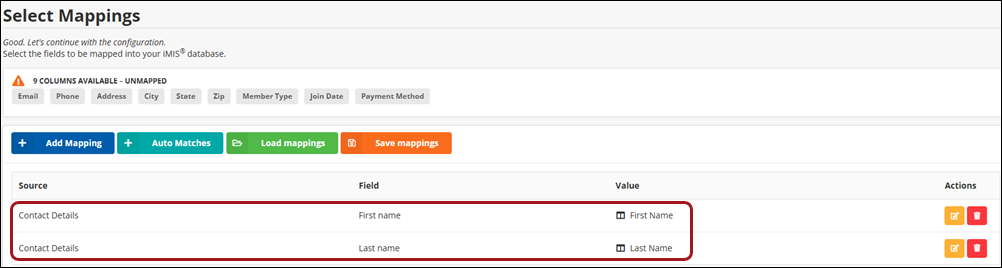
Choose Last Name or Organization to create the first mapping. To create a contact, either both first and last name must be mapped or organization name must be mapped.

-
Under Select a Property to Map, use the Sources drop-down to select Contact Details.
-
Under the Contact Details Field, select Last name or choose Last name from Available Fields.
NoteFields marked with a key icon, such as iMIS ID, are used to find existing records. For example, using email, first name, and last name means iImport proceeds only when all three match exactly.
-
Under Select a Value mapping, confirm that Column contains the Last Name value, or enter another value to use for the mapping property.
-
Click Save.
-
Repeat the process to map First Name.
-
Click Submit.
-
Review the settings for accuracy, then click Continue with Insert.
-
On the Summary page, monitor the progress log. The Logs show a record of what contacts are being updated in real-time. iImport processes rows one by one and displays the iMIS ID found, the action taken, and any records created or updated.

-
After processing, go to iImport > Dashboard to review the completed import, reread the log, or download summary reports.
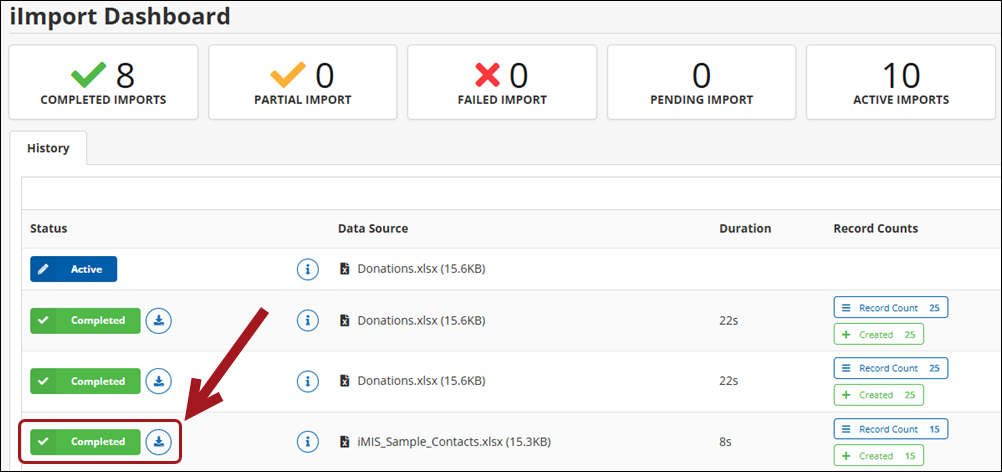
Confirming a successful import
Confirming a successful import
Once the progress log shows processing is complete, review the following:
- Scroll through the log and look for any rows that are not successfully imported.
- Confirm that the total number of processed rows matches the number of data rows in the spreadsheet.
- If a task’s status is listed as Partial, the job completed but had errors with one or more records. If a task’s status is Failed, the job encountered errors and did not complete successfully. For more information, see the iDMS Dashboard.
Understanding partial imports
A partial import means some rows were processed successfully and some were not. This happens when one of the following occurs:
- One or more rows could not find a matching record and the action was Update rather than Insert / Update.
- Multiple matches were found for a row, and Skip If More Than 1 Record Found was enabled.
- A row contained a value that failed validation. For example, a payment method or member type not found in iMIS.
A partial result is not a problem if it was expected. Review the log carefully and download the failed records file to see which rows did not process and why.
Deciding to rerun an import or manually fix an issue
The following table explains when an import needs to be rerun or manually fixed.
| Situation | Recommended approach |
|---|---|
| A small number of rows failed due to data errors (wrong payment method, misspelled member type). | Correct those rows in the spreadsheet and rerun the import with only those rows. |
| Multiple rows were skipped because no match was found. | Check the match-on field values and confirm the records exist in iMIS before rerunning. |
| A single record was affected by an incorrect value. | It is faster to correct it manually in iMIS rather than preparing and rerunning a file. |
| The wrong mapping or action was used and affected many records. | Contact ASI support before attempting a fix. Include the spreadsheet and a screenshot of the mappings. |
Table 1: Comparing reruns verses manual fixes
Important!Do not use the Delete action without first contacting ASI support. Deleting data incorrectly can cause issues in iMIS that are difficult to reverse.
Using a template versus a one-time import
Using a template can help save time, depending on how many contacts need to be imported or how often they are imported. If contacts are not imported often, then uploading a single spreadsheet is the most efficient. Create a saved mapping template when the same import is expected to run multiple times.
Review the following to determine when to use a spreadsheet template versus a one-time spreadsheet.
Common examples include the following:
- A monthly donation file from a fundraising team.
- A recurring membership update from an external system or event registration platform.
- Any import where the column headers in the spreadsheet stay consistent between runs.
| Saved mapping template | One-time import | |
|---|---|---|
| Setup | Map fields once and save under a name and category. | Map fields each time from scratch. |
| Reuse | Load mapping with one click when column headers match. | No reuse. All mapping must be redone. |
| Time | Significantly faster for recurring files. | More time-consuming but appropriate for one-time or irregular jobs. |
| Risk | Mapping errors are made once and fixed once. | Mapping errors can recur each time if not caught. |
Table 2: Comparing templates verses one-time imports
Maintaining a template
Do the following to maintain templates for future use:
- Do not rename or reorder column headers in the spreadsheet. iImport matches saved mappings by column header name, any change to a header will break the mapping for that column.
- If the spreadsheet structure changes (for example, a column is added or renamed), update the saved mapping in iImport before the next import run.
- Periodically review the saved mappings to confirm that the iMIS fields they reference still exist and are still in use.
- When setting up a new recurring import for the first time, do a small test run before saving the mapping to make sure it is correct.
Tip!Name saved mappings clearly (for example, Fundraising - Monthly donation import) so the correct mapping can be identified and loaded easily. Include a note about the corresponding spreadsheet when managing multiple recurring imports.