

Building IQA queries: Tutorials
WarningPoorly written queries can cause performance issues in iMIS. Review Best practices for writing IQA queries to ensure all queries are correctly created.
There are an infinite amount of queries you can build using the Intelligent Query Architect. Once a query is built, staff users can use it to email the generated list of contacts (non-staff users cannot access queries for emailing), display the results on a content page, build a report to distribute to your staff, and much more.
Below are examples on how to create unique queries using a variety of different business objects. These examples range from beginner to advanced.
Before you begin
Review the following information before building a query:
- By default, queries are cached in iMIS for performance purposes. To refresh a query, go to Settings > About iMIS, then click Purge System Cache.
- Do not put slashes (/) in IQA names. Doing so will cause errors when importing. To avoid these errors, update all existing IQA queries with slashes in their name and update any content items or reports associated with the queries.
Beginner
Finding contacts
This example outlines how to build a query using only one business object.
You can construct a query that uses the PartyWithDefaultAddressData business object as a source to find the full names, informal names, and email addresses of all your contacts who live in a specific city and state. This example uses Austin, TX as the city and state:
-
From the Staff site, go to RiSE > Intelligent Query Architect > New > Query.
-
(Summary tab) Enter a Name and Description for your query.
-
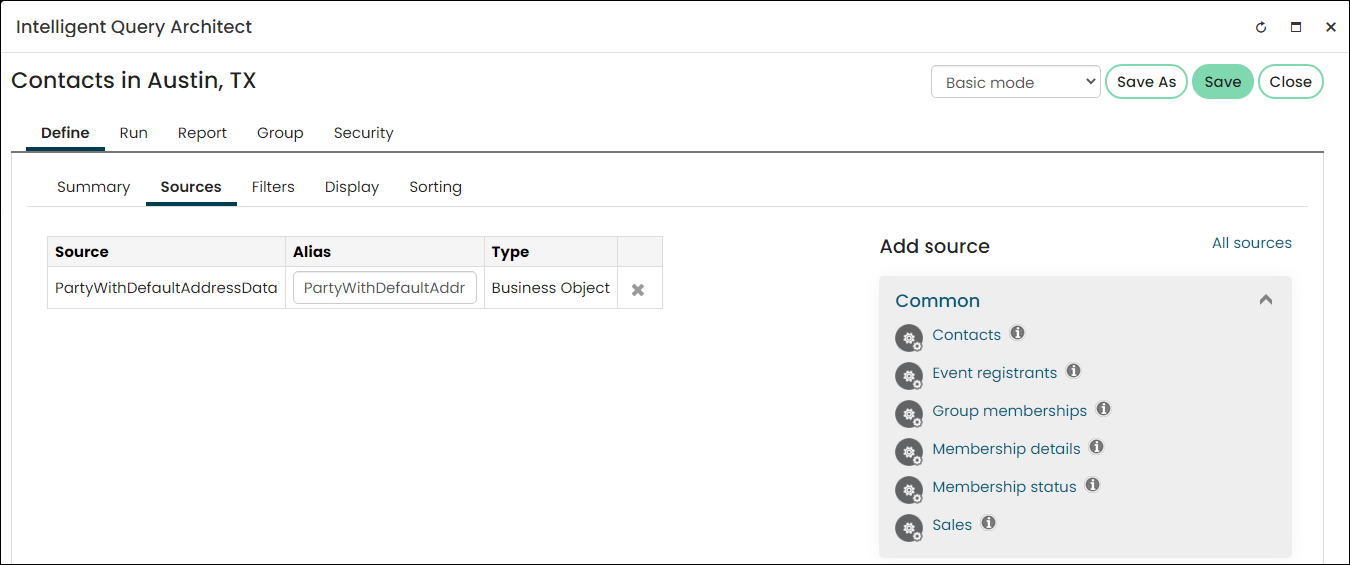
(Sources tab) Select All sources, Select the PartyWithDefaultAddressData business object, then click OK.
-
(Filters tab) Select the query filters:
-
From the Property drop-down, select State Province Id to filter the query results by city:
- Select Equal as the Comparison.
- Enter Austin as the Value.
- Select the + button.
-
From the second Property drop-down, select State/Province to filter the query results by state:
-
Select Equal as the Comparison.
-
Select Texas as the Value.
-
Select the + button.
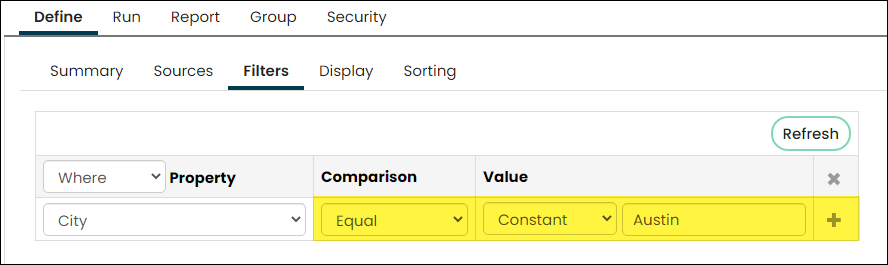
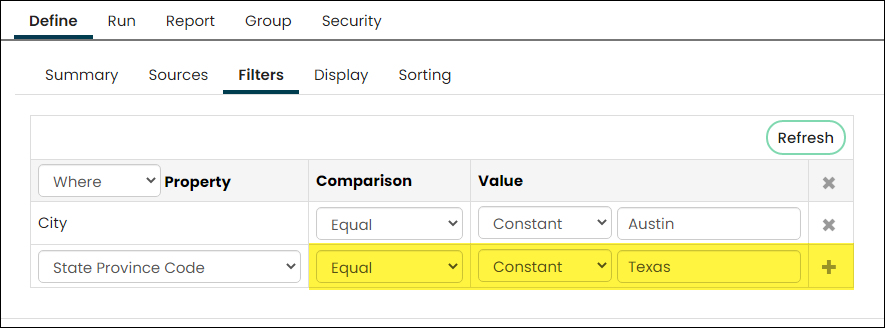
Only contacts who have Austin listed as the city and Texas listed as the state in their default address will display in the query results.
-
-
-
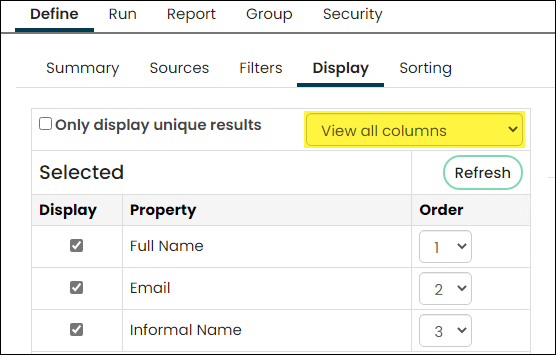
(Display tab) From the drop-down, select View all columns:
-
Select the columns that you want to display when you run the query, such as:
- Full Name
- Informal Name
-
Deselect any columns that you do not want to display when you run the query.
-
If needed, change the Order of the selected columns.
-
Refresh the query display columns.
-
-
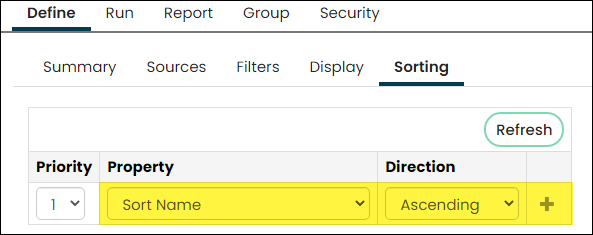
(Sorting tab) Select your preferred sorting options. For example, we will sort the results by last name in ascending alphabetical order:
-
From the Property drop-down, select Sort Name.
-
From the Direction drop-down, select Ascending.
-
-
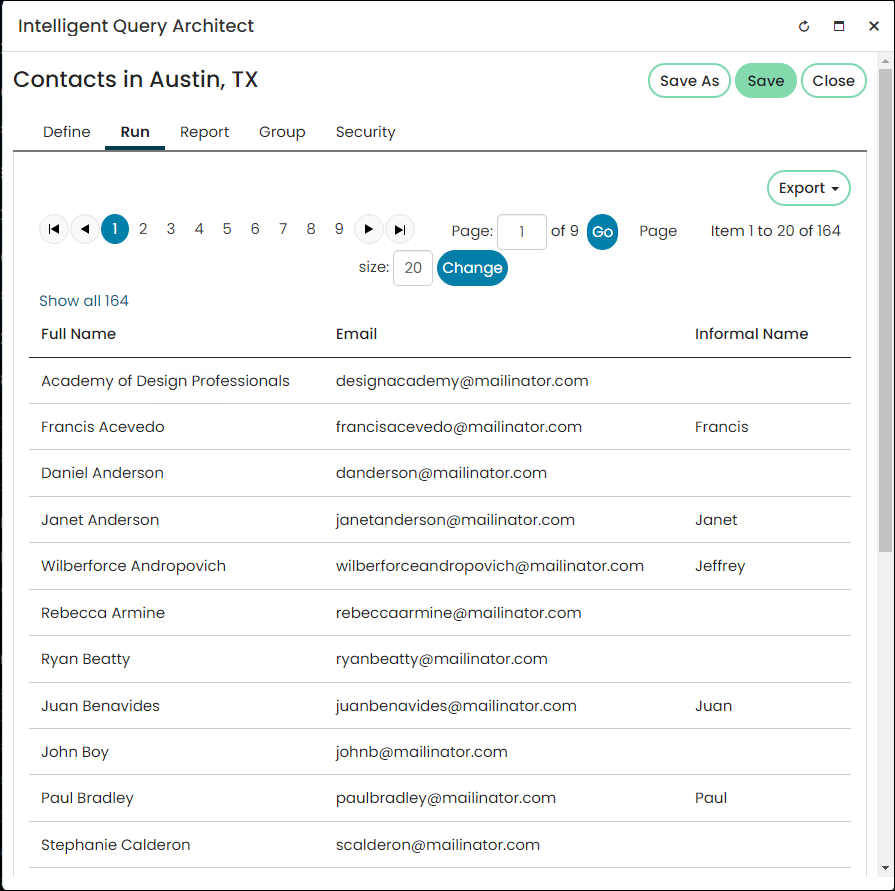
Click the Run tab to review the list of Austin members.
-
Click Save.
-
Select the location where you want to save the query.
-
Click OK.
You can access and run your query from the Intelligent Query Architect or the Document system.
Building a directory of members
The following example describes how you can build a query of members defined as anyone who is a member of a group with Is Member selected:
-
From the Staff site, go to RiSE > Intelligent Query Architect > New > Query.
-
(Summary tab) Name the query. For example, My Members.
-
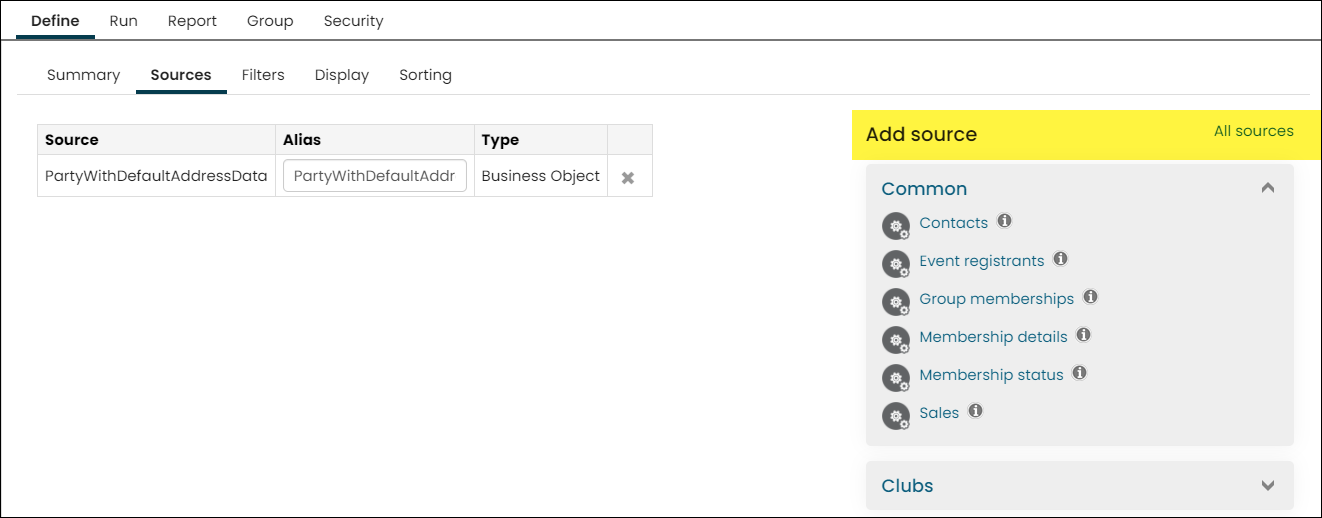
(Sources tab) Select All sources, Select the PartyWithDefaultAddressData business object, then click OK.
Click to view image
-
We recommend saving your query periodically while you are creating it. Click Save or Save As, and select a save location.
-
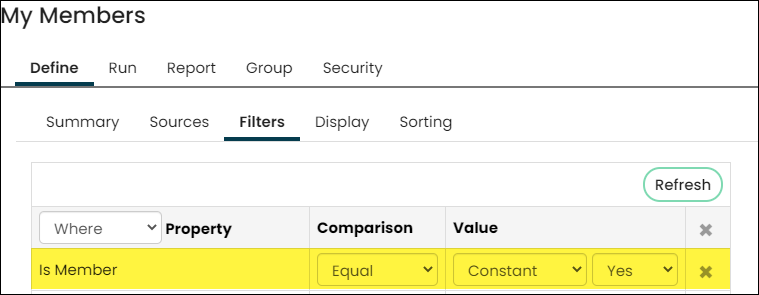
(Filters tab) Next, we want to narrow the list to only members of Is Member groups:
- Select Filters. The Filters tab is where you define the information you want to see.
- From the drop-down in the Property column, select Is Member.
-
Leave the Comparison as Equal.
-
From the drop-down in the Value column, select Yes.
-
Click the + button.
-
-
(Display tab) Next, we will want to make the query results look a little better:
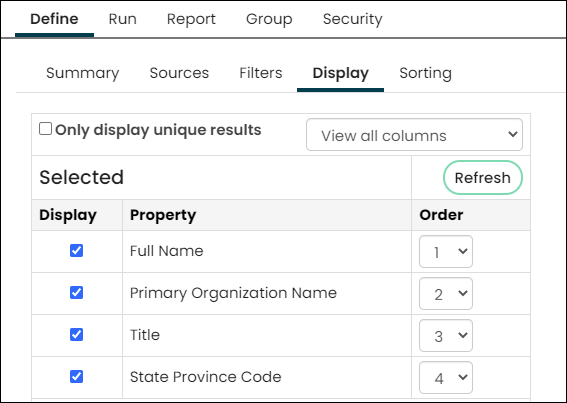
- Select Display. This is where you select the information that is displayed, and the order in which it is displayed.
- From the drop-down at the top of the table, select View all columns to see all of the information you could include in the query.
- Select the following properties to display:
- Full Name
- Primary Organization Name
- City
- State/Province Name
You can reorder the columns by selecting different numbers in the Order column.
-
Lastly, we want to make sure that only Staff users have access to run this query:
-
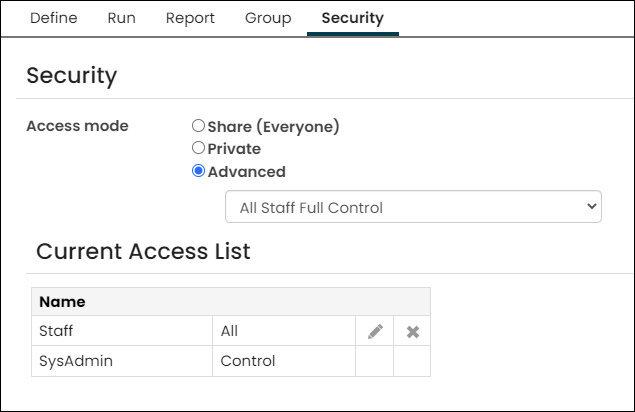
Click the Security tab.
-
Select Advanced for the Access mode.
-
From the drop-down, select All Staff Full Control.
-
-
Click Save.
Now you can use your new query in any area that queries can be used. Try adding a Query Menu content item to a page, and select your query for display.
Building a query of expired members
The following example describes how you can build a query of members with expired memberships:
-
From the Staff site, go to RiSE > Intelligent Query Architect > New > Query.
-
(Summary tab) Name the query. For example, Expired Memberships.
-
(Sources tab) For this example, we know we want the results to return all members of any group marked as Is Member with expired memberships, so we need to know information about groups and their members:
- Select All sources, Select the PartyWithDefaultAddressData business object, then click OK.
- Under Add source, select Membership details from the Common section. This adds the PartyMembershipGroupData business object.
- Next, we need to join our sources:
-
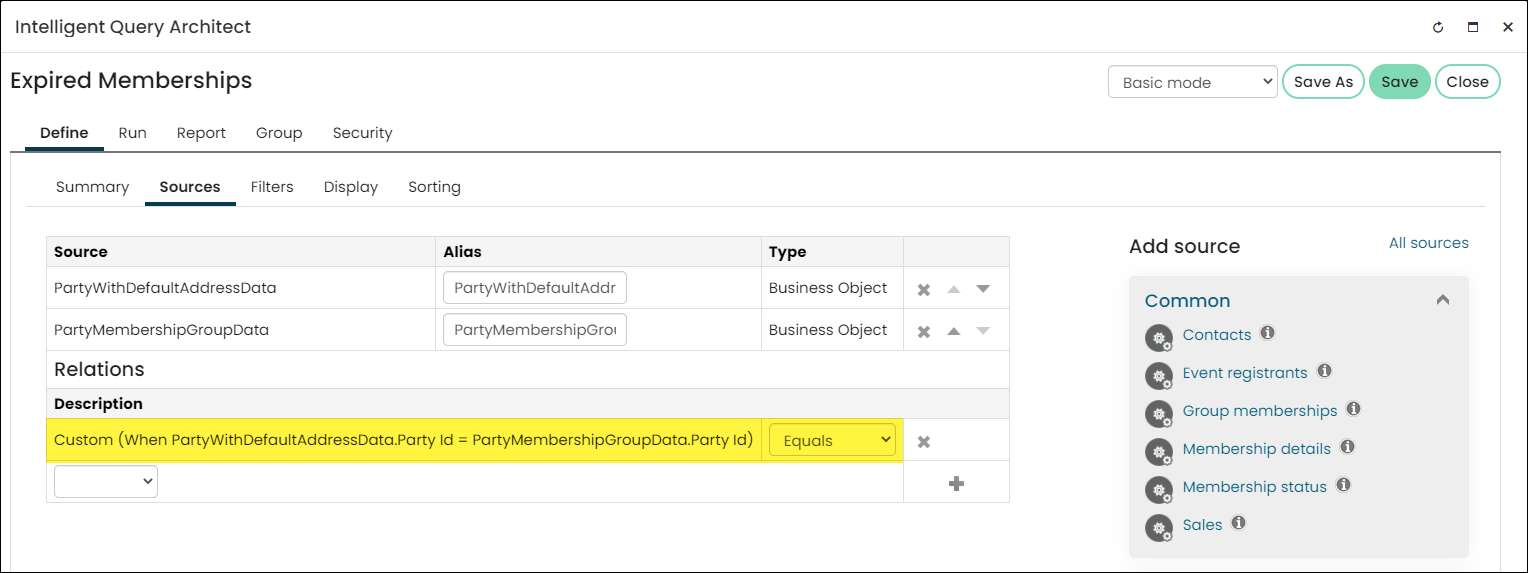
Under Relations, select Custom from the drop-down.
-
Select from the drop-downs so the equation reads PartyWithDefaultAddressData.Party Id Equals PartyMembershipGroupData.Party Id.
-
Click the + button.
-
-
We recommend saving your query periodically while you are creating it. Click Save or Save As, and select a save location.
-
(Filters tab) Next, we want to narrow the list to only members with expired memberships:
- Select Filters. The Filters tab is where we tell the query whose information we want to see.
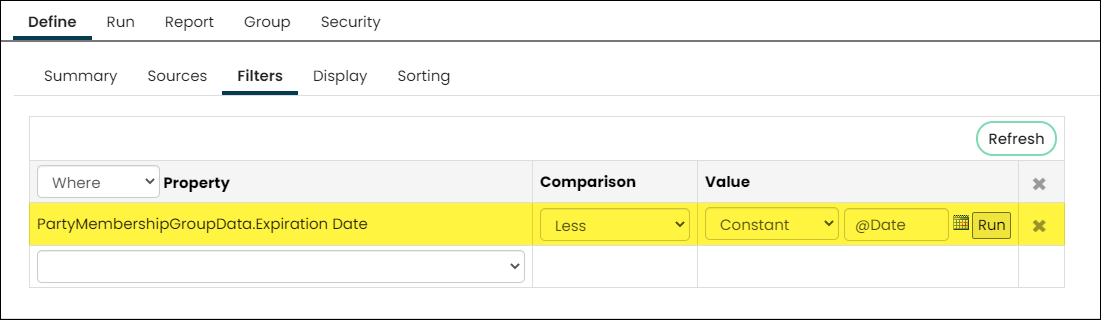
- From the drop-down in the Property column, select PartyMembershipGroupData.Expiration Date:
-
Set the Comparison as Less.
-
In the Value column, enter @Date.
-
Click the + button.
-
-
(Display tab) Next, we will want to make the query results look a little better:
- Select Display. This is where you select the information that is displayed, and the order in which it is displayed.
- From the drop-down at the top of the table, select View all columns to see all of the information you could include in the query.
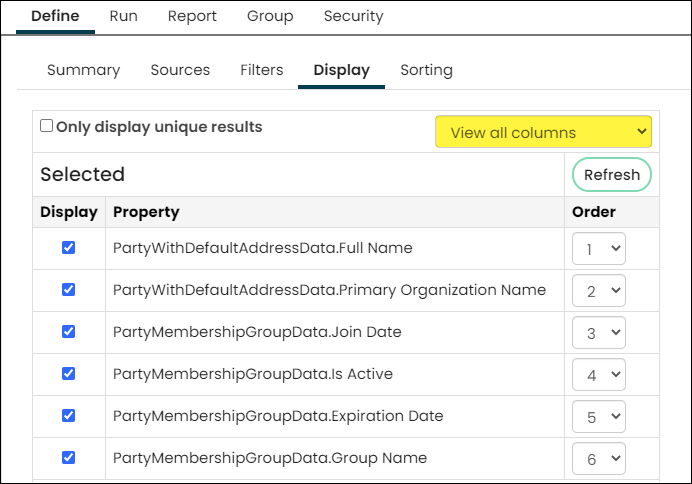
- Select the following properties to display:
- PartyWithDefaultAddressData.Full Name
- PartyWithDefaultAddressData.Primary Organization Name
- PartyMembershipGroupData.Is Active
- PartyMembershipGroupData.Join Date
- PartyMembershipGroupData.Expiration Date
- PartyMembershipGroupData.Group Name
You can reorder the columns by selecting different numbers in the Order column.
-
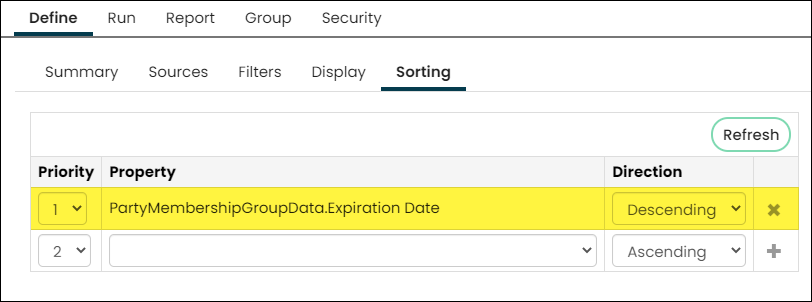
(Sorting tab) For this example, we want the members whose memberships expired most recently displayed at the top of the list:
-
Select Sorting.
-
From the Property drop-down, select PartyMembershipGroupData.Expiration Date.
-
From the Direction drop-down, select Descending.
-
Click the + button.
-
-
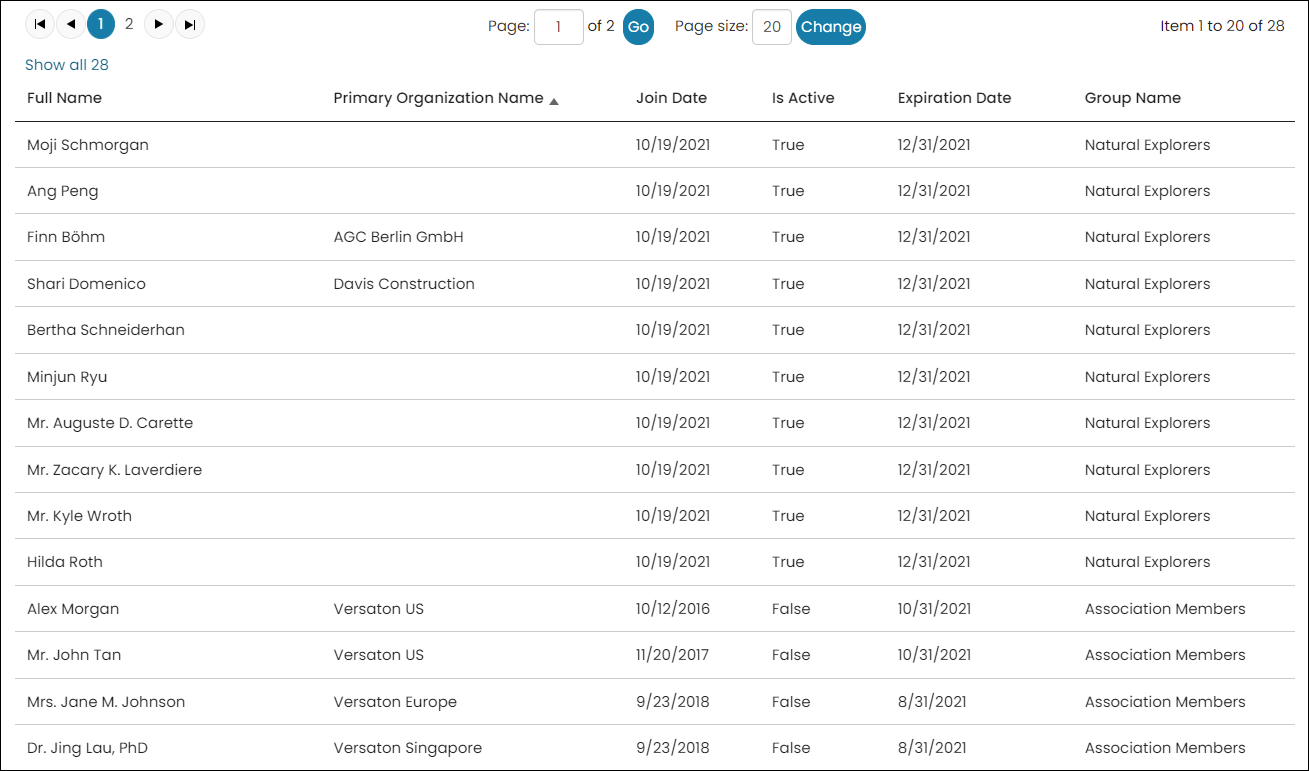
Select the Run tab. You should see a list of all of your members whose memberships have expired, sorted in descending order beginning with those whose memberships expired most recently.
-
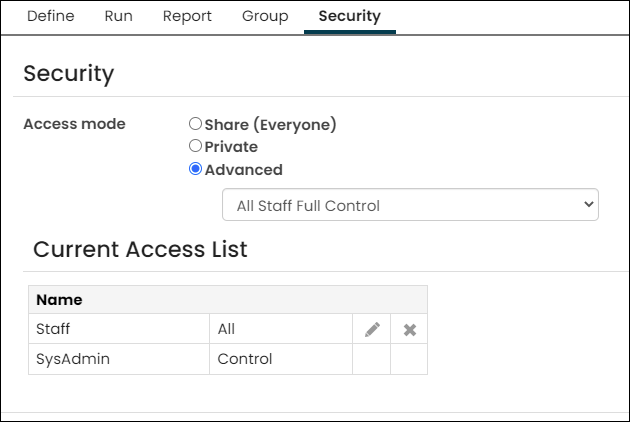
Lastly, we want to make sure that only staff users have access to run this query:
-
Click the Security tab.
-
In Access Mode, select Advanced.
-
From the drop-down, select All Staff Full Control.
-
-
Click Save.
Building a query to identify membership in Is Member groups
The following example describes how you can build a query to identify membership in Is Member groups:
-
From the Staff site, go to RiSE > Intelligent Query Architect > New > Query.
-
(Summary tab) Name the query. For example, IsMember Memberships.
-
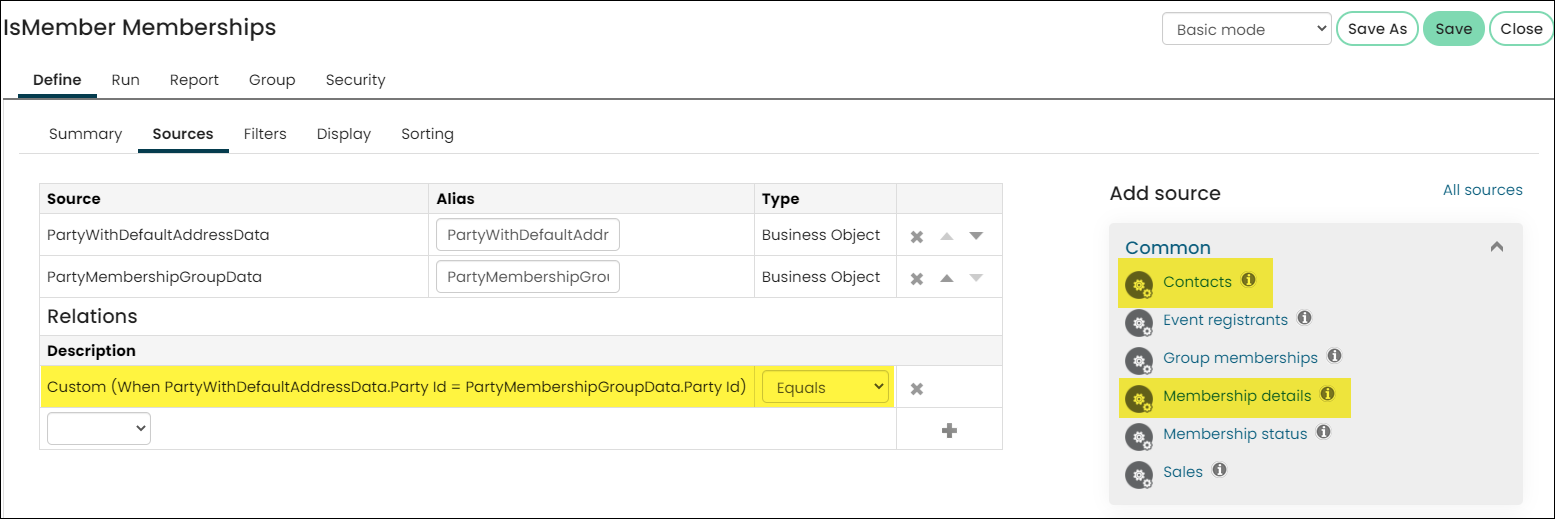
(Sources tab) For this example, we know we want to identify all members in Is Member groups:
- Select All sources, Select the PartyWithDefaultAddressData business object, then click OK.
- Under Add source, select Membership details from the Common section. This adds the PartyMembershipGroupData business object.
- Next, we need to join our sources:
-
Under Relations, select Custom from the drop-down.
-
Select from the drop-downs so the equation reads PartyWithDefaultAddressData.Party Id Equals PartyMembershipGroupData.Party Id.
-
Click the + button.
-
-
We recommend saving your query periodically while you are creating it. Click Save or Save As, and select a save location.
-
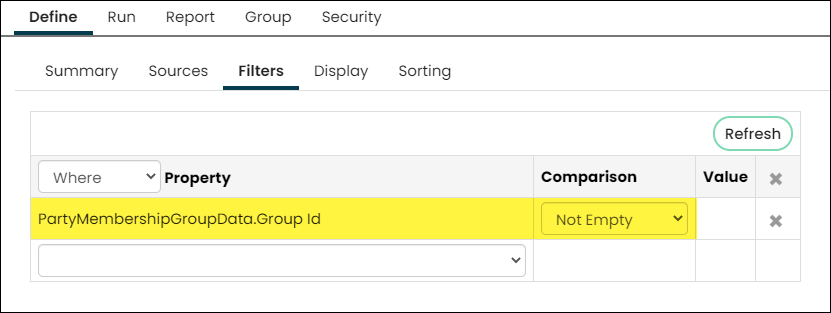
(Filters tab) Next, you can optionally filter to exclude non-members:
- Select Filters. The Filters tab is where we tell the query whose information we want to see.
- From the drop-down in the Property column, select PartyMembershipGroupData.Group ID:
-
Set the Comparison as Not Empty.
-
Click the + button.
-
-
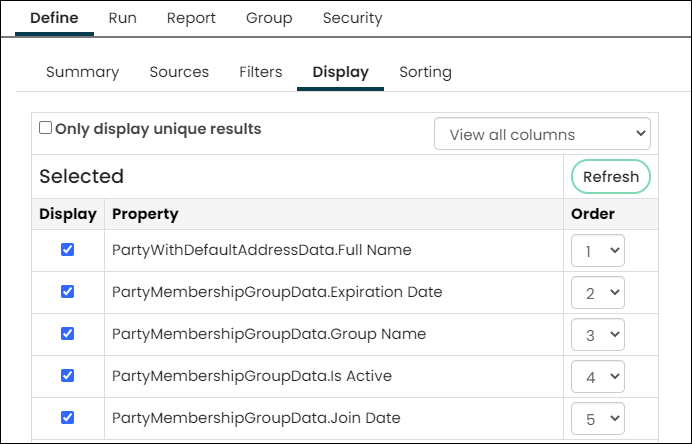
(Display tab) Next, we will want to make the query results look a little better:
- Select Display. This is where you select the information that is displayed, and the order in which it is displayed.
- From the drop-down at the top of the table, select View all columns to see all of the information you could include in the query.
- Select the following properties to display:
- PartyWithDefaultAddressData.Full Name
- PartyMembershipGroupData.Group Name
- PartyMembershipGroupData.Is Active
- PartyMembershipGroupData.Join Date
- PartyMembershipGroupData.Expiration Date
You can reorder the columns by selecting different numbers in the Order column.
-
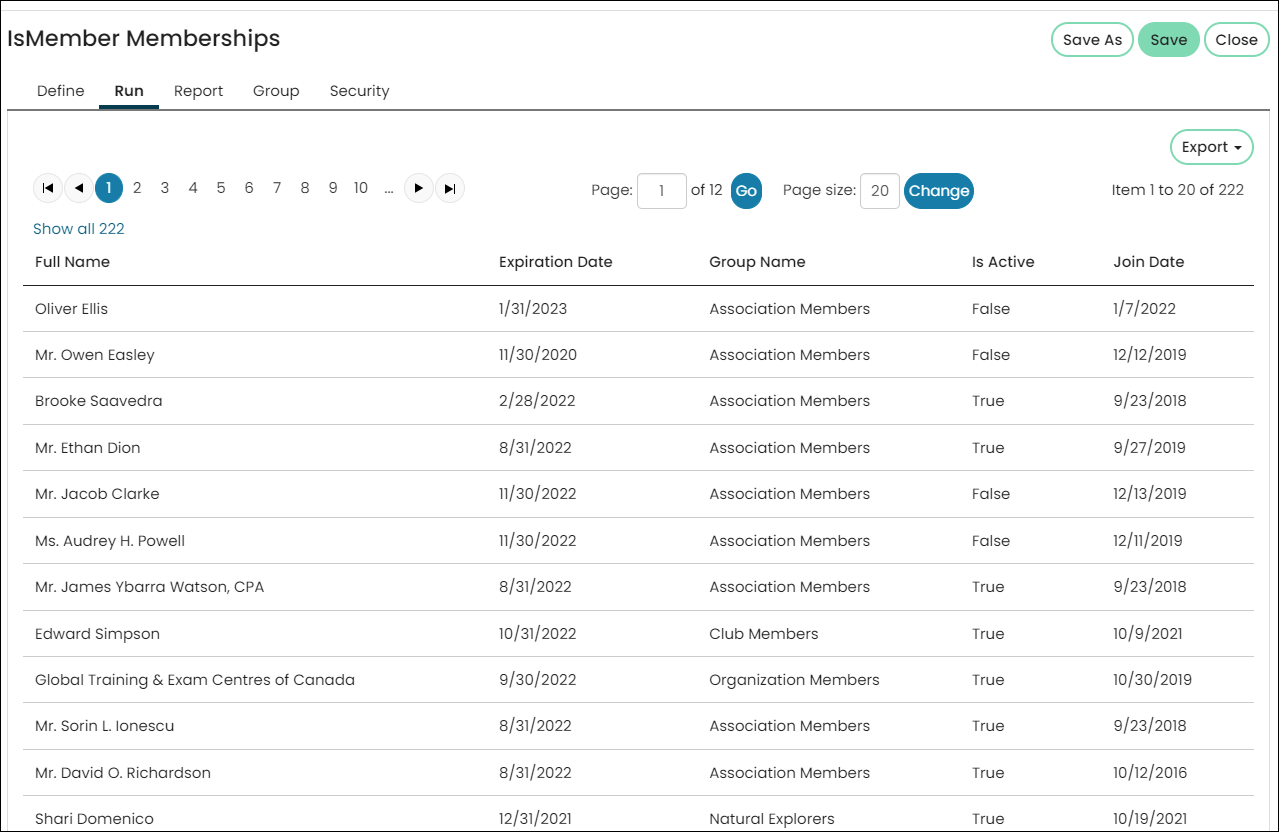
Select the Run tab. You should see a list of all members in Is Member groups.
-
Lastly, we want to make sure that only Staff users have access to run this query:
- Click the Security tab.
- In Access Mode, select Advanced.
- From the drop-down, select All Staff Full Control.
-
Click Save.
Displaying images of members
The following example describes how you can build a query to display images of members:
-
From the Staff site, go to RiSE > Intelligent Query Architect > New > Query.
-
(Summary tab) Name the query. For example, Pictures of members.
-
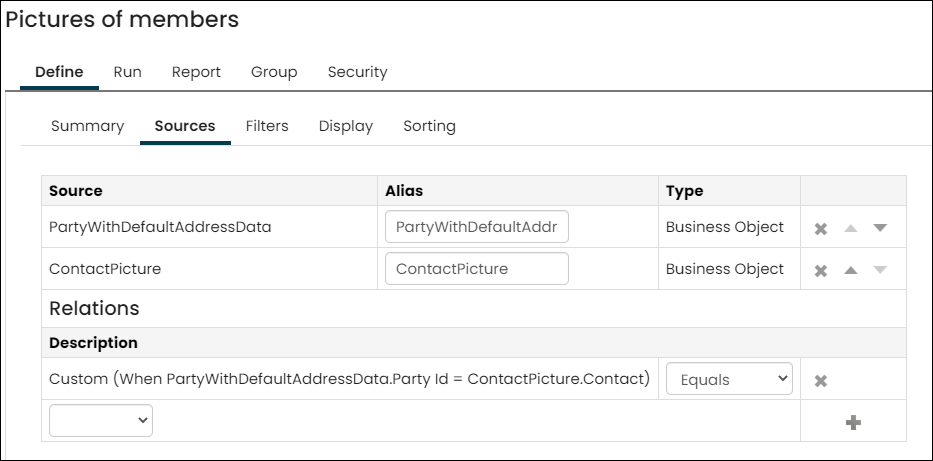
(Sources tab) For this example, we know we want the results to return images of members, so we need to know information about the members:
- Under Add source, select Contacts from the Common section. This adds the PartyWithDefaultAddressData business object.
- Select All Sources, select the ContactPicture business object, then click OK.
- Next, we need to make sure each row of data displays only the related information:
-
Under Relations, select Custom from the drop-down.
-
Select from the drop-downs so the equation reads ContactPicture.Contact Equals PartyWithDefaultAddressData.Party Id.
-
Click the + button.
-
-
We recommend saving your query periodically while you are creating it. Click Save As, and select a save location.
-
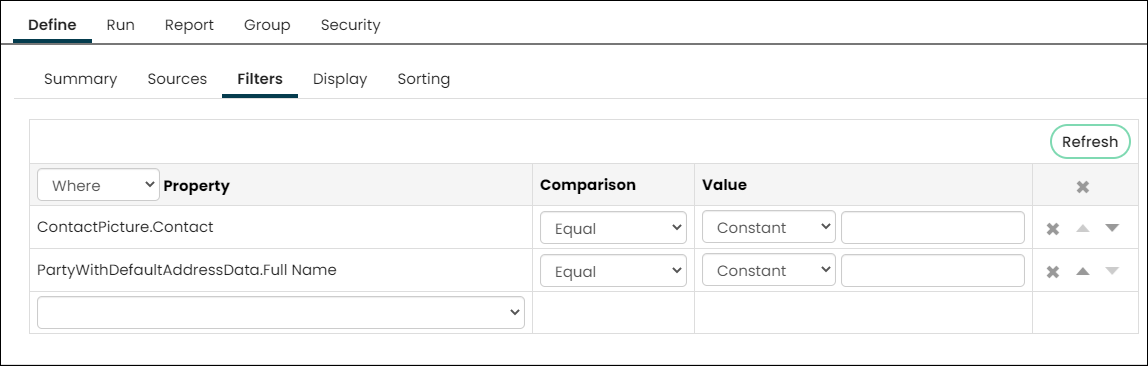
(Filters tab) Next, we want to narrow the list to members with profile pictures. From the drop-down in the Property column, select the following:
-
ContactPicture.Contact, then click the + button.
-
PartyWithDefaultAddressData.Full Name, then click the + button.
-
-
(Display tab) Next, we will want to make the query results look a little better:
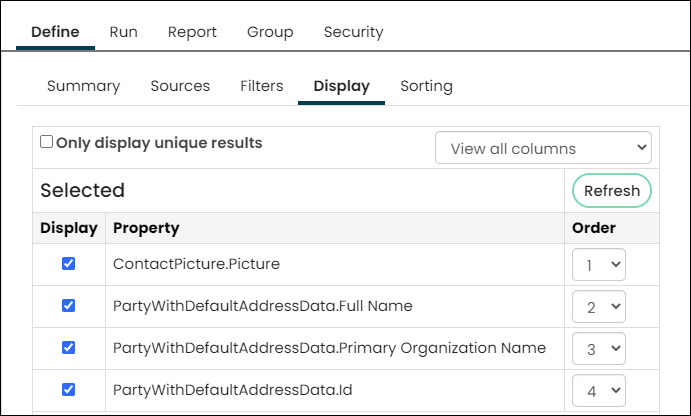
- Select Display. This is where you select what information displays and what order it is displayed in.
- From the drop-down at the top of the table, select View all columns to see all of the information you could include in the query.
- Select the following properties to display:
-
ContactPicture.Picture
-
PartyWithDefaultAddressData.Full Name
-
PartyWithDefaultAddressData.Id
-
PartyWithDefaultAddressData.Primary Organization Name
-
-
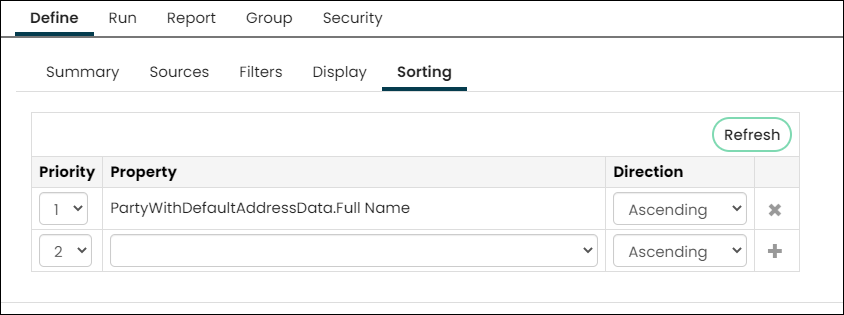
(Sorting tab) For this example, we want the names to be sorted in alphabetical order:
-
From the Property drop-down, select PartyWithDefaultAddressData.Full Name.
-
From the Direction drop-down, select Ascending.
-
Click the + button.
-
-
Click the Run tab.
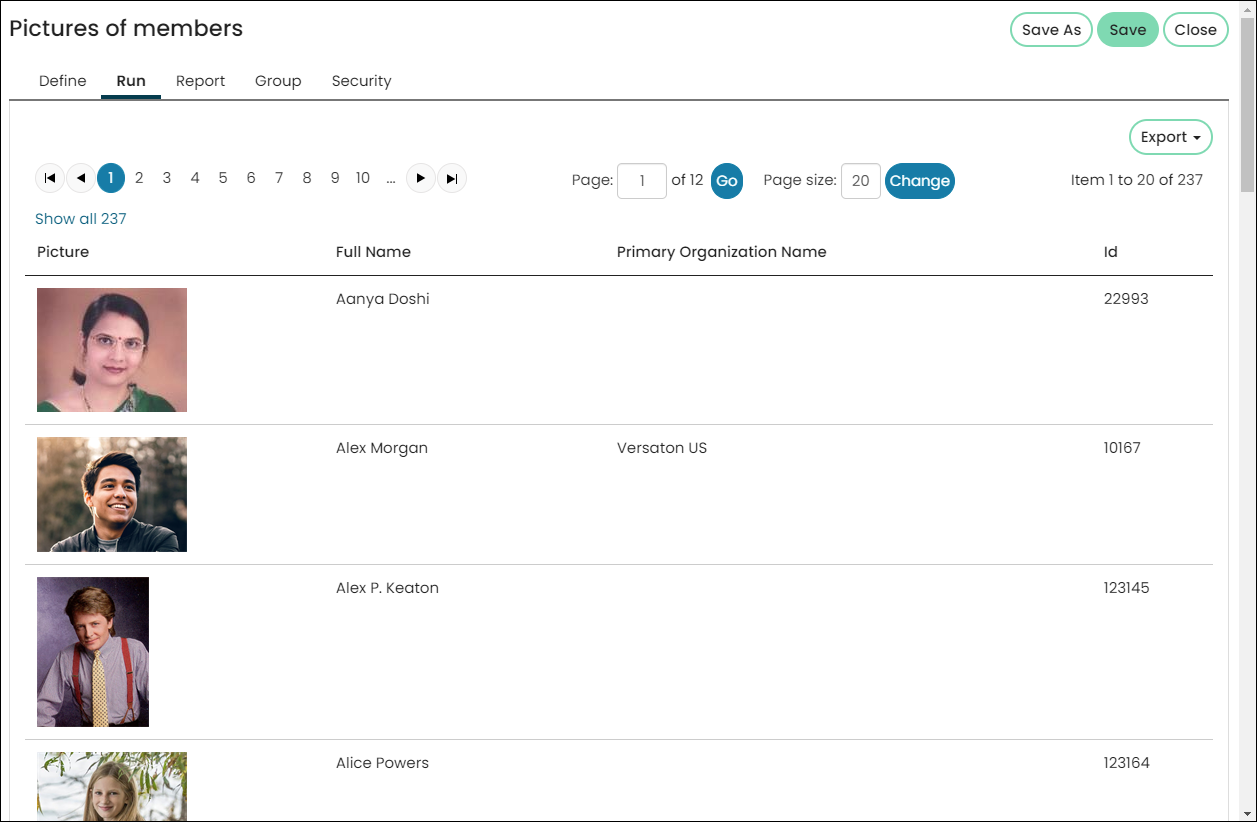
-
Click Save.
Now you can use your new query in any area that queries can be used. Try adding a Query Menu content item to a page, and select your query for display.
Displaying images uploaded through panels in an IQA query
Using the File upload property in Panel Designer, members can upload files directly to their account pages. If the files have an image extension (.png, .jpg, etc.) you can create an IQA query to neatly display all images uploaded through that panel source.
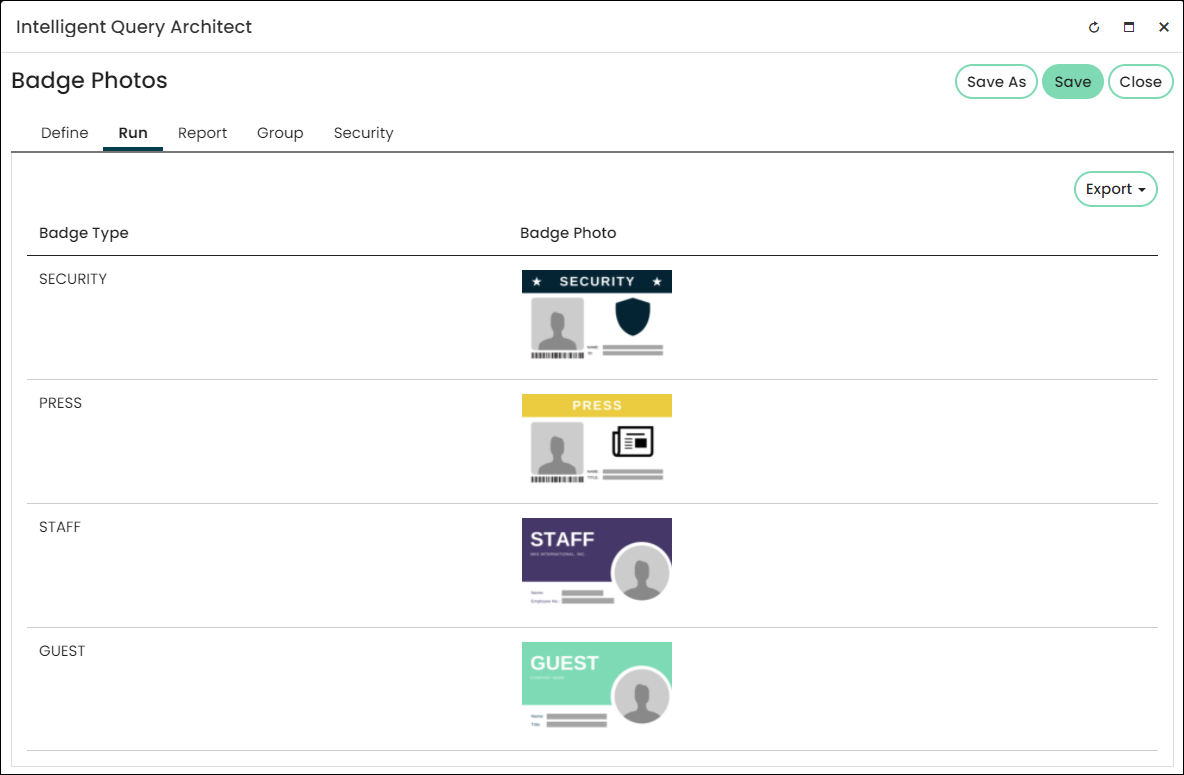
The following example describes how you can build a query to display images stored in a panel data source:
-
From the Staff site, go to RiSE > Intelligent Query Architect > New > Query.
-
(Summary tab) Name the query. For example, Badge Photos.
-
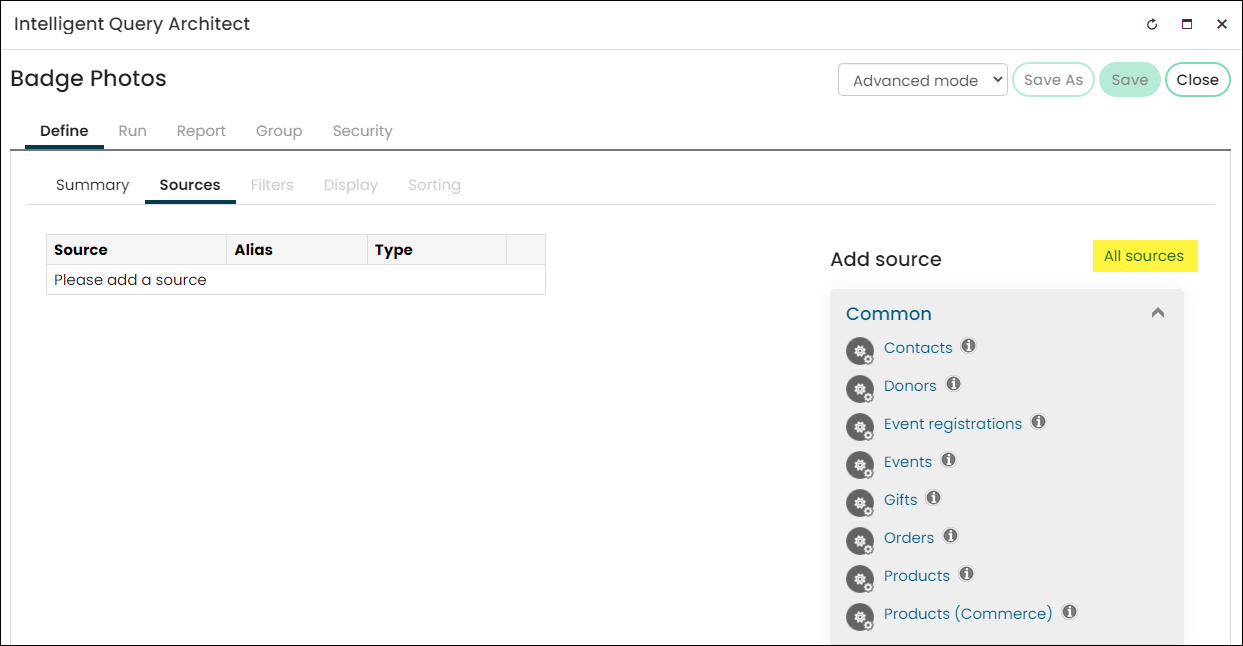
(Sources tab) Choose All sources, then find the panel data source that has the images you want.
-
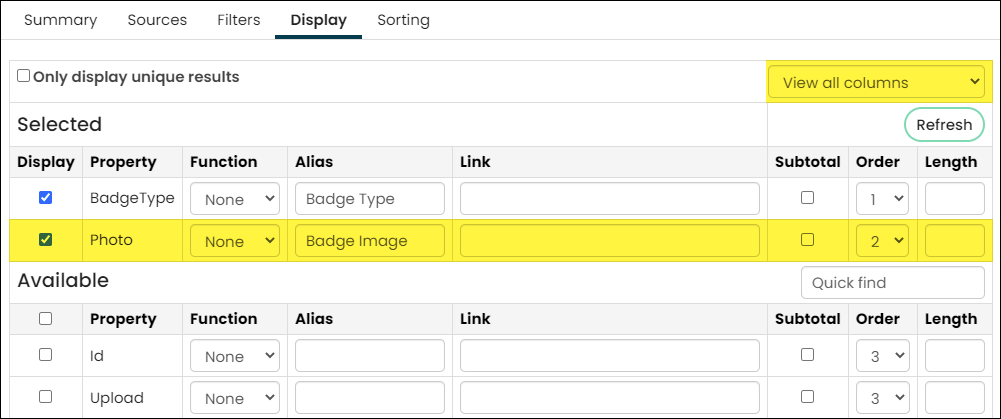
(Display tab) From the drop-down at the top of the table, select View all columns to see the information you could include in the query.
-
Select which properties you want displayed. Select which properties you want displayed, making sure to choose the property containing the images.
-
Under Length, type the image width. The smaller the number (such as 100 px), the smaller the image. The larger the number (such as 300 px) the larger the image.
-
-
Click Run. The image results appear in the IQA results.
Building a query that returns the contacts in an organization
In iMIS, an organization contact owns a group with the type of Company making it very easy to find the contacts that belong to that organization. The following example describes how you can build a query to identify the contacts in an organization:
-
From the Staff site, go to RiSE > Intelligent Query Architect > New > Query.
-
(Summary tab) Name the query. For example, Organization contacts.
-
(Sources tab) For this example, we want to identify the roster for a company:
-
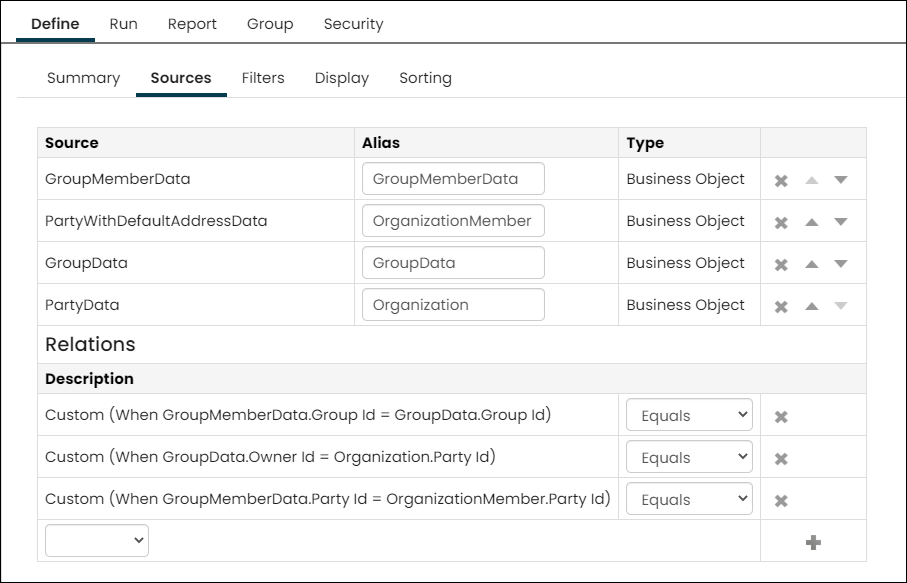
Select All sources and add the PartyData, GroupMemberData, GroupData and PartyWithDefaultAddressData business objects.
For this example, I have added an Alias for each business object.
-
Set up the relationship between the selected business objects:
- From the Relations drop-down, select Custom.
- Select from the drop-downs so the equation reads GroupData.OwnerID Equals Organization.PartyID.
- Click the + button.
- Add another relation. From the Relations drop-down, select Custom.
- Select from the drop-downs so the equation reads GroupMemberData.PartyID Equals OrganizationMember.PartyID.
- Click the + button.
- This relates the business objects so that each organization group will be associated with the correct contacts.
-
-
We recommend saving your query periodically while you are creating it. Click Save As, and select a save location.
-
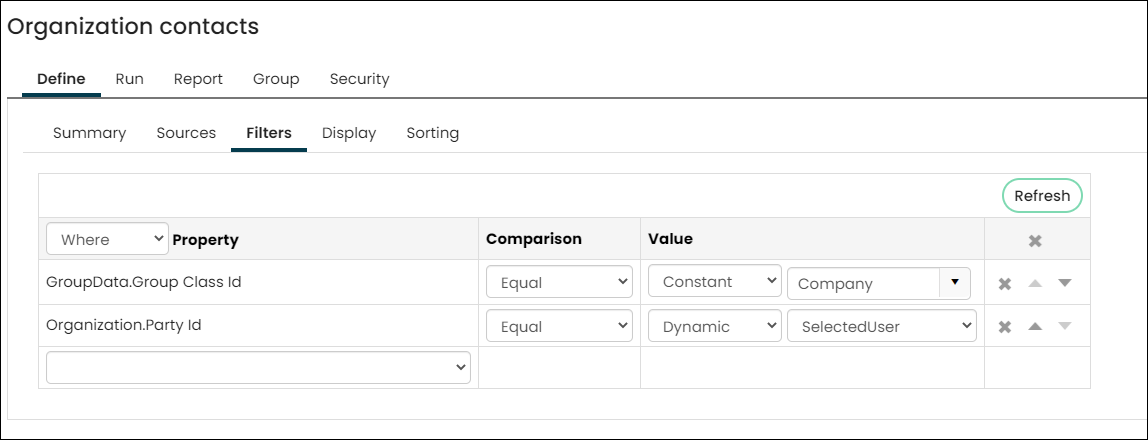
(Filters tab) We only want to view groups that have a company type for the selected organization. To do this we will need to add two filters. One of the filters will be a dynamic filter:
- From the Property drop-down, select GroupData.Group Class ID.
- From the Comparison drop-down, select Equal.
- In the Value field, select Company from the drop-down.
- Click the + button.
- Add another filter. From the Property drop-down, select Organization.PartyID.
- From the Comparison drop-down, select Equal.
- In the Value field, select Dynamic in the drop-down and then select SelectedUser.
- Click the + button.
This filter will only return results of the select user, meaning you must work On Behalf of an organization and then run the query to see the contacts of the organization. You can also place the query on the organization account page using the Query Menu content item to display the contacts for each organization.
-
(Display tab) Select the information you want to see in the query:
-
From the drop-down at the top of the table, select View all columns.
-
Select the following properties to display:
- OrganizationMember.ID
- OrganizationMember.FullName
- OrganizationMember.Formatted Address
- OrganizationMember.Email
Re-order and alias the properties as necessary.
-
-
(Sorting tab) For this example, we want to sort by the Sort Name property.
- From the Property drop-down, select OrganizationMember.Sort Name.
- From the Direction drop-down, select Ascending.
- Click the + button.
-
Save the query, then select the Run tab.
When using the dynamic filter of SelectedUser, you must be working on behalf of an organization or there will be no results. For this example, I am working on behalf of Versaton US.
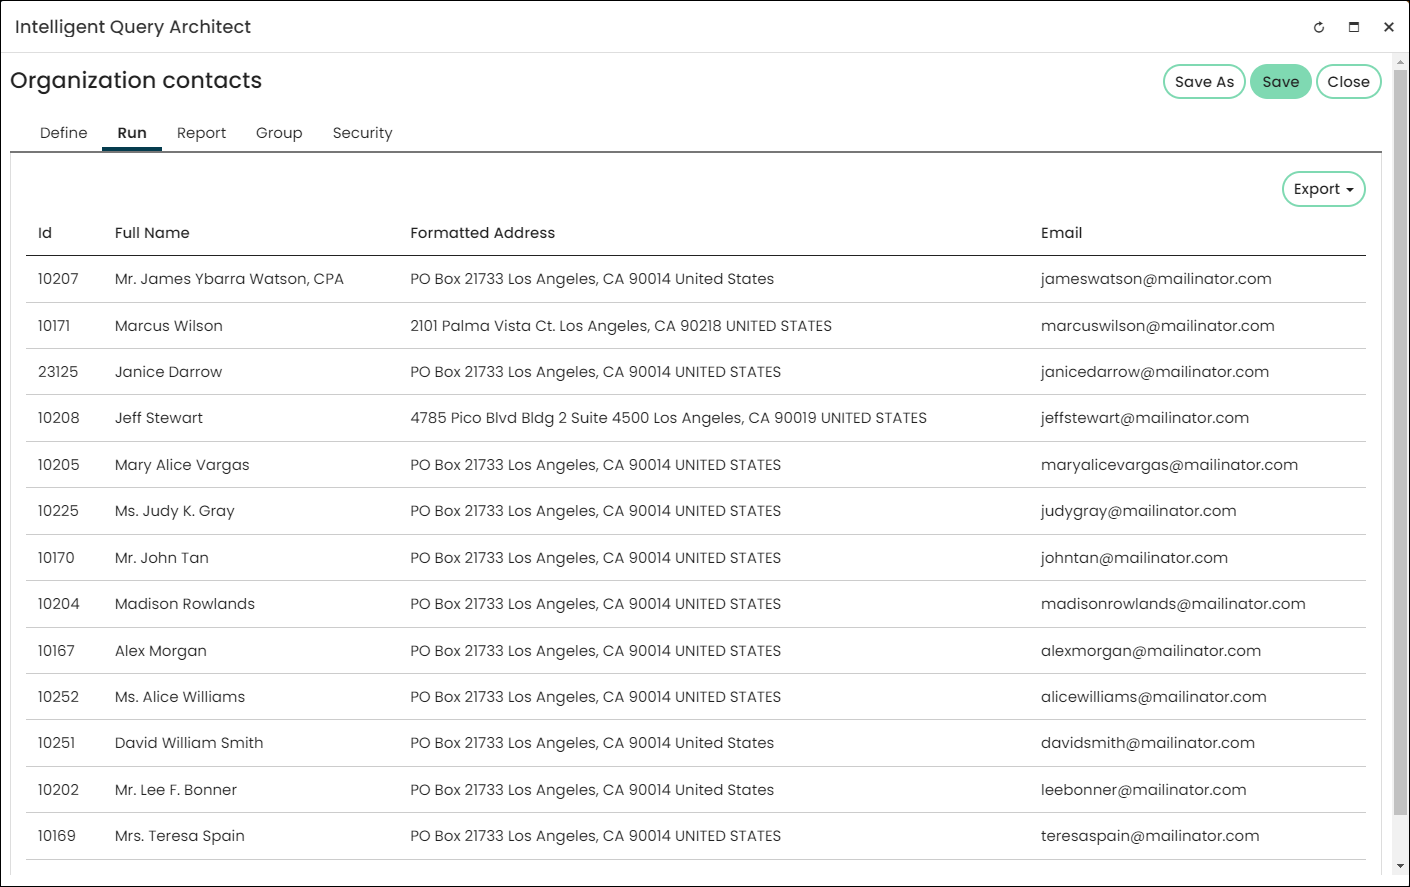
Add the Query Menu content item to display the query on an organization account page and easily export the contact list with the information selected from the Display tab.
Creating a query that returns the results in a random order
ExampleThe association offers a list of preferred medical professionals where patients can search for a physician. The patient also has the option to click Find and a list of all medical professionals appears. The list needs to be in random order, so that the same medical professionals do not always appear at the top of the list.
Do the following to create a query that returns the results in a random order:
-
Go to RiSE > Intelligent Query Architect > New > Query.
-
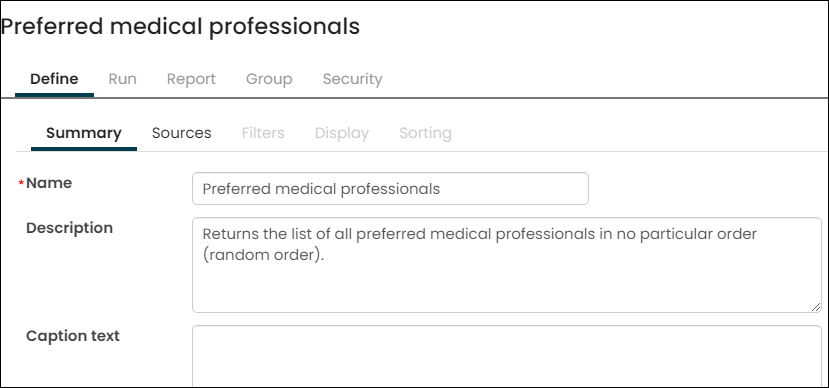
(Summary tab) Enter a Name and Description.
-
(Sources tab) Choose the necessary source.
-
(Filters tab) If there are filters required for the search query, add them.
-
(Display tab) Choose the display properties.
-
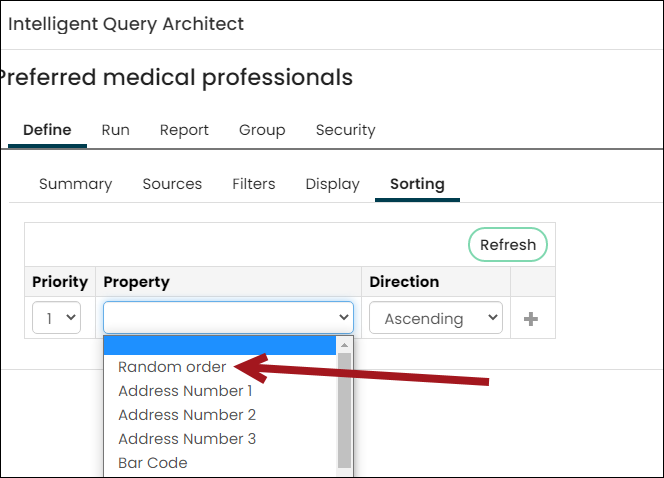
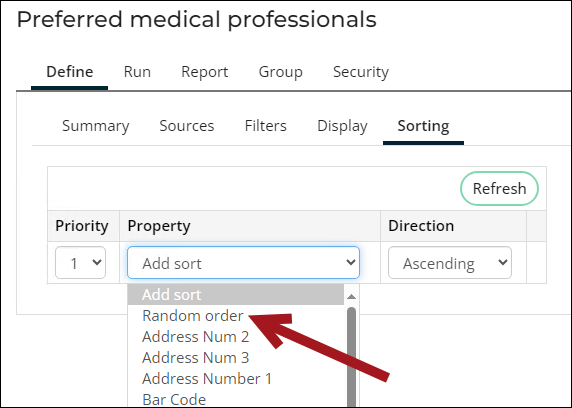
(Sorting tab) From the Property drop-down, choose Random order. Click the + icon to add the sorting property. When Random order is selected, the Direction value is ignored.
-
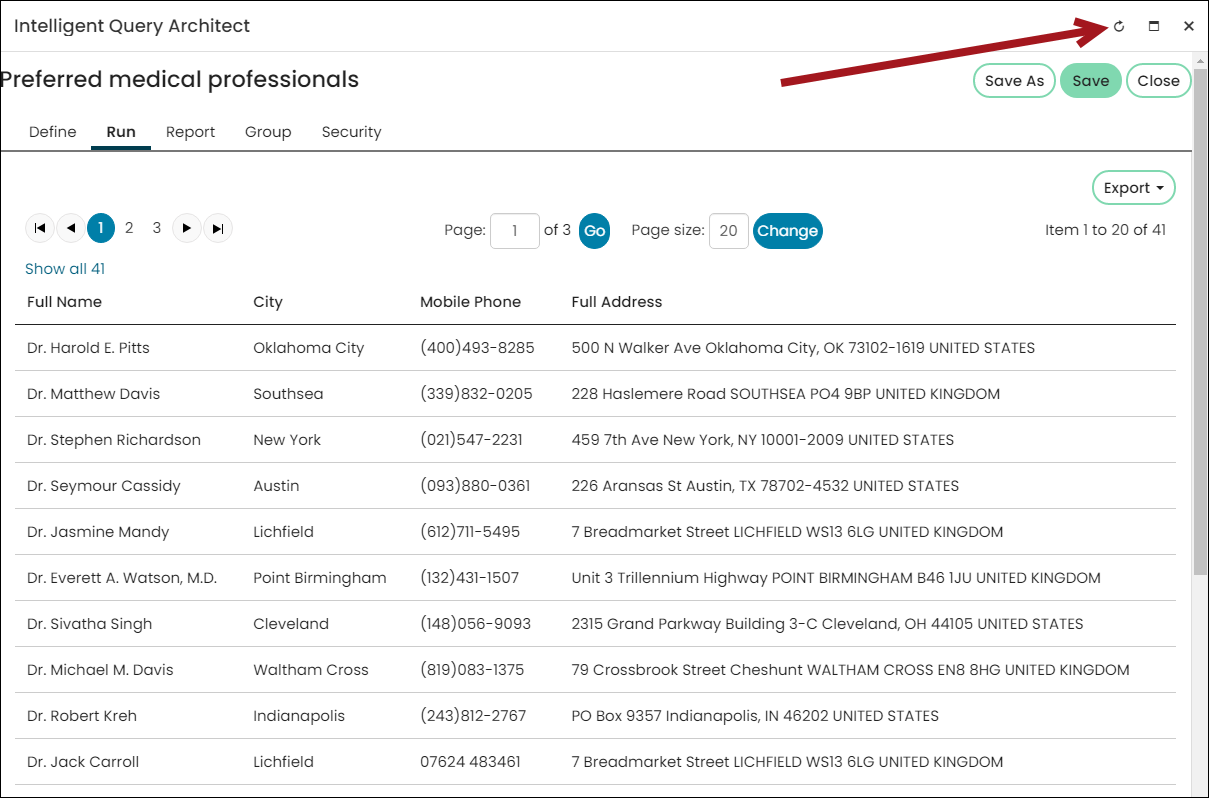
Click Run to review the query results. Use the refresh icon to confirm new results display each time the query is refreshed.
-
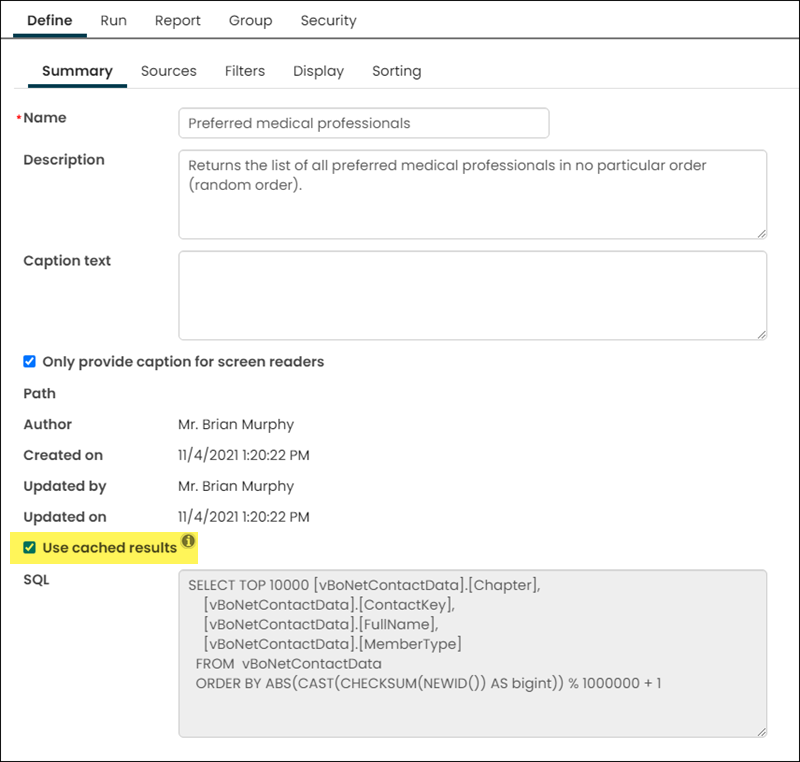
(optional) If the query results return more than one page and the user navigates through the pages, the query results are refreshed each time the user navigates to a new page. This means if a user navigates from page one to page two then back to page one, the results on page one will be different than they previously were. To keep the pages from refreshing, enable Use cached results on the Summary tab.
Intermediate
Adding filters and links
In this example, we are going to create a query that contains filters and links. The filters can be used after the query is run, and the links are clickable links to the query results.
Do the following to create the query:
-
Go to RiSE > Intelligent Query Architect > New > Query.
-
Name the query.
-
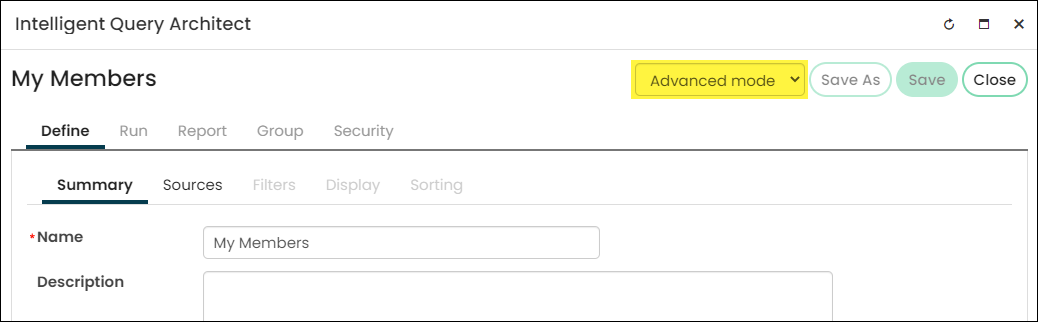
Make sure you are in Advanced mode.
-
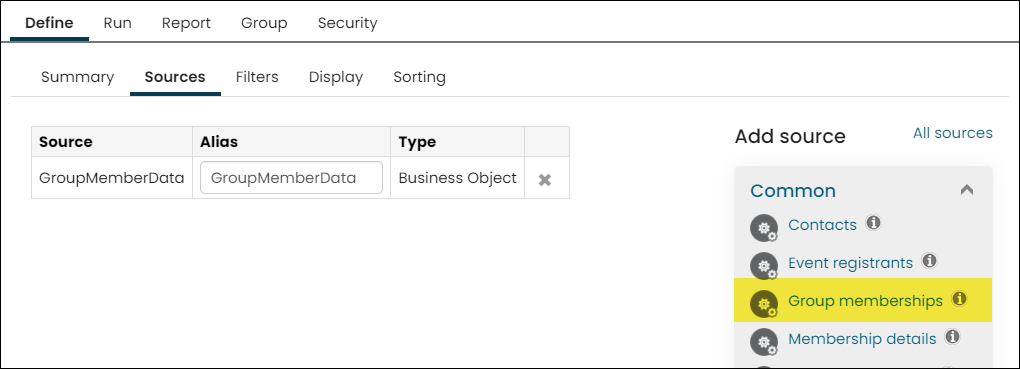
(Sources tab) Under Add source, select Group memberships.
-
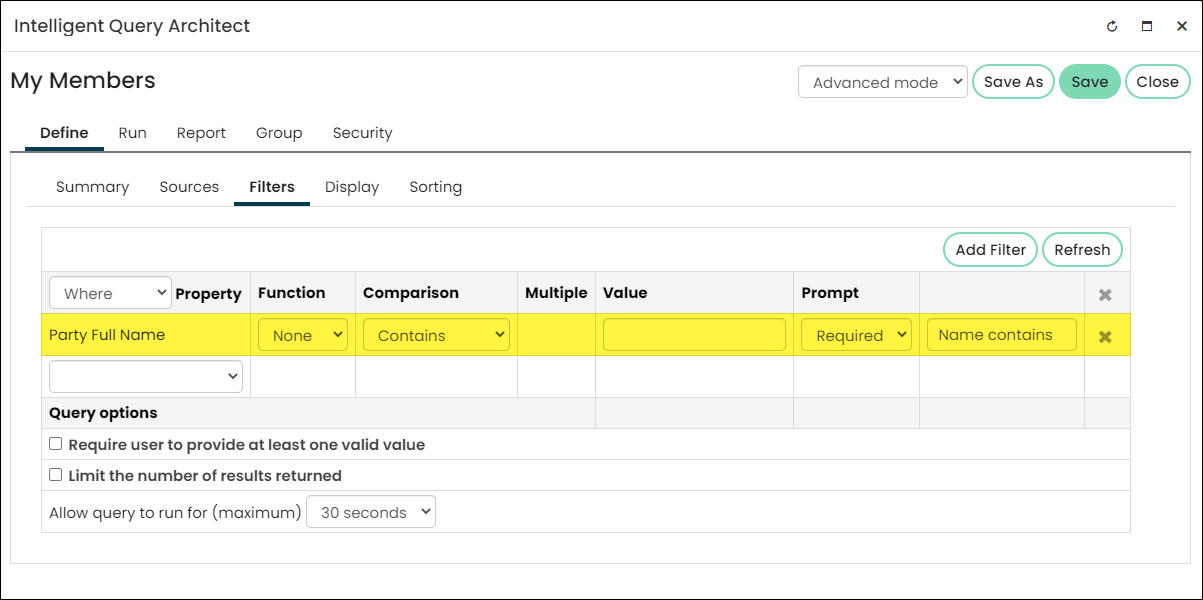
(Filters tab) We want to allow people who are viewing the query to narrow the list to members by name:
-
From the Property drop-down, select Party Full Name.
-
From the Comparison drop-down, select Contains.
-
From the Prompt drop-down, select Required.
-
In the text box to the right of the Prompt drop-down, you can define a label that will be used for the Required filter. Enter Name contains in this field.
-
Click the + button.
-
-
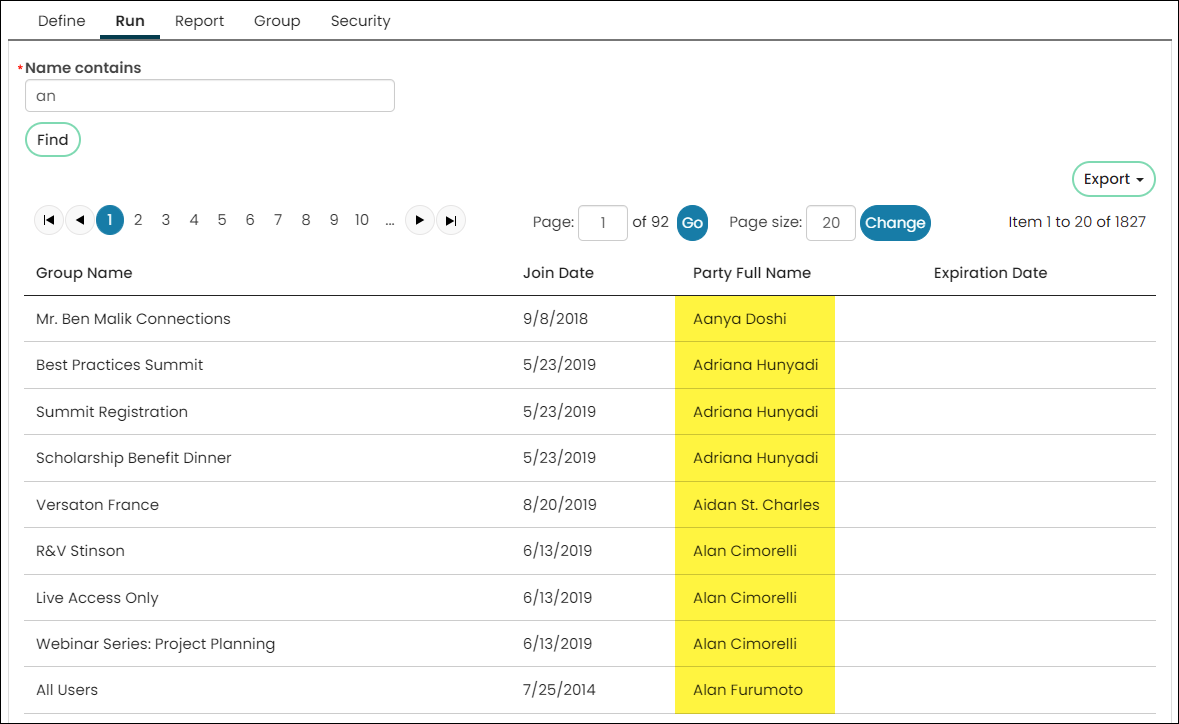
Click the Run tab to see the new filter. Instead of a list, you will see a prompt for Name contains, which is required in order to see results:
-
Enter "an" in the box (without the quotation marks), then click Find. The results return a list of all members whose name contains the letters "an." If there are no results, try a different set of letters.
Next, we want to add links to the query results that will link to a member's profile page, and to the group's page. To do this, we will need the IDs for the contact and group. These IDs will be used as URL parameters to tell the page which contact or group to display. To do this we will need the contact's ID to be used as a URL parameter to tell the page which contacts to display.
-
-
Click the Define tab, then select Display:
- From the drop-down, select View all columns.
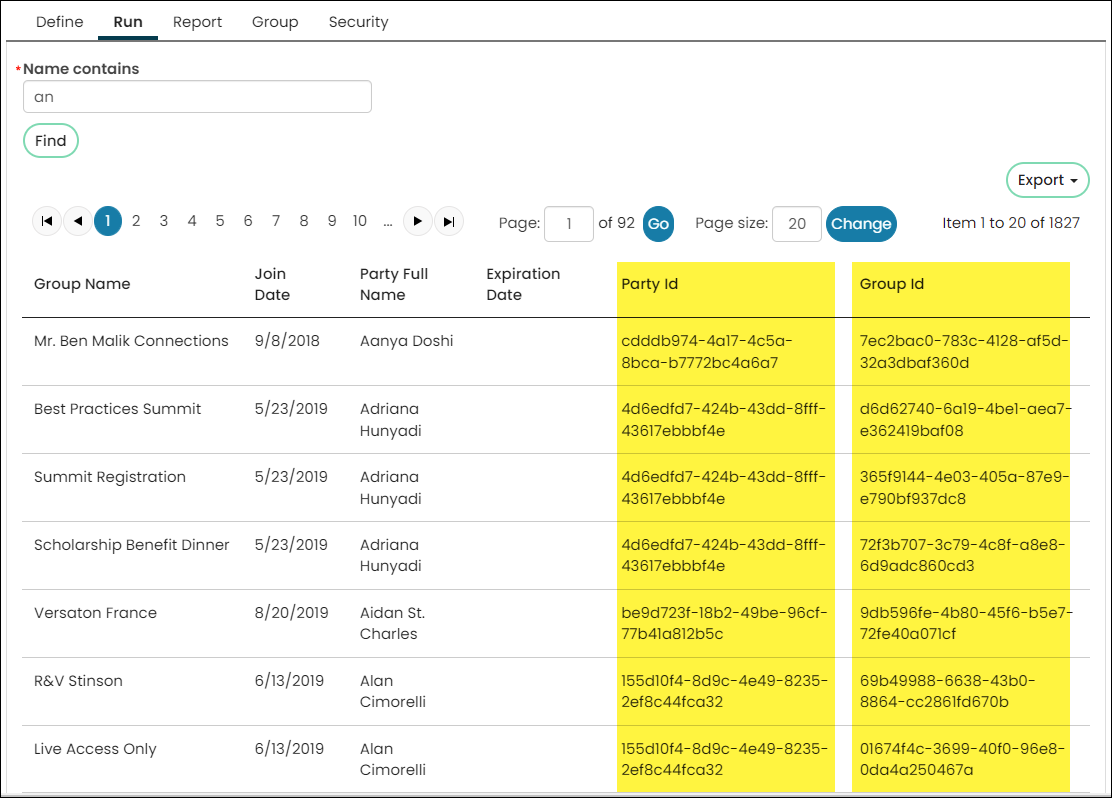
- Select the Display checkbox for Party Id and Group Id.
- Click Refresh.
If you run the query now, you will see the IDs for the contacts and the group are displayed. These IDs do not look nice, but they are needed in order to correctly build the links. Let's take a look at how you can hide these IDs from the display.
-
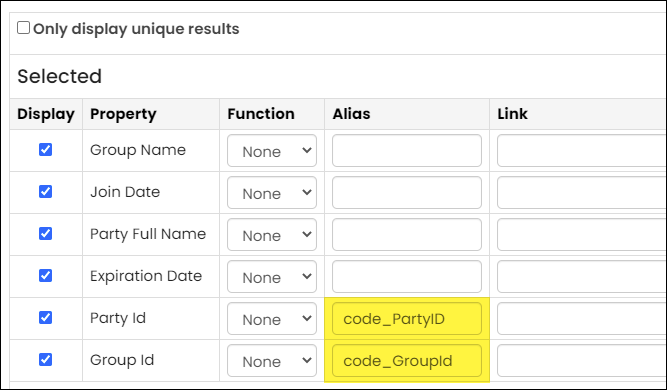
Click the Display tab:
- Party Id - In the Alias field enter code_PartyId.
- Group Id - In the Alias field enter code_GroupId.
When an IQA query is run, any column with an Alias that begins with code_ will not be displayed, but can be used for links and other IQA functions.
-
Click Run to view the results, then click Save.
-
Next, let's add the actual links. We will start with the contact:
- Navigate back to the Display tab.
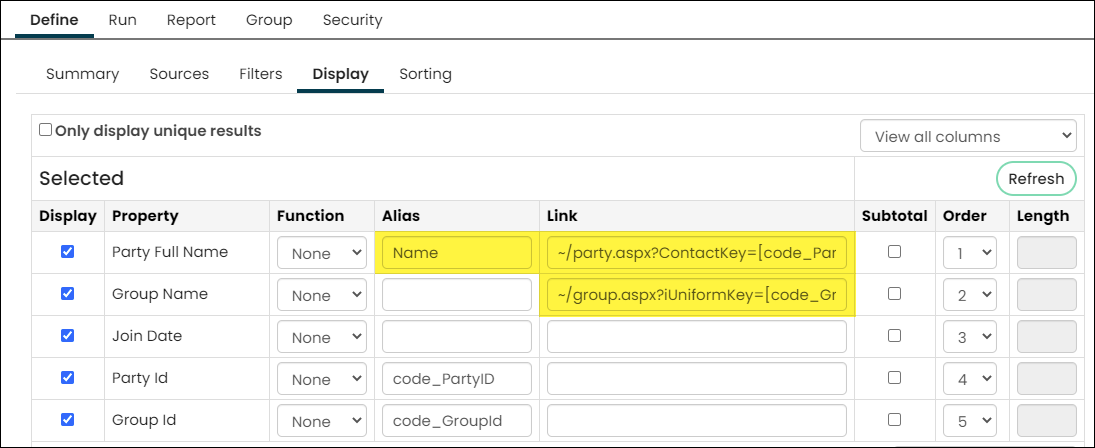
- In the row Party Full Name, enter this in the Link field: ~/party.aspx?ContactKey=[code_PartyId]
Each result of a member's name will now display as a link to the party.aspx page with a URL parameter of ContactKey that equals the contact's ID. In other words, it will link to their account page.
-
Next, let's add the link to the group page. In the row Group Name, enter the following in the Link field:
~/group.aspx?iUniformKey=[code_GroupId]This will return all of the group name results into links. These links will go to the group page using a URL parameter to determine which group to display.
-
Lastly, we want to change the column header of Party Full Name to something a little shorter:
In the Alias column for Party Full Name, enter Name. This will mean that when the query results are displayed, the column header for this column will be Name instead of Party Full Name.
-
From the Order column, arrange the columns to your desired order.
-
Click Save.
-
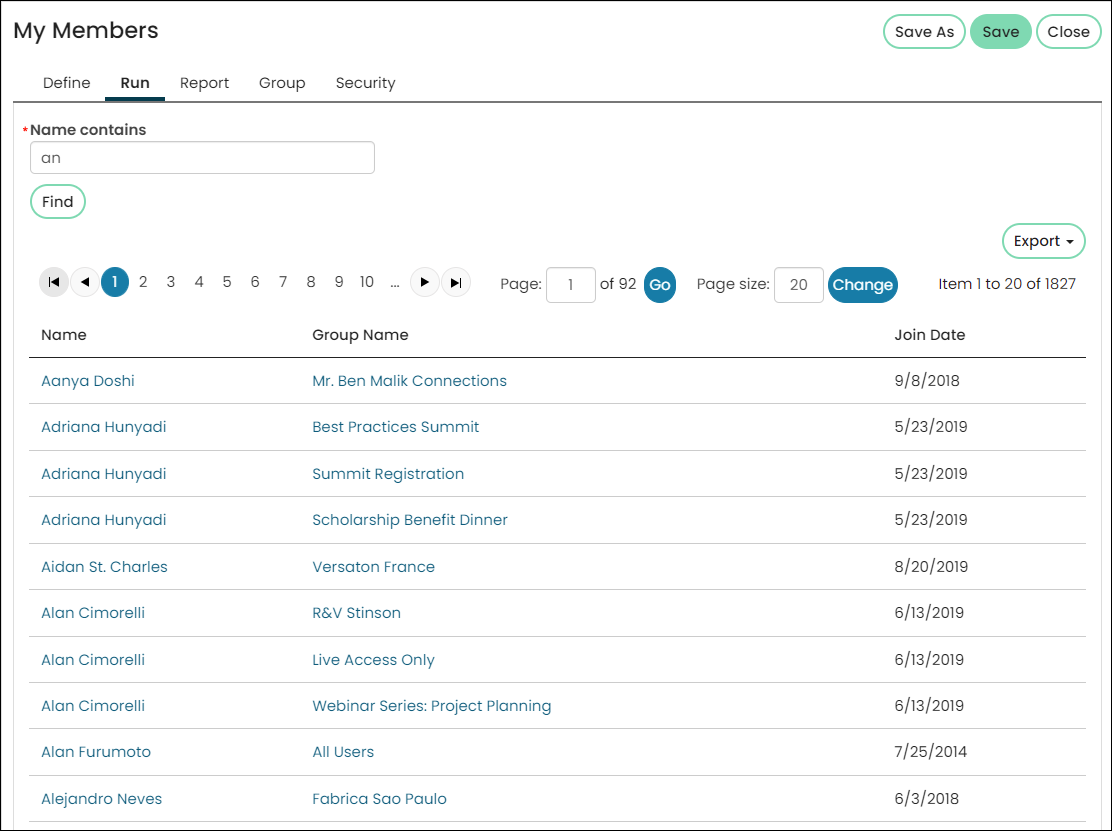
Click the Run tab:
-
Enter a filter to see results.
-
Click a contact's name to verify the links goes to the correct account page.
-
Close the pop-up, then select a linked group name. This pop-up should display the group landing page for the selected group.
-
Building Progress Tracker queries
The Progress Tracker content item uses a specifically-designed query to display progress towards a goal. The query design depends on the type of goal that is trying to be achieved. The two examples below detail how to build queries that will be used in the Progress Tracker content item.
Using a hard-coded goal
This example walks you through how to build a simple Progress Tracker query that displays this year's total revenue with a hard-coded goal that we hope to achieve by the end of the year.
-
From the Staff site, go to RiSE > Intelligent Query Architect > New > Query.
-
Name the query Progress Tracker - Revenue This Year.
-
(Sources tab):
- Click All sources and select ItemSaleData, then click OK.
-
Save the query.
-
(Filters tab) Since we only want to see the revenue from this year's sales, we are going to limit the results to return only transactions that occurred this year:
- From the Property drop-down, select Transaction Date.
- From the Comparison drop-down, select Within Years.
- In the Value field enter 0.
- Click the + button.
-
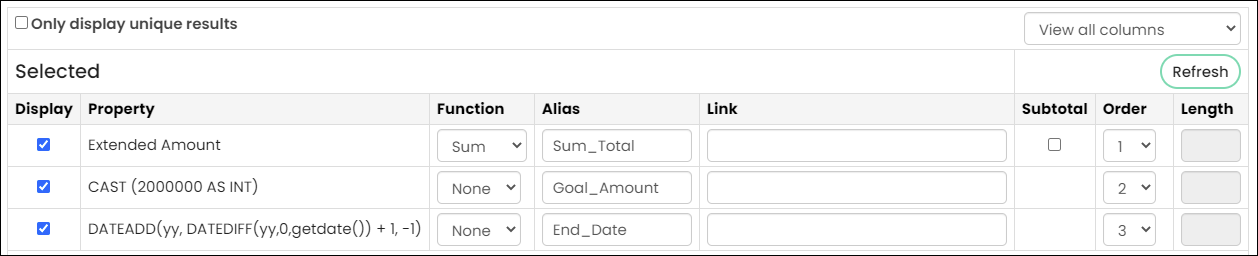
(Display tab) In order to display this year's current total revenue, we need to calculate the sum and then give it a special name:
-
From the drop-down, select View all columns.
-
Select Display for Extended Amount.
-
From the Function drop-down, select Sum.
-
In the Alias field, enter Sum_Total.
- Deselect Display for all other properties.
-
-
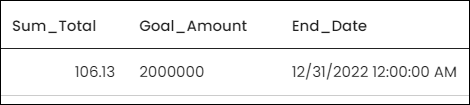
Click the Run tab. You should see only one row and one column that displays the current year's total revenue.
Next, we need to give the Progress Tracker a goal and an end date. For this example, we want the goal to be 2,000,000, and the end date to be the end of the year. Since neither of these values are available using a business object, we will have to use a couple of simple SQL statements.
-
Click the Define tab, then click the Display tab.
-
Scroll down to the Custom section. This is where you can add custom SQL expressions.
- In the SQL Expression field enter
CAST (2000000 AS INT) - In the Alias field enter Goal_Amount
- Click the + button.
- In the SQL Expression field enter
-
Next we need to create a custom display that will tell the Progress Tracker what to do when the new year begins. We want the Progress Tracker to automatically roll forward, so once the new year begins, the new end goal is the last day of the new year:
-
In the SQL Expression field, enter
DATEADD(yy, DATEDIFF(yy,0,getdate()) + 1, -1) -
In the Alias field, enter End_Date
-
Click the + button.
-
-
Save the query, then click the Run tab.
-
To display the results using the Progress Tracker content item, go to RiSE > Page Builder > Manage content.
-
Create a new content record, or Edit an existing content record to display the Progress Tracker.
-
From the Manage content window, select Add content.
-
Open the Utility folder, select Progress Tracker, then click OK.
-
Change the CSS class to read ProgressTracker2.
-
In the Source query field, select the Progress Tracker - Revenue This Year query.
-
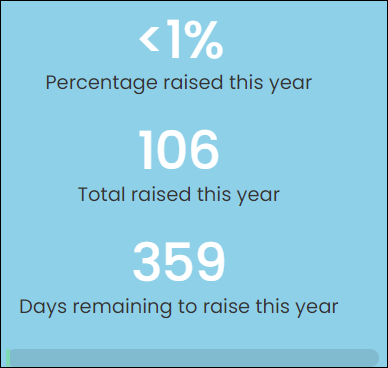
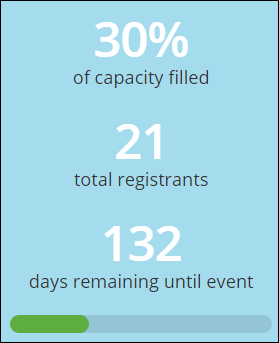
Scroll down to the Caption Options section:
- From the Progress bar location drop-down, select Below captions.
- Select the Display percent, Display total, and Display days remaining checkboxes.
- Enter a description for each caption.
-
Save and Publish the page.
Using a dynamic amount and goal
In this example, we are going to build a Progress Tracker query that shows the number of registrants for a particular event. Instead of a set-date goal, the goal is the maximum capacity for the event. The end date will be the start date of the event.
-
From the Staff site, go to RiSE > Intelligent Query Architect > New > Query.
-
Name the query Progress Tracker - Event Registrations.
-
(Sources tab):
- Under Add source, select Events from the Events section. This adds an events query.
- Under Add source, select Event registrants from the Common section. This adds the EventRegistrationData business object.
- In the Relations section, add a Custom relation that reads Event.Event Id Equals EventRegistrationData.Event Id.
- Click the + button.
-
(Filters tab) We only want to display active registrations in the Progress Tracker, so we need to add a filter that will exclude cancelled registrations:
- From the Property drop-down, select EventRegistrationData.Is Active.
- From the Comparison drop-down select Equal.
- From the Value drop-down, select Yes.
- Click the + button.
-
Click the Run tab. Each row displays data for each individual registration.
-
(Display tab) In order for the Progress Tracker to properly interpret this information, we have to create special display columns:
-
Enable Display for the following properties:
- EventData.Event Name
- EventData.Event Id
- EventData.Capacity
- EventData.Start Date Time
- EventRegistrationData.Registrant Party Id
-
For the property EventRegistrationData.Registrant Party Id, set the Function drop-down to Count. This will give you the number of registrations for the event.
-
In order for the Progress Tracker to understand the data we are giving it, some properties need to have a particular alias:
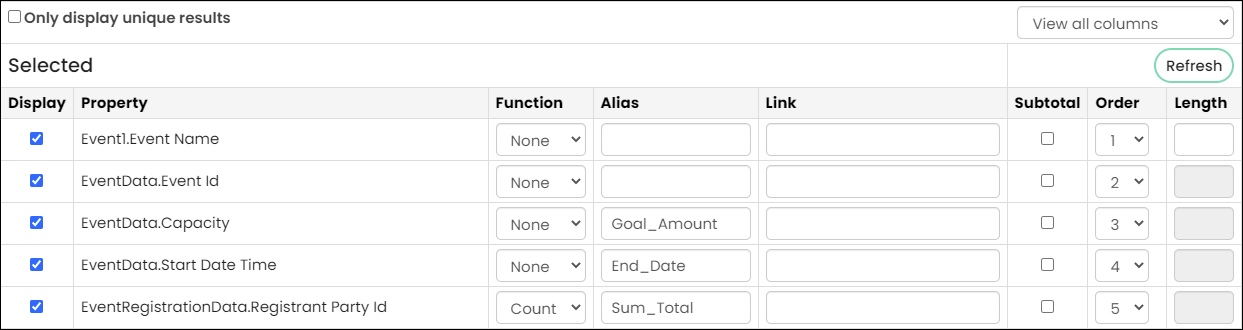
- EventRegistrationData.Capacity - Represents the goal.
- Alias - Goal_Amount
- EventData.Start Date - Represents the end date for the goal.
- Alias - End_Date
- EventRegistrationData.Registrant Party Id - Represents the current total number of registrations.
- Alias - Sum_Total
- EventRegistrationData.Capacity - Represents the goal.
-
-
Save the query.
-
Go to the event dashboard and add a new Progress Tracker content item:
- Rename the CSS class to ProgressTracker2.
- From the Source query field, select the Progress Tracker - Event Registrations query.
-
The query we built displays information for all events in the database, but we only want to display the information that is specific to the individual event. To do this, we will need to filter the Progress Tracker results based on the EventKey parameter in the URL:
- In the Filter Options section from the Filter on data column drop-down, select EventId.
- In the URL parameter field, enter EventKey.
-
In the Caption Option section from the Progress bar location drop-down, select Below captions.
-
Enable the Display percent, Display total, and Display days remaining options. Enter a description for each.
-
Save and Publish the page.
Finding contacts who have not registered for an event
To determine who has not registered for a specific event, you must first create a query of everyone who has registered for the event. After that query is created, you can create a second query that uses the first query as a source.
The following example details how to find everyone who has not registered for the Annual Conference.
Creating the first query: Finding all registrants of an event
Do the following to create a query to find everyone who has registered for a specific event:
-
From the Staff site, go to RiSE > Intelligent Query Architect > New > Query.
-
(Summary tab) Enter a Name and Description for your query.
-
(Sources tab) Under Add source in the Common section, select Event registrants.
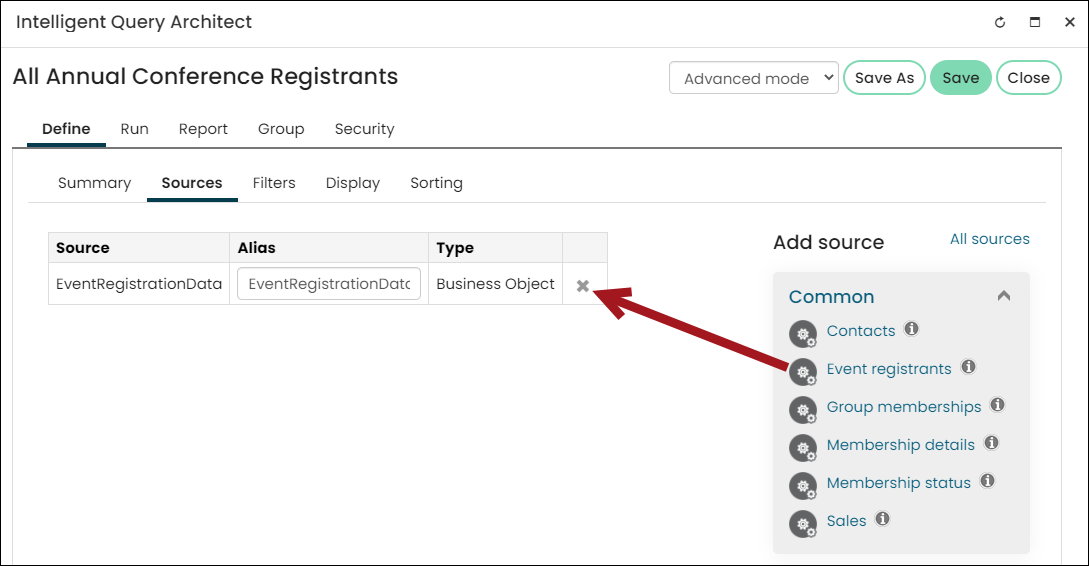
-
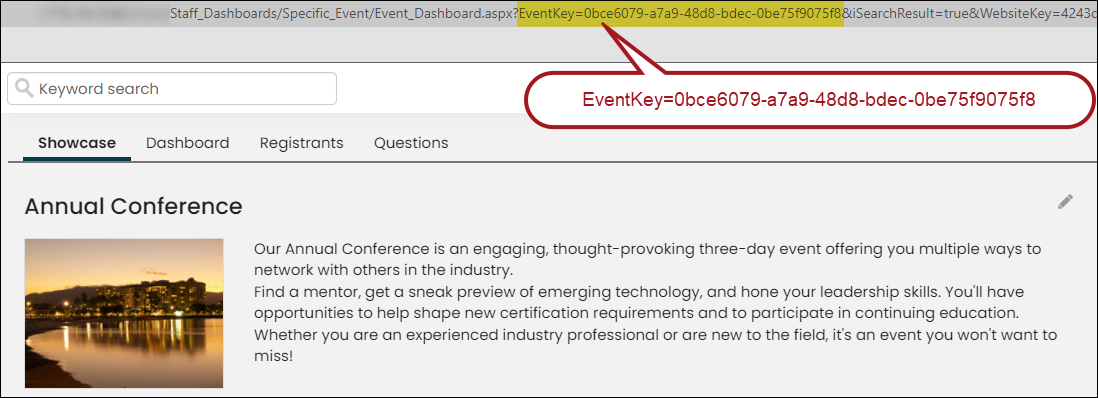
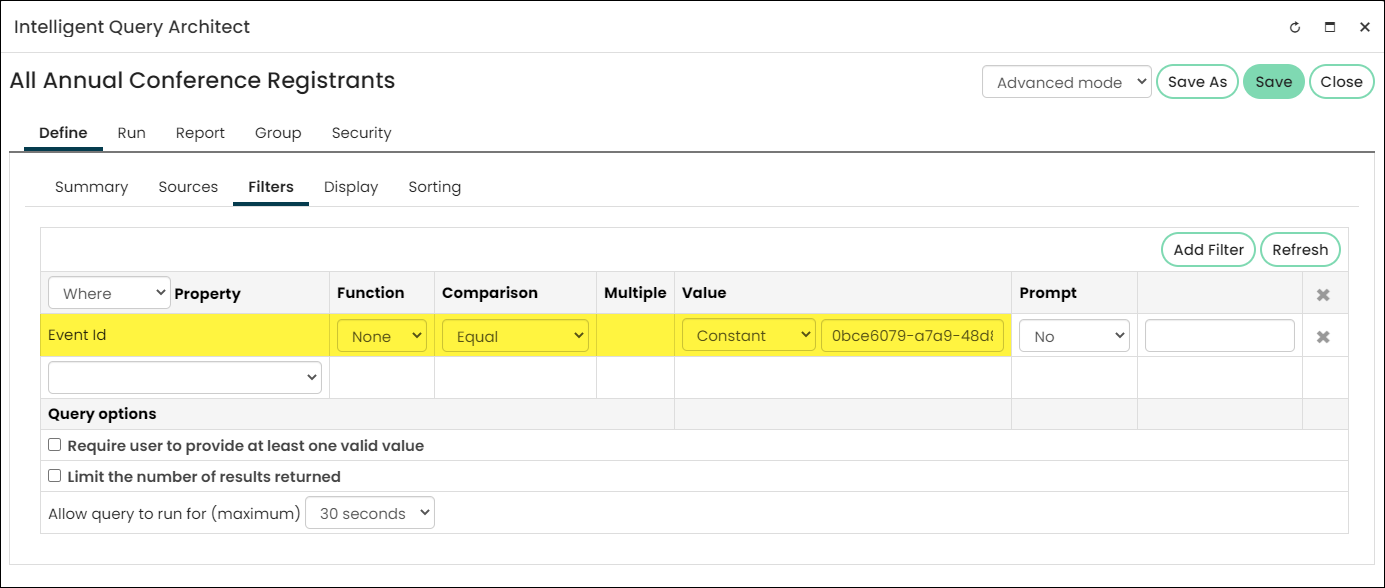
(Filters tab) From the Property drop-down, select Event Id and set it Equal to the Id of the event you need. To find the Event Id, open the event. From the URL, locate the EventKey, and copy the string after EventKey=.
-
(Display tab) Enable any properties to display, such as:
- Registrant Full Name
- Registrant Party Id
-
Click Run to verify the results.
-
Save the query.
Creating the final query: Finding all non-registrants of an event
Do the following to create a query that returns results of everyone who has not registered for a specific event:
-
From the Staff site, go to RiSE > Intelligent Query Architect > New > Query.
-
(Summary tab) Enter a Name and Description for your query.
-
(Sources tab):
-
Under Add source in the Common section, select Contacts.
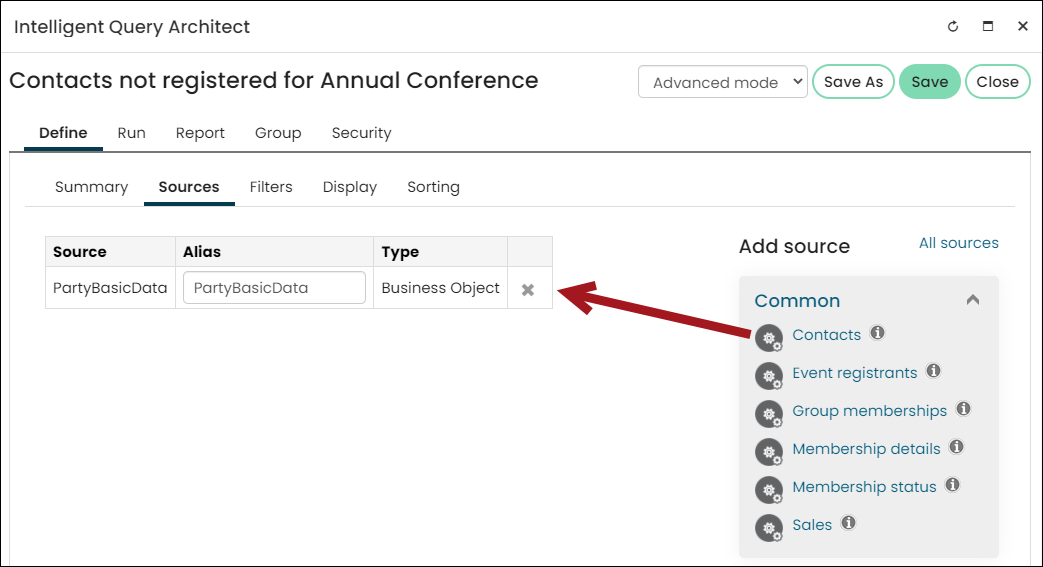
-
Select All sources.
-
Locate the query you created in the section above, then select the query to be used as a source.
-
Click OK.
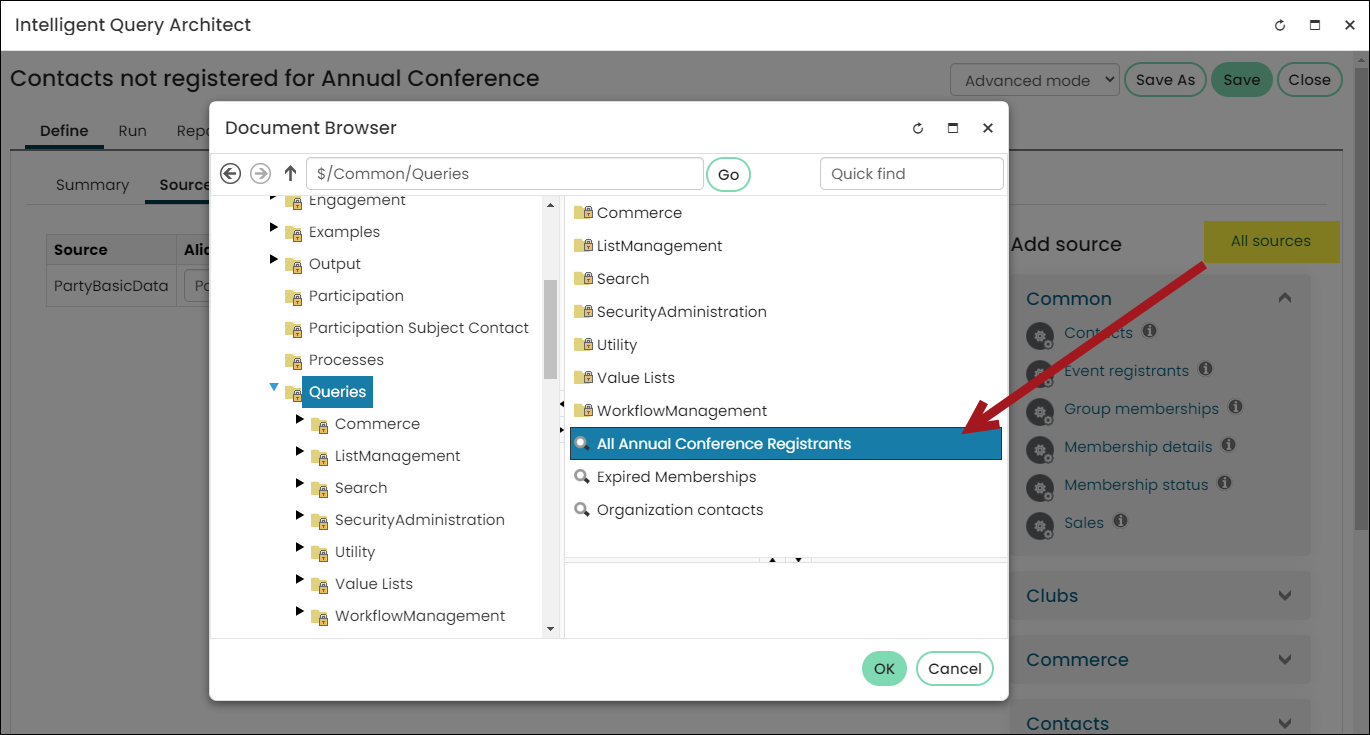
-
Define the following Relation: PartyBasicData.Party Id Not Exist EventRegistrationData.Registrant Party Id
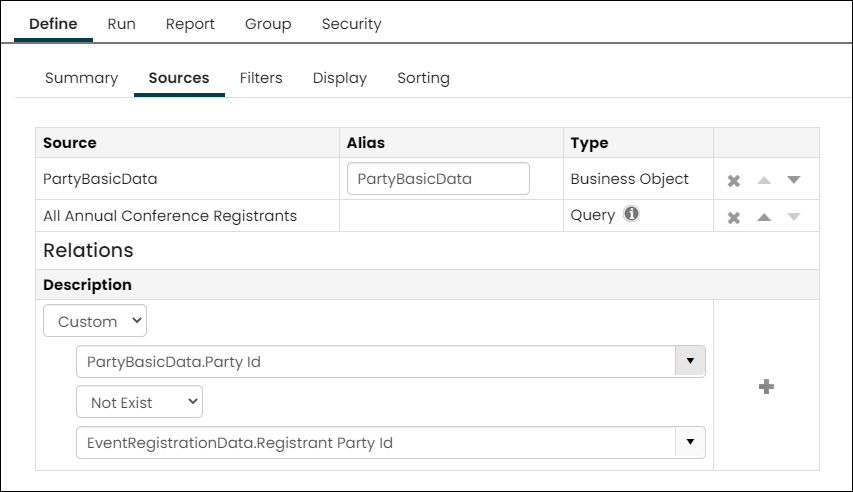
-
Click the + icon.
-
-
(Filters tab) Add the desired filters, such as excluding company records and only including active members.
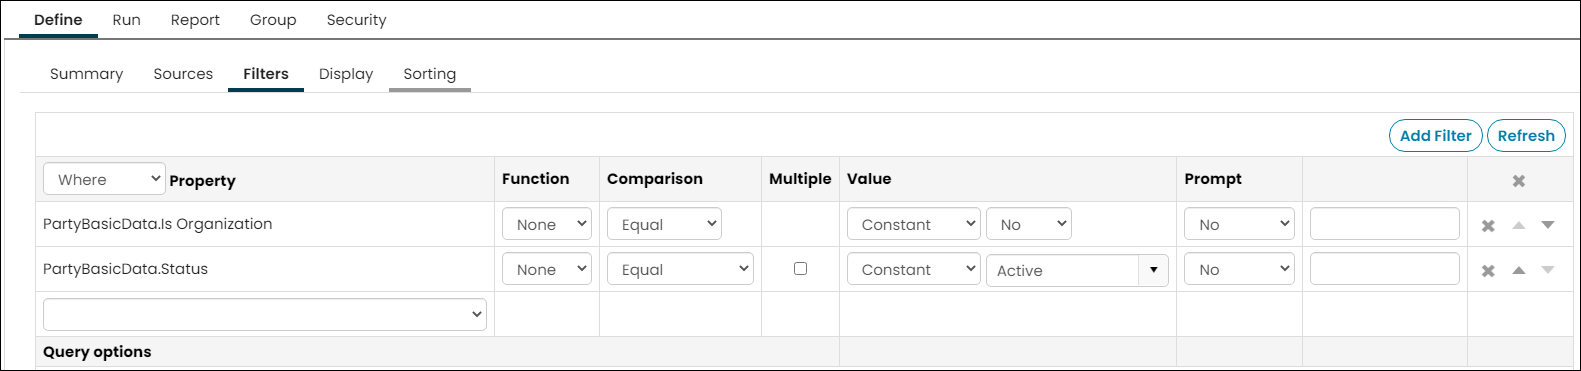
-
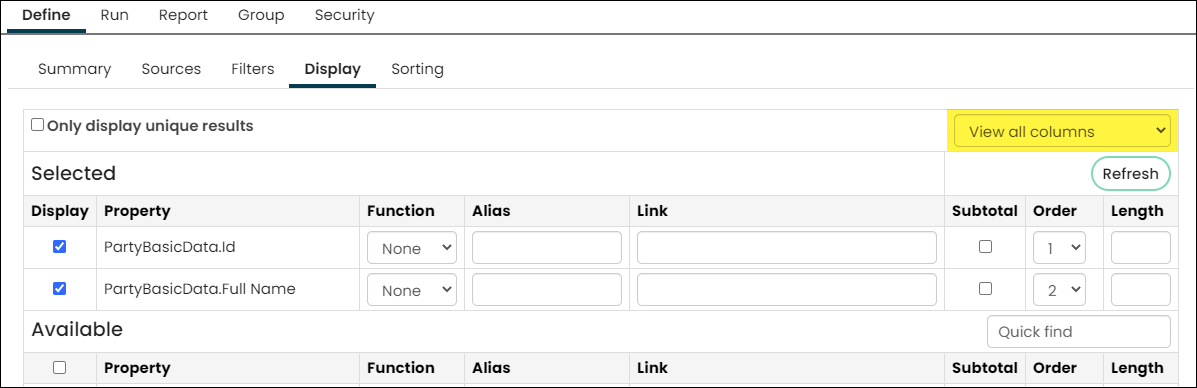
(Display tab) From the drop-down, select View all columns, then select the properties you want displayed in the query.
-
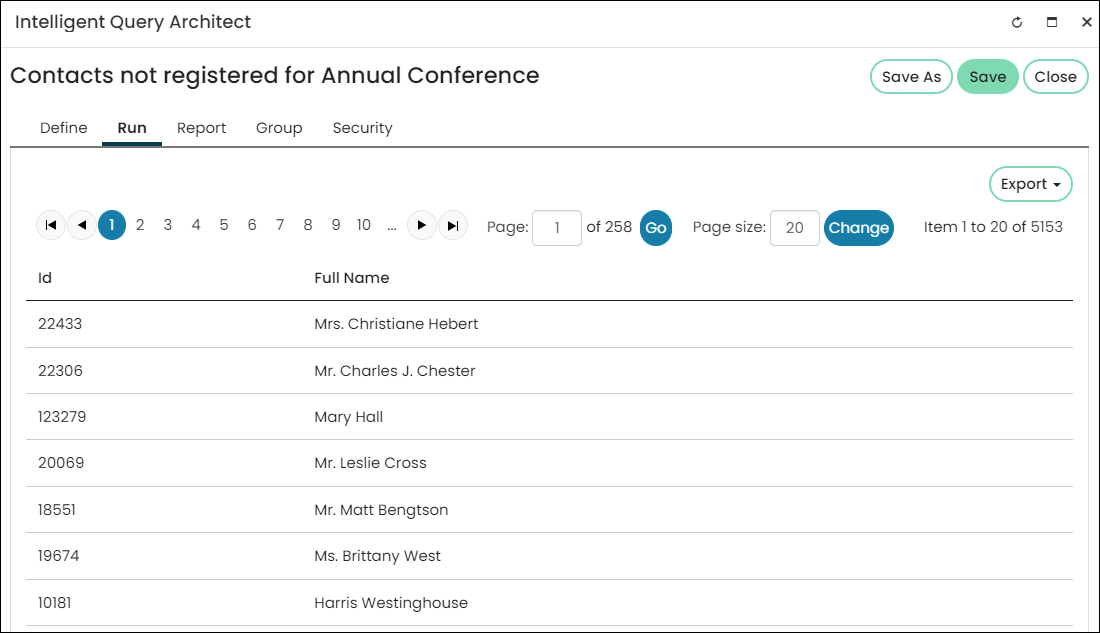
Click Run. The full list of contacts not registered for the selected event are returned.
Advanced
Adding a link to a query that takes you On behalf of a contact
In this example, we are going to create a query that enables you to click a link from a query that automatically takes you on behalf of an event registrant. Keep in mind that this feature is currently only compatible with event registrations.
Do the following to add a link for an On behalf of contact:
-
Go to RiSE > Intelligent Query Architect > New > Query.
-
Name the query.
-
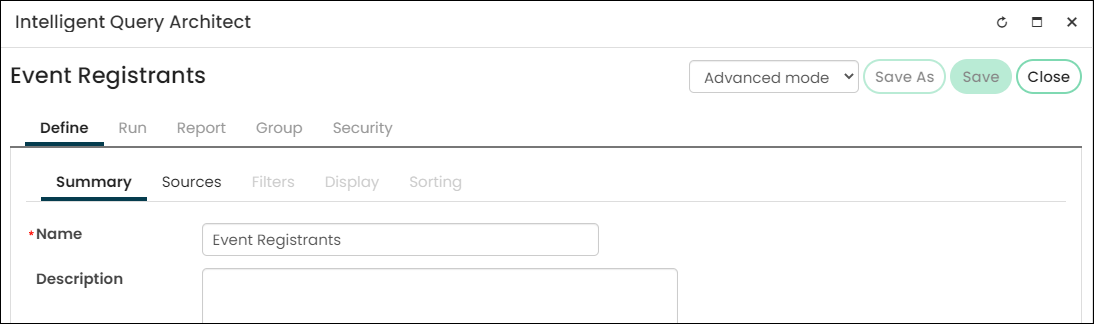
Make sure you are in Advanced mode.
-
(Sources tab) Select Add source, then select the EventRegistrationData business object.
Next, we want to add links to the query results that will let you register or view current registration someone On behalf of.
-
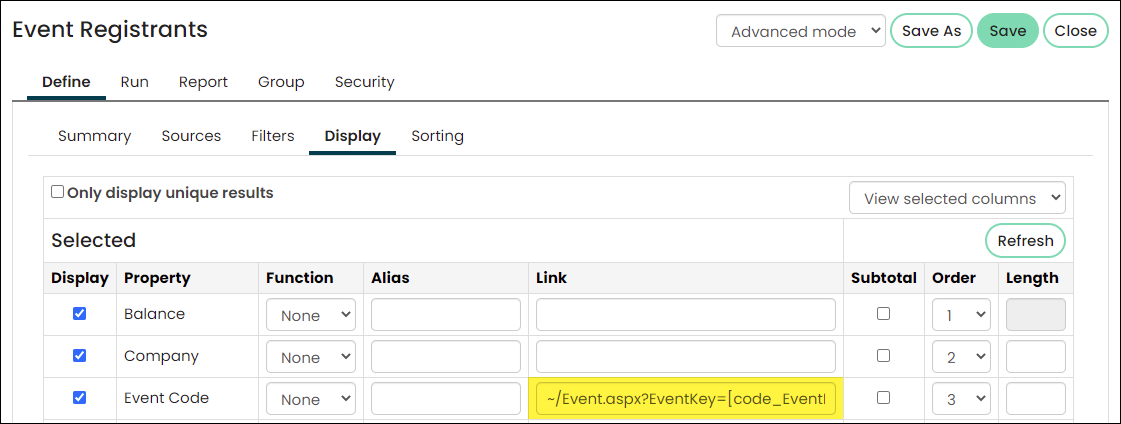
(Display tab) Populate the Link field with the following: ~/Event.aspx?EventKey=[code_EventKey]&ID=[code_ID]&EditRegistrationObo=true.
-
Click Save.
Building a multi-level query
Using IQA, you can build a query that displays summary information on one row with the ability to drill down and see more details. This example demonstrates how to build a query that displays a list of event registrations with a drop-down to see the registration options and program items for which users have registered.
-
From the Staff site, go to RiSE > Intelligent Query Architect > New > Query.
-
Name the query Registrations. Make sure you are in Advanced mode.
-
(Sources tab) Click Add Source.
-
Select EventRegistrationData and EventFunctionRegistrationData, then click OK.
-
Set up the relationship between the selected business objects:
- From the Relations drop-down, select Custom.
- From the drop-downs select EventRegistraionData.Event Id Equals EventFunctionRegistrationData.Event Id.
- Click the + button.
- Add another relation. From the Relations drop-down, select Custom.
- From the drop-downs select EventRegistraionData.Registrant Party Id Equals EventFunctionRegistrationData.Registrant Party Id.
- Click the plus (+) button.
This relates the business objects so that each function registration will be associated with the correct overall event and registrant.
-
(Display tab) Select the information you want to see in the query:
- From the View drop-down, select View all columns.
- Select the Display checkbox for the following properties:
- EventRegistrationData.Event Name
- EventRegistrationData.Registrant Full Name
- EventRegistrationData.Registration Date
- EventRegistrationData.Group Member Status
- EventFunctionRegistrationData.Function Name
- EventFunctionRegistrationData.Group Member Status
- EventFunctionRegistrationData.Quantity
- Re-order and alias the properties as appropriate.
-
(Sorting tab) Sort by the name of the event, then the name of the registrant. Then you will sort the functions. Display the registration option, then sort the program items by name. This will require four sorts total:
- From the Property drop-down, select EventRegistrationData.Event Name, with the Direction of Ascending. Click the plus (+) button.
- From the second Property drop-down, select EventRegistrationData.Registrant Full Name with the Direction of Ascending. Click the plus (+) button.
- From the third Property drop-down, select EventFunctionRegistrationData.Is Registration Option with the Direction of Descending. Click the plus (+) button.
- From the fourth Property drop-down, select EventFunctionRegistrationData.Function Name with the Direction of Ascending. Click the plus (+) button.
-
Save the query, then select the Run tab.
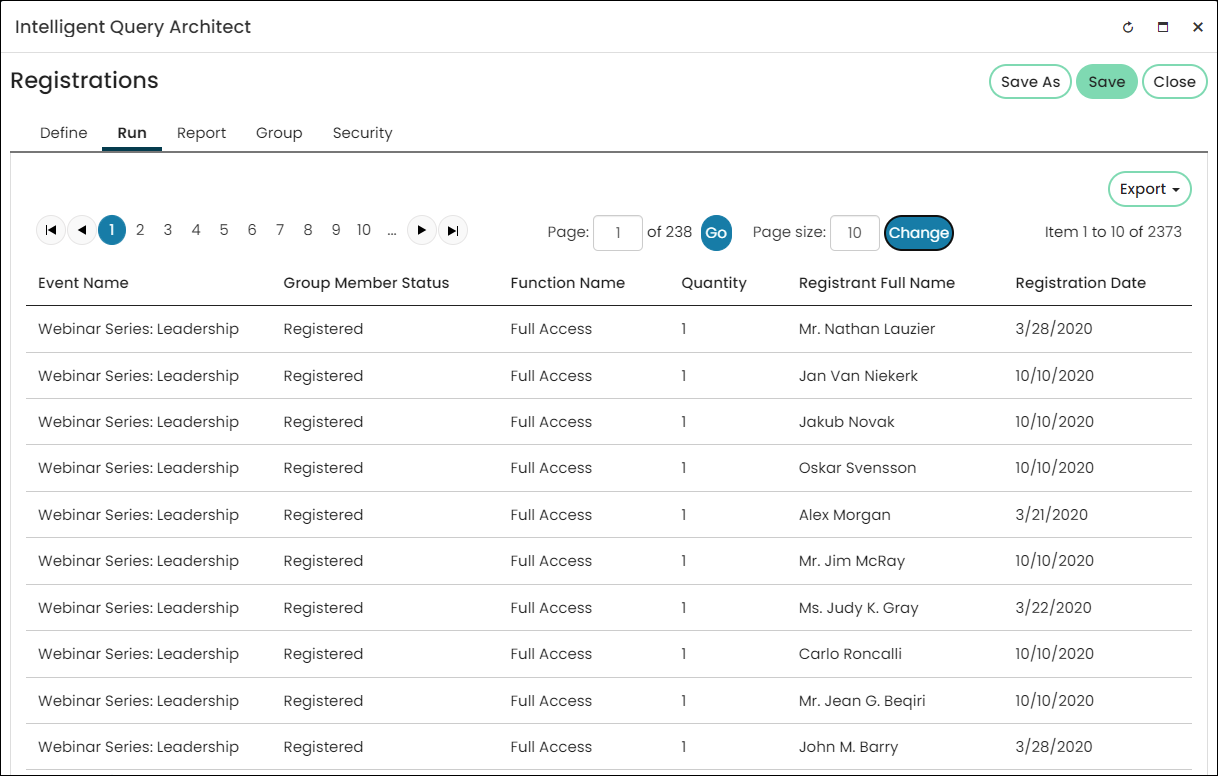
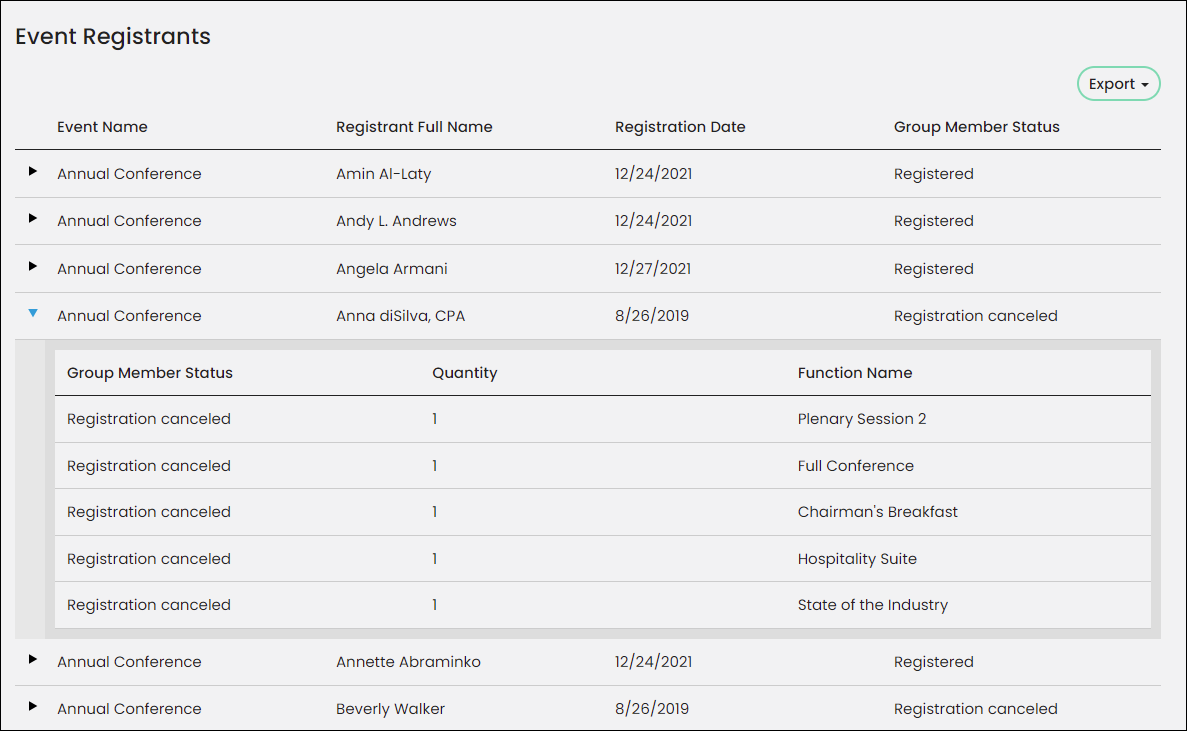
Notice that there is a row in the query per function registration, and the overall event registration data is repeated on each of these rows. Modify the query so that there is just one row per registration with a drop-down to see the selected registration options and program items.
-
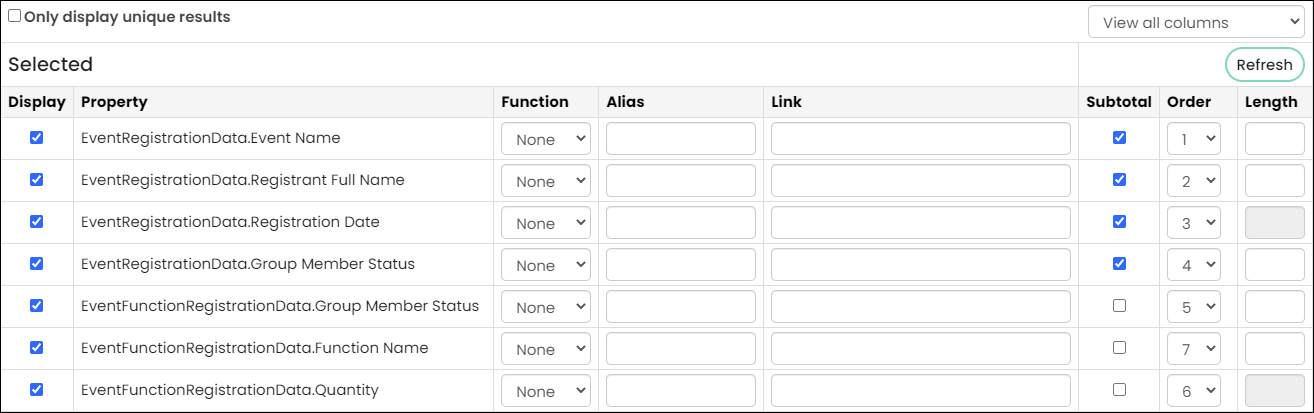
Select the Define tab, then select the Display tab.
-
Select the Subtotal checkbox for the following properties:
- EventRegistrationData.Event Name
- EventRegistrationData.Registrant Full Name
- EventRegistrationData.Registration Date
- EventRegistrationData.Group Member Status
-
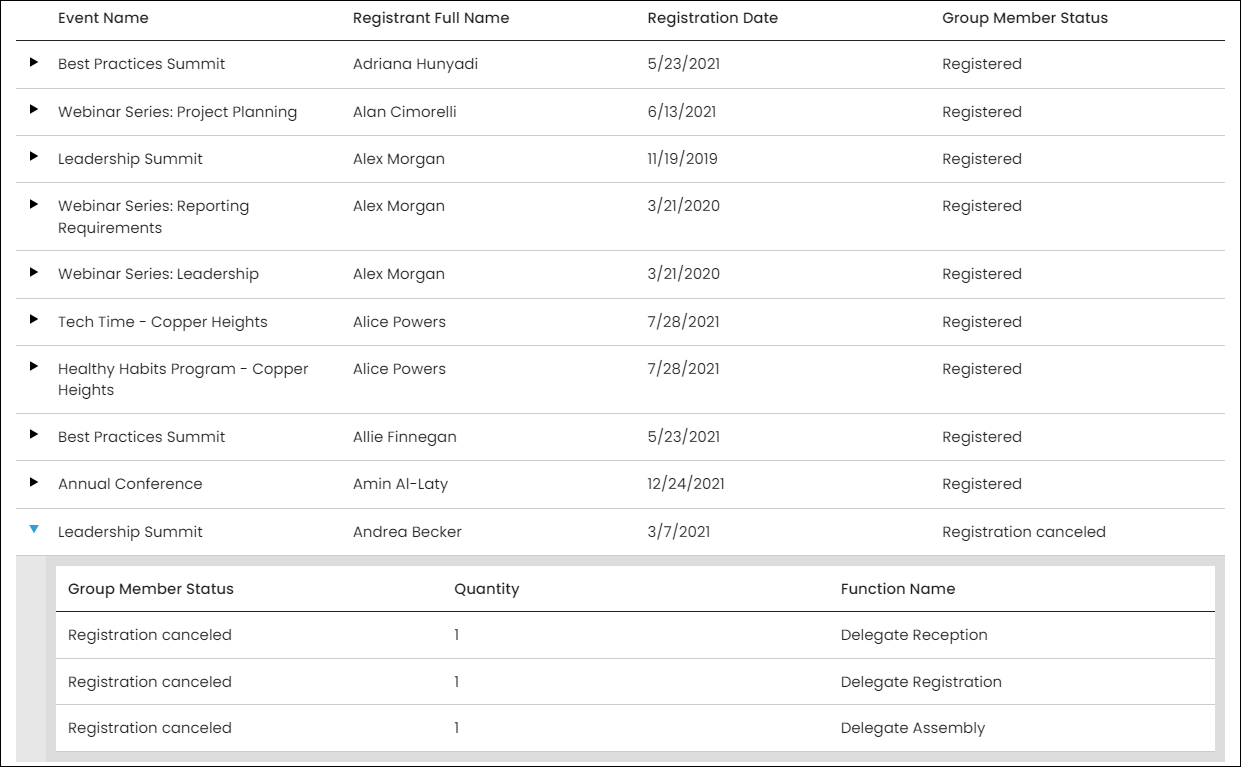
Select the Run tab. You should now see one row per order with a toggle button to the left of each row.
-
Select the toggle button to see the details of the order.
-
Save the query. You can use the Query Menu content item to display the query results on any page.
Building dynamically-filtered queries
The above query example can quickly become overwhelming after just a few registrations have been entered. In this example, we will look at a couple of different ways to dynamically filter the query results to only display needed information.
Displaying event registrations for a specific contact
For the first example, we will build a query that returns results of a contact's event registrations, and then display the results on the contact's page. First, we will need to filter the query to display only a selected contact's registrations:
-
Make a copy of the Registrations query from the example above.
- Open the query and click Save As.
- Name the new query Registrations for Contact.
- Click OK.
-
(Filters tab) We only want to view registrations for a single user at a time. To do this, we will need to add dynamic filters:
-
From the Property drop-down, select EventRegistrationData.Registrant Party Id.
-
From the Comparison drop-down, select Equal.
-
In the Value field, enter @SelectedUser.
-
From the Prompt drop-down, select No.
-
Click the + button.

-
-
Save the query, then click the Run tab. The only results that display are the registrations that you are registered for.
-
To use this query to display a contact's event registrations, go to the contact's account page, add the Query Menu content item, and select the Registrations for Contact query.
-
Save and Publish the page.
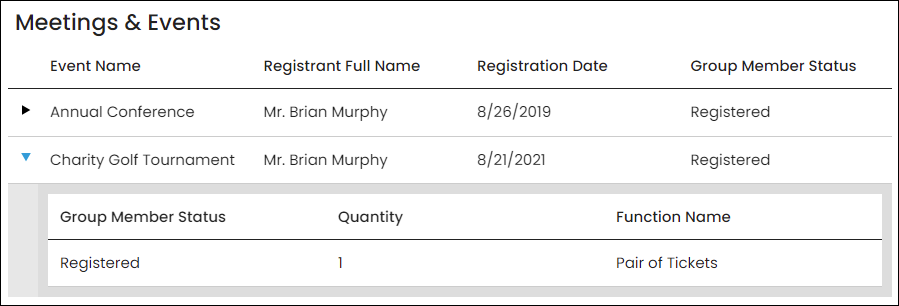
The query will display on the account page with only the selected contact's registrations displayed.
Using the "@url" filter
For this example, use the Registrations query to view all of the registrations for one specific event:
-
Open the Registrations query and click Save As.
-
Name the new query Registrations for Event, then click OK.
-
(Filters tab) Add a filter that will only show the event whose key is passed in the URL parameter:
- From the Property (Add a filter) drop-down, select .
- From the Comparison drop-down, select Equal.
- In the Value field, select URL params from the drop-down. You can then enter the URL parameter EventKey in the text field.
- Click the + button.
-
Save the query.
-
Add the query to the event dashboard:
-
Navigate to a specific-event dashboard and add a new Query Menu content item to the page.
-
Select the Registrations for Event query as the source.
-
Save and Publish the page.
-
A list of registrations for the event will now display on the page.
Updated about 2 months ago