

Managing duplicate contacts
With Contact Merge, when you discover two contacts are duplicates of each other, you can combine two records by choosing one contact record to retain, and another contact record to discard. All information with the retained record is preserved, and certain blank values are copied from the discarded duplicate record.
Getting started with Contact Merge
Review the following information before merging contacts:
What information is included in the merge?
General merge information
Some of the different types of record information that might be merged include the following information:
- Identity
- Missing data in the retained record is populated when the data exists for the duplicate record.
- Related data (for example, Physical Address, Phone, Email, or Fax for a specific address) in the retained record is updated only when corresponding related data exists in the duplicate record, and the data fields have not been populated in the retained record prior to the merge.
- Contact ID field values in all related items (for example, Orders, Invoices, Event Registrations, and Group Memberships) for the duplicate record are replaced with the contact ID of the retained record.
- Where both contacts have an engagement category assignment, the retained contact is set to the higher of the two category assignments.
- Engagement scores from a discarded contact are retained if both contacts have engagement scores. This results in two separate engagement scores, neither of which accurately reflects the merged contact. To fix this, you must run the Recalculate Historical Scores process.
- Financial
- All financial information, including order history, orders, billing parties, and shipping parties, are merged so that the retained record contains the combined history from both records.
-
User credentials (individuals only)
- When merged, any permissions that were attached to the Username of the discarded contact are given to the retained contact. The Username of the discarded contact is deleted, and that login will no longer work.
- If the retained contact does not have a user account, but the discarded contact does have a user account, then the discarded contact's Username will become the retained contact's Username after a merge.
- Sales History
- Any sales history that was associated with the discarded contact is merged with the retained contact.
📘 Note
If you run Recalculate Historical Scores, engagement scores will be recalculated for your entire database. This could affect performance.
📘 Note
Records that contain AutoPay data cannot be merged.
-
CalculatedEngagementScore table
- When both sets of scores exist, engagement scores are recalculated for the retained contact.
- If an engagement score exists only for the retained contact, no action is taken.
- If an engagement score exists only for the discarded contact, all CalculatedEngagementScore entries are updated to reflect the retained contact's ContactKey.
- EngagementCategoryContact table
- For data points where both contacts have a category assignment, the retained contact is set to the higher of the two.
- If a category assignment exists only for the discarded contact, that category assignment is copied to the retained contact.
- If a category assignment exists only for the retained contact, no action is taken. All EngagementCategoryContact entries for the discarded contact are then purged.
Contact Merge: Standard versus Plus
Standard
Contact Merge - Standard allows users to merge contacts from the profile pages of individual users. With Contact Merge - Standard, you must already know which contacts you want to merge.
Plus
Contact Merge - Plus locates all potential duplicate records and organizes them into pairs. You can manage these pairs to determine which records to retain, which records to merge into the retained records, and which records to mark as Not Duplicates. See Managing multiple duplicates for more information about Contact Merge - Plus.
Before you begin: Important items to consider
When merging contact records, you are provided with detailed information about the potential duplicates to help you determine whether the records belong to the same person. When reviewing potential duplicates, the following items are important to consider:
- In the Other Memberships field, groups to which contacts belong are displayed. This includes Membership and Subscription groups as well as Chapters, Committees, Event registration rosters, and Relationships, and all event functions for which a contact is registered .
- In the Custom Data field:
- For single instance data sources, you can expand and compare data line-by-line, and any missing data in the retained record is populated when the data exists for the duplicate record.
For multi-instance sources, you only see the count of how many instances exist for each contact, and the entire record for each instance from the duplicate record is preserved in the retained record after the merge.
- If you perform a contact merge before a batch containing an entered gift is posted, you will encounter an error. The party for the gift can no longer be found in the database. It is recommended that you review your open batches to ensure they do not contain any merged contacts. These contacts could cause a partial failure for those gifts with the missing contacts.
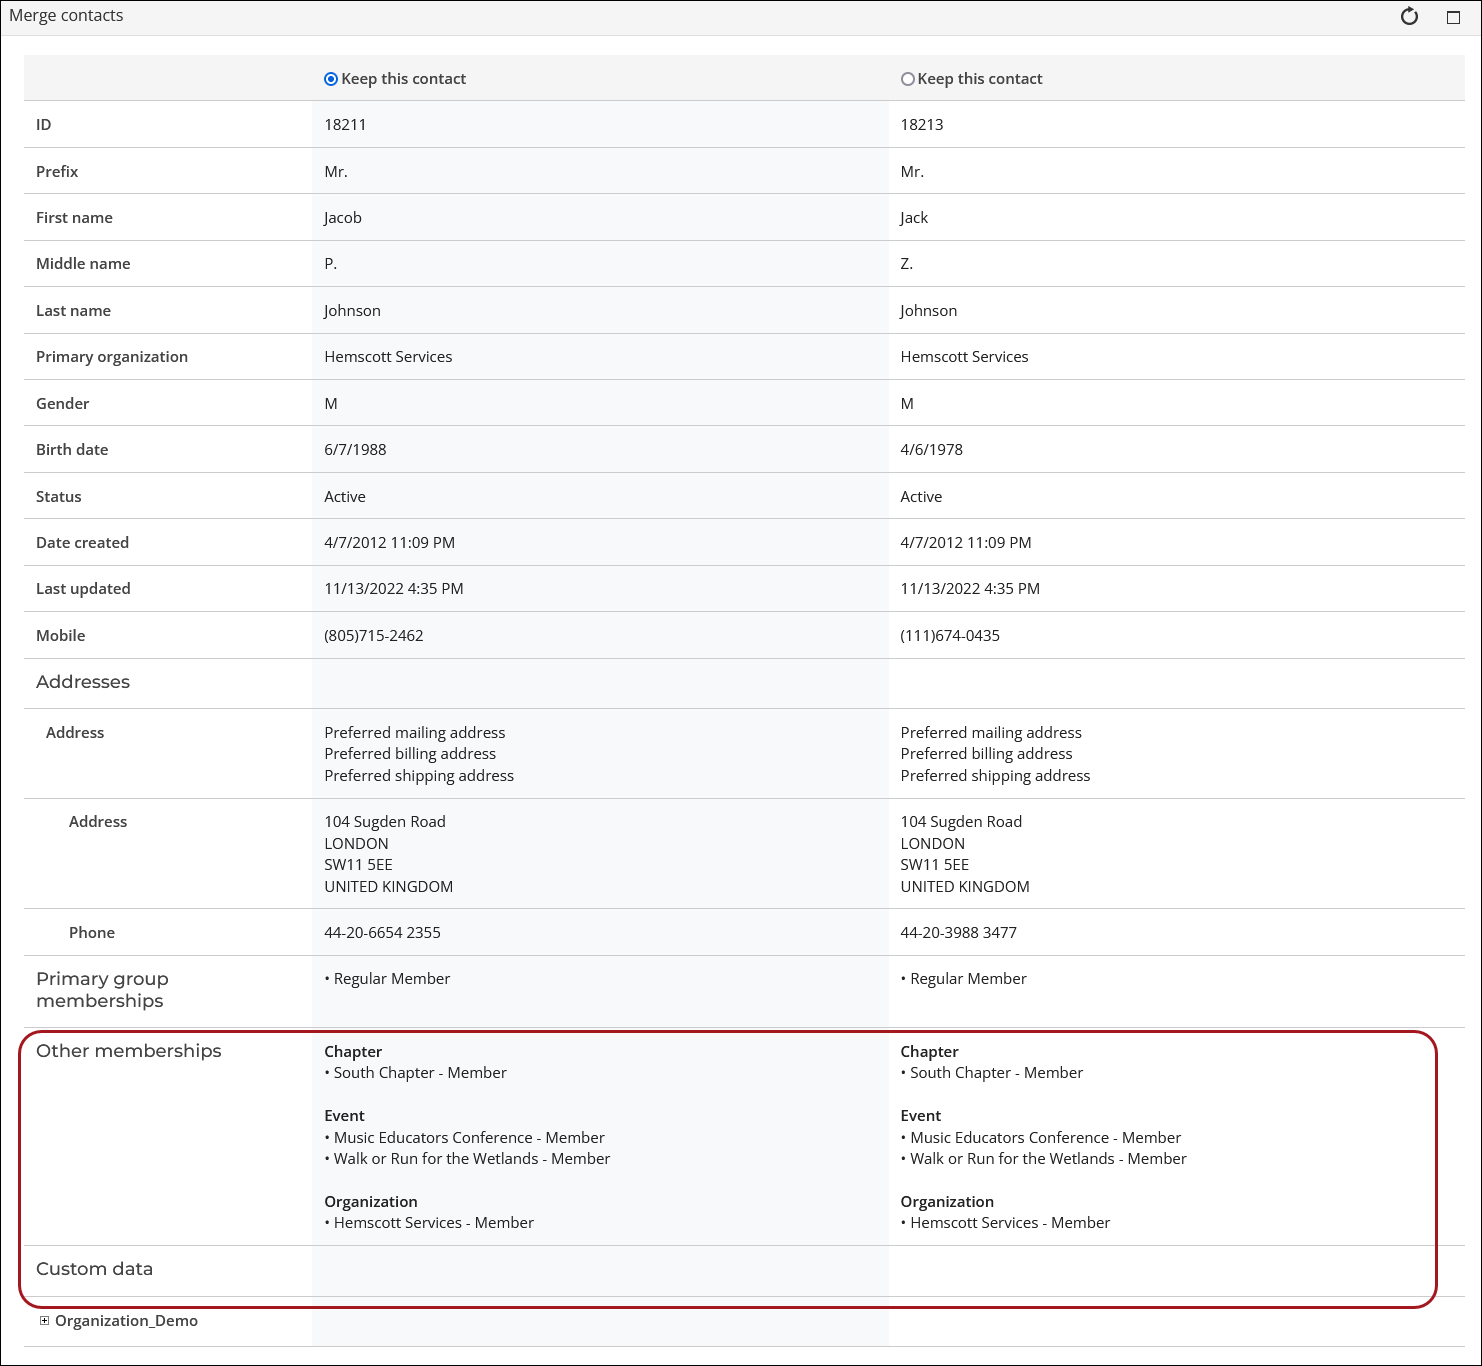
To ensure important data is not overwritten or otherwise lost, merges are prevented in the following scenarios:
- Events — If two people are registered for the same event, and neither person is cancelled, then their records will not be merged. Their records can be merged if one of the individuals cancels their registration.
-
Groups — If two contacts are active members in the same Membership or Subscription group:
- If group member records have overlapping dates, then:
- If the group requires payment for membership, these contacts will not be merged.
- If no payment is required for membership, then these contacts will be merged, and the membership is extended to the furthest date.
- If group member records do not have overlapping dates, then these contacts will be merged and the membership is extended to the furthest date.
- If group member records have overlapping dates, then:
- Roles - If both contacts are roster members for the same organization, with one contact being a Group Member Administrator for the organization, you must remove the Group Member Administrator role from the contact to discard before merging, or you must select the Group Member Administrator as the contact to keep. If necessary, you can add the Group Member Administrator role back to the merged contact record.
Adding the resolve duplicates action to custom account pages
New content added to the out-of-the-box account pages is not automatically added to custom account pages. If your custom account pages do not include the Resolve duplicates action, you may need to update the Actions content item to include the out-of-the-box configuration.
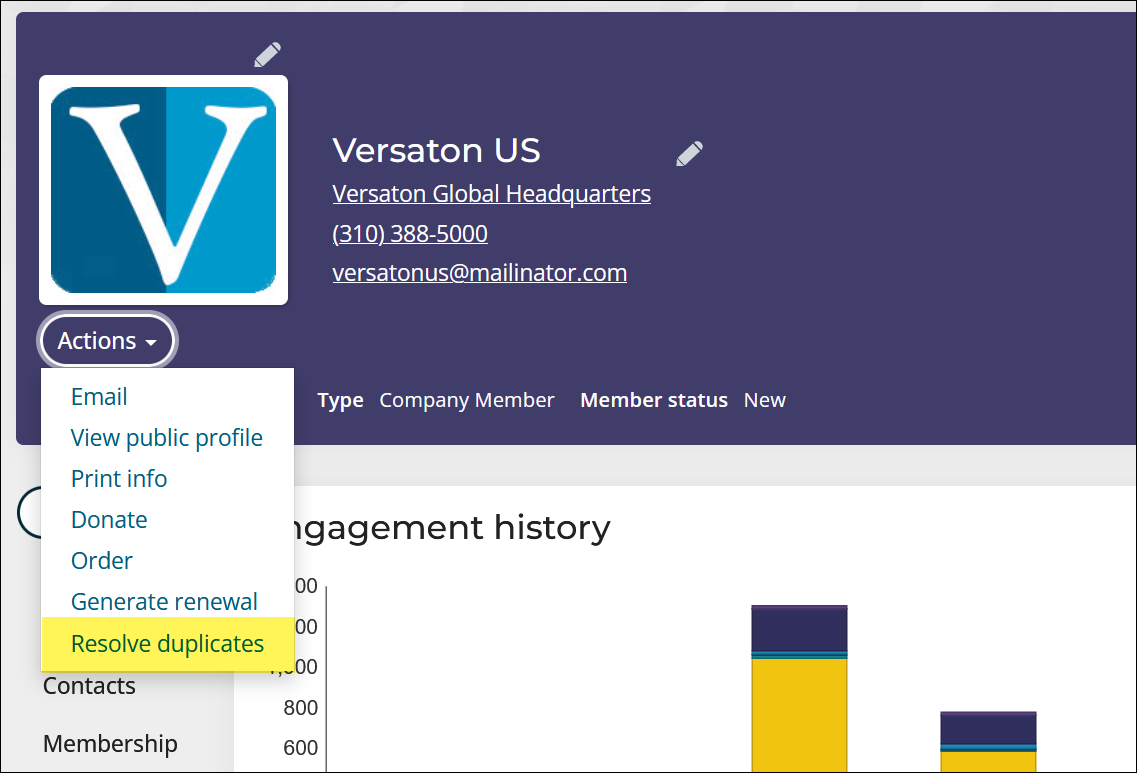
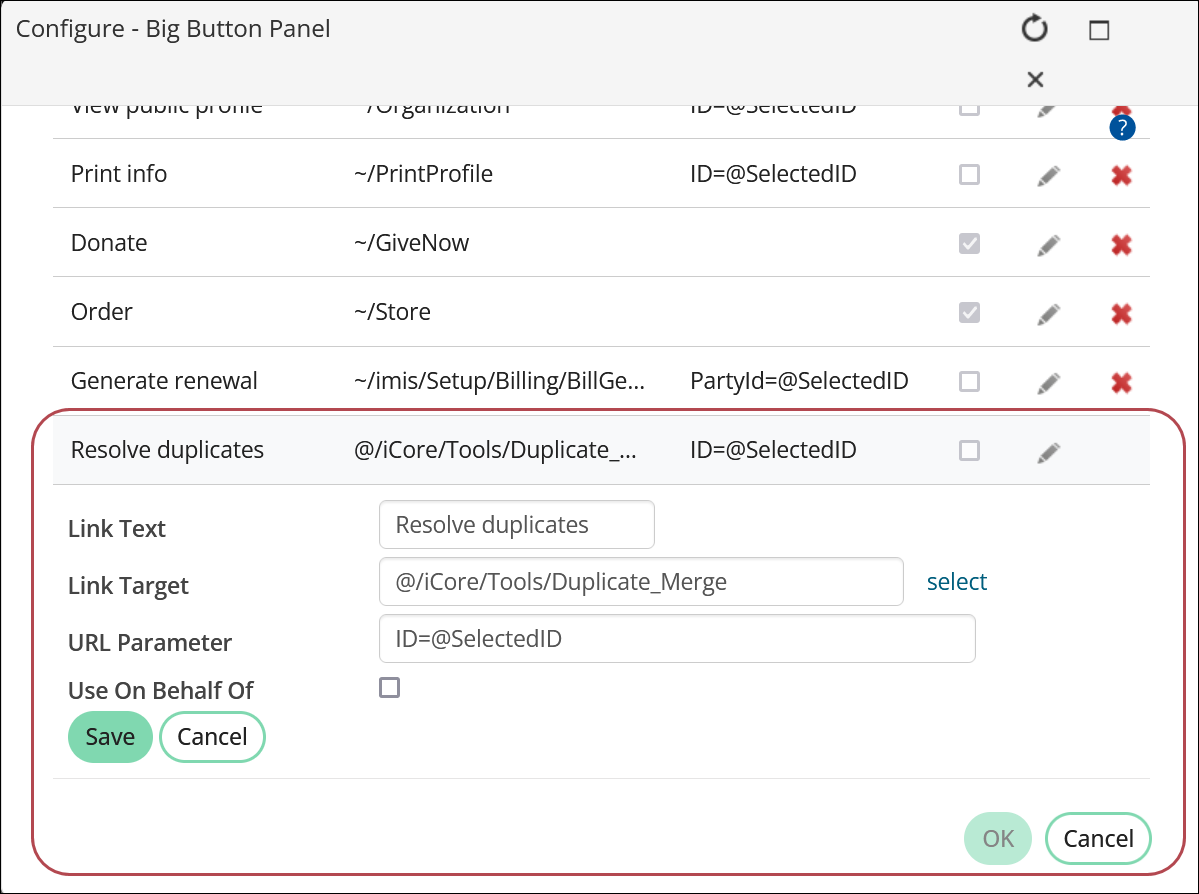
To add the Resolve duplicates option, open the custom account page for edit and Configure the Actions (Big Button Panel) content item to include the following action:
- Link Text – Resolve duplicates
- Link Target – @/iCore/Tools/Duplicate_Merge
- URL Parameter – ID=@SelectedID
- Use On Behalf Of – Disabled
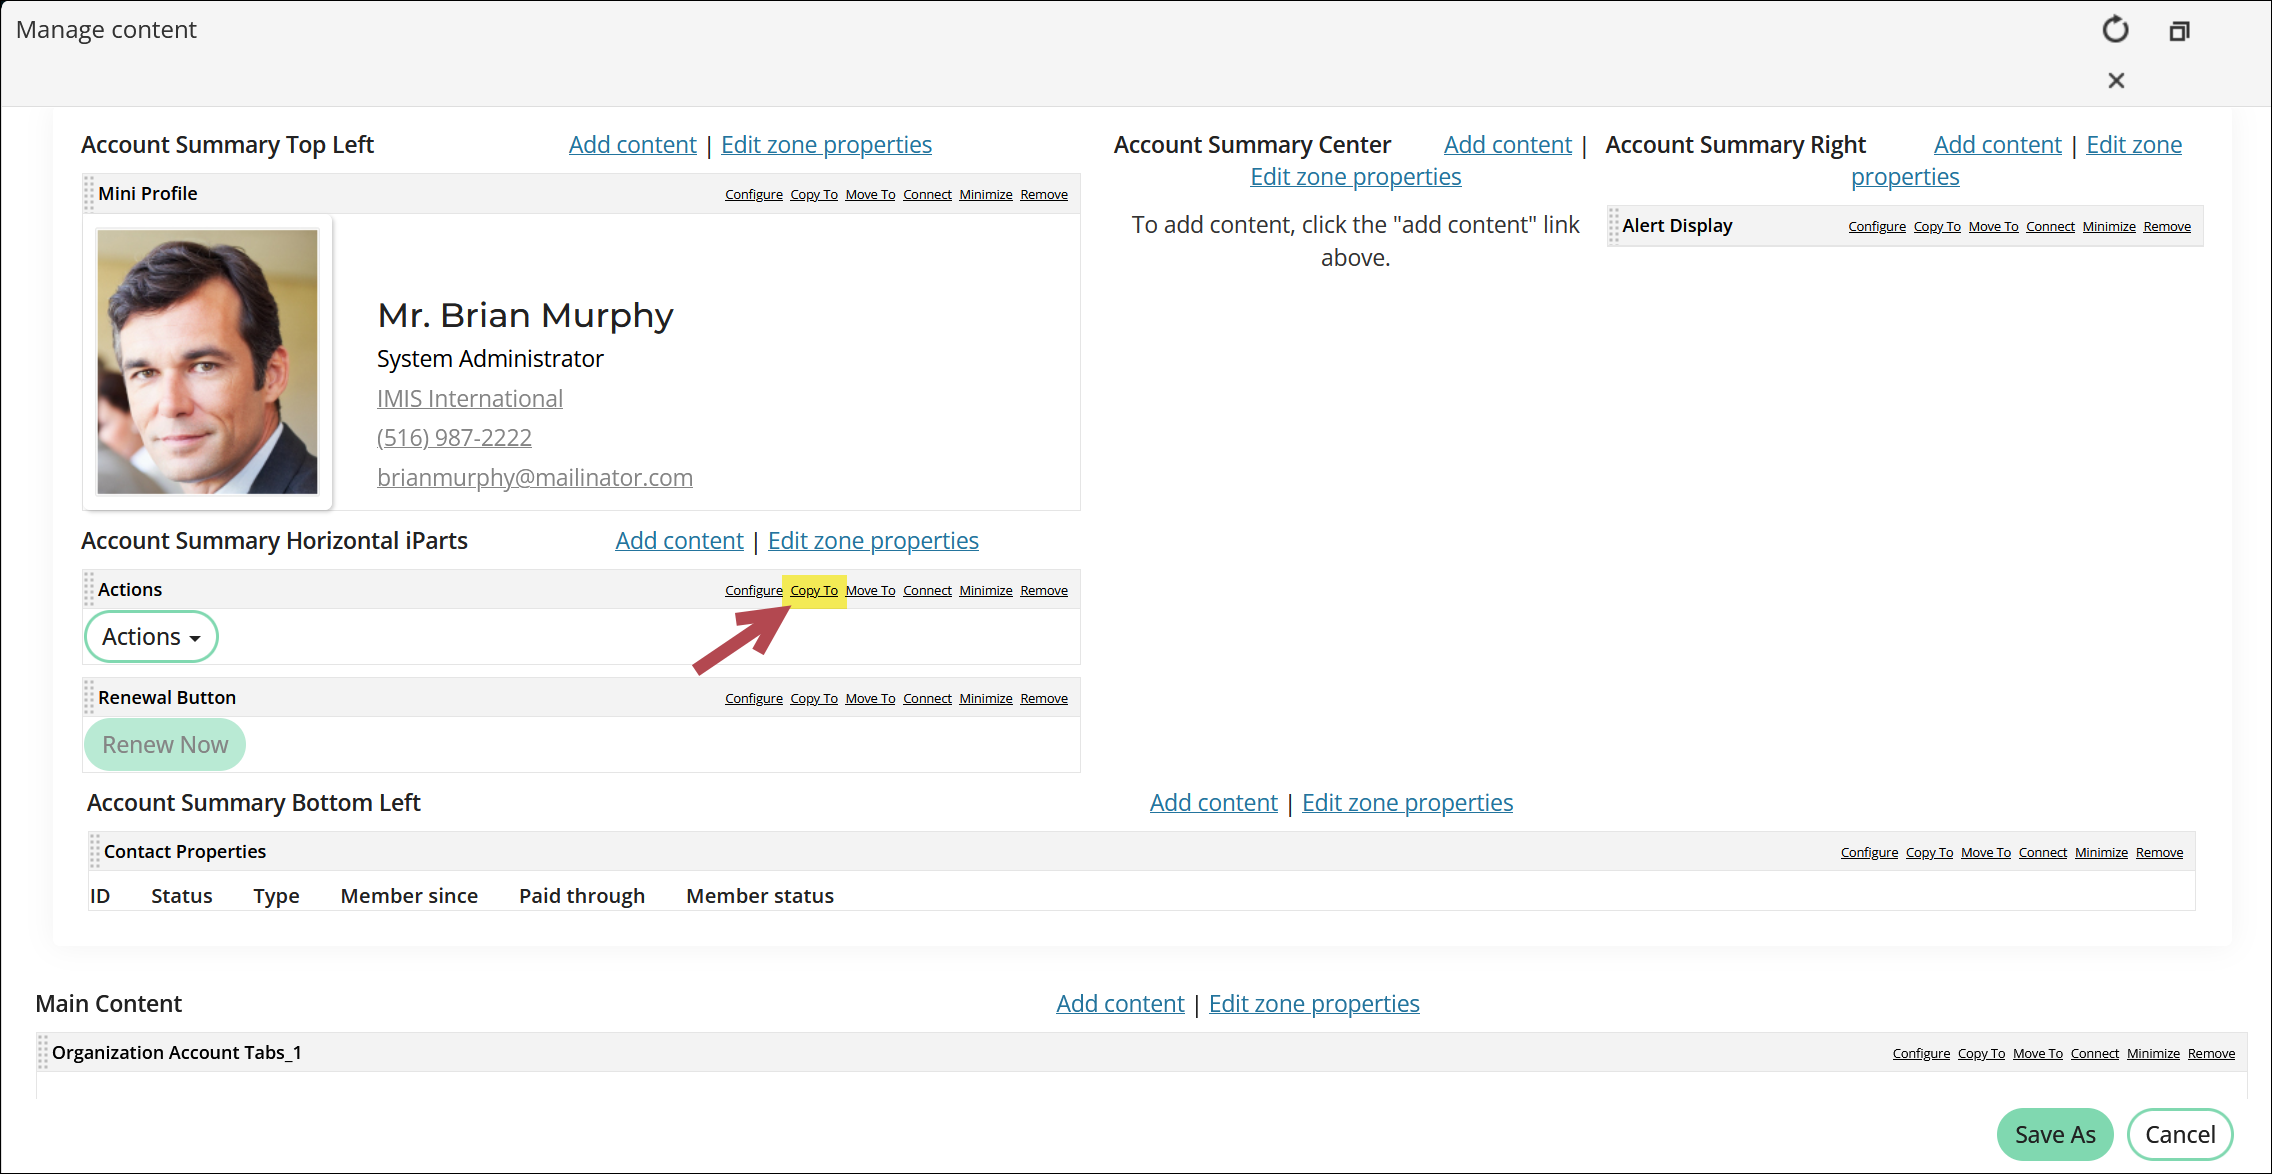
Alternatively, if you do not have an Actions button on your account pages, do the following to copy the out-of-the-box Actions content item:
- Go to RiSE > Page Builder > Manage content.
- Open to the out-of-the-box account page content records:
- Individuals: @/iCore/Contacts/ContactLayouts/ Account_Page_Staff
- Organizations: @/iCore/Contacts/OrganizationLayouts/Account_Staff
- Find the Actions content item, then click Copy To.
- From the Document Browser, navigate to the custom account page you want to move the content to.
- Click OK, then close the content record.
- Navigate to the individual or organization account page you moved the content to, then open it for edit.
- Move the copied Actions content item to the desired location.
- Click Save & Publish.
For more information, see Adding out-of-the-box content to custom account pages.
Tips for deterring duplicate account creation
If you are experiencing a problem with existing members or users (who already have usernames or accounts) creating new accounts instead of signing in with their existing accounts, the following tips might help cut down on the number of duplicate accounts being created:
- Consider adding user instructions on your Event Showcase regarding signing in versus creating a new account. Add a Content Html content item just above or just below the existing Contact Sign In content item. Emphasize that existing members should sign in with their account or use the Forgot my password or Forgot my username links, rather than creating a new account. You can even provide readily-accessible contact information or links so that users can receive assistance from staff if they are still having trouble signing in with their existing account.
- You could add notes inside your event description area. For example, add a note explaining that users must sign in first, and to use their existing account.
- You could configure the existing Contact Sign In content item on that page, and change the text for the Create account link text, for example, you could enter Create a new account only if you do not have an existing account.
- You could add another warning or set of instructions at the top of the Create Account page with the Content Html content item. Emphasize that it is very important that users log in with their existing account, rather than creating a new account. Using the Content Html content item, you can put your note in bold, use a color, and so forth.
📘 Note
If you are using the default Event page, you will need to make a copy of it in order to add the Content Html content item, and then edit your EventDetail shortcut to point to your new copy of the page.
📘 Note
If you are using the default Event page, you will need to make a copy of it in order to add the Content Html content item, and then edit your EventDetail shortcut to point to your new copy of the page.
📘 Note
If you are using the default Event page, you will need to make a copy of it in order to add the Content Html content item, and then edit your EventDetail shortcut to point to your new copy of the page.
Adding one or more of these things to your site should help to mitigate the risk of duplicate account creation.
Merging contacts
Merging individual contacts
To merge contacts directly from a profile page, do the following:
- Go to the account page of an individual contact.
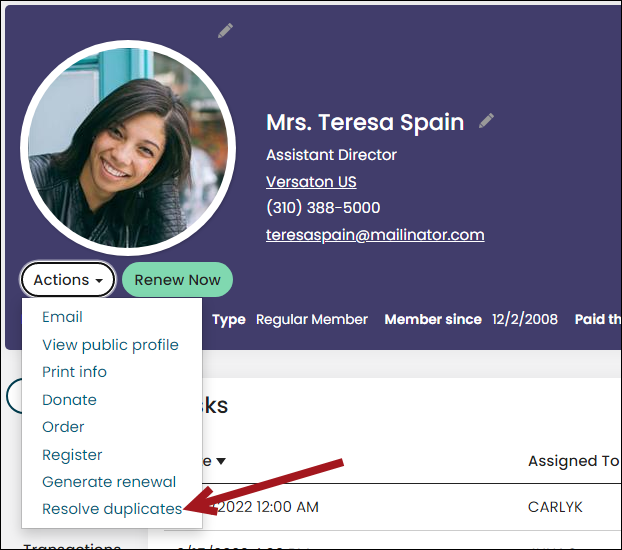
- Under the profile picture, click Actions, then select Resolve duplicates.
- Click Select a contact to merge to open a Merge contact window that allows you to select a record which you suspect might be a duplicate.
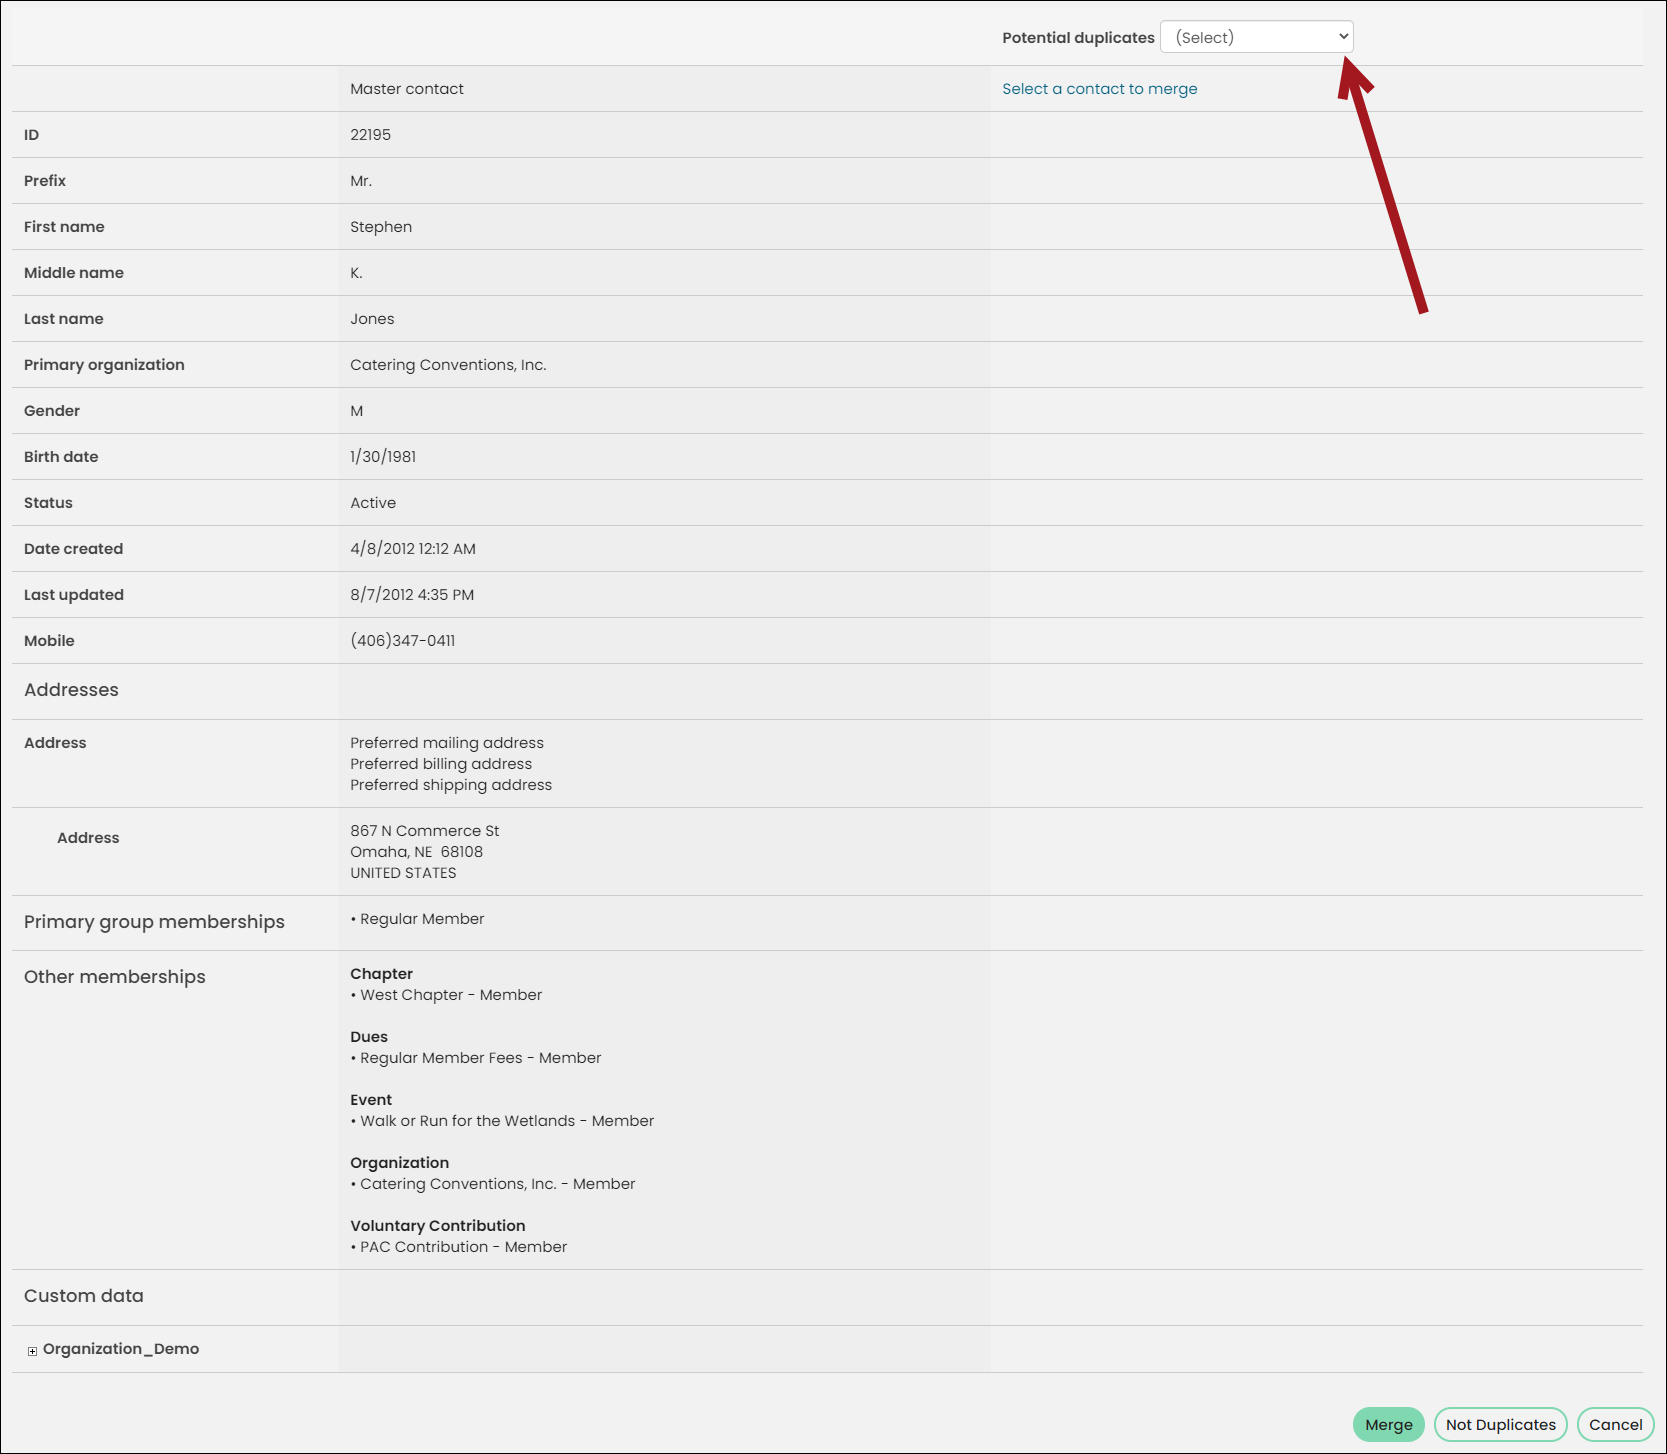
- (optional) If you are licensed for Contact Merge - Plus, select a contact from the Potential duplicates drop-down. The drop-down will not appear if you are not licensed, or if the Duplicate Search task did not find any potential duplicates:
- From the drop-down, you can select a new contact to load into the second column.
- The contacts in the drop-down will always be potential duplicates of the contact in the first column.
- Search for someone with the same name. If there is a duplicate contact, select that contact. The column for the duplicate contact will be populated with the duplicate contact’s information.
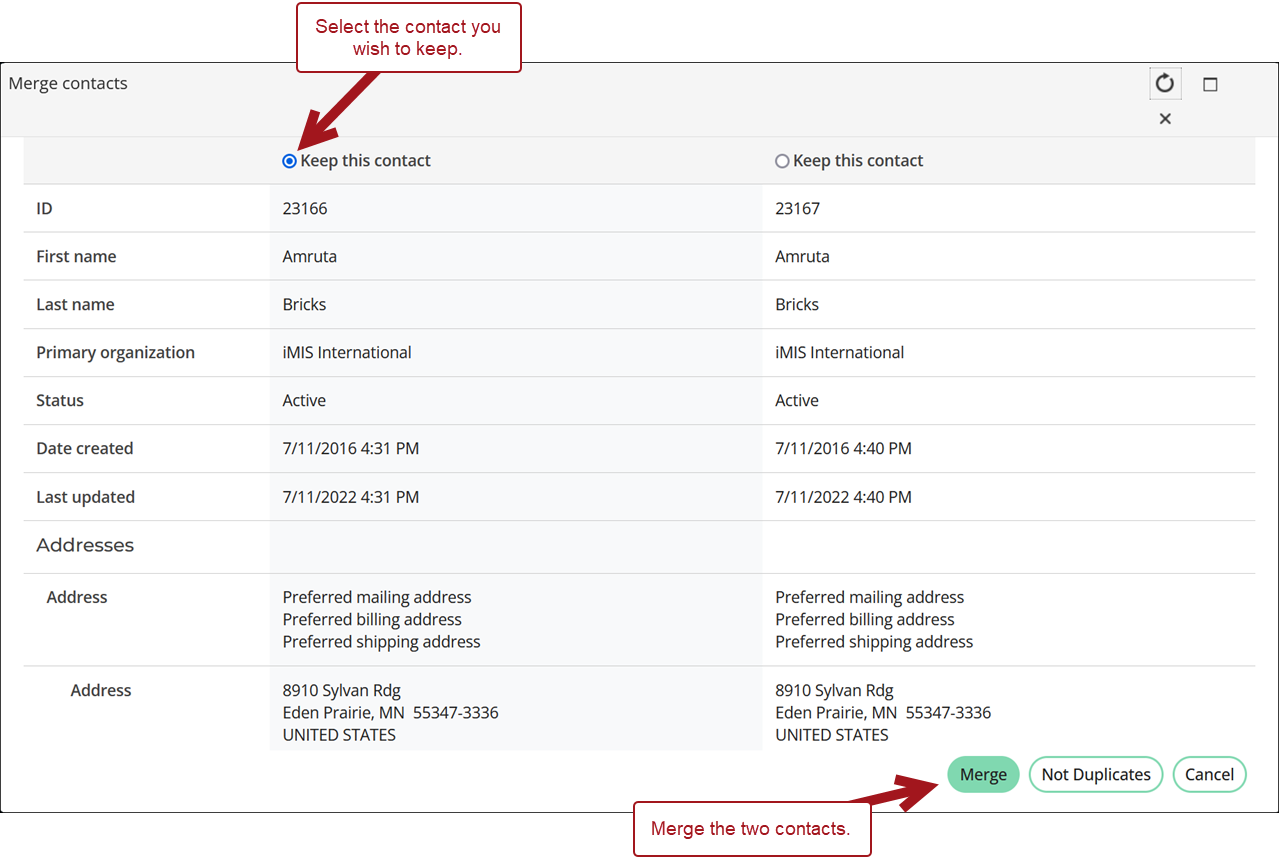
- Select the Keep this contact radio button for the contact you want to retain. The information from the contact you are not keeping will be merged. If there is an empty field in the kept record, information from the other contact is used to fill the field.
- After you have reviewed the contacts' detailed information, click Merge. The ID number of the contact that was deleted is recorded. The change log also records data changes for any field for which changes are normally tracked.
- While reviewing the contact information, if you decide that the contacts should not be merged and are not duplicates of each other, click Not Duplicates.
- A confirmation message displays once the merge is initiated. Select Merge logs to review the status of the merge and the properties that changed. For more information, see Reviewing the duplicate merge logs.
The Resolve Duplicates window is displayed. The Master contact column displays pre-populated information for the contact.
The queries you can access through this window are stored in the $/ContactManagement/DefaultSystem/Queries/Contacts folder. These queries can be modified by an Administrator if necessary. However, these queries are the same queries used by the On behalf of tool. Any modifications made to the queries for a merge will also be reflected in On behalf of.
📘 Note
After a contact’s record has been merged, a user might see errors when attempting to log in with the merged user credentials. This problem is due to temporary caching. These errors will pass after a short timeframe, typically between five and ten minutes.

Managing multiple duplicatesPLUS
📘 Note
This is a licensed feature. For more information, contact your AiSP or ASI Technical Support.
iMIS Contact Merge - Plus locates all potential duplicate records and organizes them into duplicate pairs. You can manage these pairs to determine which records to retain, which records to merge into the retained records, and which records to mark as Not Duplicates.
System Administrators can manage all potential duplicate contacts from a single interface. System Administrators can also enable a task that searches the database for potential duplicates on a specific date and time.
All records identified as potential duplicates are paired together and displayed in the Manage Duplicates tab. An alert appears on the profile pages of the potential duplicate contacts. This alert is only visible to staff users. To learn more about automated alerts, please see Creating and using alerts.
Searching for duplicate contacts
From the Manage duplicates settings, schedule or run a task that searches for potential duplicates. The task identifies contacts as potential duplicates if the following are true:
- The first four characters of their last names are the same
- The first characters of their first names are the same
- The zip codes of their primary addresses are the same
📘 Note
Currently, this formula cannot be modified.
Do the following to search for duplicate contacts:
- Go to Community > Manage duplicates.
- Click the Settings tab.
- (optional) Click Find Duplicates Now to immediately search for potential duplicate contacts. Depending on how large your database is, this could take several minutes. You can navigate around your site while the task runs.
- To automatically search for potential duplicates at a later time, select Run task on a scheduled basis.
- From the Frequency drop-down, select how often you want your database to be searched for potential duplicate contacts.
- Schedule - Select how often and at what time you want the task to run.
- Start - Select the date and time you want to begin running daily searches.
- End - Select the date you would like the daily searches to stop.
- Schedule - Select how often and at what time you want the task to run.
- Day of week - Select the days of the week you want the task to run.
- Start - Select the date and time you want to begin running weekly searches.
- End - Select the date and time you would like the weekly searches to stop.
- Schedule - Select how often you want the task to run.
- Day of month - Select the days of the month you want the task to run.
- Start - Select the date and time you want the task to start running.
- End - Select the date and time you want the task to stop running.
- Click Save.
- Once the task is completed, all records identified as potential duplicates are paired together and displayed in the Manage Duplicates tab.
📘 Note
Dates and times are based on the system Time zone setting.
One time
Select a Start date and time.
Daily
Weekly
Monthly
Any time you create and save a new scheduled task, the previous task is overridden and will no longer run.
📘 Note
Depending on how large of a database you have, the task could take several minutes to run. It is suggested you run the scheduled task at a time your system is not being heavily used. For example, on weekends or overnight.
Managing duplicates
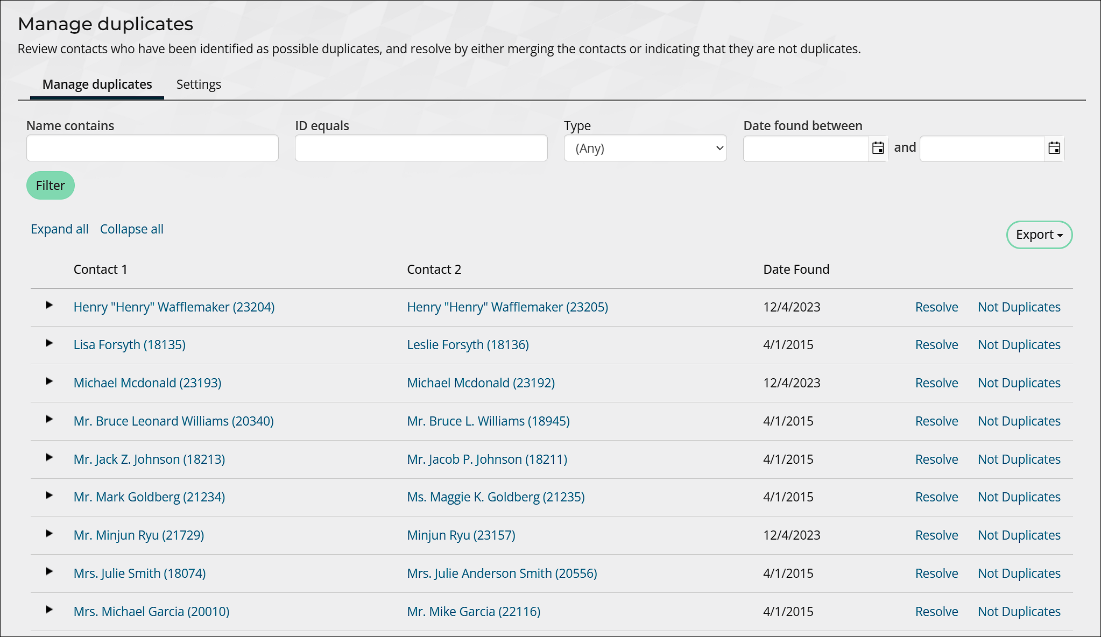
From the Manage duplicates tab, review contacts who have been identified as possible duplicates, and resolve by either merging the contacts or indicating that they are not duplicates.
- Go to Community > Manage duplicates.
- From the Manage Duplicates tab, search for potential duplicates or scroll through the list.
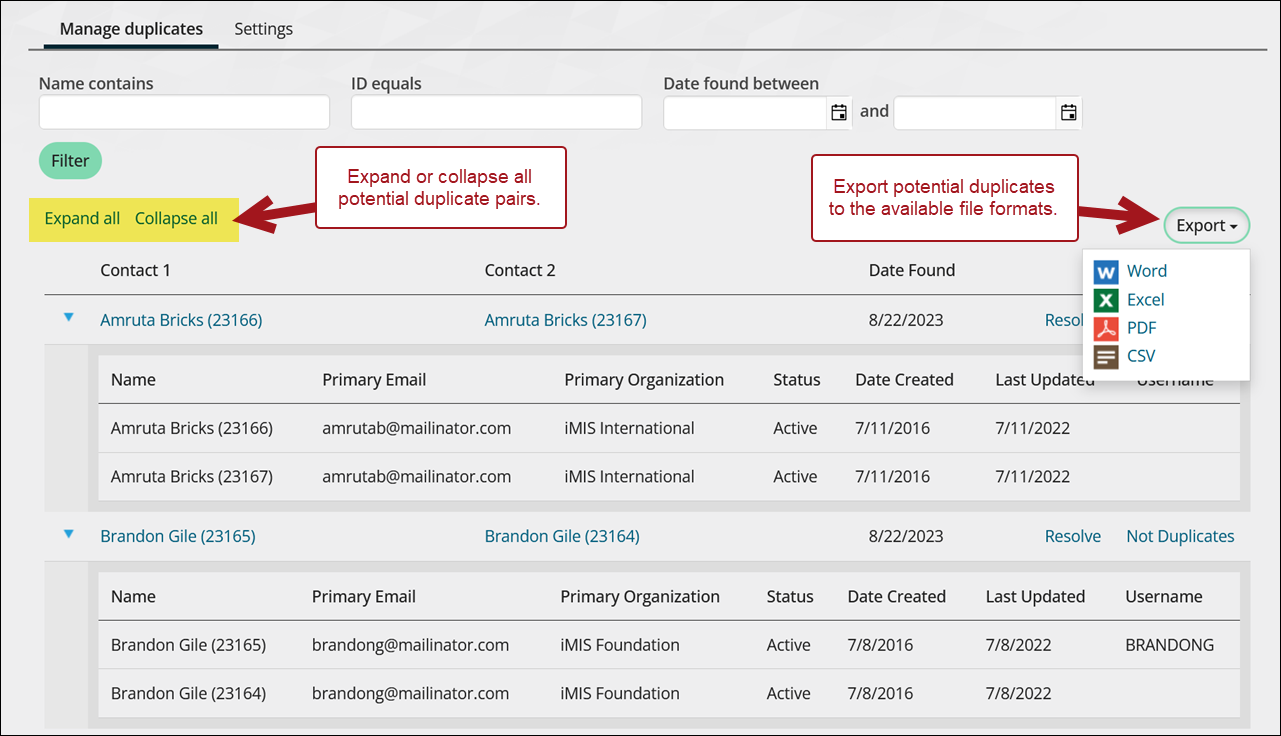
- Contact 1 - The potential duplicate of Contact 2. Select the contacts name to view more profile information.
- Contact 2 - The potential duplicate of Contact 1. Select the contacts name to view more profile information.
- Date Found - The date the potential duplicate was found.
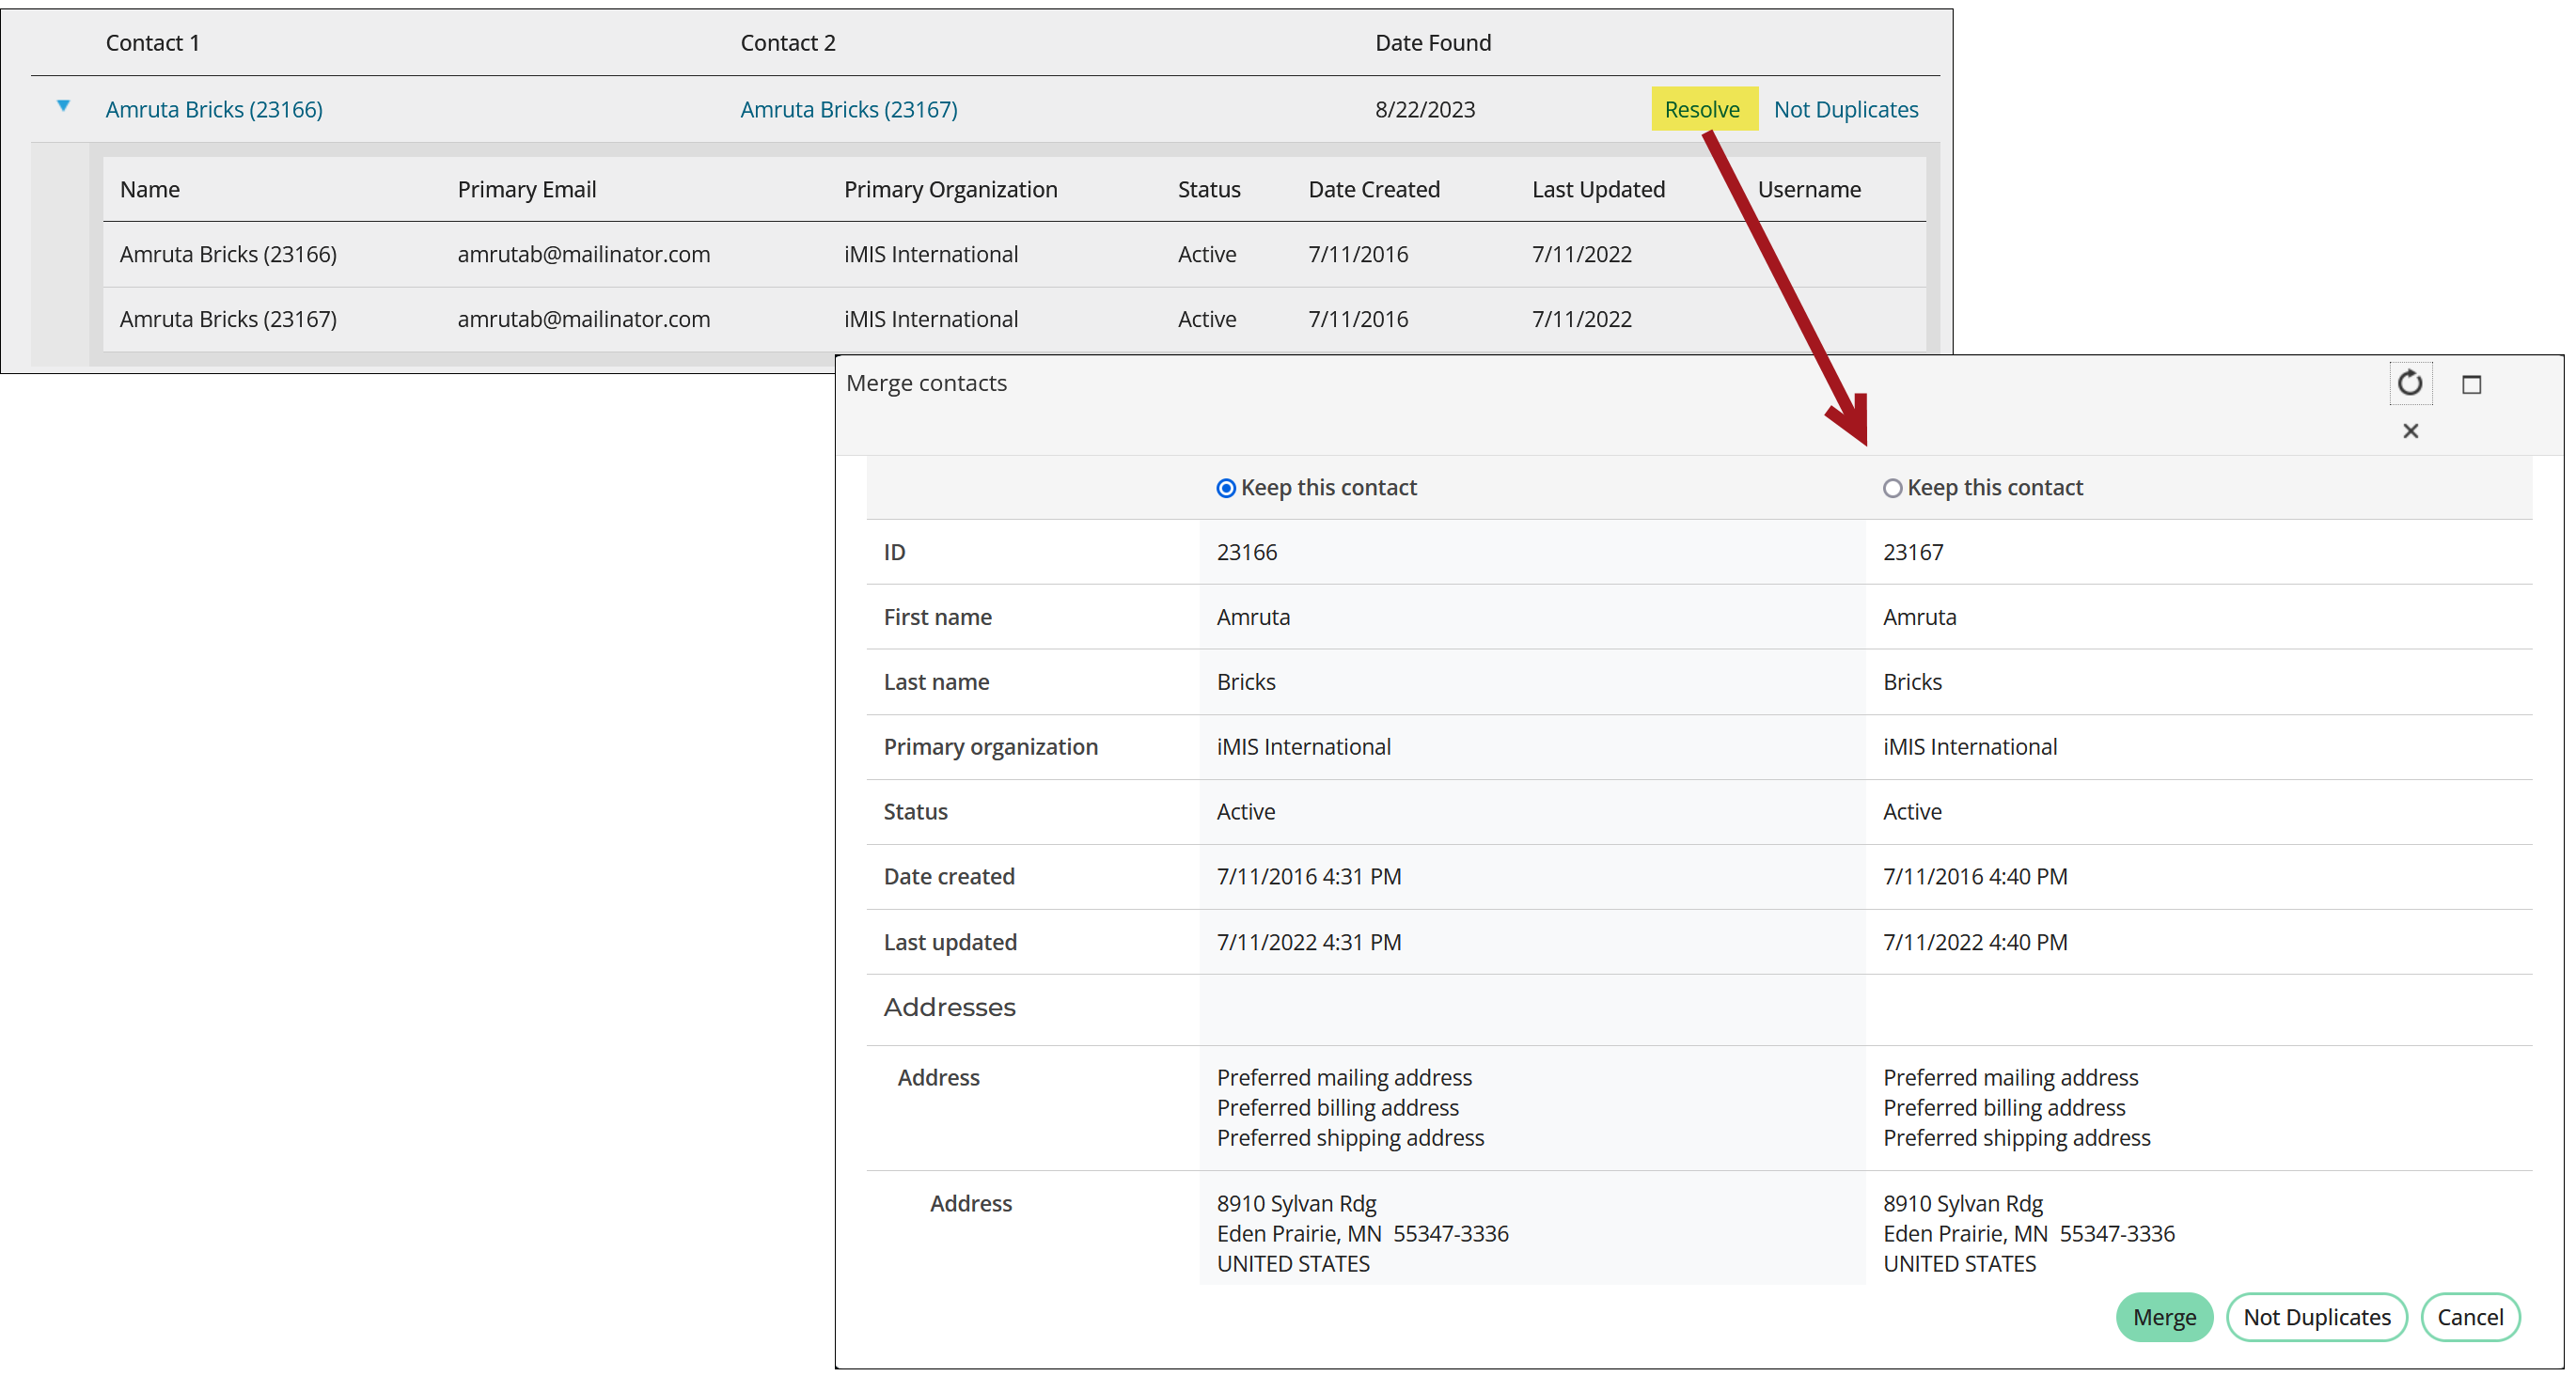
- Select the arrow to expand the potential duplicate pair.
- Name
- Primary Email
- Primary Organization
- Status
- Date Created
- Last Updated
- Username
- If the two contacts are determined not to be duplicates, select Not Duplicates. This permanently marks them as not duplicates of each other.
- Select Resolve to open the Merge Contacts window. From here you can view detailed information about the pair to help you determine if you should merge the contacts, or mark them as Not Duplicates.
- After reviewing the contacts' detailed information, if you decide the contacts are not duplicates of each other, click Not Duplicates.
- If the contacts are duplicates of each other, select a contact to keep, then click Merge. The information from the contact you are not keeping will be merged. If there is an empty field in the kept record, information from the discarded contact is used to fill the field.
- A confirmation message displays once the merge is initiated. Select Merge logs to review the status of the merge and the properties that changed. For more information, see Reviewing the duplicate merge logs.
📘 Note
To ensure a quicker response, when the results return more than 100 potential duplicate contacts, not all of the pairs will display. In that case, if you search for a specific potential duplicate contact by ID or full name, it will always be found.
The following columns of information are available for each potential duplicate pair:

Both potential duplicate contacts in the pair contain information specific to that account:
The contact information displayed is currently not customizable.

📘 Note
Once the contacts have been merged, they will no longer be shown in the table.

If you would like to export the Manage duplicates table, select the desired export icon. Select Expand All to expand all of the nodes in each potential duplicate pair.
Reviewing the duplicate merge logs
The Duplicate merge logs detail the progress of recent contact merges and the properties affected by the merges. To access the logs, go to Community > Duplicate merge logs.
📘 Note
Successful merge logs are retained for 30 days, and failed merge logs are retained for 90 days. This retention policy is not configurable.
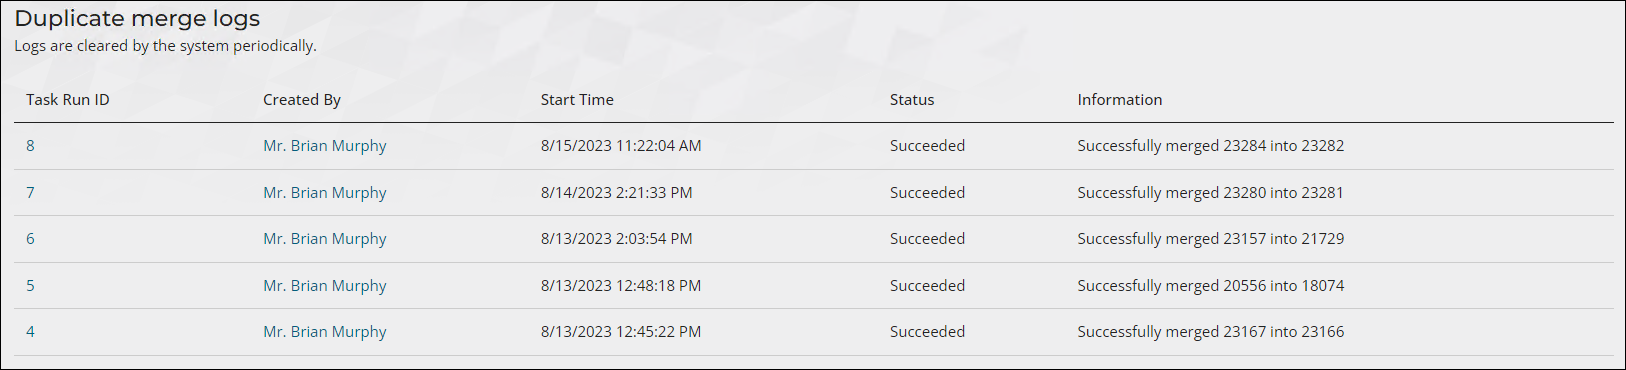
The Duplicate merge logs display the following information for each recent merge request:
- Task Run ID – Select the Task Run Id associated with a merge to view the Duplicate merge log detail screen. This screen provides a breakdown of the tasks performed during the merge and the change history of properties affected by the merge.
- Created By – The user who initiated the merge.
- Start Time – The date and time the user initiated the merge.
-
Status – The success of the merge. The status can be one of the following:
- In progress - The task has been initiated and is currently running. The task has not yet ended.
- Failed - The task was initiated and ended, but the task was not completed successfully.
- Succeeded - The task was initiated and ended, and the task completed successfully.
- Information – The results of the merge, including the merge status and the contact IDs merged.
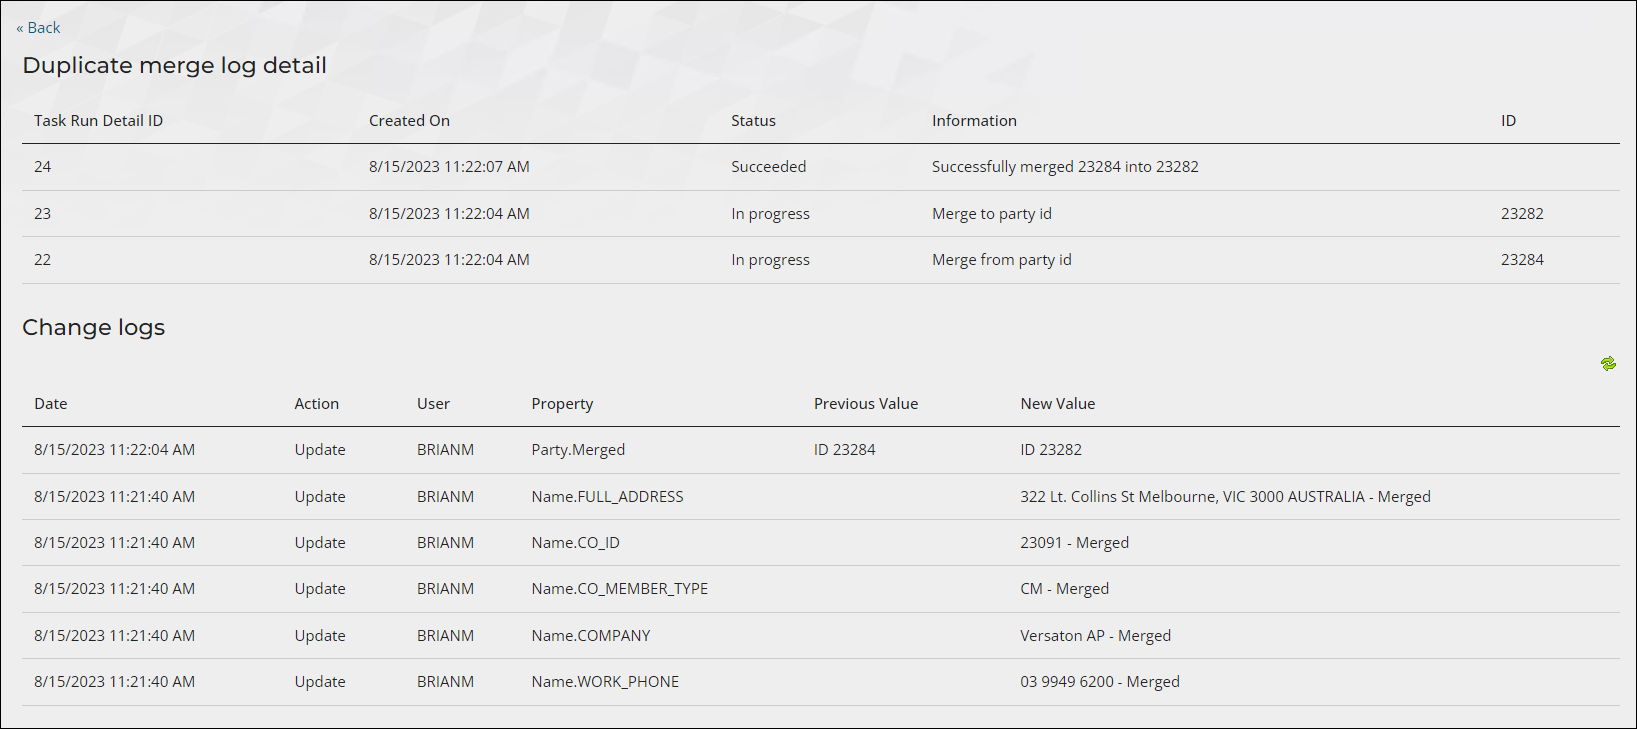
Select the Task Run Id to review the following merge details:
-
Duplicate merge log detail – Displays the following columns of information for each task performed during the merge:
- Task Run Detail ID – The ID of the task.
- Created On – The date and time the task was initiated.
- Status – The success of the task. The status can be one of the following:
- In progress - The task has been initiated and is currently running. The task has not yet ended.
- Failed - The task was initiated and ended, but the task was not completed successfully.
- Succeeded - The task was initiated and ended, and the task completed successfully.
- Information – The activities involved in the task.
- ID – The iMIS ID affected by the task.
-
Change logs – The change history of properties affected by the merge. The Change logs display the following columns of information for each property that changed:
- Date – The date the property changed.
- Action – The type of change (Add, Delete, Update).
- User – The contact who changed the property.
- Property – The property that has changed. For more information, see Properties logged in the Change history.
- Previous Value – The original value of the property.
- New Value – The current value of the property.
👍 Example
Contact A does not have an address defined, while Contact B does have an address defined. When Contact A is merged with Contact B, the address of Contact B is retained, updating the Name.FULL_ADDRESS property. The change log records Contact B’s address as the New Value for Name.FULL_ADDRESS.
The data from the Change logs is also available in the Change history of the merged contact.
Updated 3 months ago