

Setting up fees
Setting up your membership fees requires planning both your membership join and fee renewal billing processes. There are several different types of cases to consider when setting up your fees:
- A simple case in which regular members join for one fee and student members join for another, you would need to set up basic fees.
- A complex case in which joining confers membership in more than one group.
- Set up the renewal invoicing and billing process to efficiently bill for term-based items, such as dues and subscriptions.
Setting up fees
After you identify the fees that you want to charge a member who joins, log in as a SysAdmin and do the following:
- Go to Settings > Groups > Types to review the Group Type called Primary Membership. Verify that the roles and statuses are what you need for your membership group. For our simple case, we will use roles of Regular and Student, and statuses of Active and Inactive.
- Go to Settings > Commerce > Product classes to review the settings for your Product Class for the class you intend to use for dues products: usually, the Billing and Subscriptions class. Verify that the settings (especially the default GL accounts) are correct, since these will become the default values for each dues product you create.
- Go to Community > Add group to create a group that represents membership in your organization. When creating the group:
- Group type: usually the Primary Membership group type is used, but that is not required. If you choose another group type, be sure to select one that is date-limited.
- Is Member: Select this checkbox option, which makes members of this group eligible for discount price for products or events.
- Create a Join now product for members to purchase online. Note that you can create a product collection that allows users to pick from several membership options.
- Go to Commerce > Add product to create one simple product for each fee to be charged. In our example, that's one product for Regular members, another for Student members.
📘 Note
Discount prices do not currently apply to dues products; only the Standard price is used for joins. - Check Assign purchaser to a group, and select the group you created in the previous step.
- Review the Accounting tab to ensure that the desired settings apply. The selected Accounting method determines the following:
- Invoice Journal Entries tab - Journal Entry will appear under Sales Journal
- AR Statement
- AR Trial Balance
- GL Journal Reports
- Invoice Journal Entries tab - No Journal Entry under Sales Journal
- AR Statement (optional)
📘 Note
Assign the correct role to each product. Use a naming convention in the Product Code field to distinguish between simple products, product collections, and sets of collections. For example, prefixing simple product codes with S_, collections with C_ and series with S_ lets you see at a glance which products are the collections versus the simple products contained within a collection.Accrual Cash Income is accounted for when sale occurs. Income is accounted for when payment is made. Purchaser is active member of group as soon as the invoice is issued. Purchaser is not active member of group until invoice is paid.
Invoice will appear on: Invoice will appear on: - Go to Commerce > Add product to create one simple product for each fee to be charged. In our example, that's one product for Regular members, another for Student members.
- (optional) Create a product collection that presents your two join products as a choice.
- Create a collection of items shown separately and individually priced.
- Item Set Properties: Select the Customer must select only one component option to create a pick-one type of collection.
- Item Set Components: Use the add link to add each of the choices, regular or student, one at a time to the item set. Select the order in which you want them to be displayed, and indicate which should be the default choice.
- Review the Accounting settings for the collection. Fields that can be edited here will override the individual simple products' settings.
- Typically if you create a collection, then you don't want to show the individual products for Student or Regular in your list of products. To indicate that these products can only be sold as part of the collection and not individually:
- Go to Settings > Commerce > Manage products.
- Retrieve each simple product you created.
- Enable Can only be purchased within a collection of items then click Save. After a short delay, the simple products will no longer appear in the Shop list.
- Create a collection of items shown separately and individually priced.
- Go to Community > Find groups to set up your join policy and renewal policies. Select the group and click the pencil icon to edit the group.
- Select the Start Policy, or accept the default which uses actual join date.
- Set up a renewal policy:
- Check the box for Group Membership is subject to renewal billings.
- In the table for renewal products, add one line per role in this group.
📘 Note
Assign a renewal product individually for each role, or else members with that role will not be billed for renewals.📘 Note
Do not use the All Roles option when creating a renewal policy. - In the simplest case, fees are the same for joining and for renewing, so you can use the same simple products for both the join and the renew tasks. In our example, you would add a line for role Member that uses product S_Regular, and a line for role Student that uses product S_Student.
- If the fees after initial join are lower, you must create separate products:
- Create a separate product for each renewal, such as S_RegularRenew and S_StudentRenew.
- Enable Can only be purchased within a collection of items to keep them out of your Shop list.
- Assign those products as the renewal products for each role in the Group Renewal Policy.
🚧 Warning
The Primary Membership group type must have Single Role selected. If this option is not selected, it will cause errors when running renewals.
📘 Note
Do not make any changes to the Unit of Measure area, that is not supported yet and those settings must remain unchanged.
📘 Note
Do not change the tax settings without reviewing documentation on how to set up proper taxation for your country.
Setting up fees with subscriptions
This section discusses the use of a more complex product collection, when joining confers membership in more than one group. An example of this might be if you charge an optional fee for the member’s choice of either of two association journals when they join, which provides them with a 1-year subscription. In this case, purchasing the Join product makes that contact a member in both the association membership group, and in the group for one of the journals.
- Create groups for Our Association Members, Monthly Journal and Quarterly Journal. The group type for journals typically would be Subscriptions. It must be date-limited.
- Create all the simple products first: Regular member (product code S_Regular), Student member (S_Student), Monthly Journal (S_JournalMthly) and Quarterly Journal (S_JournalQtrly).
- For each simple product, be sure to assign the appropriate group and role to be assigned upon purchase.
- Hide the Regular and Student products (enable Can only be purchased within a collection of items), but don’t hide the journals, so that nonmembers can still shop and purchase a subscription.
- In order to make users select one of the member types, we need a collection: Create a collection for product C_SelectType, with the components S_Regular and S_Student.
- Because we ultimately will create a series of collections as our Join product, we need to also create a collection for C_JournalSubscriptions, with components S_JournalMonthly and S_JournalQtrly simple products.
- Now create a series-of-collections product SS_JoinToday, which contains the C_SelectType and C_Journal collections.
- Use a separate renewal procedure for each product (recommended):
- Set up the renewal policy for the association group so that role Regular uses product S_Regular, and role Student uses renewal product S_Student.
- Set up the renewal policy for the Monthly Journal group so that role Subscriber uses renewal product S_JournalMthly, and the Quarterly Journal group renews role Subscriber to product S_JournalQtrly.
- Association staff generate the renewal billings once each month for each group, which generates one invoice for each separate group renewal.
- Once the renewal batches are posted, the user will see the Renew Membership button appear on their Account page, and with a single click, all renewal invoices can be placed in their cart for payment.
- Use a single renewal procedure for all products:
- Your renewal policy for the association membership group would need one renewal product for Regular members (consisting of a collection containing products S_Regular, S_JournalQtryly and S_JournalMonthly), and a separate renewal product for Student members (consisting of a collection containing products S_Student, S_JournalQtryly and S_JournalMonthly).
- Each renewed member will only be billed the fees for products that are tied to groups of which they are already a member, so we can include both journals in the renewal product collection.
- When association staff generate the renewal for the association membership group, the rules in the article titled Renewal Processing Rules will be applied, generating a single invoice for each member of the association membership group, effectively billing for the renewal of their member fees and for renewal of any subscriptions to either journal.
- Journals will also be billed only if the subscription is due to renew.
📘 Note
This collection would be required EVEN IF there were only a single journal being offered, because when you create a series of collections, you cannot add simple products or kits to it; a series can only contain collections of simple products.
When a new contact purchases the SS_JoinToday product, they are added to the membership group and to the group for the journal they have selected, for a 1-year term. At the end of that term, the renewal process will bill them based on the fees in the renewal product for any groups that are expiring. You must choose one of these renewal strategies:
📘 Note
It is still important to run a monthly renewal for each group, and to run the association membership renewal before running renewals for the journals. Any contacts who subscribe to the journals but are not association members will only be renewed when you process renewals for the journal groups. If the renewal is run for the journal before the association membership, then the journals will be renewed first in one invoice, and they will no longer be due when the association membership renewal is run, resulting in a separate invoice for the association dues.
Setting up renewal fees billing
Set up the renewal invoicing and billing process to efficiently bill for term-based items, such as dues and subscriptions. Depending on your organization’s needs, you can:
- Define start and end date rules and billing cycles.
- Assign renewal billing schedule and prices by group role.
- Define a set of mandatory and optional products for the join process and a subset for renewal billing.
- Display a Renew link on a user’s account page when a user with outstanding renewal invoices logs in.
- Record payments.
Setting up the renewal product
Create the renewal item. In simple cases, the join item is the renewal item. However, for more complex product sets such as collections, you might need to set up a separate renewal item with a specified term:
- From the Staff site, go to Commerce > Add product.
- Select Create a collection of items.
- Select Create a series of collections of items shown separately and individually priced.
- For Item class, select Billing and Subscriptions.
- Enter an Item code, for example, MEM_REN.
- Enter a product Name, for example, Membership Renewal.
- In the Item set components section select Add an existing collection to this series.
- Select Associate Membership.
- Click Add to select another item set component.
- Click Save.
Setting up renewal billing
The setup steps include creating a group that is date-limited.
- From the Staff site, go to Community > Add group.
- Enter a Name for the new group, for example, Renewal Examples.
- Select a group Type that is date-limited and has the appropriate roles and status values, for example, Primary Membership.
- Select the Group Status.
- Select the Is Member option.
- Click Save.
- Click the edit icon.
- In the Membership Term area, select the Membership Term Basis to control the start and end time of a customer or product term:
- Anniversary - Individual renewal date that fluctuates based on each customer's Join Date. For example, if a customer joins on July 1, his or her term would be from July 1 to June 30 of the following year. If you select an anniversary billing time, terms will initially default to a year (or other specified billing interval) from the Join Date, if it exists, or the Effective Date you specified during billing.
- Annual - Fixed annual customer term. All customers have the same billing term. The customer membership term begins with the selected first month in the fixed term (begin in any month). Annual fees are commonly prorated for new customers. Staff users can select Prorate fees when defining or editing an annual membership billing item:
- Do not prorate - Same dues regardless of when customer joins.
- Standard monthly prorating - Prorating for the current year (depends on the billing interval). For example, if a customer joins in month 7 and annual dues are $200, the calculated dues would be one half of the total dues, or $100 (six months out of twelve).
- Use a custom schedule - User-defined prorating rules, depending upon the needs of the organization. If the Use a custom schedule option is enabled, proration rules are created from prorating schedules on the Staff site (Commerce > Prorating schedules).
-
Select the Start Policy:
- Set Start Date equal to the date member was added to the group: Use this when memberships are effective on the exact date of addition.
- Set Start Date equal to first day of the month member was added to the group: Use this when memberships are effective for the month of addition. If you choose this option, the following setting is available:
- After day <number> set Start Date equal to the first day of the next month: Enter the day of the month that a member’s addition will advance to the next month. For example, if you set this option to day 16 and Sally joins on January 14, her Start Date is January. However, if she joins on January 20, her Start Date is February.
- (optional) Enable Grant membership benefits immediately upon joining. This option only applies when you are using the Set Start Date equal to first day of the month member was added to the group Start Policy and have the start date equal to the first day of the next month after a specific day.
- In the Renewal Policy area, enable Group Membership is subject to renewal billings.
- In the Renewal selection criteria area:
- Enable Include inactive members to also include inactive members when processing renewals. If this is not enabled, only active members of this group will be processed for renewal.
- Specify the Include members expiring within amount. This is the range (in days or months) of renewals to be included in renewal processing.
- Add the group Roles to be renewed in renewal processing. Only the roles that you add here will be included when renewals are processed. Select Add:
- Select the Role.
- Click select to choose the Renewal Product to be associated with the role, for example, Member Renewal Example.
- Click OK.
- Click Save.
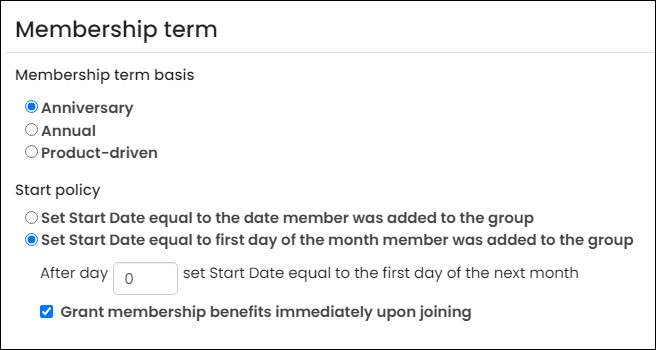
If the option for the start date is set to the first day of the next month and a member joins, then the membership would be inactive between the time that they actually joined and the first day of the next month. When Grant membership benefits immediately upon joining is enabled, the member will receive a small active membership term starting on the day they joined until the first of the month, receiving discounted pricing and other membership benefits.
When the renewal billing process runs, group members with the specified roles will see a Renew Now button on their account page if they have outstanding invoices.
Updated 3 months ago