

Finance: Settings
From the Staff site, go to Settings > Finance to define site-wide settings for finance functionality.
TipReview the iMIS Finance: Getting Started and Best Practices guide for important financial information.
General
The General settings specify accounting settings such as the default tax category, default currency code, and default payment terms.
General
- Default Accounting Method - Select the accounting method you want to use. You can choose from either Accrual or Cash.
- Default Currency - Select the default currency your site uses.
- Default country - Select the default country in relation to your default currency.
- Allow staff users to enter prepayments and overpayments - When enabled, Staff users will be able to enter prepayment information On behalf of users. The prepayments are recorded and are then available to users as Open Credits. An option to Enter prepayment is displayed in the shopping cart if there are no items in the shopping cart. If there are items in the cart, Staff users can still enter a payment amount that is greater than the sum of the items in the shopping cart.
- Allow non-staff users to enter partial payments - When enabled, public users can make partial payments when checking out through the cart. Public users must enter an amount greater than 0 and an amount equal to or less than the cart total.
Taxation
- Default tax category - Select a default tax category. For example, when you create an event and you are asked to put in a tax category, you can select Default and it will automatically default to this defined option.
-
Tax inclusive warning message - You can define a message that is displayed when customers purchase products for which tax has been included. The Tax inclusive warning message is not displayed by default.
📘 Note
The Tax inclusive warning message option on this page is displayed only if the database already contains at least one tax-inclusive tax rate rule.
Customer accounts
General ledger interface
-
Summarize exported journal entries by - Choose the summary option for general ledger transaction exports:
- Detail - Each journal entry (debit and credit) line will be exported and organized by date, and then by overall journal entry in the order the transactions were processed in iMIS. The greatest amount of information is returned using this option.
- Month - One summarized journal entry per month will be exported, sorted, and summarized by GL Account, Project Code, and where applicable, Product Code. Each summary journal entry will be dated the first day of the month and year the transactions were dated. Each journal entry line item represents a summarized amount. A separate summary journal entry will be created for each month and year the transactions are exported within the specified date range.
- Day - One summarized journal entry per transaction date will be exported, sorted, and summarized by GL Account, Project Code, and where applicable, Product Code. Each journal entry line item represents a summarized amount. A separate summary journal entry will be created for each day the transactions are exported within the specified date range.
-
Default export file format - Exported general ledger transactions will be downloaded to your computer in the selected file format:
- CSV - Each line of the file is a data record, and each record consists of one or more fields, separated by commas.
📘 Note
Excel might require additional steps to import all data in the CSV file correctly. - IIF - Select this option if you use QuickBooks Desktop. The file can be directly imported into the QuickBooks Desktop software.
📘 Note
QuickBooks Online might require an additional application to import the IIF file. It is recommended you use either Zed Axis or Guru Importer. Both of these applications are available in the QuickBooks App Store.
- CSV - Each line of the file is a data record, and each record consists of one or more fields, separated by commas.
Financial entity
The financial entity settings page is used to store information about your organization. A financial entity is a legal entity for which a separate set of balanced financial accounts (or set of books) must be maintained independently.
Financial entity
- Enter the Code, or abbreviation, of the financial entity. For example, Bank of America, could be “BoA.”
- Enter the Name of the financial entity as you want it to appear on reports or communications.
- Select the Country that represents the main location in which the organization is located for tax purposes.
- Select the Default tax schedule If a default tax schedule is not assigned directly to the product being purchased, then this option adjusts to the correct price if the customer is exempted from included tax for one of the following reasons:
- In a different country from the Financial entity
- Outside the EU
- Registered in a different EU Country from the Financial Entity
- Exempt in ANY tax authority
For more information, see Setting up tax information.
- Click Select to enter a new contact record or select an existing one for your Organization. If no contact record already exists, click Add new and fill out the required information. Once the initial information has been saved, you can click the organization name to open the account page where additional information can be added if desired.
- Select the First Month of Fiscal Year.
📘 Note
A fiscal year is an Accounting period covering 12 consecutive months over which a financial entity determines income and profits. The fiscal year does not necessarily correspond to the calendar year. - Select a Logo Image from the Image Selector or upload a new one to the Document system. The logo appears on invoices, reports, content pages, email templates, and more. To replace an existing logo, it is best practice to upload a new version of the existing image via the Document System. See Replacing images for details.
- Enter the Image alt text, which will appear for users when the image cannot be rendered or seen.
- Click Save.
Messages
- Enter Additional Information if there is text you wish to display at the bottom of invoices and order confirmations.
- Enter a Tax receipt message if there is text you wish to display at the bottom of all official tax receipts.
- Select a Signature image and define the Image alt text that can be used in reports or communications.
📘 Note
The query $/Commerce/DefaultSystem/Queries/FinancialEntity/Default can be used as a data source in communications, to obtain information for the financial entity.
GL accounts
GL Accounts stands for General Ledger Accounts. The general ledger accounts sort your money into different places specified by you.
This is a list of all your accounts. You can edit, delete or add a new account.
- GL Account: When adding a new account, enter the account number. You can use special characters in your account number.
- Account Name: Define or edit the name of the account. Someone should be able to tell where the money is dedicated to based on the account name.
- Project: If the money is dedicated to a specific project, select the project from the drop down list. To set up these projects, go to Settings > Finance > GL accounts > Projects.
-
Financial Entity: Select your financial entity.
📘 Note
Be sure to select the financial entity if you plan to use the GL account for commerce products.
To view and configure Default Accounts for your organization, do the following:
- Go to Settings > Finance > GL accounts.
- Click the Default Accounts tab.
- Click the red arrow next to the financial entity to view the Default Accounts.
- Click a folder next to the default account name to search for the corresponding GL account number.
- Select an Account Code.
- Click Validate Accounts to sync the accounts.
- Click Save.
When a donor gives money, they can specify how it should be used by the organization. This enables staff users to track and record donation purposes in iMIS. For example, a church receives a donation for $100. Rather than go to a general fund, the donor designates that their monetary donation should go to the food pantry.
- Configure your Income Accounts (Settings > Finance > GL accounts).
- Navigate to the Projects tab and Add a project.
- Enter a Project Code. This code provides a designation for a specific donation fund.
- Enter a Description of the project.
- Select a Financial Entity Key from the drop-down.
- Add multiple Projects to create donation purposes. It is recommended that you create an unrestricted Project Code so that you can have a default fund designation
- Create a GL account:
- On the Chart of Accounts tab, click Add.
- Enter a new GL Account. You can use special characters in your account number.
- Enter a name for the GL Account.
- Select a Project from the drop-down.
- Select a Financial Entity from the drop-down.
- Create a Gift item and select the GL Account you created.
To view the total gifts collected for each project, you can go to Fundraising > Dashboard, and select the By project tab.
Taxes
See Setting up tax information for more information.
Payment terms
You can set the payment terms for your payments. Payment terms specify the period of time allowed for the customer to pay for the goods and services that have been ordered. Common payment terms include:
- Annually – The payment is due within one year (twelve months).
- PrePaid - The payment is expected at the moment of the transaction. When a payment term is set to PrePaid, the invoice due date is the date of the invoice.
- Quarterly - The payment is due within one quarter (three months).
- Net 30 - The customer is given 30 days from the date of the invoice to submit the payment. When a payment term is set to Net 30, the due date will be thirty days in the future.
- Monthly - The payment is due within one month.
When a payment term is set to PrePaid, the invoice due date is the date of the invoice. When a payment term is set to Net 30, the due date will be thirty days in the future. With AutoPay, you will send invoices to the Pay Central service for payment processing on the invoice due date.
It is recommended that you set the default payment term for your organization:
- Fundraising-based organizations - Set the default payment term to PrePaid.
With AutoPay, invoices are sent to the Pay Central service for payment processing on the invoice due date. Set your payment terms to PrePaid so that recurring donation invoices are sent to the Pay Central service for payment processing on the date the donation was made.
- Membership-based organizations - Set the default payment term to Net 30.
📘 Note
You can set payment terms system-wide or at the product class.
If you collect donations, it is suggested to set the default payment term to PrePaid system-wide because donations are expected at the time of the donation. If you collect membership dues, it is suggested to set the default payment term to Net 30 at the system level, but PrePaid is suggested for Fundraising product classes.
Do the following to create payment terms:
- Go to Settings > Finance > Payment terms.
- Do one of the following:
- Select the payment term to edit.
- Click Add new item to define a new payment term.
- Enter or edit the following information for the payment terms:
- Enter a Name for the payment term.
- (optional) Enter a Description for the payment term.
- From the Payment Due drop-down, select when the payment for your new term is due:
- After Invoice – Enter a value in the Due in Days field. This indicates how many days after the invoice is generated that customers can pay.
- Next Month – Enter a value in the On day field. This indicates on which day of the month following the invoice being generated the payment will be due.
- At the End of this Month – This option indicates that payment will be expected by the end of the current month.
- Specify at Data Entry Time – You can specify when payment is due when the information about the order is entered into the iMIS system.
- Click Save.
Pay Central
Pay Central Service
The Pay Central service is the hub for iMIS Pay and AutoPay payments in iMIS. If you are not using iMIS Pay or AutoPay, the red errors referencing Pay Central do not apply to you.
If you are using iMIS Pay or AutoPay, these status messages need to be green. If the statuses are not green, review the table below to figure out what you must do next.
👍 Tip
If you have issues with Pay Central not properly connecting, verify that the Certificate expiration date is current and not expired. To review this date, go to Settings > About iMIS, then select the Show more link. If the date has expired, contact ASI Technical Support.
| Warning Message | Meaning |
|---|---|
Pay Central service address is not set. | One or more of the following is true:
|
| Pay Central UI service address is not set. | |
| Could not connect to the Pay Central authorization service. | |
| Could not connect to the Pay Central service. | |
| Could not create a new Pay Central service account. | Your Pay Central Account may not be saved yet, or the Pay Central Service server may be down. Contact ASI Hosting Support. |
| Pay Central service account not saved. | |
| Could not authenticate. | |
| No gateways have been activated. | (*Required) Activate your gateway. Click the Gateways tab, and add the gateway to iMIS. See the Gateways documentation for specific setup instructions based on the gateway you are using. |
| Recurring donations are turned off. | (AutoPay users only) To turn on recurring donations, click the Automatic payments tab. Enable Allow users to create recurring donations. |
| Auto-renewing memberships are turned off. | (AutoPay users only) To turn on auto-renewing memberships, click the Automatic payments tab. Enable Allow users to create auto-renewing memberships. |
| Task 'Retrieve processed payments from Pay Central' task is inactive and is not scheduled. | (AutoPay users only) Enable this task if you want to automatically retrieve processed payments. See Processing recurring transactions. |
Gateways
The Gateways tab specifies authorization options for credit cards and debit cards.
From the Staff site, go to Settings > Finance > Pay Central > Gateways. From this window, you can review the defined gateway accounts. To create a new gateway account, select Add new gateway account.
From the Gateway type drop-down, select a gateway account and enter the appropriate information. See Gateways documentation for more information.
📘 Note
CSC and postal code are required for public users and optional for staff users. Currently, there is no setting in iMIS to amend this.
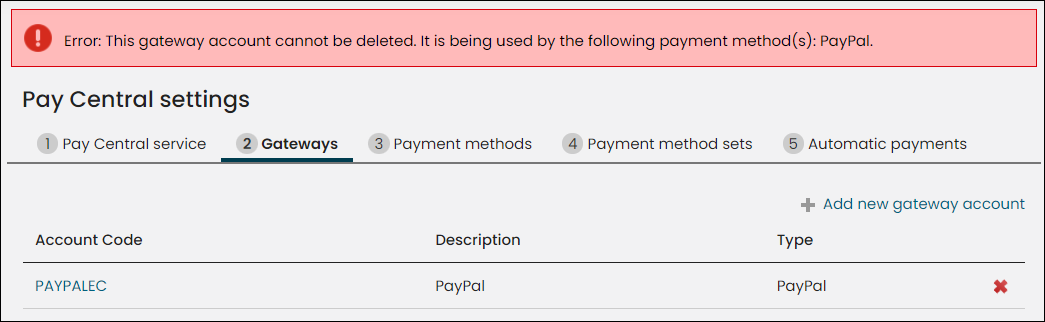
You cannot delete an in-use payment gateway. If you attempt to delete a payment gateway that is currently in use by a payment method, you will see the following error:
Payment methods
Payment method sets
UK direct debit
See Direct Debits.
Automatic payments
Staff users can define automatic payment settings for recurring donations and auto-renewing memberships. From the staff site, go to Settings > Finance > Pay Central > Automatic payments tab.
📘 Note
In order to use automatic payments, you must have a license key for AutoPay. Contact ASI for more information.
- Enable Allow users to create recurring donations:
- Donations are recurring by default - Select this option to allow all donations to be recurring. Donors can disable this function at the time of transaction.
- Allow donors to change the amount of their donation - Select this option to allow donors to modify the amount of an active recurring donation.
📘 Note
This option is required for customers to add new payment methods to their existing AutoPay enrollments.📘 Note
This does not apply to UK direct debits. UK direct debits have different requirements for adjustments. See Direct Debits for more information. - Allow stored payment methods to be used for all purchases – Select this option to allow customers to use saved payment options for all future purchases. You must have an iMIS Pay gateway configured for this option to be available.
- Allow staff users on behalf of a customer to use their stored payment methods – Enable to allow all staff to use customers’ saved payment methods when working on their behalf.
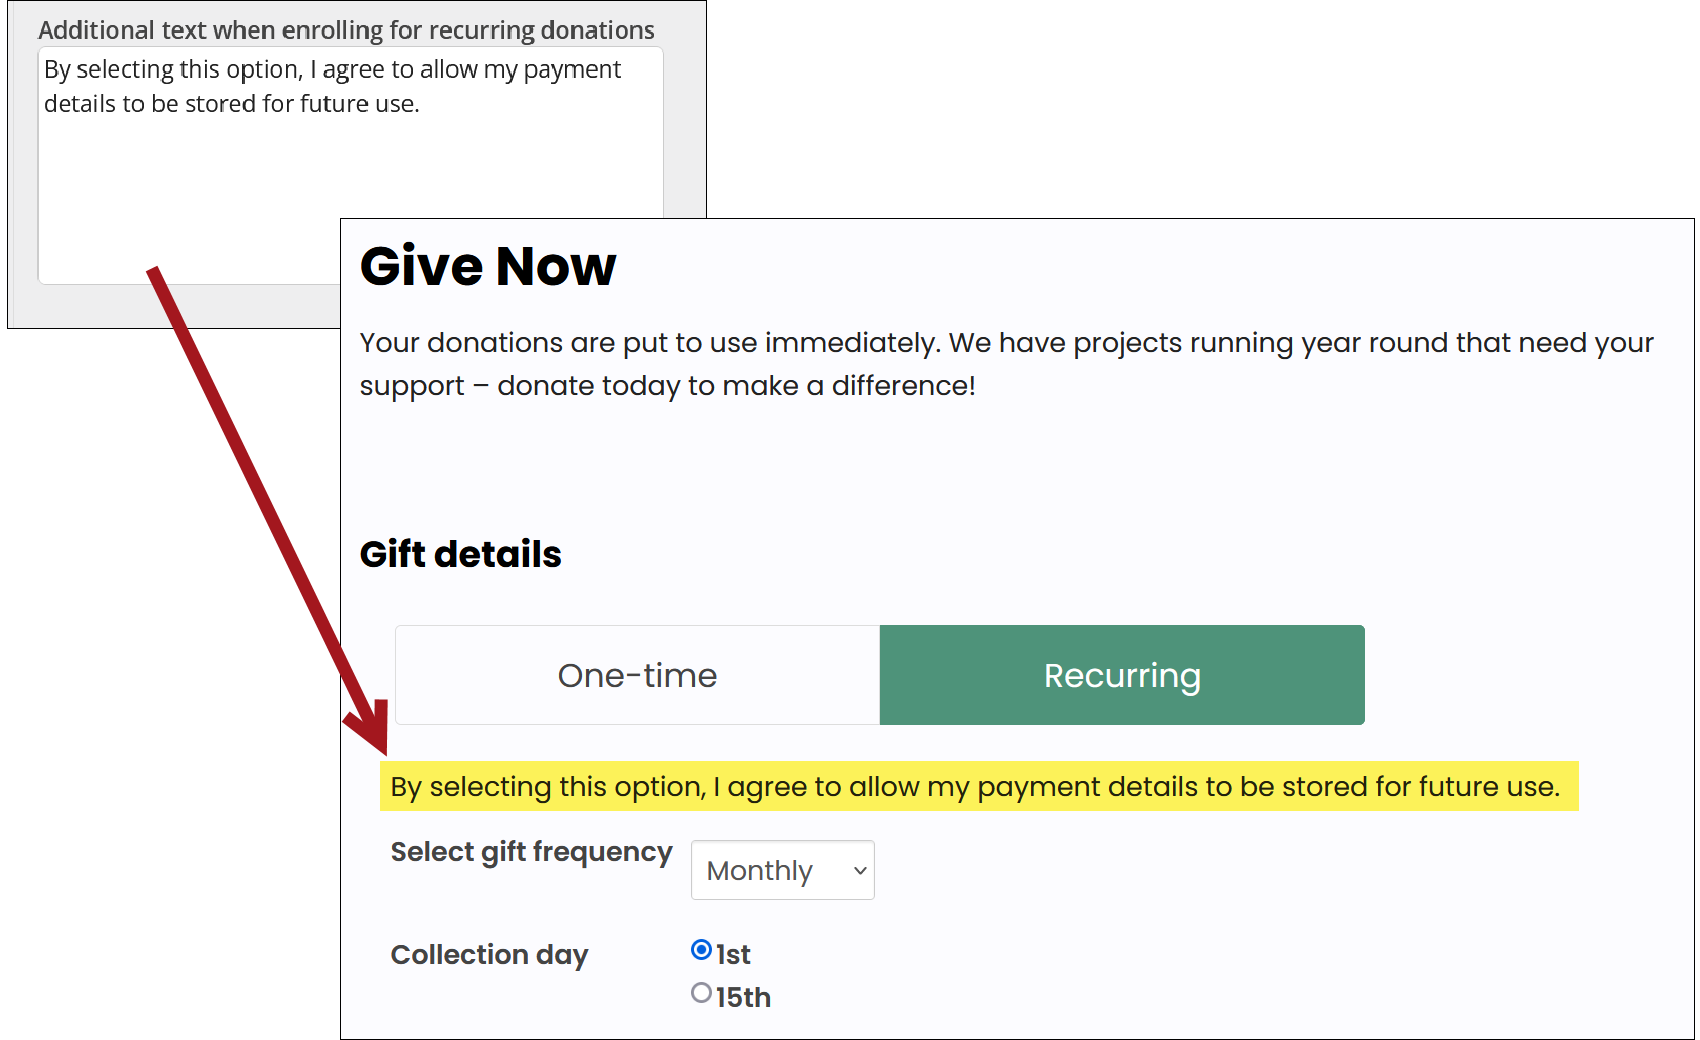
- Additional text when enrolling for recurring donations – Add a custom message to display when a customer pays for recurring donations or keep the default message.
📘 Note
If Allow stored payment methods to be used for all purchases is enabled, this message should clearly inform customers that their AutoPay payment method will be stored and available to use for future purchases.
-
Allow users to create auto-renewing memberships - Select this setting to enable automatic billing for memberships.
- Memberships are auto-renewing by default - Select this option to make all sitewide memberships auto-renew by default. Members can disable this function at the time of transaction.
- Click Save.
Updated 3 months ago