

Managing individual events
Every event in iMIS has its own unique console. From a single location, staff event managers are able to see at-a-glance statistical information, run reports and print badges, view registrants, and view and edit event and program item details.
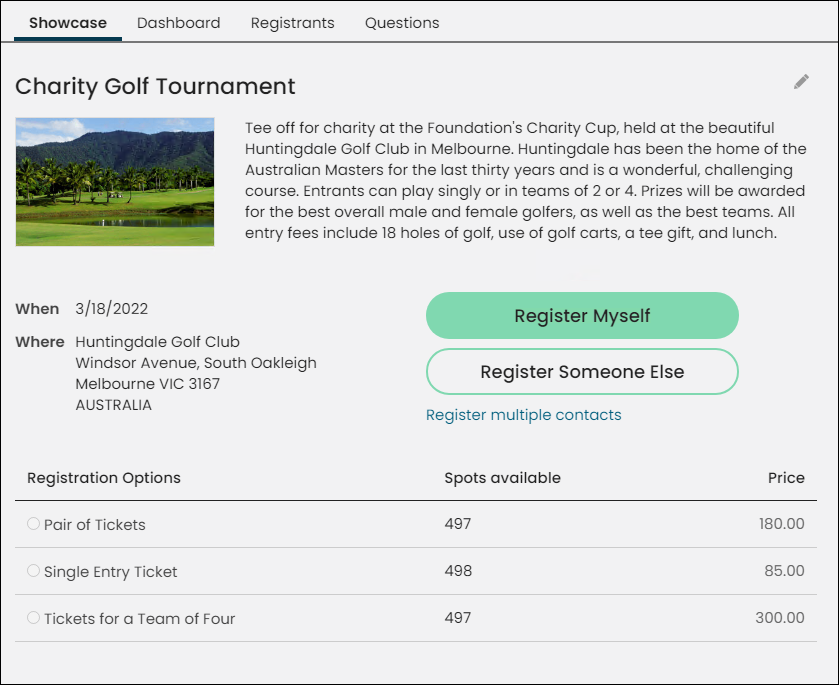
Showcase
The Showcase tab is the landing page for events, and displays the same information your event registrants see. Event details, functions, and options are configurable from this section. For more information about using the showcase tab, please see Creating an event and Registering for events.
Deleting registration options and program items
Event registration options and program items can be deleted from the Staff site, even with existing registrations.To delete an event registration option or program item with existing registrations, the registrations must first be cancelled. See Cancelling an event registration.
Deleting a registration option
To delete an event registration option, do the following:
- Go to Events > Find events.
- Open the desired event andselectEditfrom the drop-downon the Showcase tab.
- From the Pricing tab, locate the registration option you wish to remove.
- Click the Delete link.
- Click OK when prompted to confirm deletion.
Deleting a program item
To delete an event program item, do the following:
- Go to Events > Find events.
- Open the desired event you wish to modify.
- On the Showcase tab, in the Program section, find the program item to be deleted.
- Select the program item link to open it.
- From the drop-down, select Delete.
- Click OK when prompted to confirm deletion.
Dashboard
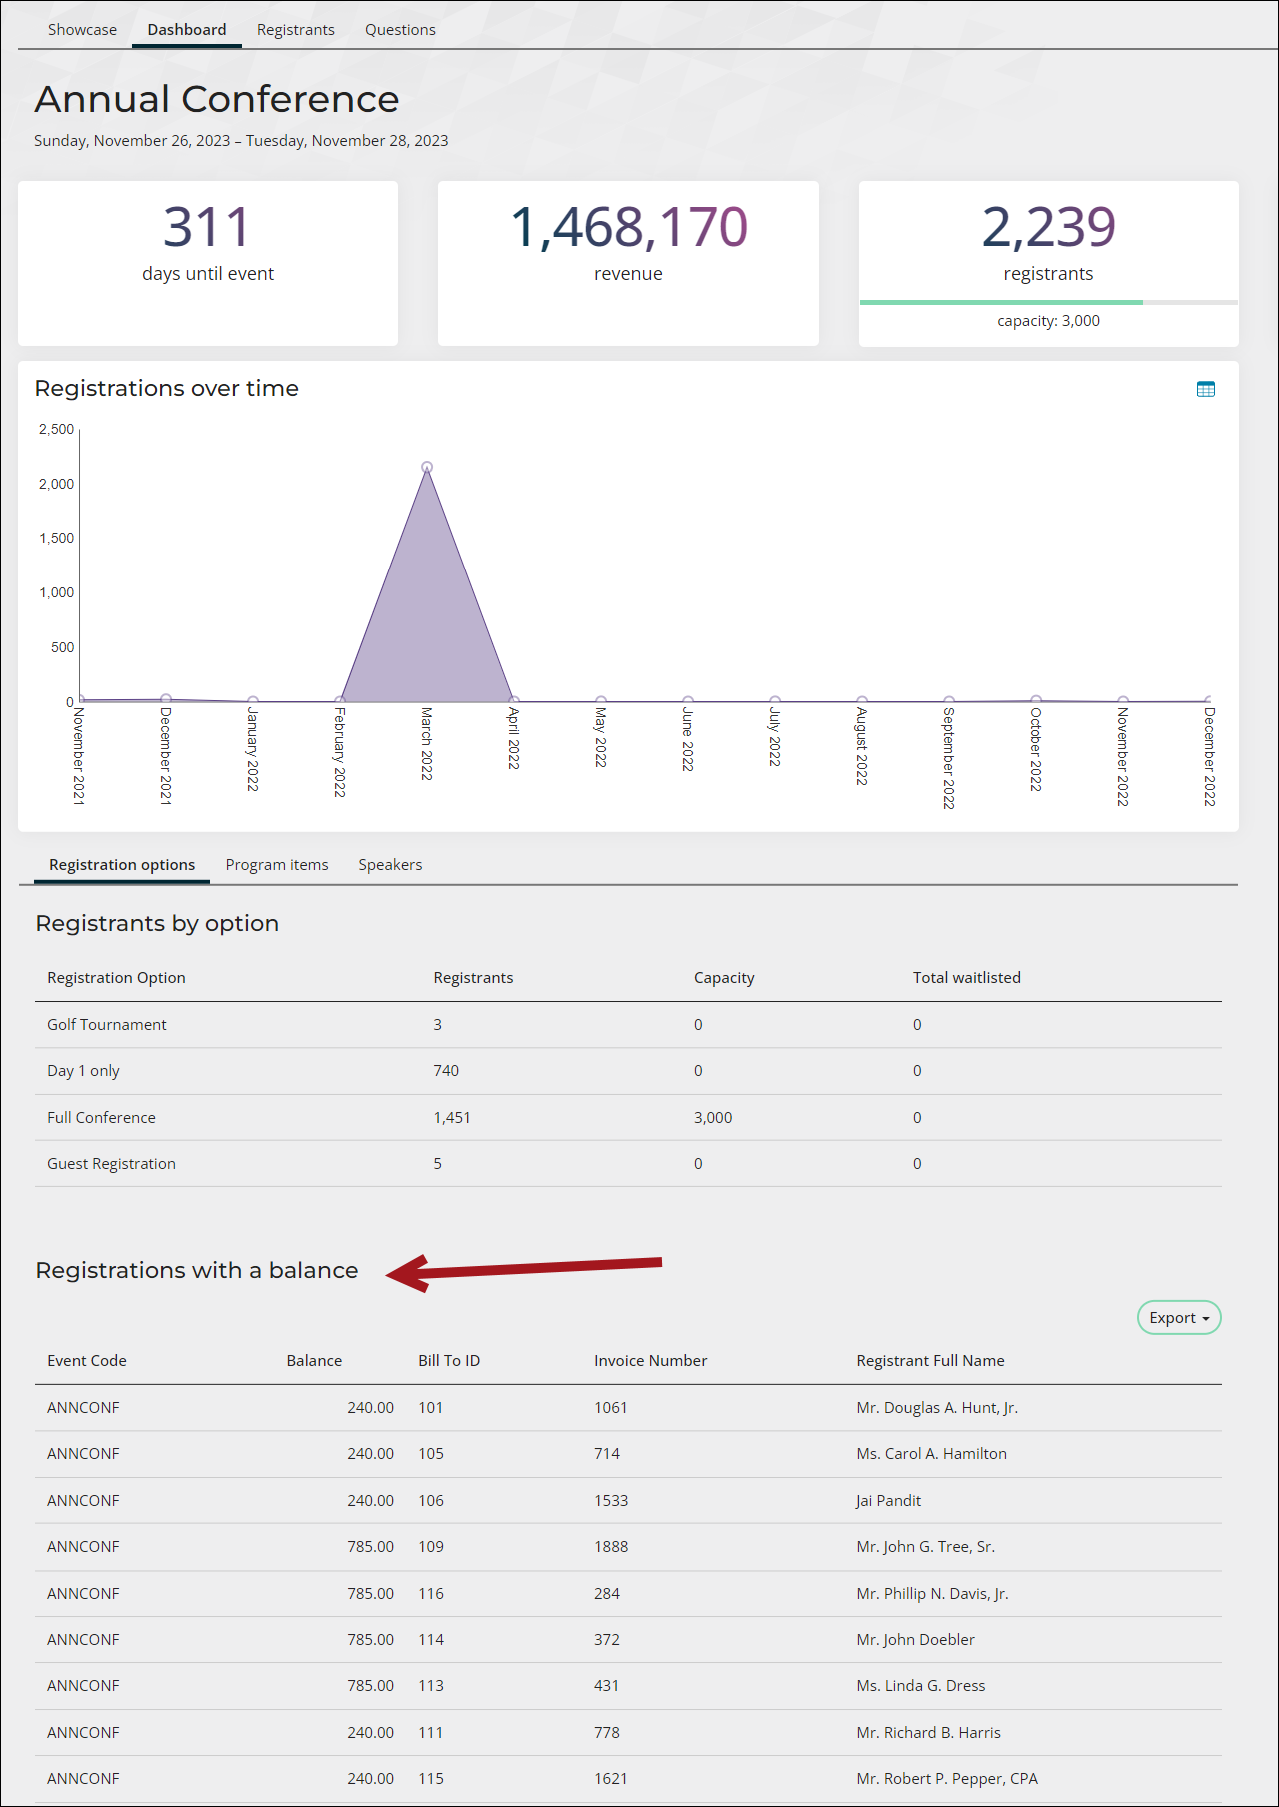
The event-specific Dashboard tab provides a quick view of important, up-to-date registration information and statistics for a specific event. The dashboard information is configurable. See Modifying the event-specific console.
Generating invoices
The Generate Invoices button enables staff users to generate official invoices for events. The invoices can then be sent to the Bill To contact for each registration.
When you click Generate Invoices, a new window is displayed. This window has a Registrations with an outstanding balance only option that is enabled by default. This functionality is restricted to staff users. Registrations can only be invoiced once the batch containing the registration has been posted.
The generated invoices are assigned invoice numbers if they do not already have them, and orders are updated with an invoice number. If the Registrations with an outstanding balance only option is enabled, then invoices for registrations with no outstanding balance are not assigned an invoice number. The invoice date is updated to the date you generate the invoice.
On this new window, when you click Generate Invoices, a message is displayed either indicating the number of invoices generated or that no registrants were available to invoice.
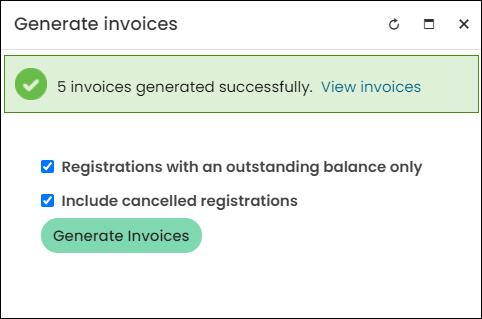
Click View invoices. A new window is displayed that shows all invoices for the event. Staff users can review invoice information for the specific event.o
Running reports
The Run Reports button displays several event-specific reports that can be immediately run. The following is a list of the available reports:
Print badges
Displays a report containing registrant badge information. The badges display the full name, informal name, title, organization, city, state/province, and country of each registrant. This report is configured to print badges on Avery 5392 badge stock. To configure the Print Badges report results, you can adjust the following parameters:
- Event Name: The unique event identification code determined during your initial event set up.
- (optional) First Name: Enter a first name to display badges only for people with that name.
- (optional) Last Name: Enter a last name to display badges only for people with that name.
- PDF and Excel icons: Select an icon to export the report as the designated file type.
📘 Note
You must export a report as a PDF in order to preserve the Avery 5392 formatting for printing.
Registrant directory
Displays a report that lists all event registrants and their information. To configure the Registration Directory report results, you can adjust the following parameters:
- (optional) Report Title: Enter a descriptive title for your report.
- Include Cancelled: Select Yes or No from the drop-down list. If you select Yes, cancelled registrations are included in the report and are distinguished by an asterisk (*).
- Event Name: The name of the event.
- PDF and Excel icons: Select an icon to export the report as the designated file type.
📘 Note
You must export a report as a PDF in order to preserve formatting for printing.
Registration option registrants
Displays a list of registrants and the organizations they belong to for each registration option. To configure the Registration Option Registrants report results, you can adjust the following parameters:
- (optional) Report Title: Enter a descriptive title for your report.
- Include Cancelled: Select Yes or No from the drop-down list. If you select Yes, cancelled registrations are included in the report and are distinguished by an asterisk (*).
- Show Registrants for: Select either Registration Options or Program Items in order to display the registrants that are listed for each option.
- Event Name: The name of the event.
- PDF and Excel icons: Select an icon to export the report as the designated file type.
📘 Note
You must export a report as a PDF in order to preserve formatting for printing.
Program item registrants
Displays a list of registrants and the organizations they belong to for each program item. To configure the Program Item Registrants report results, you can adjust the following parameters:
- (optional) Report Title: Enter a descriptive title for your report.
- Include Cancelled: Select Yes or No from the drop-down list. If you select Yes, cancelled registrations are included in the report and are distinguished by an asterisk (*).
- Show Registrants for: Select either Registration Options or Program Items in order to display the registrants that are listed for each option.
- Event Name: The name of the event.
- PDF and Excel icons: Select an icon to export the report as the designated file type.
📘 Note
You must export a report as a PDF in order to preserve formatting for printing.
Print certificates
Prints certificates of completion for each attendee of the selected event. To configure the Event certificates report results, you can adjust the following parameters:
- (optional) ID: Enter the name of the event.
- (optional) Title: Enter a descriptive title for the type of certificate: for example, a Certificate of Completion.
- (optional) Completion Text: Enter the completion text.
- Display Event Name: Select Yes or No from the drop-down. If you select Yes, the event name will be included on the report.
- Display Event Dates: Select Yes or No from the drop-down. If you select Yes, the date of the event will be included on the report.
- Include Financial Entity Logo: Select Yes or No from the drop-down. If you select Yes, the logo of the Financial Entity will be included on the report.
- Include Financial Entity Signature: Select Yes or No from the drop-down. If you select Yes, the report will display the Financial Entity’s signature.
📘 Note
You must export a report as a PDF in order to preserve the formatting for printing.
📘 Note
Event questions can be reported on using the FormDefinitionFieldData and FormFieldResponseData business objects.
Printing tickets
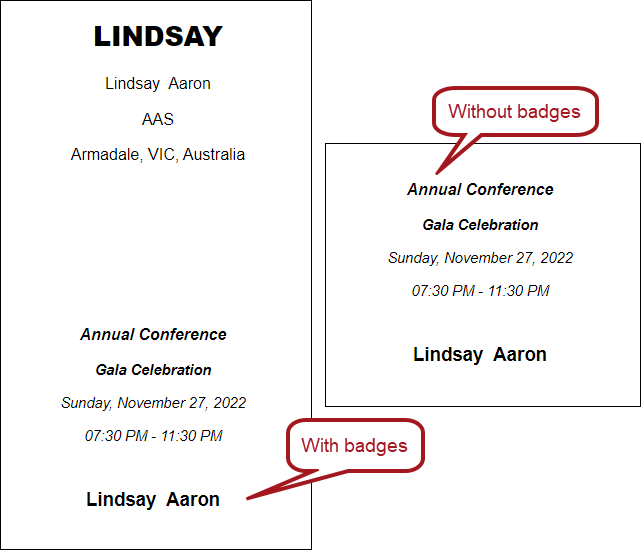
This button displays when Print Tickets is enabled for at least one registration option or program item of the event. When Print Tickets is enabled, you are able to print tickets With badges or Without badges for registrants of the program items and/or registration options. There are separate pages for each registrant.
Example: Adding invoice data to an event dashboard registrant page
You can join certain invoice business objects with CsEvents to provide detailed invoice information to your specific event dashboards.
👍 Example
You want to know how many registrants for the annual conference have a balance due. To do this, you must create a query and add it to the specific event dashboard.
Creating the query
To create the query, do the following:
- Go to RiSE > Intelligent Query Architect > New > Query.
- Enter a Name, such as Event registration with balance.
- (Sources tab) Select All sources and add CsEvent and EventInvoice.
- From the Relations area, add the following joins:
- CsEvent.Event Code = EventInvoice.Event Code
- (Filters tab) Add the following filters:
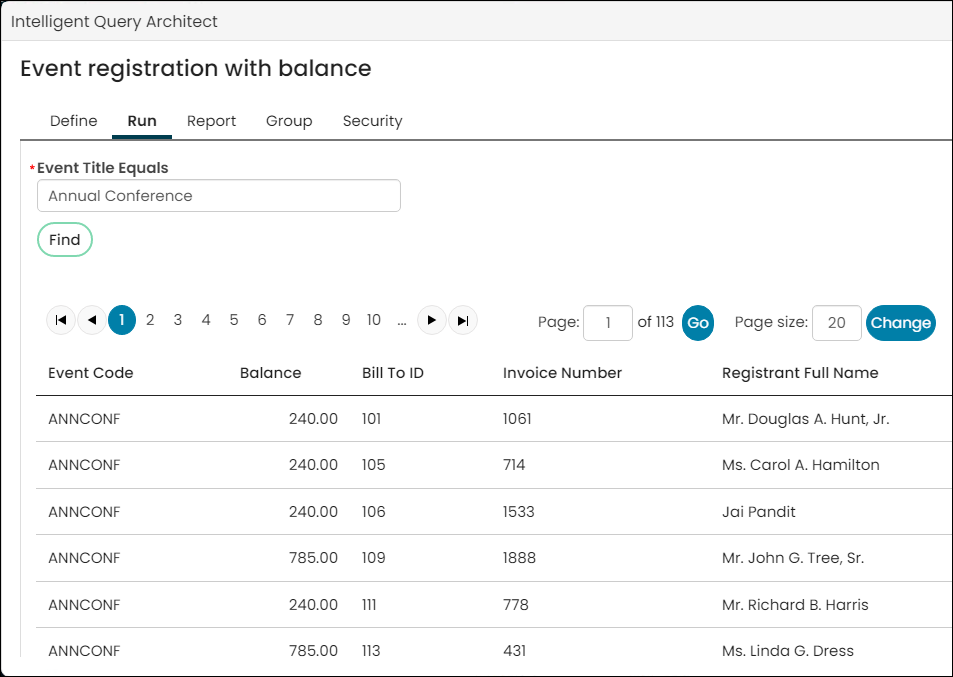
Property Function Comparison Mulitple Value Prompt EventInvoice.Balance None Greater Equal Constant 0 EventInvoice.Event Title None Required - (Display tab) Add the following properties:
- CsEvent.Event Code
- EventInvoice.Balance
- EventInvoice.Bill To ID
- EventInvoice.Invoice Number
- EventInvoice.Registrant Full Name
- Save and Run the query.
Adding the query to an event dashboard
To add the query to the event dashboard, do the following:
- Go to RiSE > Page Builder > Manage content.
- Go to @/iCore/Staff_Dashboards/Specific_Event and Copy the Event Detail and Event Dashboard content records.
- Paste the records into a Shared content folder.
- Open the copied Event Detail record and select Add content.
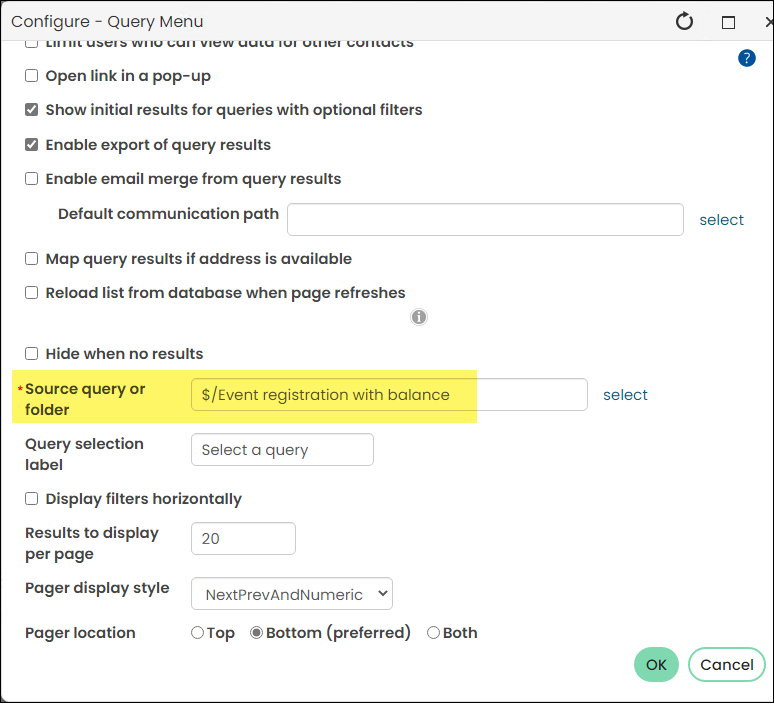
- From the Content gallery select the Query Menu shortcut.
- Select the query you just created in the Source query or folder field, then click OK.
- Click Save & Pubish.
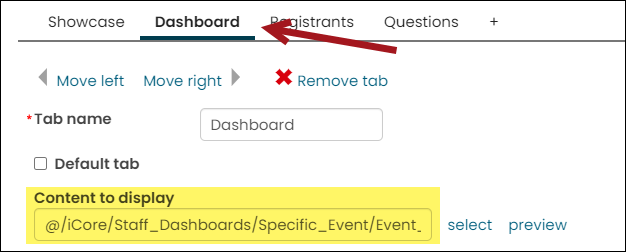
- Open the copied Event Dashboard content record:
- From the Event Dashboard content item, select Configure.
- Click the Dashboard tab.
- From the Content to display field, select the Event Detail content record previously copied.
- Click OK, then click Save & Publish.

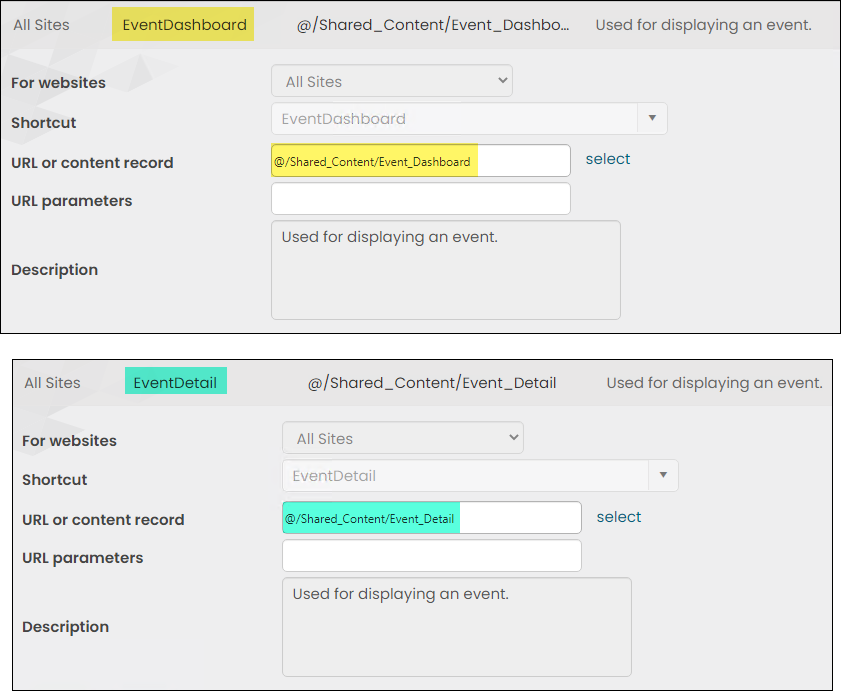
- Go to RiSE > Site Builder > Manage shortcuts.
- Edit the EventDashboard and EventDetail shortcuts to point to the new content records. Click Update.
- Go to Events > Find event and select any event. From the Dashboard tab, you’ll see the new query.
Registrants
The Registrants tab presents a listing of all the registrants for a selected event.
Viewing a registrant's individual registration
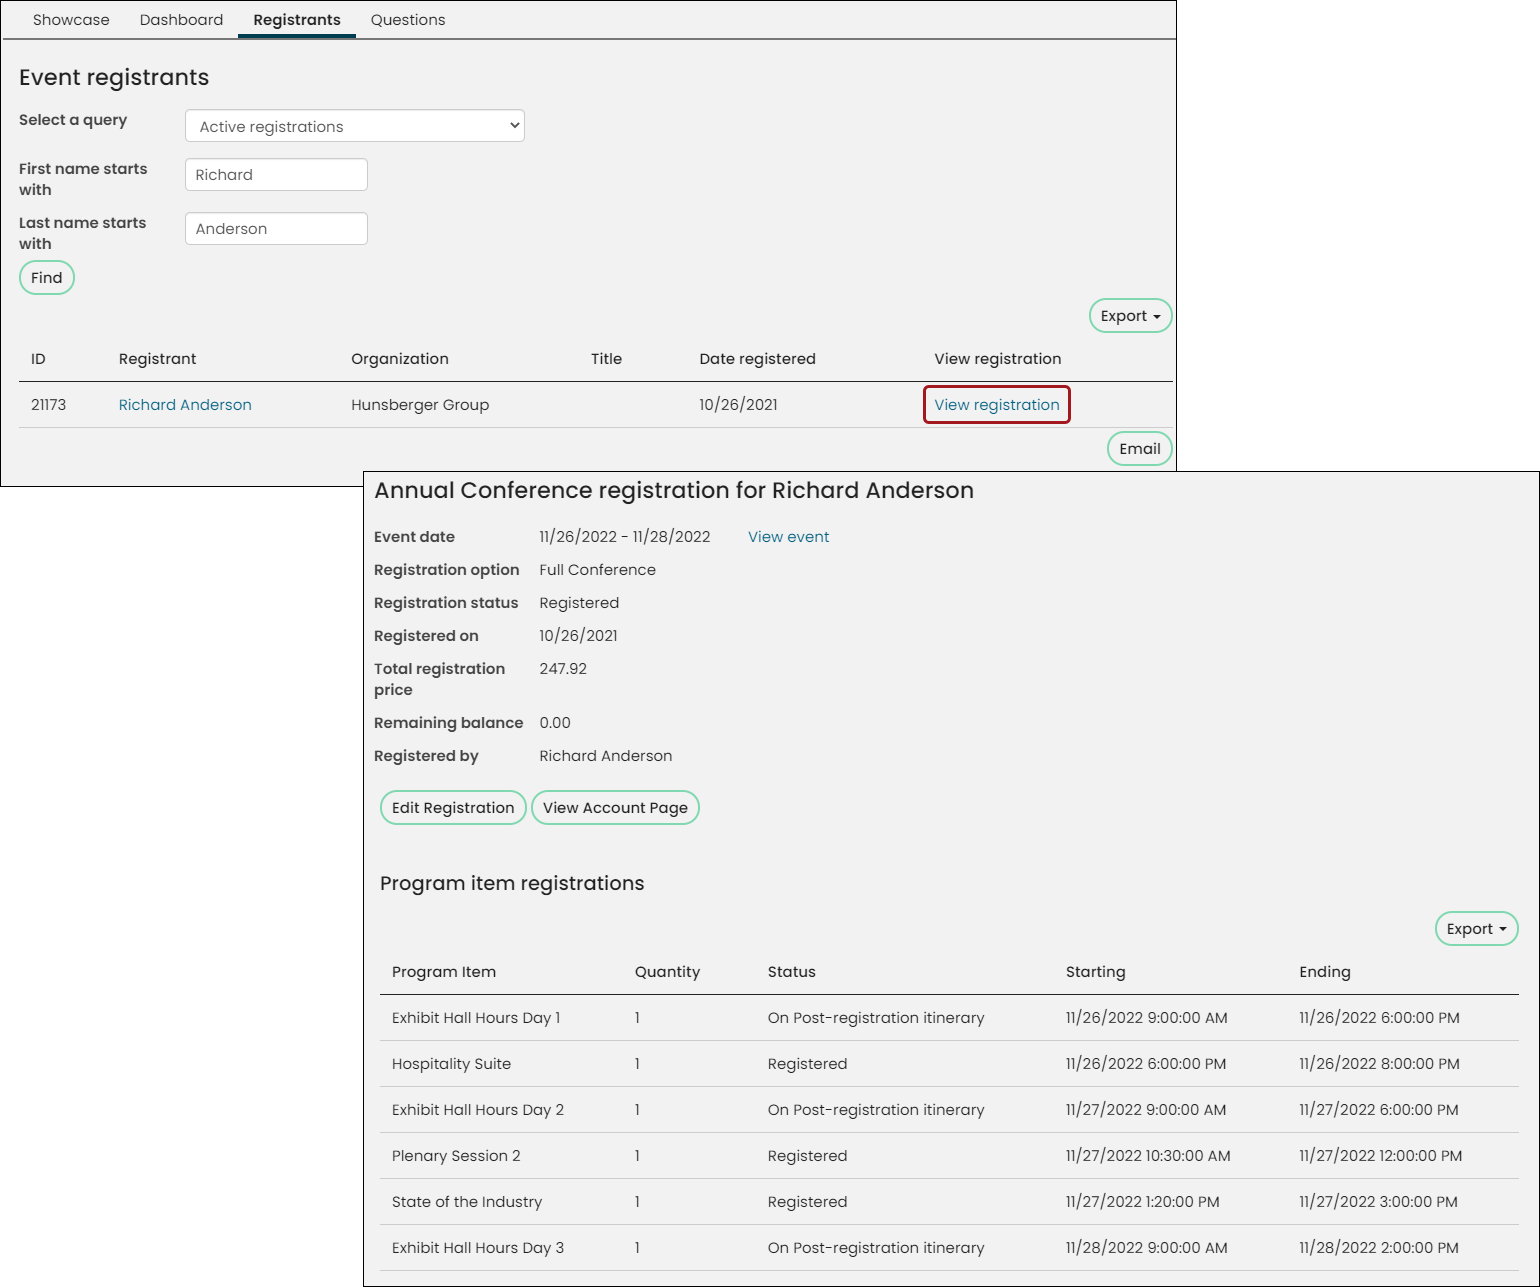
Staff users can view the registration details of each registrant by selecting the View registration link.
📘 Note
The View registration link is also available on the Participation tab of the account page, under the Meetings and events section.
The View registration link displays the event registration details page. This page includes the event dates, a View event link that opens the event page, registration option, registration status, the date the registrant signed up for the event, the total registration price, and the remaining balance.
The Edit Registration link goes to the event Showcase, and allows Staff users to modify the registrant’s event registration details On behalf of the registrant.
Clicking the View Account Page opens the registrant’s account page.
Viewing program item registrations and question responses
Staff users can also view the registrant’s Program item registrations, including the program item name, the quantity, and the start and end date and time for the program item. The registrant’s responses to event questions are also included.
The program item registrations list, and the registrant’s responses to the event questions can be exported and printed.
📘 Note
Any modification to responses to event-level and function-level questions will not be retained until the cart is submitted.
For example, register for RegOption1 and provide responses to related questions. If we change the registration to RegOption2 and provide responses to related questions for RegOption2 then all responses related to RegOption1 are deleted as the cart is not yet submitted.
Submit the cart for RegOption2 and then view the registration. We can edit and change the responses to related questions from RegOption2 to RegOption1. We can provide responses to related questions for RegOption1 but the answers for RegOption2 will remain in the database until the cart is submitted again.
Questions
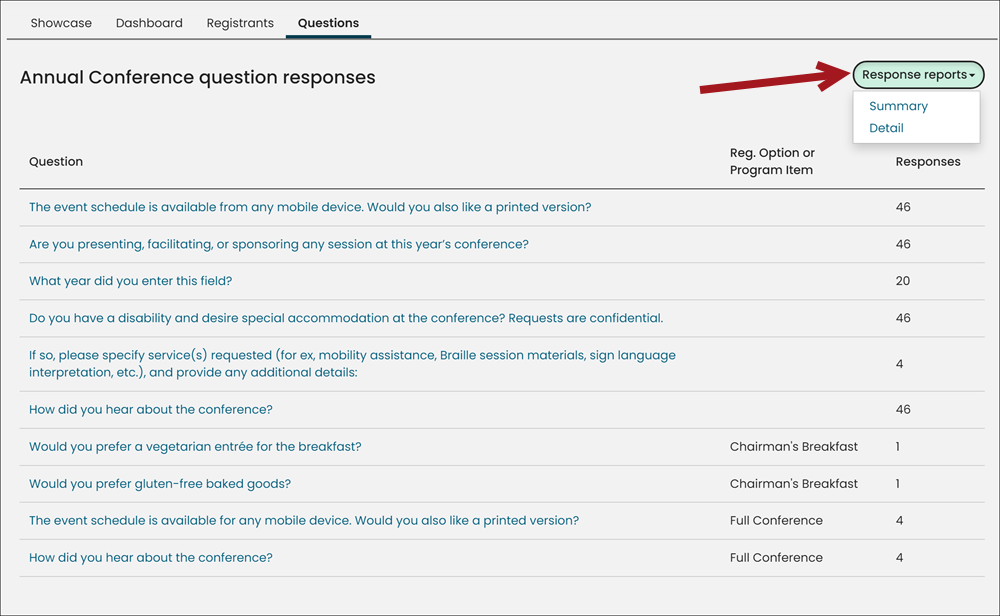
The Questions tab displays registrant responses to event-level questions.
Out-of-the-box reports
Use the Response reports to report on the event questions:
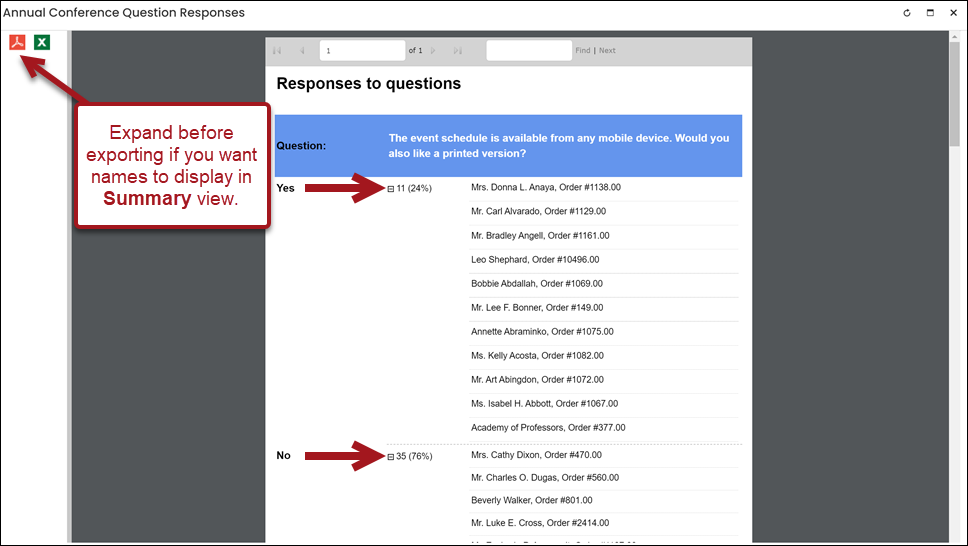
- Summary - Answers are displayed in a percentage format for yes/no questions, in a graph format for multiple-choice questions, and as a collapsible list for open-ended response questions.
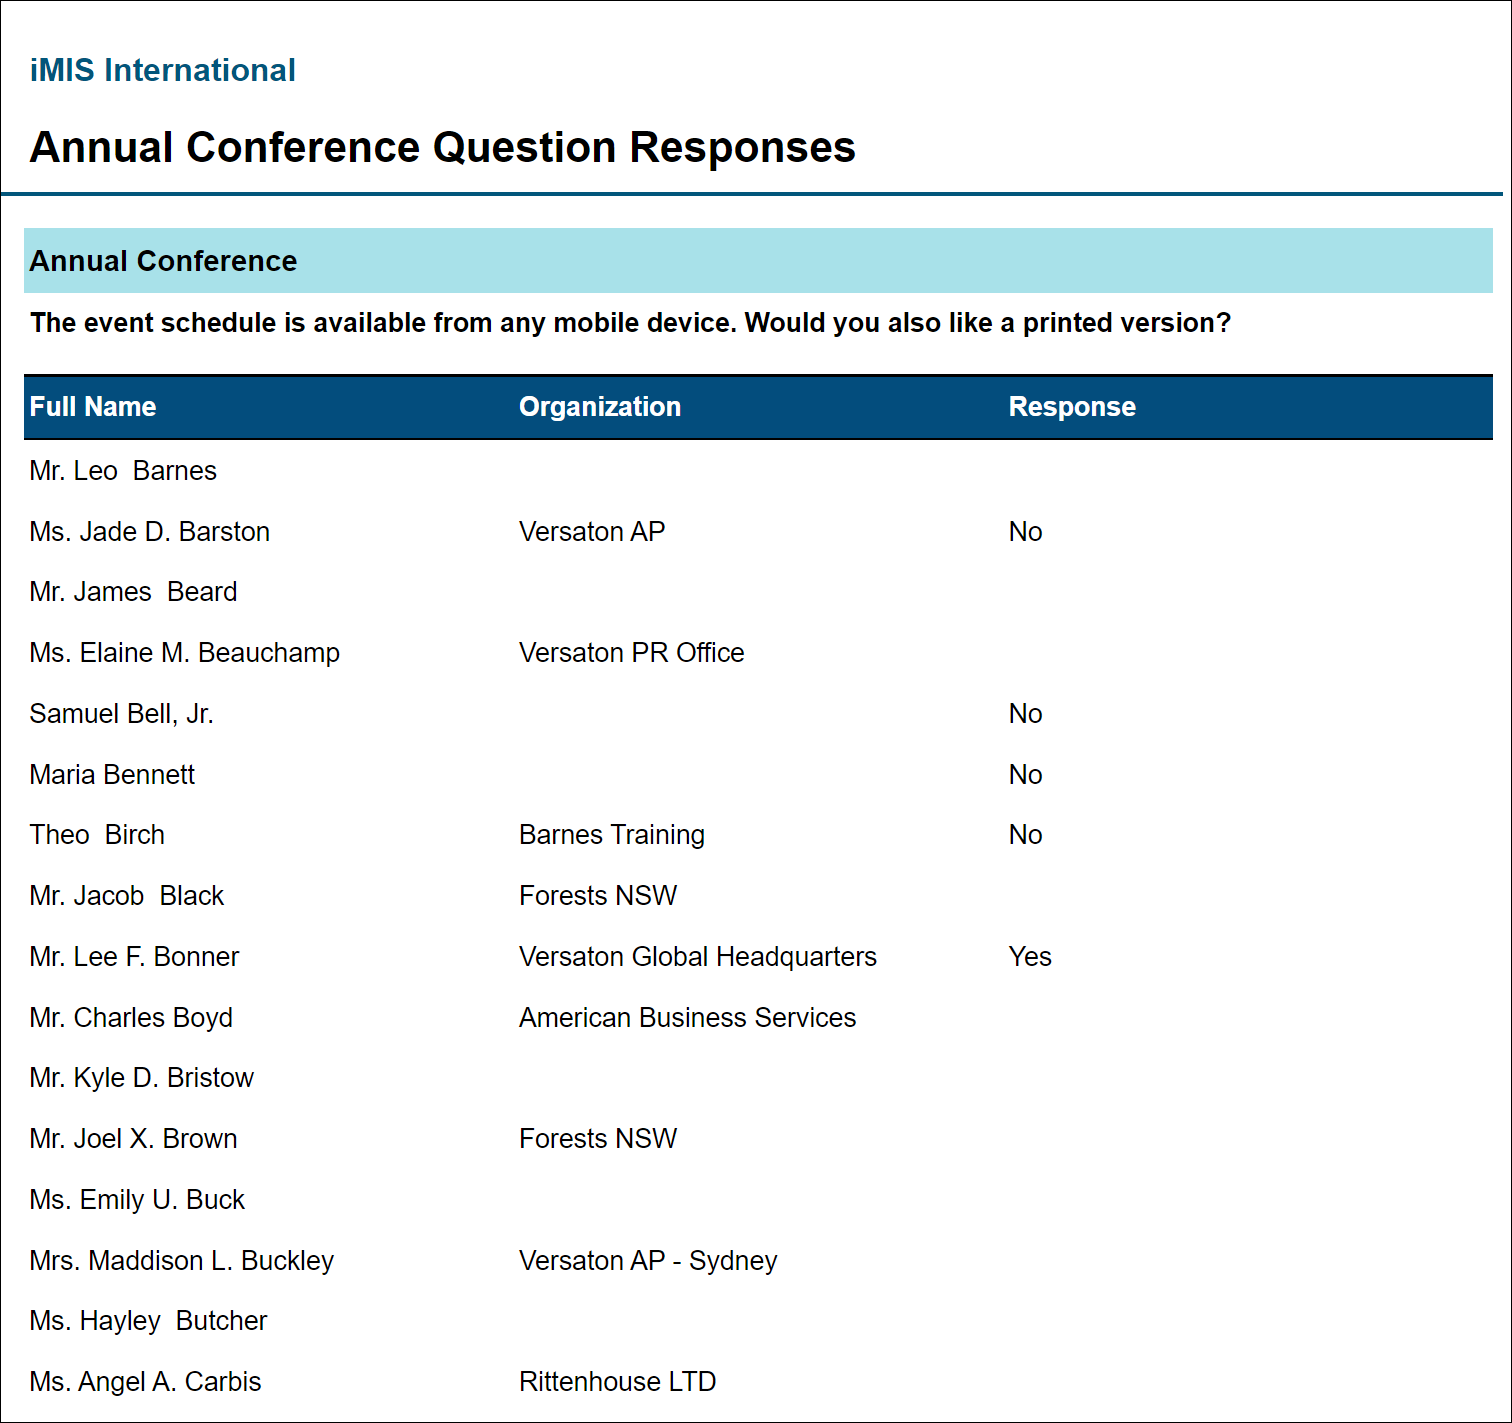
- Detail - Responses are displayed per question with the registrants full name and organization.
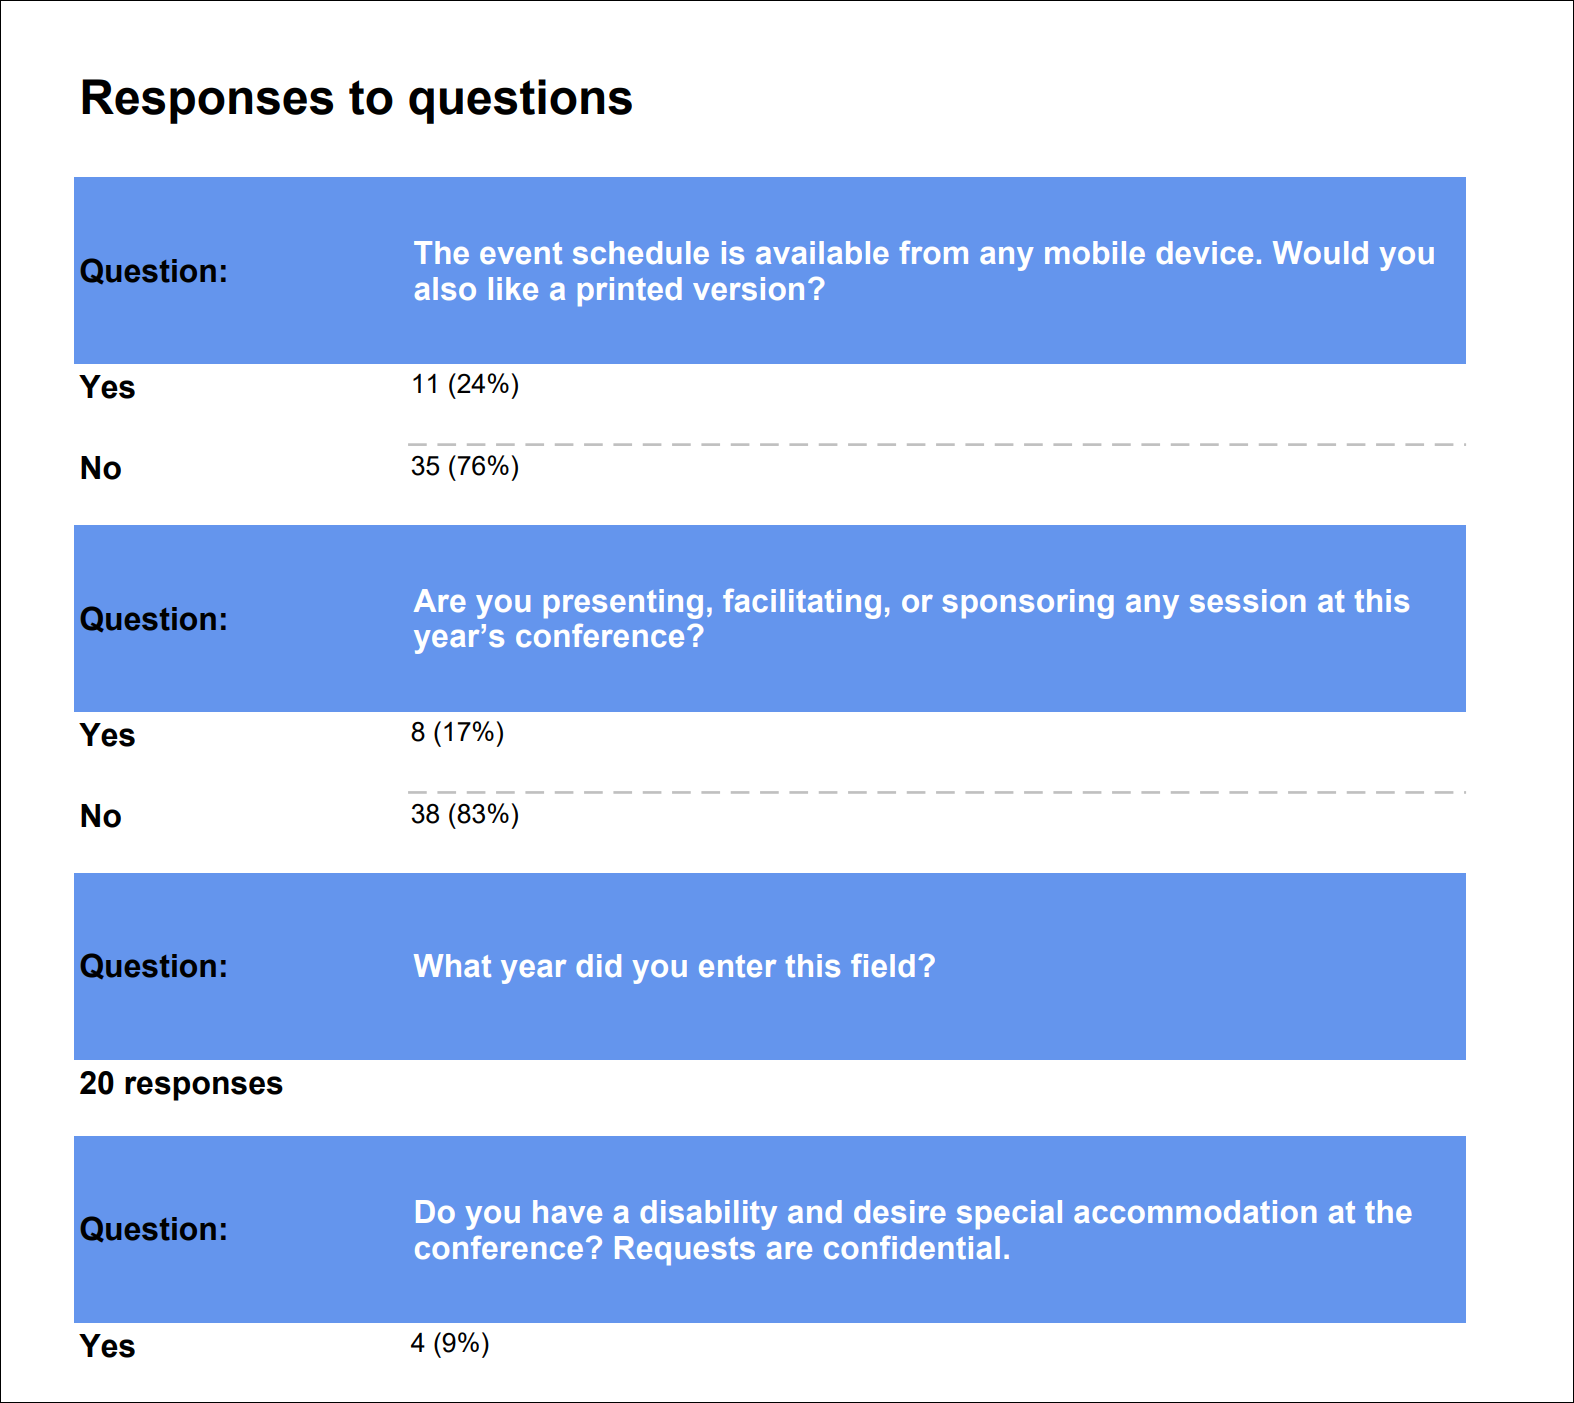
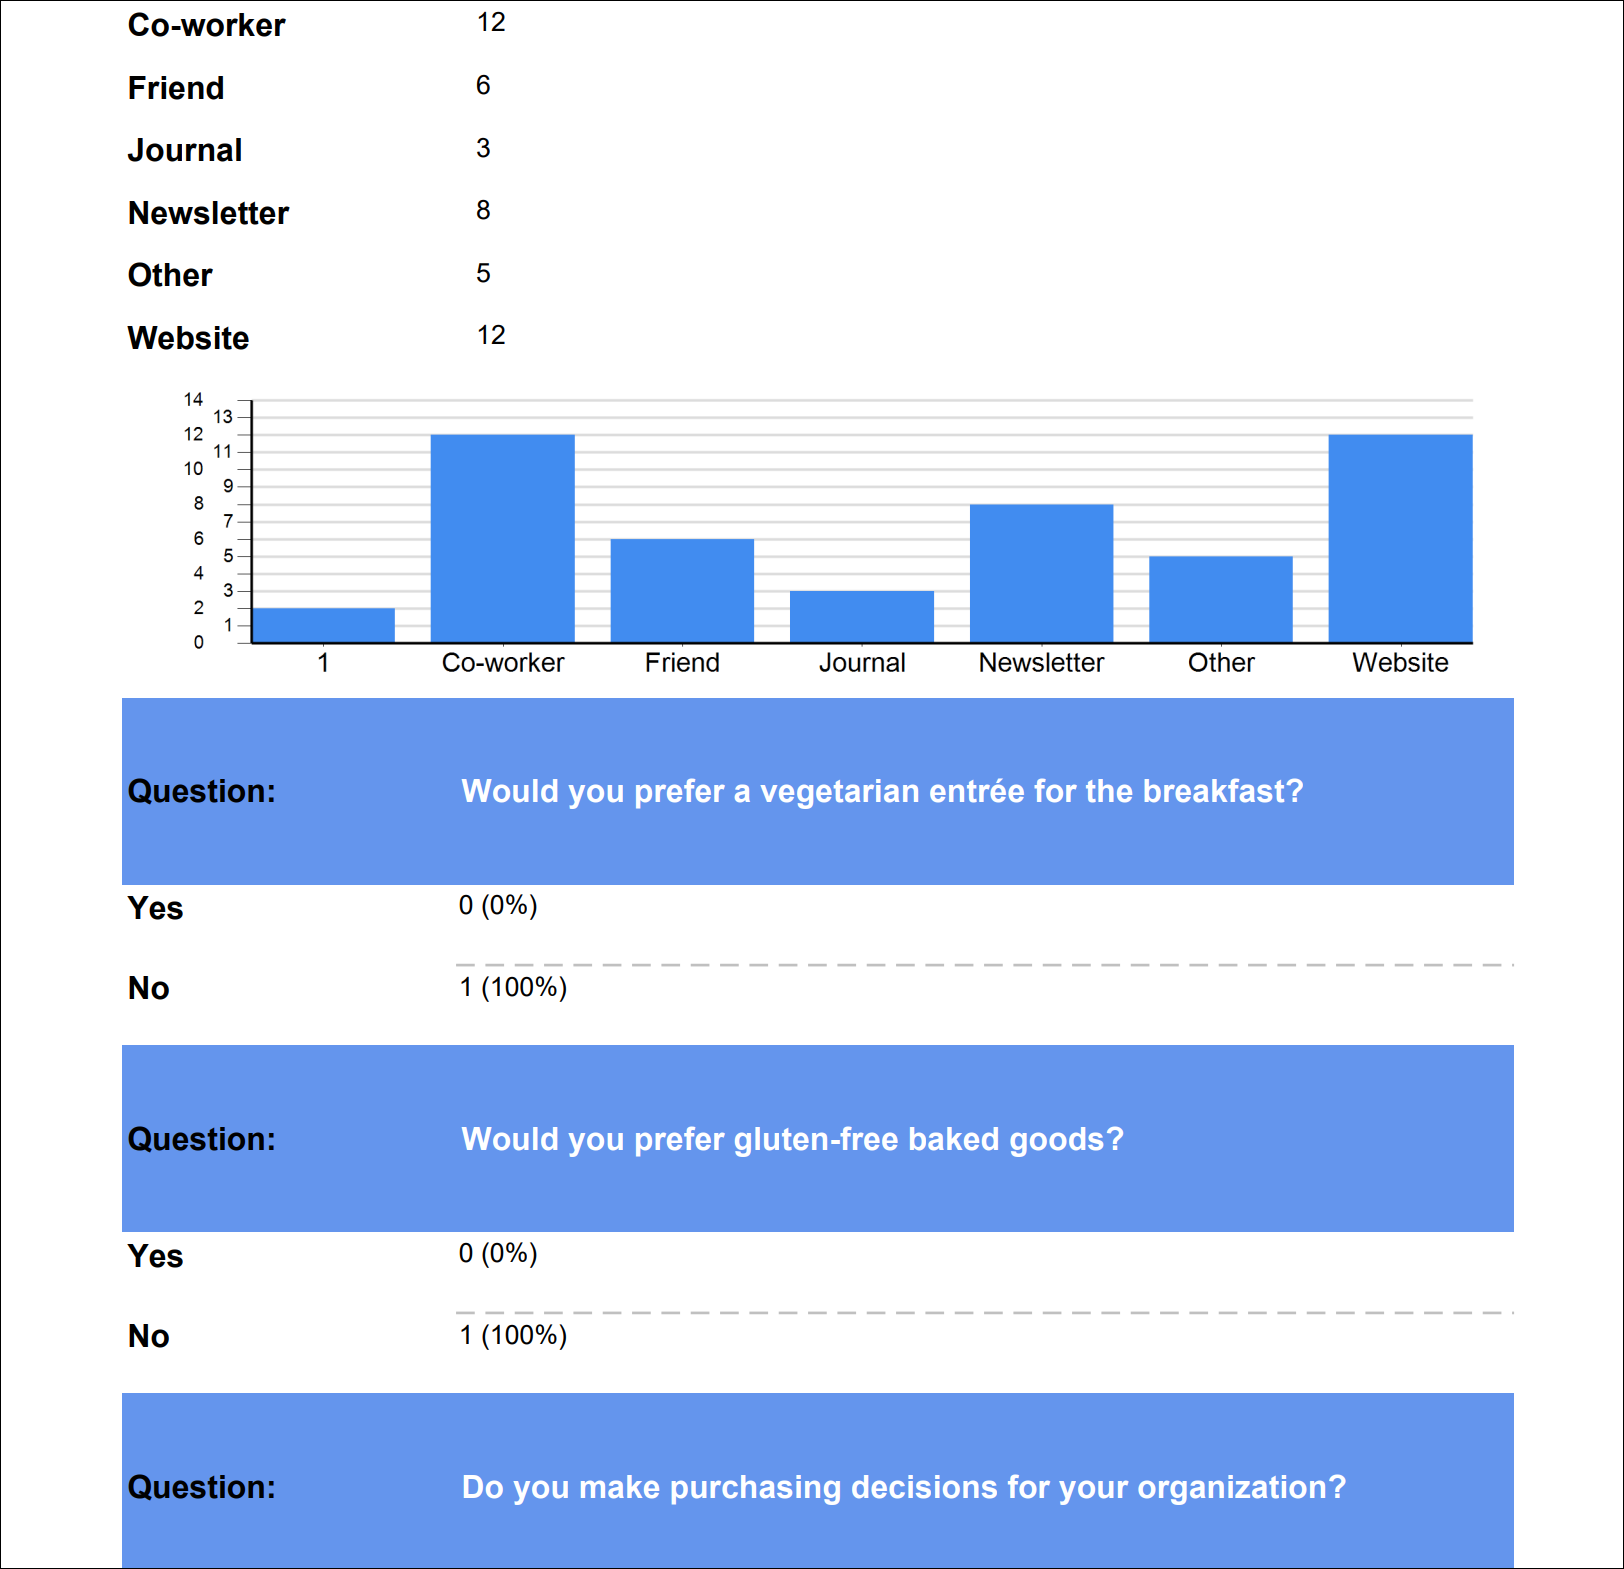
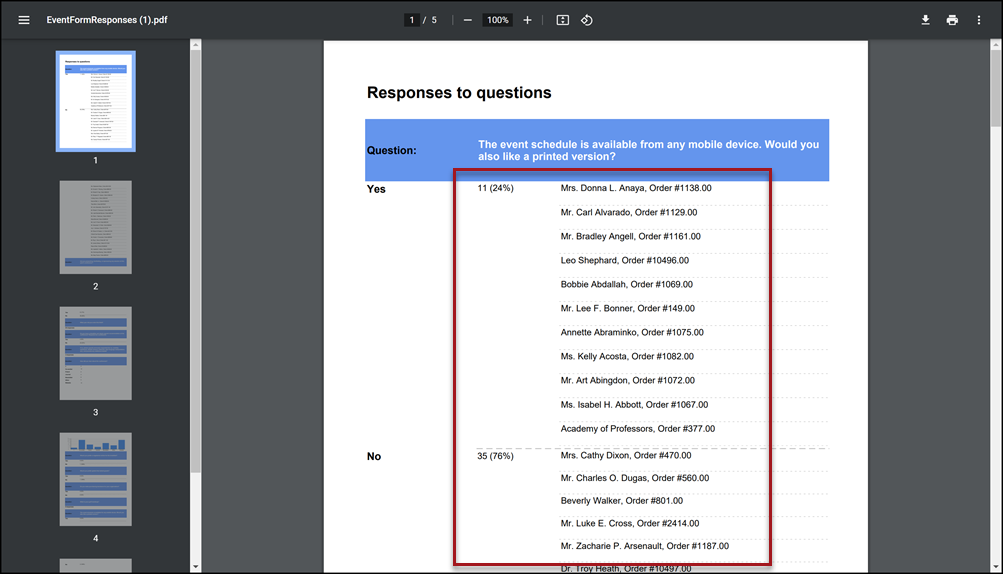
Expand each section before exporting the report if you want all data to display in the exported report.
Creating a query of event questions
Event questions can be reported on using the FormDefinitionFieldData and FormFieldResponseData business objects. Do the following to create your own event question report:
- Create a new query.
- (Sources tab) Add the following sources:
- FormDefinitionFieldData
- FormFieldResponseData
- NetContactData
- CsEvent
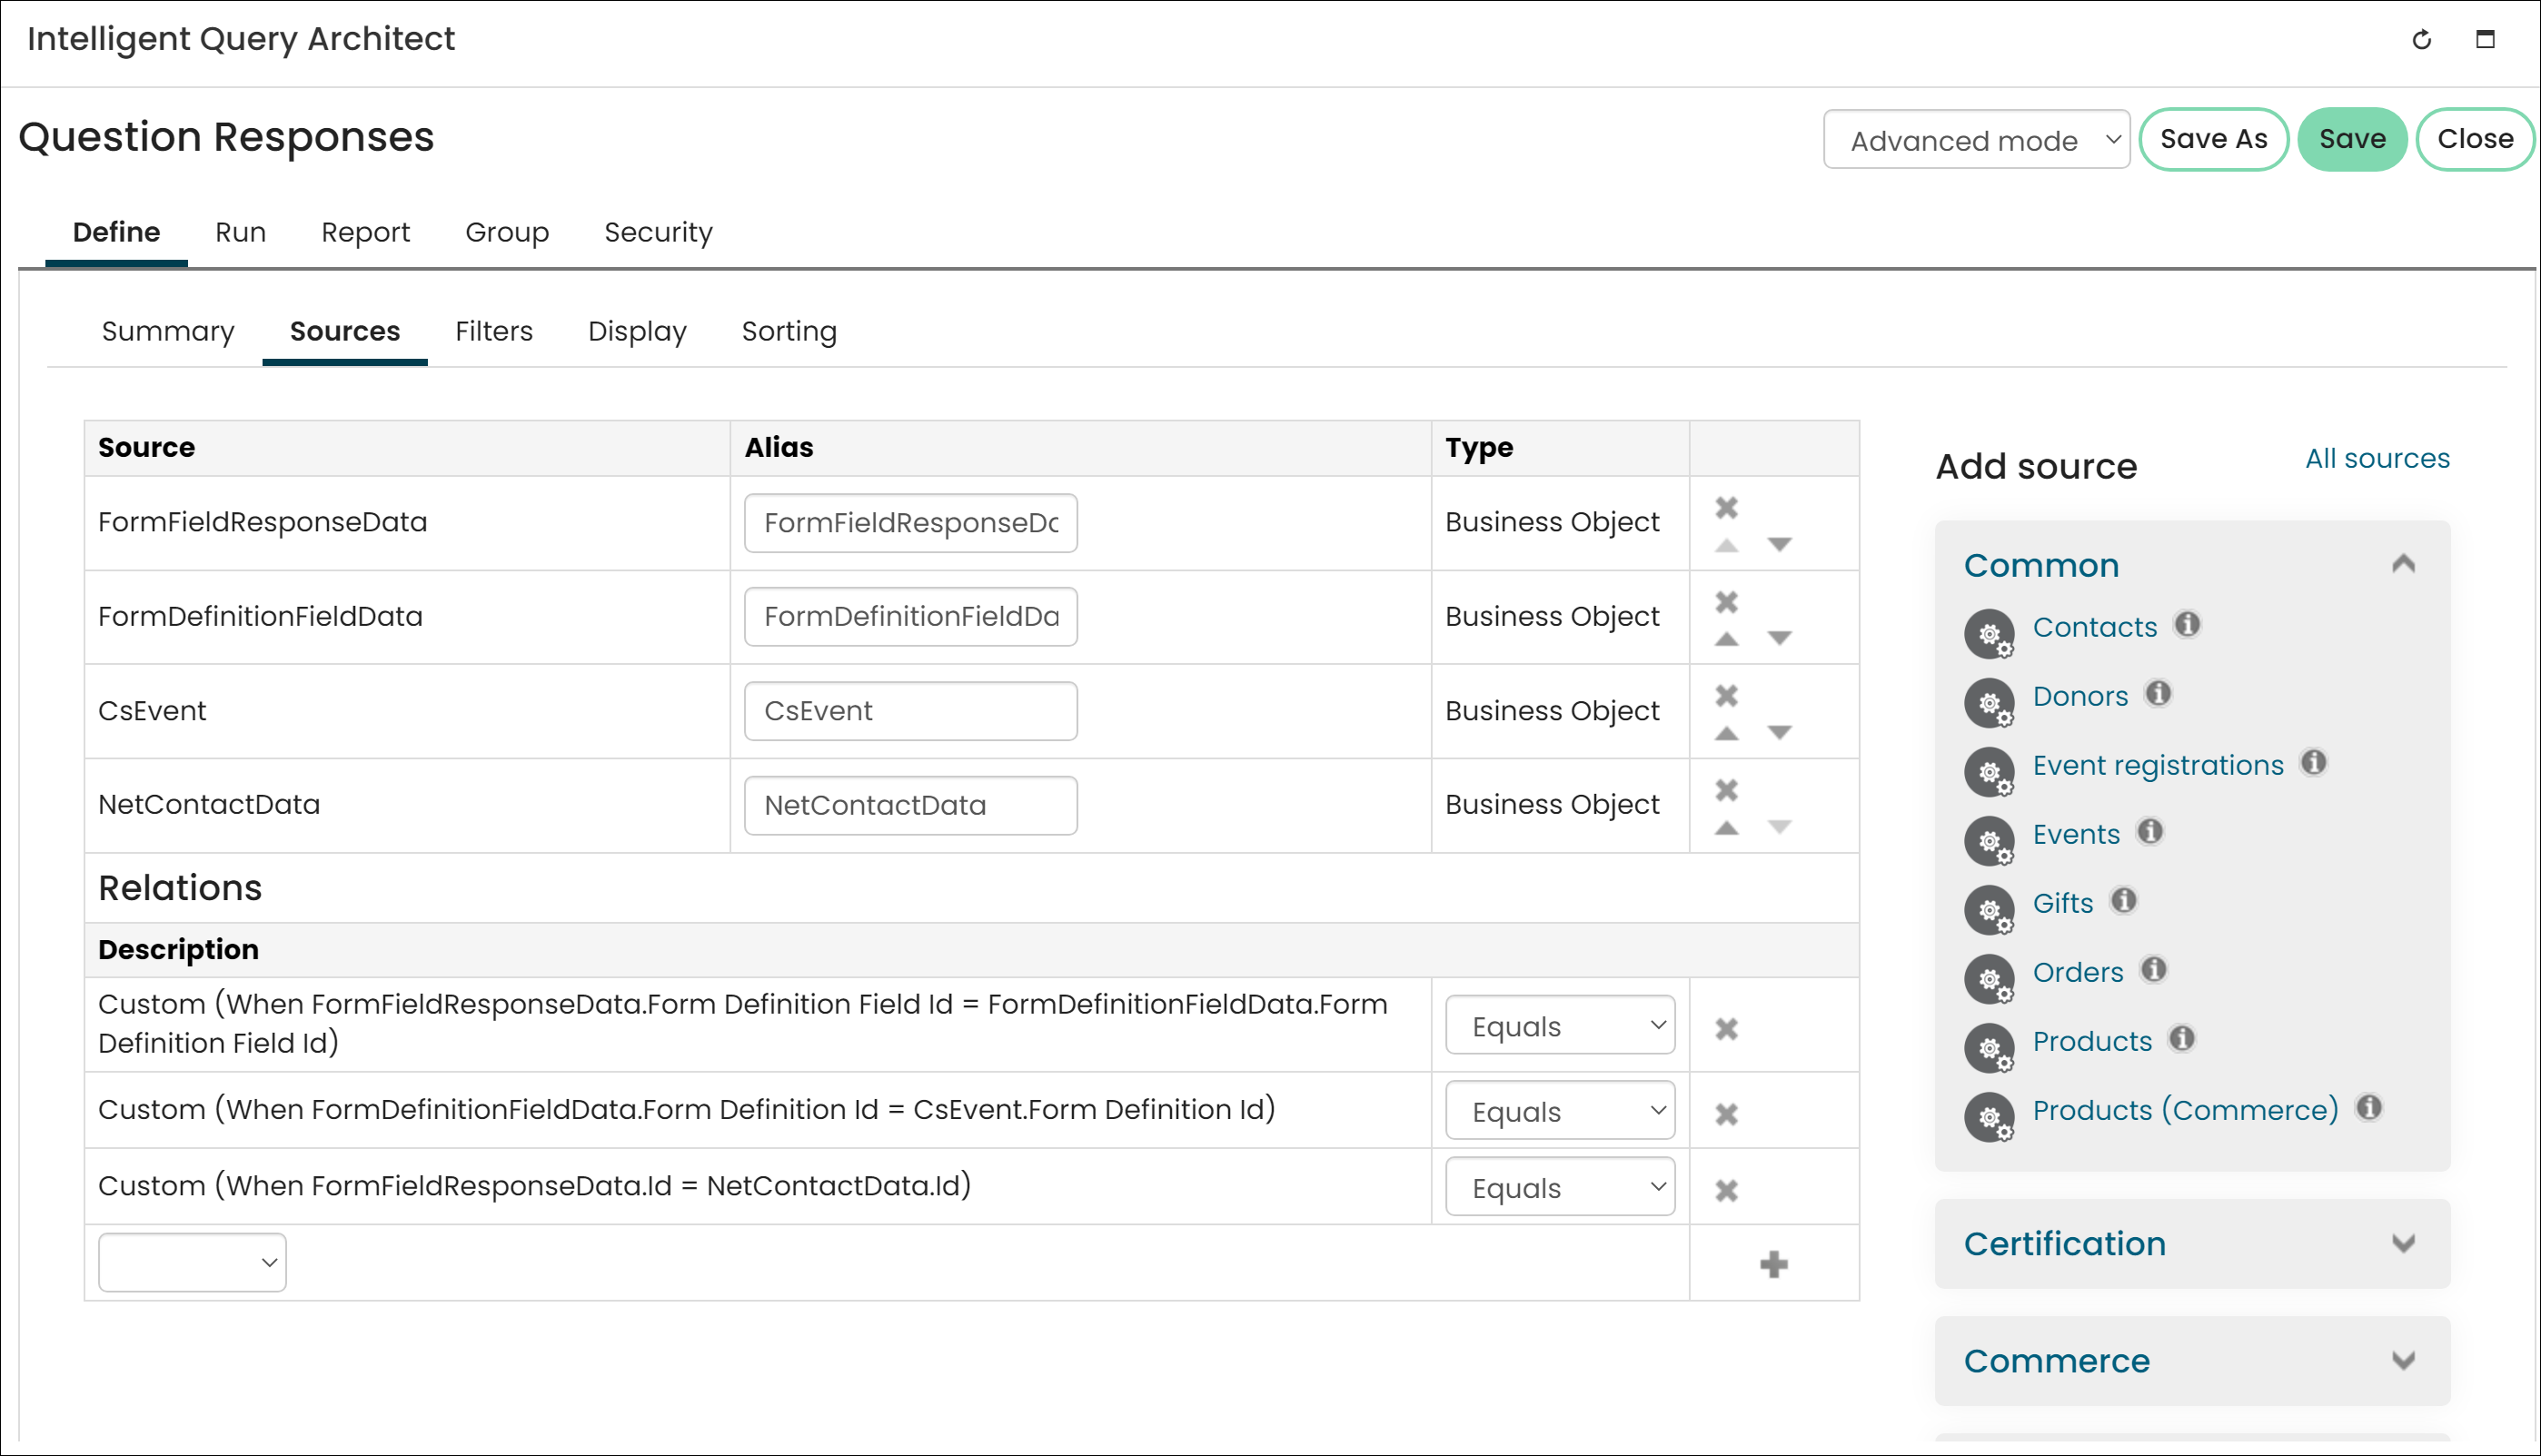
- (Sources tab) Relate the sources:
- FormFieldResponseData.Form Definition Field Id = FormDefinitionFieldData.Form Definition Field Id
- FormDefinitionFieldData.Form Definition Id = CsEvent.Form Definition Id
- FormFieldResponseData.Id = NetContactData.Id
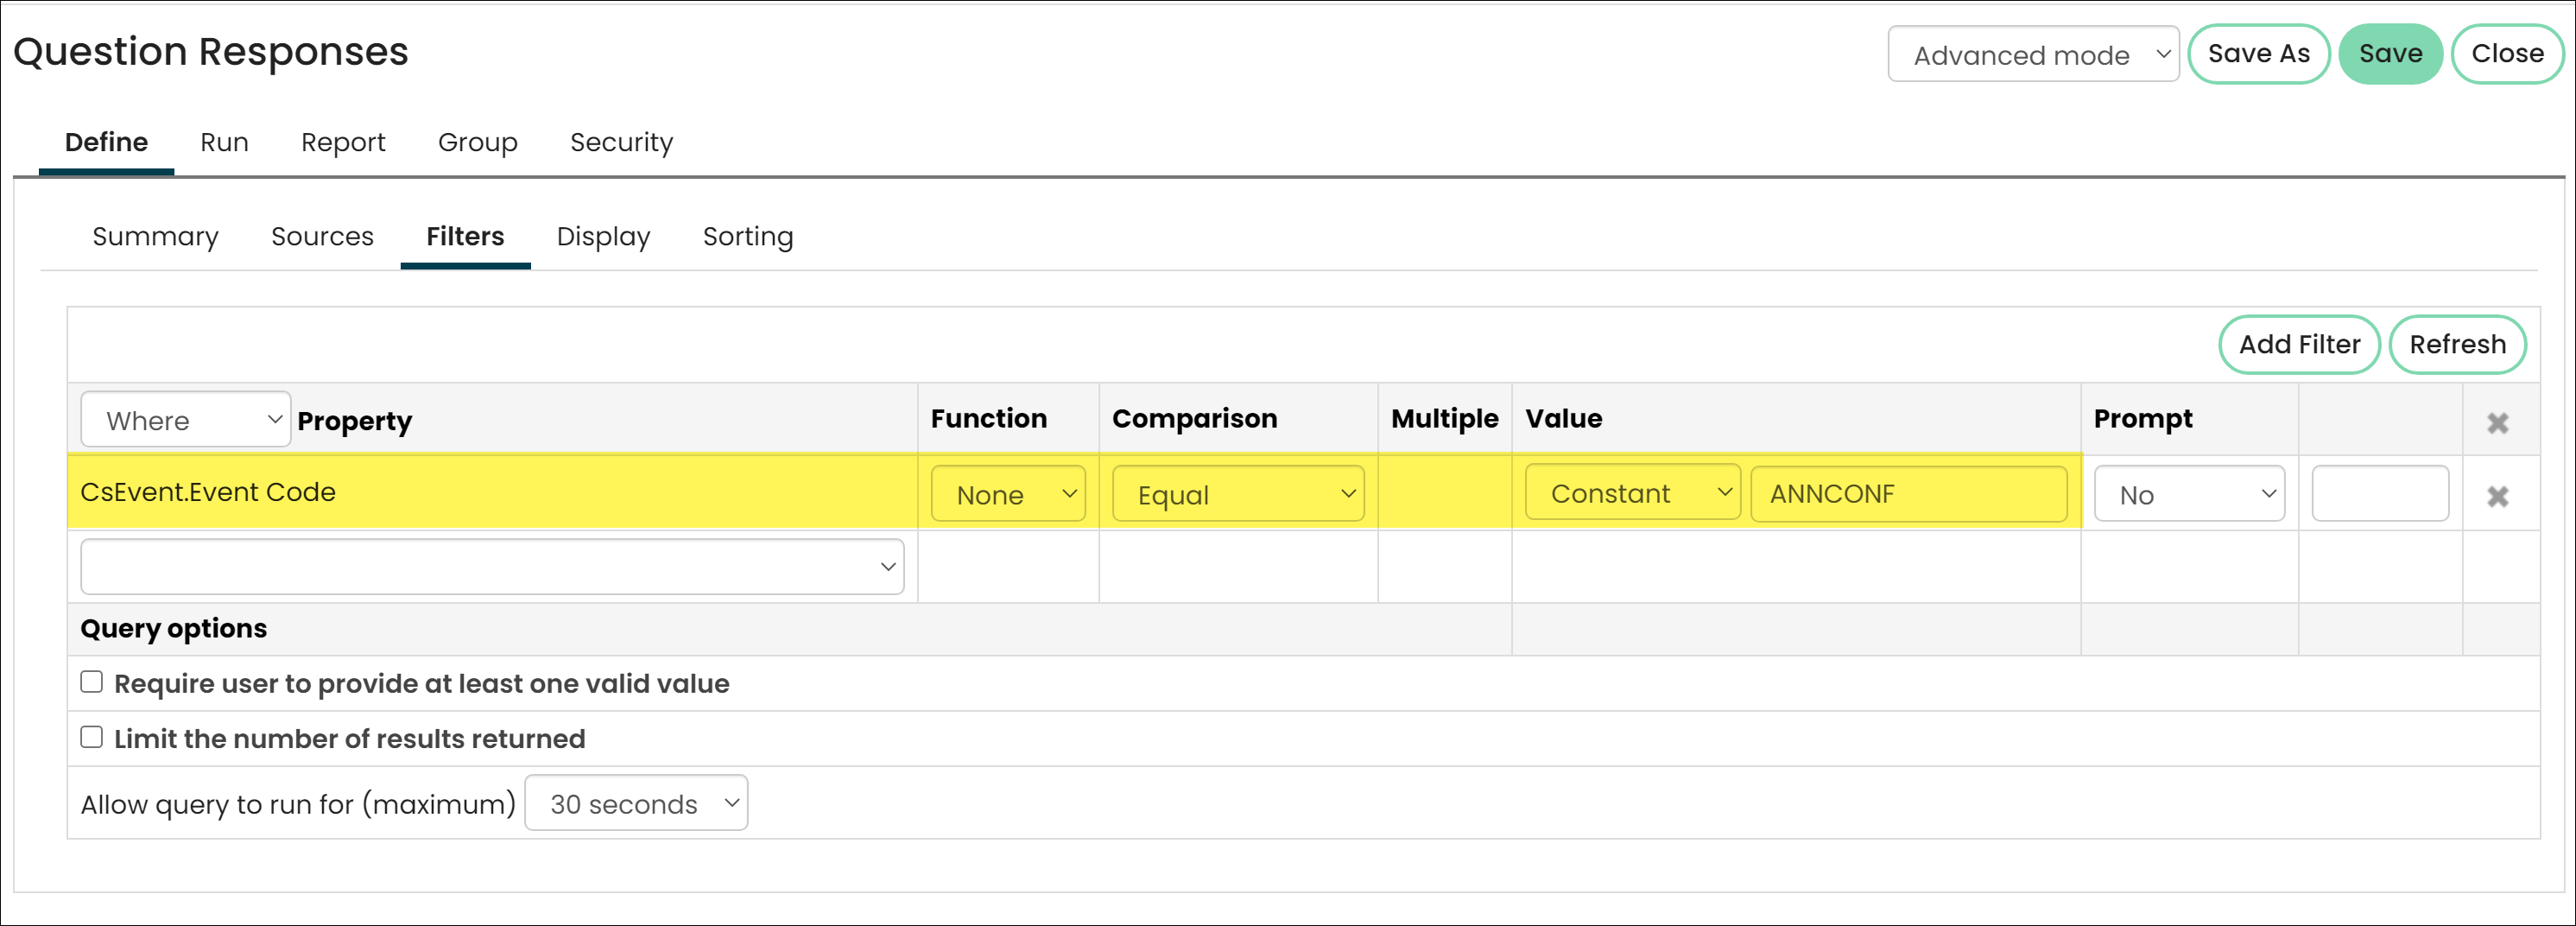
- (Filters tab) Add any desired filters, such as setting the CsEventCode.Event Code property equal to a specific event.
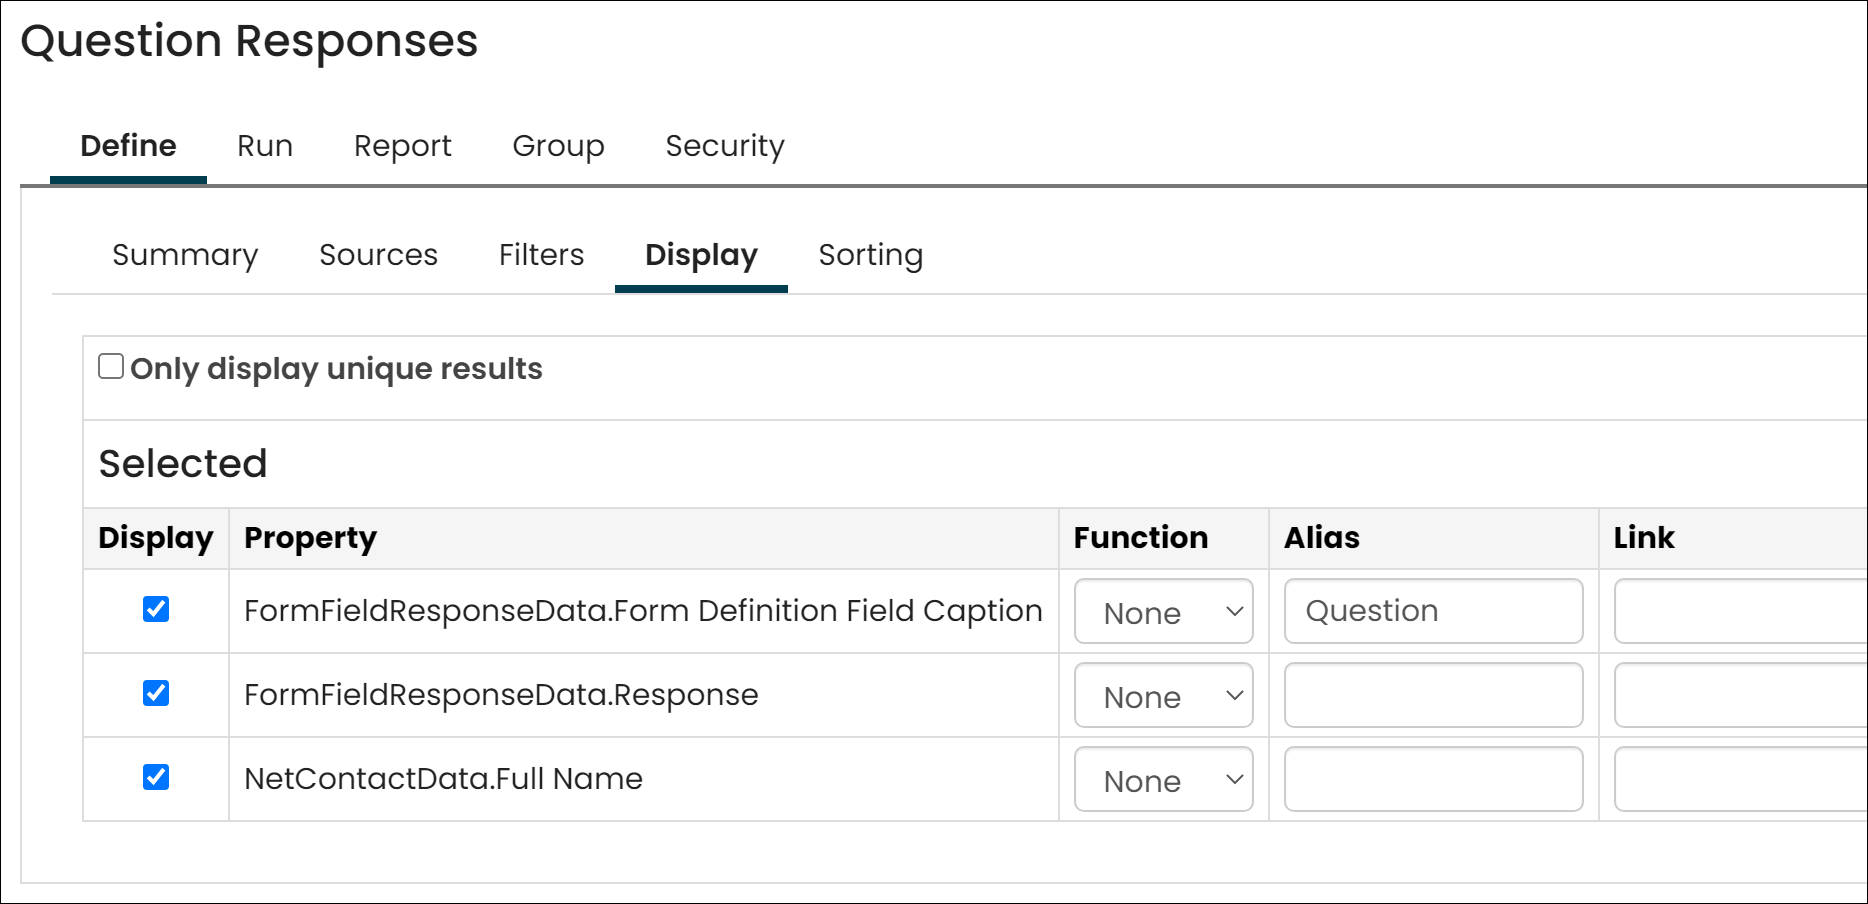
- (Display tab) Add the following display properties:
- FormFieldResponseData.Form Definition Field Caption - Alias this property as Question.
- FormFieldResponseData.Response
- NetContactData.Full Name
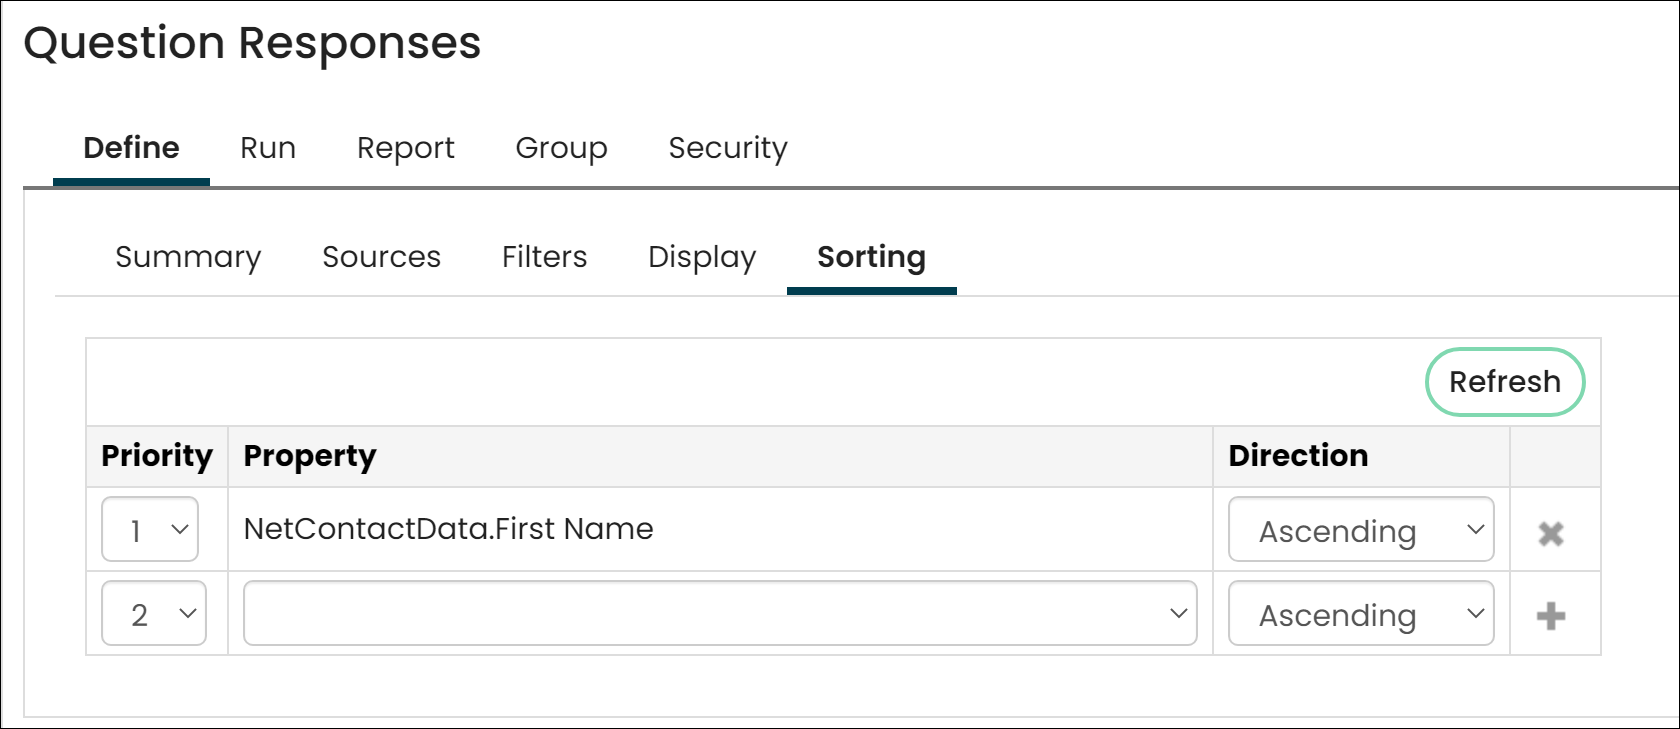
- (Sorting tab) Sort on NetContactData.First Name, so that all responses for a single contact are grouped together.
- Click Save.
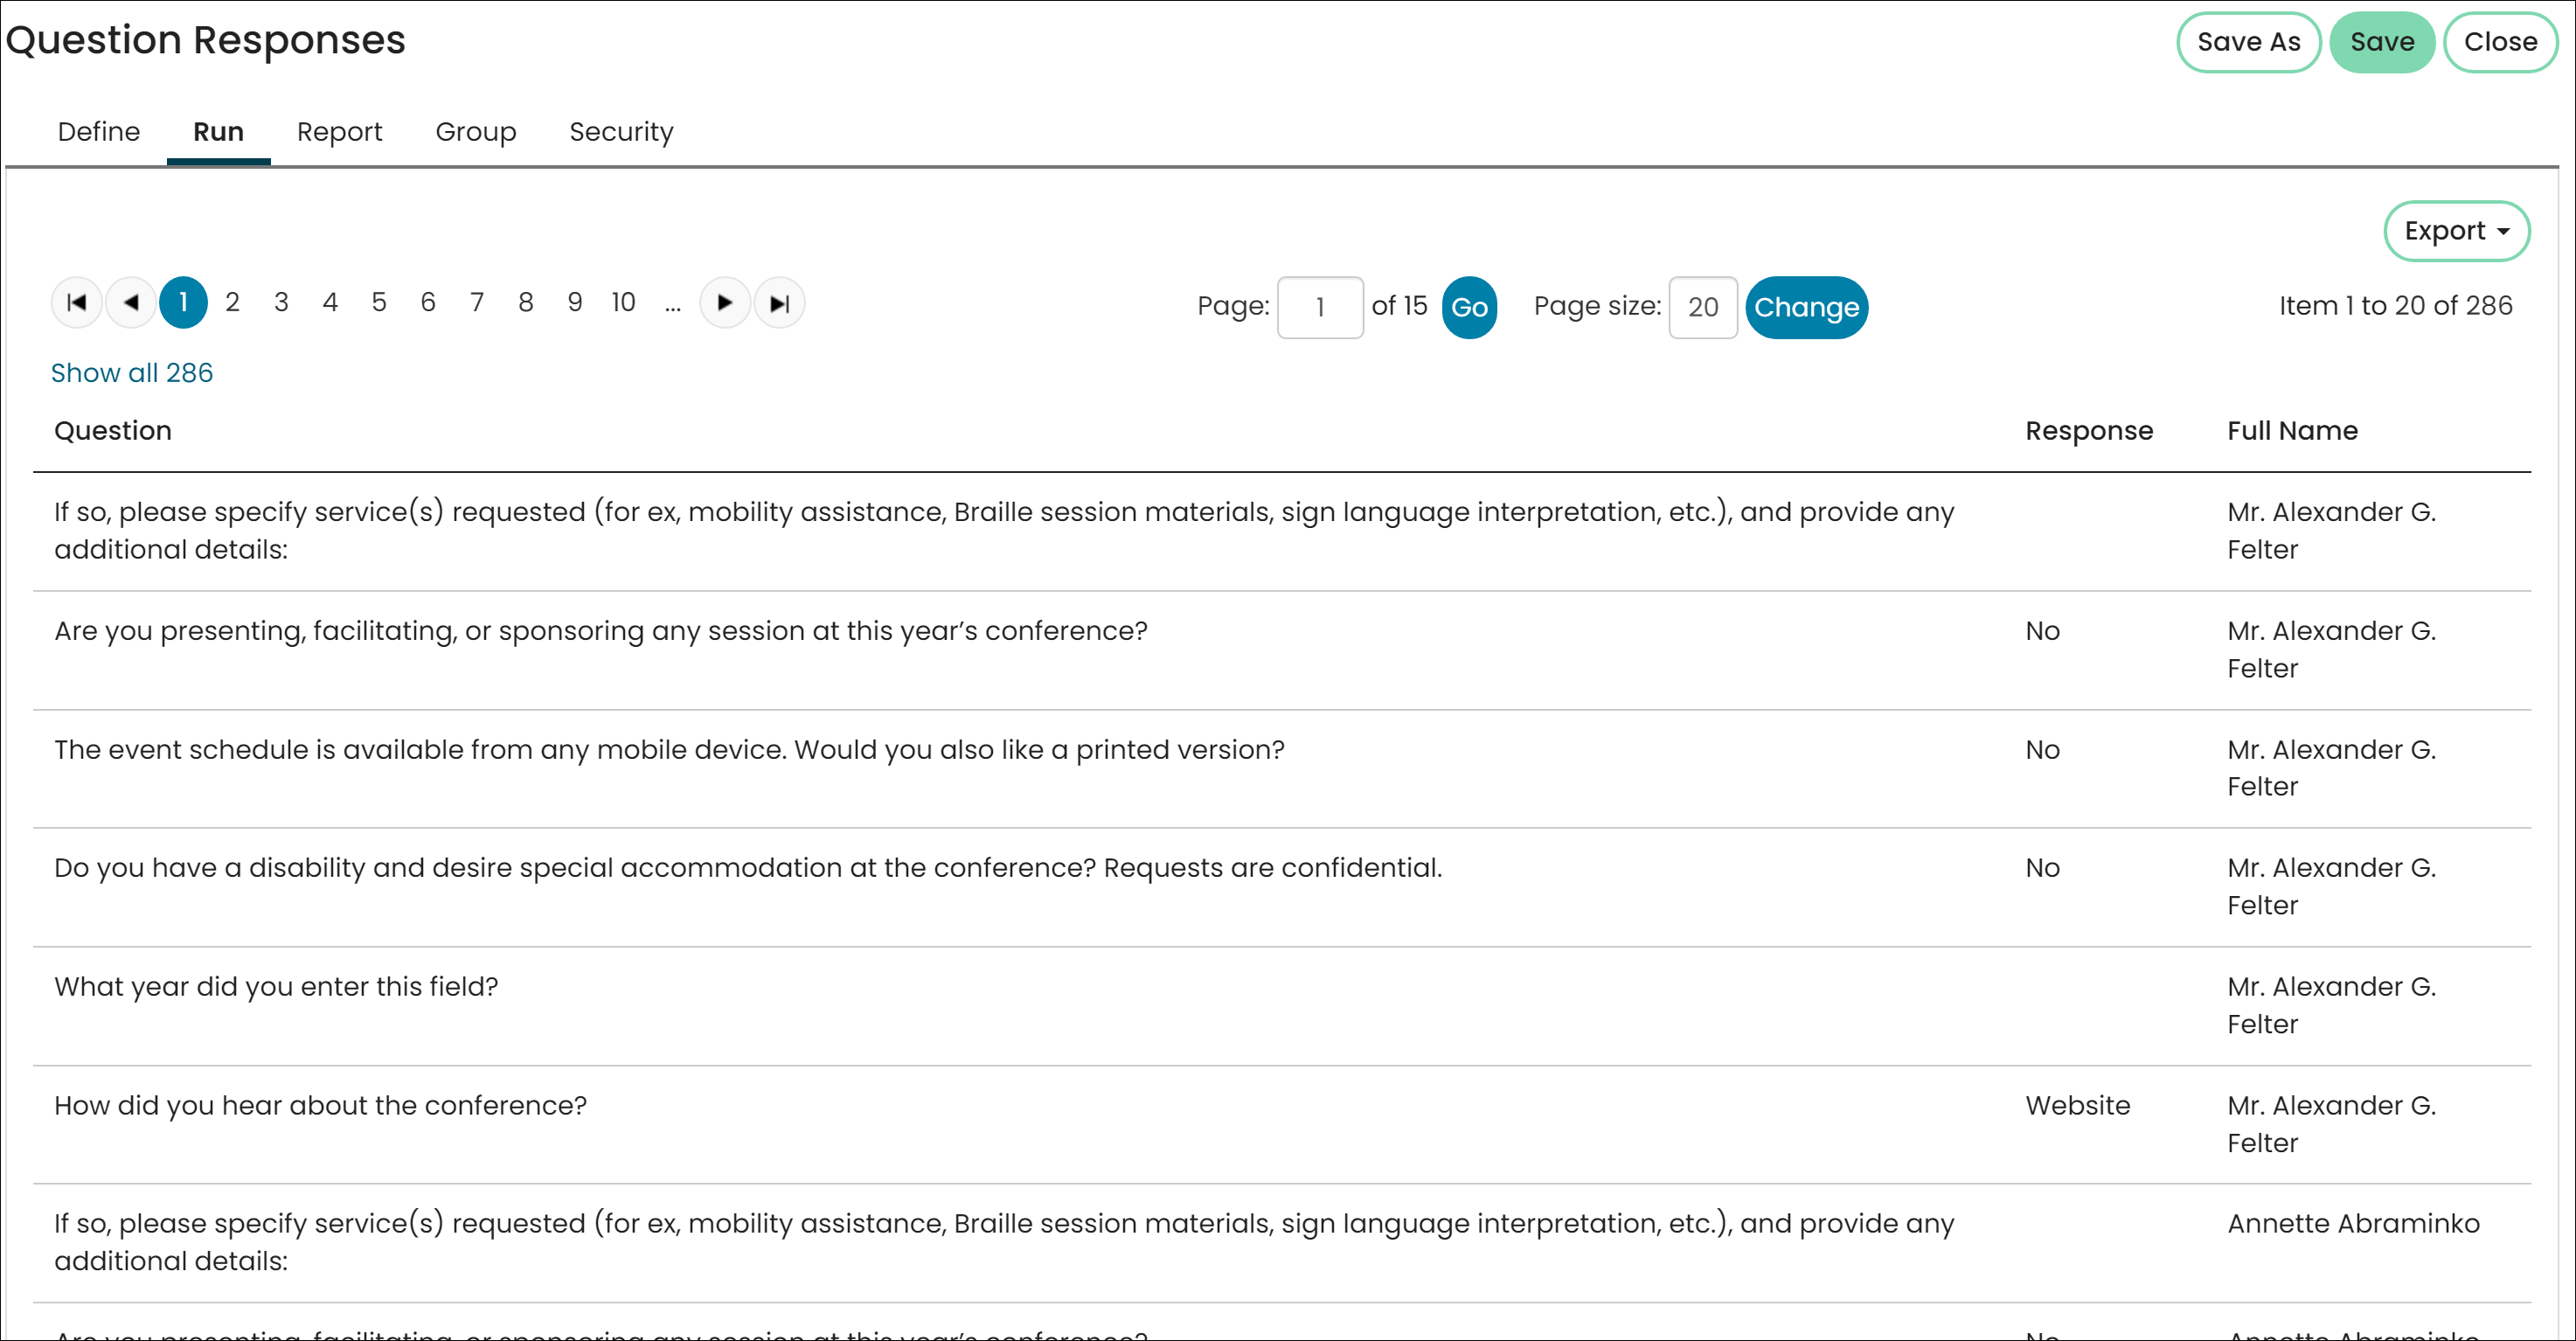
- Click Run.
Updated 3 months ago