

Exporting general ledger transactions
General ledger transactions that are generated as a byproduct of processing commerce activities in iMIS can be exported into a CSV or IIF file. Use the IIF format if you are using a desktop version of QuickBooks. Use the CSV file format for importing into other accounting packages. In order for the file to be properly imported into other accounting packages, you might need to convert the exported file into a different format that your accounting software recognizes.
To set the file format type and the summarization option (Month, Day, or Detail), go to Settings > Finance > General. Depending on the selected GL summarization option, the information returned in the CSV export file will vary:
- Transaction Date - The transaction date that appears depends on the selected summarization option.
- GL Account
- Project Code
- Bill To Customer - Detail level only
- Ship To Customer - Detail level only
- Description
- Amount
- Debit
- Credit
- Fiscal Period
The information returned for the IIF format is organized into columns that hold direct meaning for QuickBooks:
- DATE
- ACCNT - The GL Account Code
- NAME - Set to iMIS for all lines
- MEMO - Populated with the most meaningful description for the transaction detail or summary line
- AMOUNT - Set to a positive amount for a debit or negative amount for a credit
- CLASS - Set to the Project Code, if populated for the GL Account
Selecting a summarization option
Before you export general ledger transactions, you must set a summarization option and define the file format. The summarization options allow you to specify how the exported general ledger transactions will be organized, and the file format in which the transactions will be exported into.
To choose a summarization option, go to Settings > Finance > General:
-
Summarize exported journal entries by - Choose the summarization option for general ledger transaction exports:
- Detail - Each journal entry (debit and credit) line will be exported and organized by date, and then by overall journal entry in the order the transactions were processed in iMIS. The greatest amount of information is returned using this option.
- Month - One summarized journal entry per month will be exported, sorted, and summarized by GL Account, Project Code, and where applicable, Product Code. Each summary journal entry will be dated the first day of the month and year the transactions were dated. Each journal entry line item represents a summarized amount. A separate summary journal entry will be created for each month and year the transactions are exported within the specified date range.
- Day - One summarized journal entry per transaction date will be exported, sorted, and summarized by GL Account, Project Code, and where applicable, Product Code. Each journal entry line item represents a summarized amount. A separate summary journal entry will be created for each day the transactions are exported within the specified date range.
-
Default export file format - Exported general ledger transactions will be downloaded to your computer in the selected file format:
- CSV - Useful for various accounting softwares. Each line of the file is a data record, and each record consists of one or more fields, separated by commas. This file format might need to be converted to a format your accounting software recognizes before being imported. Depending on the selected GL summarization option, the information returned in the CSV export file will vary.
- IIF - Select this option if you use QuickBooks Desktop. The file can be directly imported into the QuickBooks Desktop software. The information returned for the IIF format is organized into columns that hold direct meaning for QuickBooks.
📘 Note
Excel might require additional steps to import all data in the CSV file correctly. For more information, see Viewing General Ledger data in Excel.📘 Note
QuickBooks Online might require an additional application to import the IIF file. It is recommended you use either Zed Axis or Guru Importer. Both of these applications are available in the QuickBooks App Store.
Creating a general ledger export file
Before exporting, review the Default export file format and Summarize exported journal entries by options to verify the appropriate options are selected.
Do the following to generate a general ledger export file:
- Go to Finance > General ledger export.
- From the Create new export file tab, select the Financial entity from which the general ledger transactions will be pulled.
- Select a Begin date and an End date. Any type of transaction dated within the specified range will be included in the export file. If a transaction was already exported, it will not be included in the new export file. For more information on regenerating a previously exported file, see Regenerating a previously exported file.
- Click Create Export File. The file will be downloaded to your computer. The filename will contain the Run Number and Begin date used to generate the export. This will enable you to reconcile against previously exported files listed under the Export log tab. For example, if the Run Number is 4, and the Begin date is November 2nd 2016, the file will be named GL Export R4 11-2-2016.csv.
📘 Note
As a best practice, it is recommended you retain all export files for audit trail purposes. Also, it is recommended that you include the Run Number in a comment field for the group of entries as you import each file. You can find the Run Number on the Export log tab or in the export filename. This allows you to clearly tie each GL journal entry back to a specific set of transactions in iMIS for audit purposes.
If all of the transactions in the specified date range have already been downloaded, no file will be downloaded. The Export log will display the attempted export with No transactions in the Download column.
Viewing general ledger data in Excel
Excel files may interpret data in the #-#### format, such GL account codes, as dates. To ensure correct formatting of GL account codes, export general ledger transactions, custom batches, and related IQA queries to CSV files. Manually import the CSV files in Excel, and during the import, format the GL account codes as text.
Do the following:
- Export the general ledger transaction or IQA query to a CSV file.
- In Excel, go to File > Open.
- Select the CSV file.
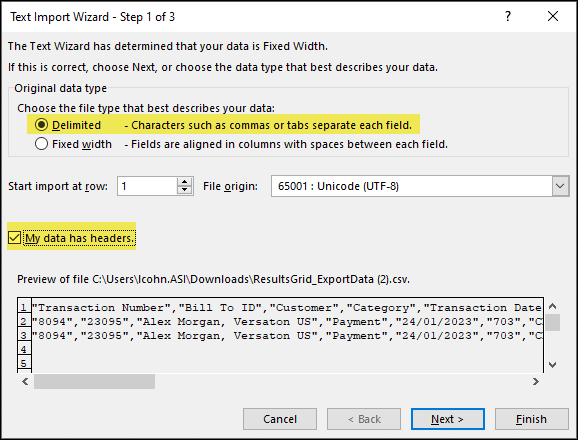
- From the Text Import Wizard, select Delimited and enable My data has headers. Click Next.
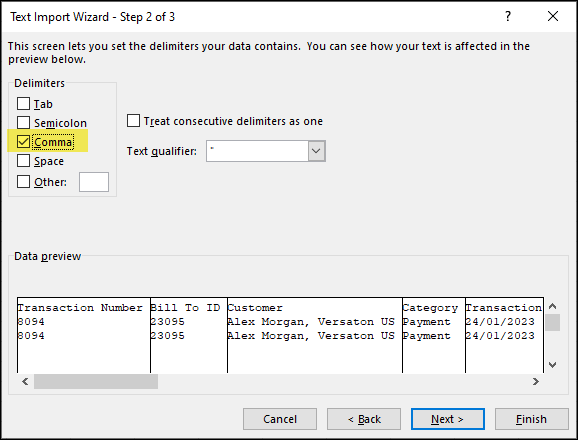
- In the Delimiters area, select Comma only. Deselect any other delimiters. Click Next.
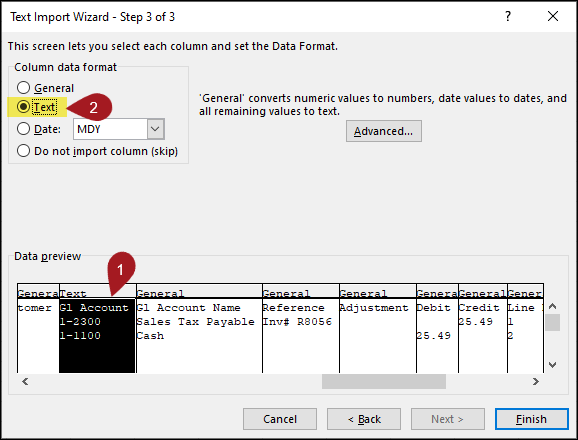
- Select the column with data in the #-#### format, then select Text as the Column data format. Repeat for each column with this format.
- Click Finish.
For more information, see the related Excel documentation.
Regenerating a previously exported file
Do the following to regenerate a previously exported file:
- Go to Finance > Closing procedures> General ledger export.
- Click the Export log tab.
- Locate the export, then select Download. The file will be automatically downloaded to your computer.
📘 Note
To regenerate the export file into a different file format or summarization option, change the Default export file format or Summarize exported journal entries by options before downloading the file.
Updated 5 months ago