

Hiding inactive groups
Although groups cannot actually be deleted, you can hide information about inactive groups from your website users. If you do not want website visitors to access information about obsolete groups, you can hide the groups in search results on your member website. To hide groups, you must complete the following steps:
- Set the obsolete groups to a status of Inactive.
- Create a query that only retrieves groups with a status of Active. You can copy the All Group - Search query, which retrieves all of the groups in your database, and then modify the copied query to retrieve only active groups and to prohibit users from changing the group status when searching for groups.
- Add a Query Menu content item to your Member site with the query that retrieves active groups designated as the source query.
NoteiMIS does not allow you to delete groups because iMIS requires group data to maintain an accurate history for your contacts.
Setting groups to a status of Inactive
Set to Inactive the status of any groups that you want to hide in the search results:
- From the Staff site, go to Community > Find groups.
- Enter the necessary search criteria to find the group you want to mark as Inactive.
- Click Find.
- Open the group.
- Click the pencil icon.
- From the Group Status drop-down, select Inactive.
- Click Save.
For more information on groups, see Setting up groups.
Creating a query that only retrieves groups with a status of Active
To omit inactive groups from search results, create a query that only retrieves groups with a status of Active. When you use this query as the source query in the Query Menu content item on your member website, the query allows website users to run a search that omits inactive groups from the search results.
To create this query, you can copy the AllGroups - Search query, which retrieves all of the groups in your database. Then, modify the copied query, so it retrieves only active groups and prohibits website users from changing the Status search criteria when searching for groups.
To edit the AllGroups - Search query, do the following:
- From the Staff site, go to RiSE > Intelligent Query Architect.
- Go to ContactManagement > DefaultSystem > Queries > Groups > FindGroups > AllGroups.
- (Define tab) Click Filters.
- In the Group.Group Status row of the grid:
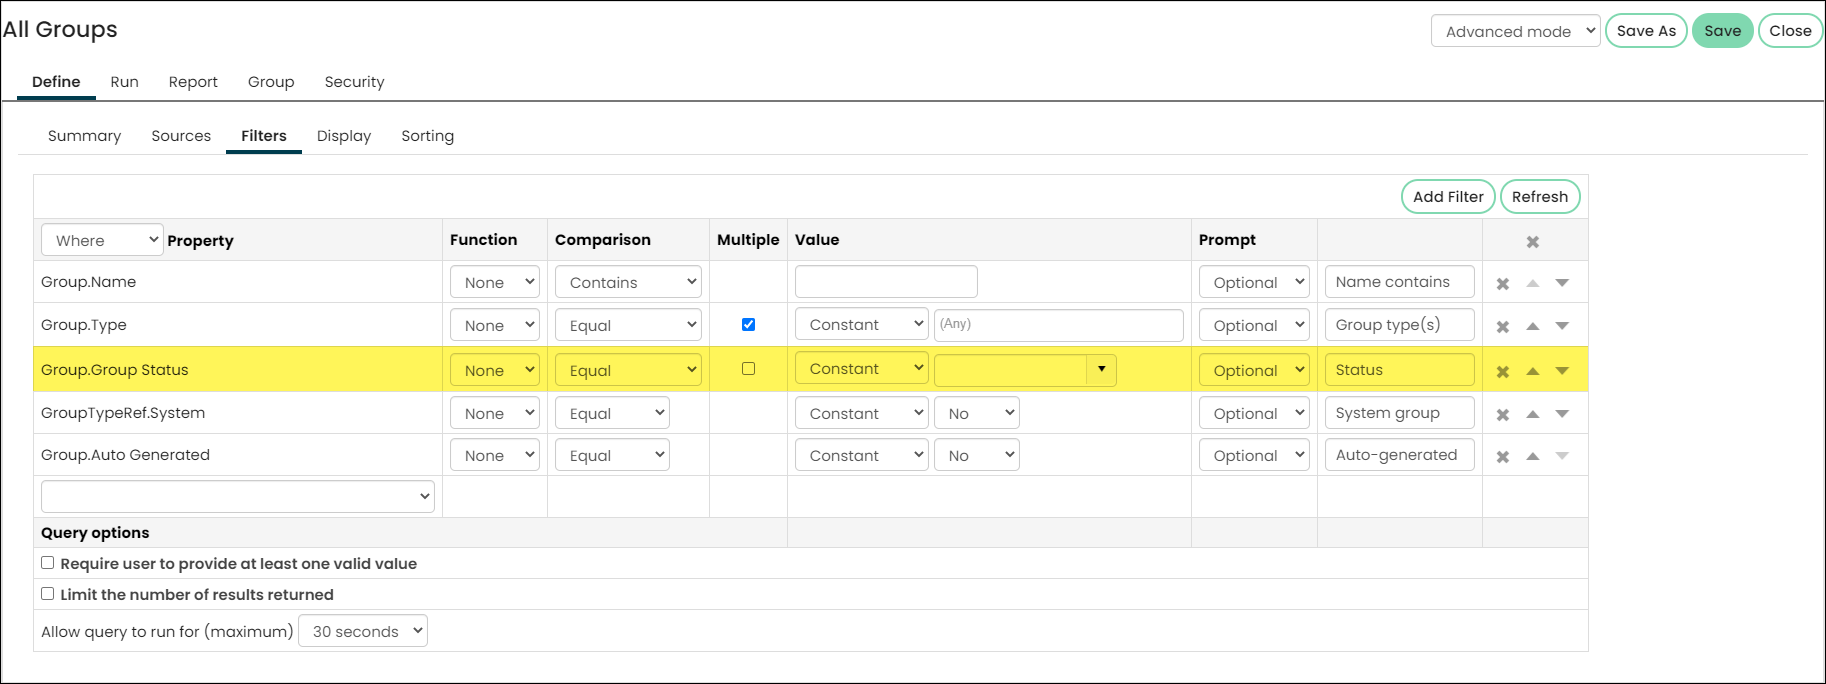
- From the Value drop-down, select Active. The query will only retrieve groups with a status of Active.
- From the Prompt drop-down, select No. When the query is set as the source query for the Query Menu content item, the content item will not prompt website users to select the status when searching for groups.
- Click Save As.
- In the Name field, enter a new name for your copied query.
Note
It is recommended that you preface the name of the copied query with an acronym for your organization. For example, a staff member at Advanced Solutions International might name the copied query ASIActiveGroups.
- Click OK.
- Close the IQA page. The copied query is now available for use.
For more information on the Intelligent Query Architect and using queries, see Intelligent Query Archietect (IQA).
Adding or editing the Query Menu content item
To allow members to search for groups, add a Query Menu content item to your member website, or edit the existing Query Menu content item that users use to currently search for groups. The Query Menu content item should use the query you created previously as the source query. Since this new query only retrieves active groups and does not allow users to change the Status manually when searching for groups, groups set to a status of Inactive are always hidden in the search results.
Do the following to edit the Query Menu:
- On your Member site, navigate to the page to which you want to add the Query Menu content item.
- Click the Easy Edit icon.
- Click Content Designer in the lower left corner. The Content Designer is displayed.
- Select Add content in the zone where you want to add the Query Menu.
- In the ContentTypes folder, select Utility.
- Select the Query Menu content item, then click OK.
- Specify the appropriate configuration options including:
- (optional) Specify a Title for the content item. The title displays above the content item on the website.
- In the Source query or folder area, click select.
- Go to ContactManagement > DefaultSystem > Queries > Groups > FindGroups.
- Select the query you created previously and click OK. The query is designated as the source query for the Query Menu content item.
- Click OK to add the Query Menu content item to the page.
- (optional) Drag the content item to the location where you want it to be displayed.
- Save & Publish the content record.
NoteMember site users can run a search for all groups, including inactive groups, from the Communities web page. If you do not want website users to use this feature, remove the Common Search content item from this web page. The Keyword Search in the top right corner of the website will also retrieve inactive groups in its search results. This feature cannot be removed.
Updated 5 months ago