

Contacts: Settings
Managing rosters is easy for staff and Group Administrators, or you can empower your users to self-manage their group memberships. To do this, simply enable the feature which permits automatic additions to the list when users join a group or organization. For more information about group administration and roster moderation, see Defining group member roles.
To access these configuration settings, go to Settings > Contacts.
General
Review the following general Contacts options.
- When selected:
- All users, including Public users, are able to add themselves directly to groups without approval from an administrator.
📘 Note
Public users can change the company name for their record or other records for which they have edit permissions if the Allow all users to link to an organization option is selected. For more information, refer to Changing the displayed Primary organization name for a contact. - When not selected:
- Public users are able to enter an organization during registration, but this does not add them to the organization group or organization roster.
- Group administrators can use the Group List Editor to add contacts to the roster for the company (or group) they moderate (or administer).
- Staff users (Full, or with administrative privileges) can add contacts to groups or organizations using Group List Editor, Account Creator, or through the mini profile.
Users who can bill to their organization
A Company Administrator can bill to their organization; however, you can extend that functionality to all users, if desired. Go to Settings > Contacts > General, then choose an option from the Users who can bill to their organization drop-down:
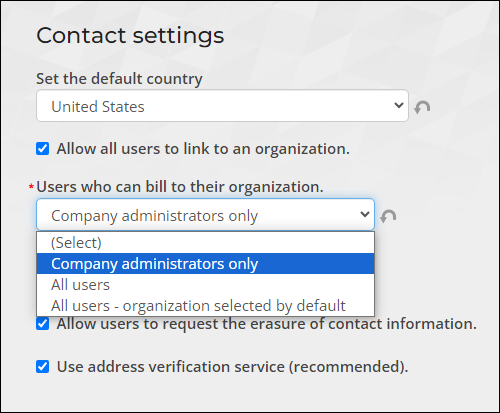
- Company group member administrators only is set by default. If this option is selected, only a Company Administrator or staff user acting On behalf of a Company Administrator can select their organization as the Bill To contact.
- All users enables all users, including public users, the ability to select their organization as the Bill To contact. When this option is selected, the Bill To payment detail in the cart defaults to Myself with the organization also listed as an option.
- All users - organization selected by default allows all users to select their organization as the Bill To contact. When this option is selected, the Bill To payment detail in the cart defaults to the user’s organization with Myself also listed as an option.
📘 Note
Renewal invoices cannot be generated for any contact other than the member. Selecting a Bill To contact in the cart only pertains to that particular order and transaction. The selection does not apply to any future membership renewals.
🚧 Warning
Do not allow all users to link to an organization if you also allow users to bill an organization. This would allow anyone to create an account and link and bill to any organization.
Staff on behalf of a customer can bill to their household group member administrator; however, you can extend that functionality to all users, if desired.
- None is set by default. Select this option if you are not using households.
- Staff on behalf of a customer allows staff users to select On behalf Of contact's household group member administrator as the Bill To contact when checking out.
-
All users enables all users, including public users, the ability to select their household group member administrator as the Bill To contact.
- Household group member administrator billed by default - This option will only be available when Staff on behalf of a customer or All users is selected. If this option is enabled, the Household group member administrator will be the default Bill to contact for any contact in that household.
📘 Note
If Users who can bill to their organization and Users who can bill to their household group member administrator are both set to All users, the default Bill To will be the primary contact in their household. The drop-down will also provide the option to select the current user and their company records as an option to Bill to.
Allow users to request the erasure of contact information
When this setting is enabled, the Erase this contact section is displayed in the Contact Mini Profile. This allows staff users to send a request for a contact's personal data to be erased, and system administrators to initiate the process to mark a contact for erasure. This request is sent to a system administrator for approval. See Erasing a contact's personal data for more information.
Number of days after which unpaid membership renewal invoices are considered past due (for reversal using Process Automation)
Define the number of days after which a membership-renewal invoice is considered past due.
Use address verification service (recommended)
Enable or disable the Use address verification service (recommended) setting. When enabled, the out-of-the-box Address Verification Service runs verification on all addresses entered in iMIS and offers suggestions to clean up the entered address. When disabled, address verification is not performed on any addresses system wide. Even when the setting is disabled, UK addresses still use the UK Postal Code lookup.
📘 Note
If an address is invalid, or there are multiple entries for the same address, the county code isn’t returned by AVS as the address isn’t validated.
See Address Verification Service (AVS) for more information.
Contact security
Define how contacts can see and access other contacts through the use of the contact security queries. The contact security queries allow you to define the contacts that are visible by unauthenticated users (guests), authenticated users (contacts with a login), and members.
Contacts returned in these queries can be found when searching your website, and their profile pages can be viewed by website visitors. These contacts may also be found through the API for each respective user type. When viewed through our API and in search, the following information can be obtained for contacts in these queries: Full name, ID, Profile picture, City, State/province, Country, Email, and Phone number.
🚧 Warning
REST API calls do not use these security queries.
Understanding access levels
Each query grants a specific level of access.
All users access query
All users access query returns group A: All website visitors, authenticated, and unauthenticated users can view group A contacts. If this field is left blank, visitors cannot see the public profiles of any contacts and an error message is displayed.
By default, the following query is used: $/Samples/Security/UserAccess/Contacts available to all users for security. If you wish to modify the default query, you must ensure the results from this query do not return duplicate rows. On the Display tab in the IQA editor, enable the Only display unique results option. This ensures that duplicate contact keys are not returned, as this can cause the query to fail and search indexing to be interrupted, resulting in new contacts not being searchable through the keyword search.
👍 Example
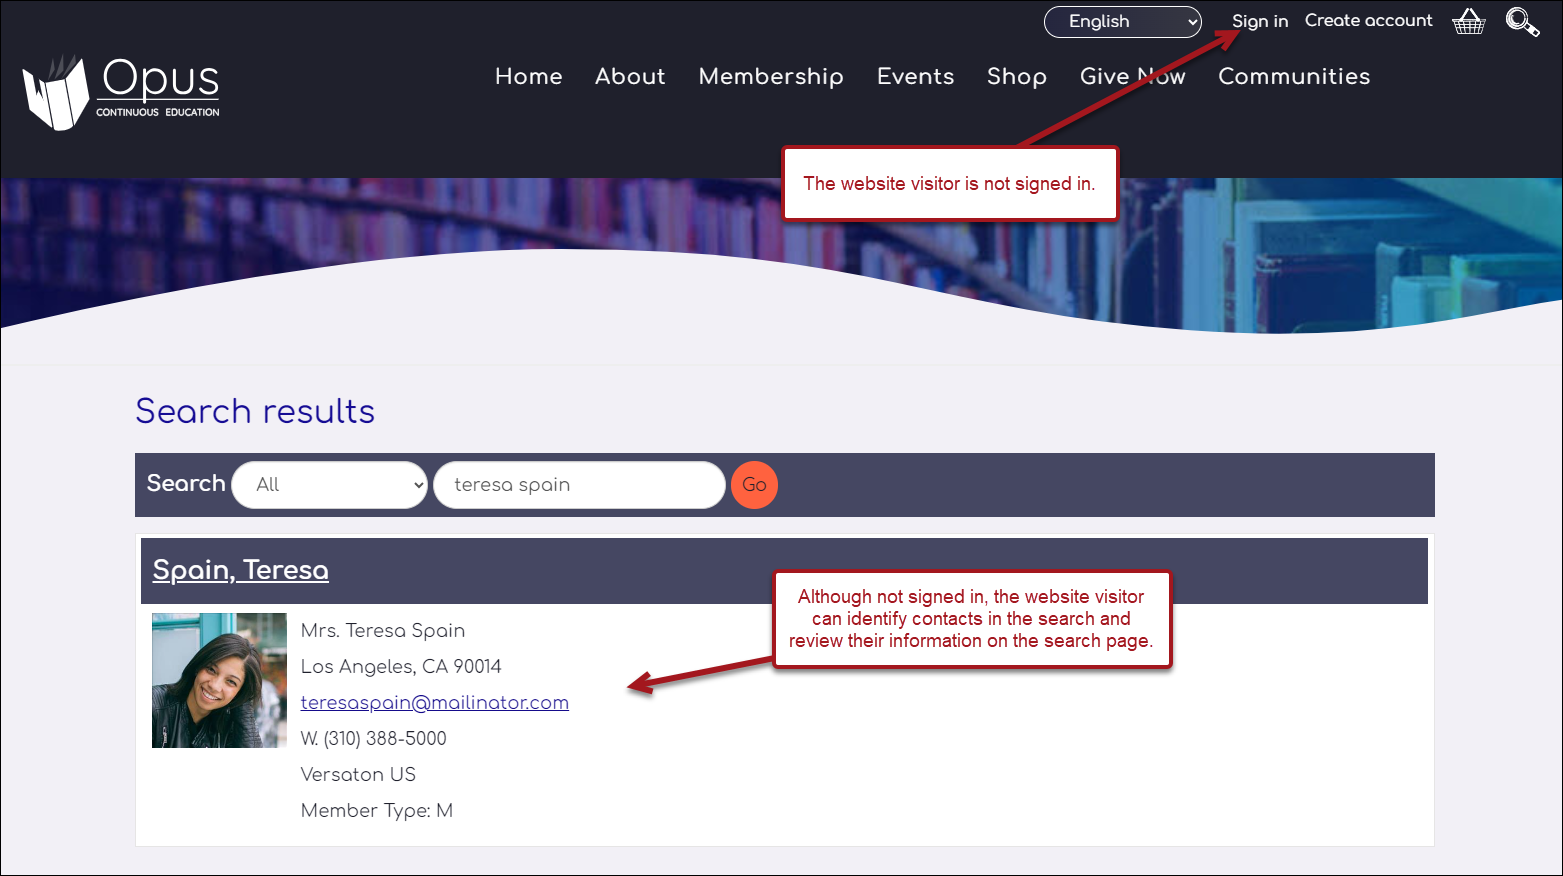
A website visitor who is not logged in uses the website's search to search for Teresa Spain. Since Teresa is included in the All users access query, the website visitor can see her information on the search page. They must login to gain access to her profile.
Authenticated users access query
Authenticated users access query returns group B: Website visitors who are logged in can view groups A and B contacts. Create or edit a query for this field to determine which public profiles all logged-in users can view. Logged-in users will not be able to access public profiles or information for any contacts not included in this query. If this field is left blank, logged-in non-members will effectively have the same level of access as unauthenticated users.
👍 Example
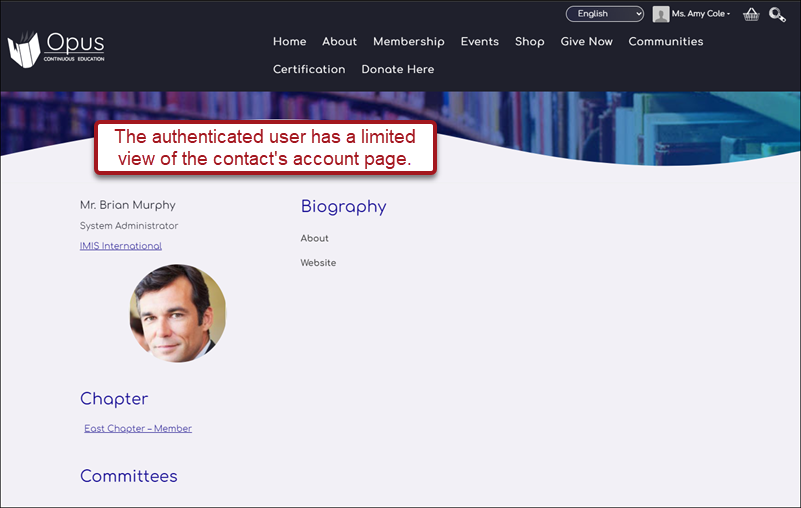
An authenticated user (logged in but not a member) uses the website's search to search for Brian Murphy. Since Brian is included in the Authenticated users access query, the authenticated user can see his information on the search page and can view some information on their profile page.
Using the Authenticated users access query for Register Someone Else
If you intend to have events that take advantage of Register Someone Else, do one of the following to ensure authenticated users have access to all contacts available for registration:
- (recommended) Enable Permit public users to register existing contacts. For more information, see Settings: Events.
- (not recommended for security purposes) Include contacts that can be registered in the Authenticated users contact security query. When you include the contacts in the Authenticated users access query, their public profiles are visible to all logged-in users throughout iMIS, including the search results.
Members access query
Members access query returns group C: Members of your organization can view group A, B, and C contacts. Create or edit a query for this field to determine which public profiles members of your organization are allowed to view. If this field is left blank, members will effectively have the same level of access as logged-in non-member users.
Creating access queries
When creating or editing an access query, you must do the following:
- Use the PartyData business object
- Add the PartyId property to the Filters tab with the Prompt set to Optional
- Add the PartyId property to the Display tab with an Alias of Key_UniformKey
iMIS provides example queries that you can copy and adjust to fit your organization's needs:
- $/Samples/Security/UserAccess/Contacts available to all users
- $/Samples/Security/UserAccess/Contacts available to members
Visitors to your site might receive an error if they click on the name link of a contact they don’t have permission to view. If your customers report seeing these messages frequently, you might want to review your queries in these fields to loosen the restrictions.
📘 Note
After you select a query to determine your online user access, you can edit it directly from this page by clicking Edit source query.
Defining access queries
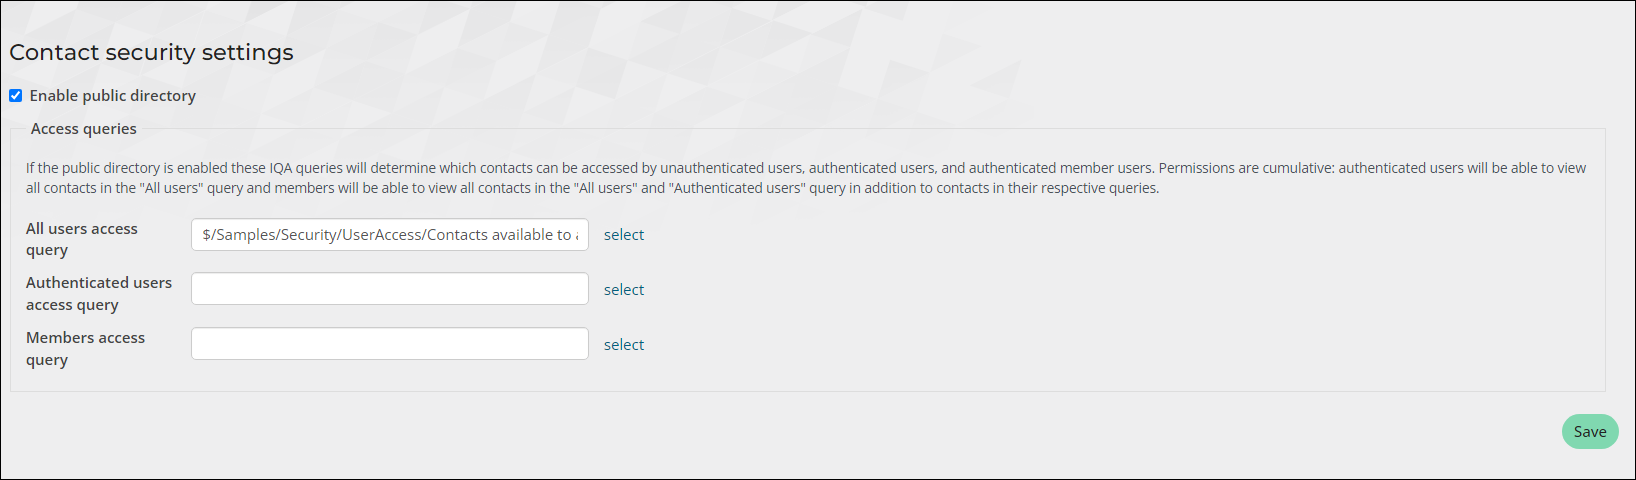
When the Enable public directory setting is enabled, the Access queries become definable. These queries determine which contacts are accessible by unauthenticated users, authenticated users, and authenticated member users.
Do the following to define the contact security queries:
- Go to Settings > Contacts > Contact security.
- Enable the Enable public directory checkbox.
- Select the query for each access level.
- Click Save.
Account management
The account management settings allow you to tailor the account notification messages that display when an account is created, a password is changed, or a sign-in attempt fails. You can also set the address from which email notifications of password resets and username requests are sent and the text contained in those emails.
From the Staff site, go to Settings > Contacts > Account management.
Password requirements text
This setting specifies the message that is displayed when an account is created or a password is changed.
🚧 Warning
This setting does not control the actual password requirements. Password requirements are hard-coded, and are not configurable.
The default message is:
The password must be at least {0} characters long and contain both letters and numbers.
This setting allows you change the text surrounding the {0} variable. For example, you are able to change the text to say, Please enter a password that is at least {0} characters long. The user will see the message, Please enter a password that is at least 7 characters long.
Default message if sign in fails
Specifies the message that is displayed when a sign-in attempt fails. The default message is:
The username or password you entered is incorrect.
If you would like to change this message, edit the Contact Sign In content item directly.
📘 Note
iMIS provides enhanced password hashing to secure all user login passwords. This enhanced password security complies with PCI 3.2 guidelines.
Body of the warning message for a user session that is about to time out (appears 2 minutes before timeout)
When Session Timeout settings are enabled, specifies the warning message that is displayed two minutes prior to a user’s session timing out. The default message is:
                            You are about to be signed out
You will be signed out in [SecondsRemaining] seconds due to inactivity. Your changes will not be saved.
To continue working on the website, click "Stay Signed In" below.
Text for the System Timeout Stay Signed In button
When the Session Timeout warning message appears, users have the option to stay signed in. The text defined in this field will appear on the button that keeps the user signed in. By default, the button text says Stay Signed In.
Text for the System Timeout Logout button
When the Session Timeout warning message appears, users have the option to logout. The text defined in this field will appear on the button that logs the user out. By default, the button text says Logout.
Message after session timeout
Specifies the message that displays when a user’s session has timed out. The default message is:
Your session has timed out. Please sign in to continue.
See Session Timeout for more information.
Message after browser timeout or sign out due to logging in from another browser
Specifies the message that displays when a user is inactive for a period or logs into another browser session with the same credentials.
Default message if user password fails minimum password requirement settings
Use this field to define the message that appears when a user has created a password that does not meet the minimum password requirements.
The email address from which password reset and username requests should be sent
Enter the email address from which email notifications are sent.
Allow "Forgot my username" to automatically create user credentials for existing contacts
If enabled, when a contact does not already have user credentials and submits a Forgot my username request, user credentials will be automatically generated if the email address entered is associated with an existing contact. By default, this setting is not enabled.
📘 Note
The contact cannot have an existing user account, and a contact cannot have different user accounts based on their emails.
📘 Note
The Forgot username? link uses the SignIn shortcut.
Message when an unauthenticated user attempts to create an account using an email address that is already in use
Enter the message that displays when an existing user attempts to create an account. If the user enters an email address that is already associated with an account, this message displays.
The body of the email sent to a user when they fill out the "Forgot my username" form. The special values [UserId], [ContactId], [Email], and [LogonUrl] can be used in the message to insert the appropriate values. HTML is permitted.
The LogonInformationRequestMessage is sent to users who have submitted the Forgot my username form. The default message is:
We received a request for the username associated with this email address. Based on the information provided, your username is:
[UserId]

Please click the link below to return to our website and sign in:
[LogonUrl]

If clicking the link does not work, you can copy and paste it into your browser's address window.
📘 Note
The Forgot username? link uses the SignIn shortcut.
The body of the email sent to a user when they fill out the "Forgot my username" form, and their user name is not found. The special value [Email] can be used in the message to insert the appropriate value. HTML is permitted.
The LogonInformationRequestMessageUserNameNotFound is sent to users who have submitted the Forgot my username form, and their username is not found. The default message is:
We received a request for the username associated with this email address, [Email]. Based on the information provided, we could not find a username.
Please contact your administrator for further assistance.
📘 Note
The Forgot password? link uses the SignIn shortcut.
The body of the email sent to a user when they fill out the "Forgot my password" form. The special values [UserId], [ContactId], [Email], and [LogonUrl] can be used in the message to insert the appropriate values. HTML is permitted
The PasswordResetRequestMessage is sent to users who have submitted the Forgot my password form. The default message is:
We received a request to reset the password for the username '[UserId]'. If you made this request, go to the password reset page.
This link is valid for [ValidResetDuration] minutes after the time it was requested.
If you did not request to have your password reset, you can safely ignore this email.
If clicking on the link does not work, you can copy and paste the following link into your browser's address window.
[LogonUrl]
You can use the following variables in the LogonInformationRequestMessage and the PasswordResetRequestMessage. When an email is sent, the variables are replaced with the appropriate values.
- [UserId]
- [Email]
- [LogonUrl]
-
[ValidResetDuration] - for PasswordResetRequestMessage text only.
Use HTML or CSS to modify the display of the emails.
📘 Note
The Forgot password? link uses the SignIn shortcut.
Tips
- HTML and inline styles work best in emails, because some email clients ignore externally linked CSS files. For example, the following inline style turns the header text blue and changes the font:
<h1 style="color:#0000FF;font-family:Georgia,serif;">Heading text</h1>
- Use full paths to images, not relative paths. For example:
<img src="http://www.servername.com/images/logo.gif" alt="Company logo" />
- Test your email messages in different email clients to make sure everything looks the way you want.
reCAPTCHA settings
iMIS uses CAPTCHAs for security. CAPTCHA is a program that can generate and grade tests that humans can pass but current computer programs cannot.
📘 Note
CAPTCHAs are used on Request username, Reset password, Account creation pages and Contact Us forms only.
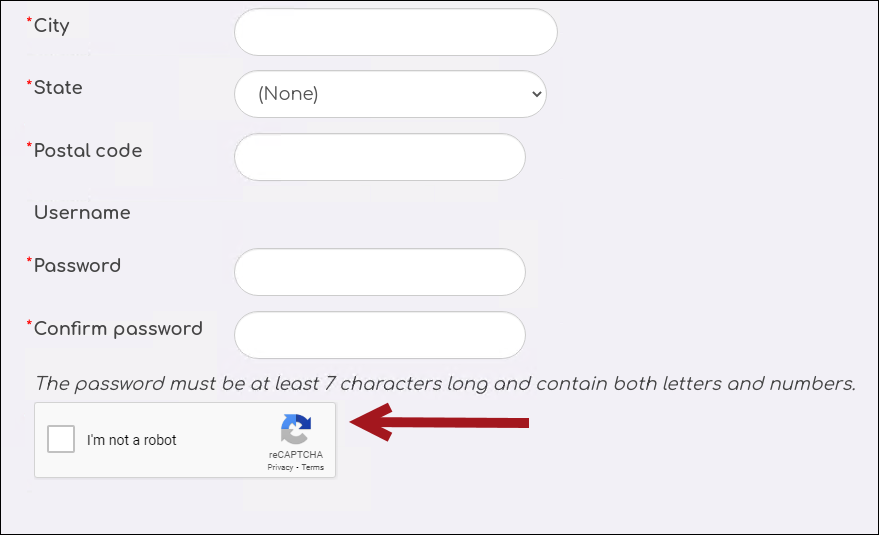
Do the following to enable CAPTCHA security:
- Create an account with reCAPTCHA.
- Follow reCAPTCHA's instructions to create your Public and Private keys.
- From the Staff site, go to Settings > Contacts > Account management.
- From the reCAPTCHA Settings section, enter the following values:
- Public key
- Private key
- Theme - You can customize the look and feel of reCAPTCHA.
- Enable Skip validation to allow iMIS to bypass the CAPTCHA validation. This is useful if you are testing your sites.
- Click Save.
📘 Note
When registering a new site with reCAPTCHA, select to use reCAPTCHA v2 with Checkbox. iMIS supports only this type of reCAPTCHA.
Default expiration date, in years from last login
Whenever a user signs in, their account expiration date is reset to that login date plus the number of years specified in this field. For example, if this value is 3, and a user signs in on January 1, 2015, their account expiration date is set to January 1, 2018.
The number of minutes the reset password token is good
Specifies the number of minutes the reset password token is valid. The default value is 20 minutes, but it is recommended that the value does not exceed 60 minutes.
Authentication
See Password security.
Formulas
ID assignment
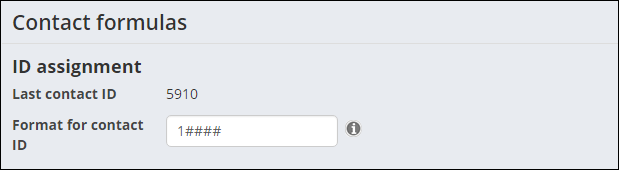
- Last contact ID - The ID of the last contact, or account, created in the database. For example, the ID of the last contact created based on the image above is 15910. Any number entered in the Format for contact ID field is a constant and will always appear in all contact IDs.
- Format for contact ID - This field allows you to define the format for contact IDs. For example, entering "1####" means that all IDs begin with the number 1 and are followed by the next number following the number in the Last contact ID field. The next contact ID created based on the image above would be 15911. If you changed the constant to be 2 instead of 1, the next contact ID would instead be 25911.
The # will become a 0 if there are any missing digits. The maximum length is 13 characters, and can be letters, numbers, and dashes.
📘 Note
Any change to this format will only apply to newly created contacts. Existing contacts will not be updated.
Formula
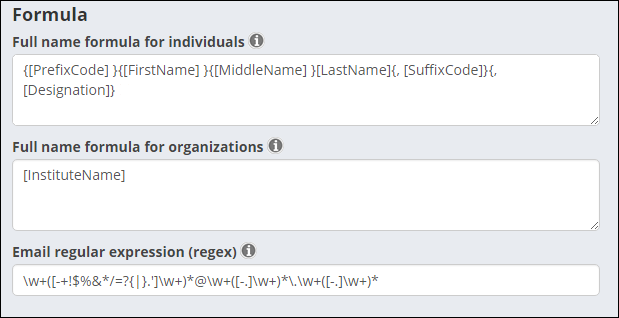
The full name formula defines how the full name for an individual or organization displays throughout the system. The full name for a contact is used in a number of places, including queries, invoices, and on the contact's account page.
📘 Note
Any change to this formula will only apply to newly created contacts. Existing contacts will not be updated unless their name is modified.
You can use a combination of dynamic text and plain text to create the full name. Specific variables placed in square brackets are replaced by the system with dynamic text, and curly braces can be used to include other text or punctuation that should only display if that variable has data.
For example, the default formula for individuals is:
{[PrefixCode] }{[FirstName] }{[MiddleName] }[LastName]{, [SuffixCode]}{, [Designation]} This will be displayed as Mr. Joseph Leon Martinez, Jr., LLB. For someone who does not have data for each of these variables, it might display as Joseph Martinez.
📘 Note
The commas and spaces (within the curly braces) next to[SuffixCode]and[Designation]do not display in this case, because those variables are not available for Joseph Martinez.
-
Full name formula for individuals - The information to be displayed when using an individual's full name. The following are the available replacement variables:
[Prefix]- The person's prefix, such as Mr. or Mrs..[FirstName]- The person's first name.[MiddleName]- The person's middle name.[LastName]- The person's last name.[SuffixCode]- The person's suffix abbreviation, such as Jr..[Suffix]- The person's full suffix, such as Junior.[Designation]- The person's designation, such as CPA or Esq..[Informal]- The person's informal name.[PrimaryInstituteName]- The person's primary organization name.[PrimaryInstituteTitle]- The person's title at their primary organization.
-
Full name formula for organizations - The information to display when using an institute’s full name. The available replacement value is
[InstituteName](the name of the organization). - Email regular expression (regex) - The regular expression rule is used to determine if the email address a user enters contains valid characters as specified in the regular expression syntax. You can modify the regular expression to specify your own rule. The following default regular expression:
\w+([-+!$%&*/=?{|}.']\w+)*@\w+([-.]\w+)*\.\w+([-.]\w+)*allows email addresses to contain specific characters.
- Rules:
- Word characters are allowed, but are not required.
- A word character is any alphabet or numeric characters and includes underscores (_).
- The email address must begin with a word or numeric character, or an underscore, any of which can be entered one or more times.
- Specific special characters (
- -+!$%&*/=?{|}.' -) are allowed if they are followed by at least one word character. Special characters are not required. - The at sign (@) is required.
- Hyphens and periods are permitted after the @ character. If hyphens and periods are used, they must be followed by word characters.
- The period is required.
📘 Note
This default expression does not allow foreign characters. - Examples of email addresses regarded as valid when using the default expression:
- Examples of email addresses regarded as invalid when using the default expression:
- user@[IPv6:2001:db8:1ff::a0b:dbd0]
- "much.more unusual"@example.com
- "[email protected]"@example.com
- üñîçøðé@example.com
- üñîçøðé@üñîçøðé.com
Prefixes and suffixes
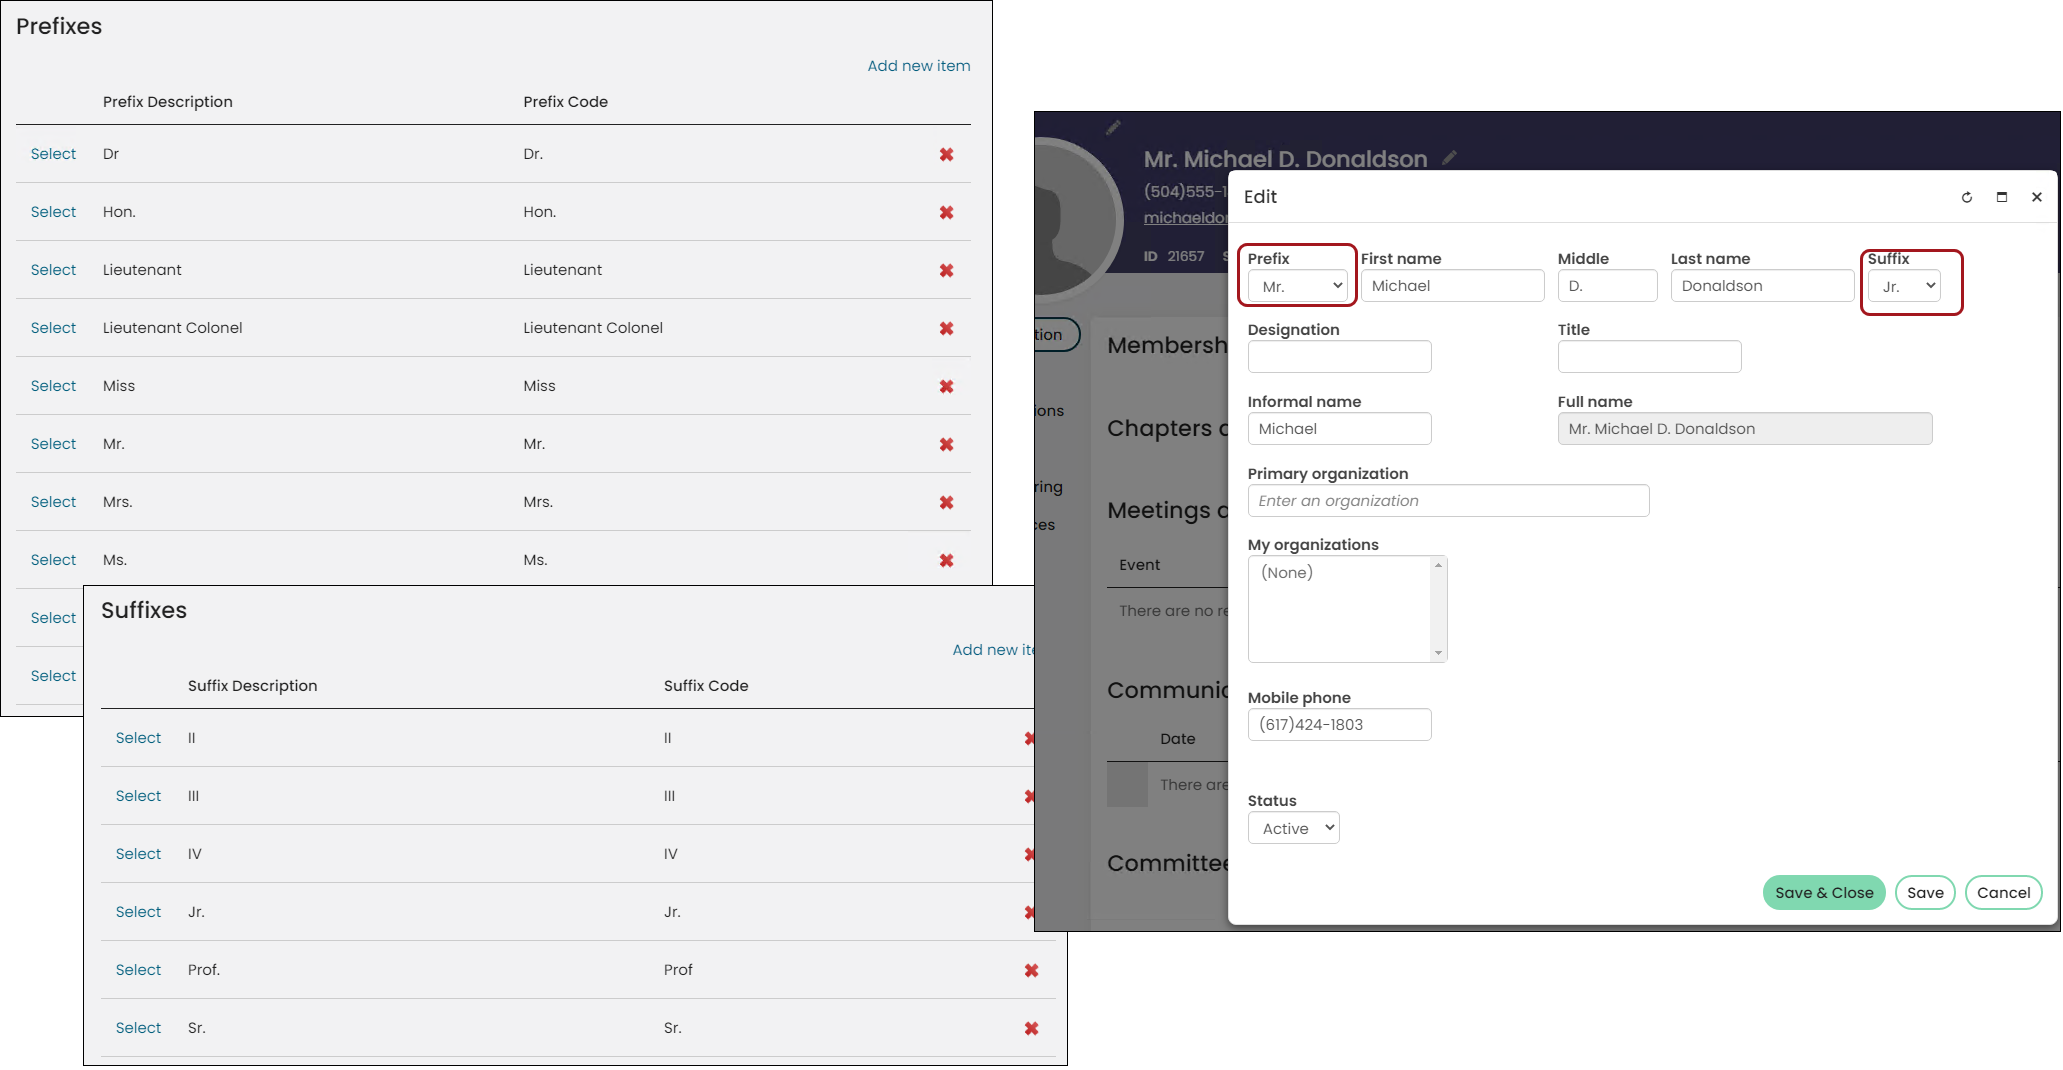
From the Staff site, go to Settings > Contacts > Prefixes and suffixes.
Prefixes and Suffixes are used for unique names, and provide additional information about the contact. Add Prefixes and Suffixes to the lists so that contacts can choose one when necessary.
Education levels
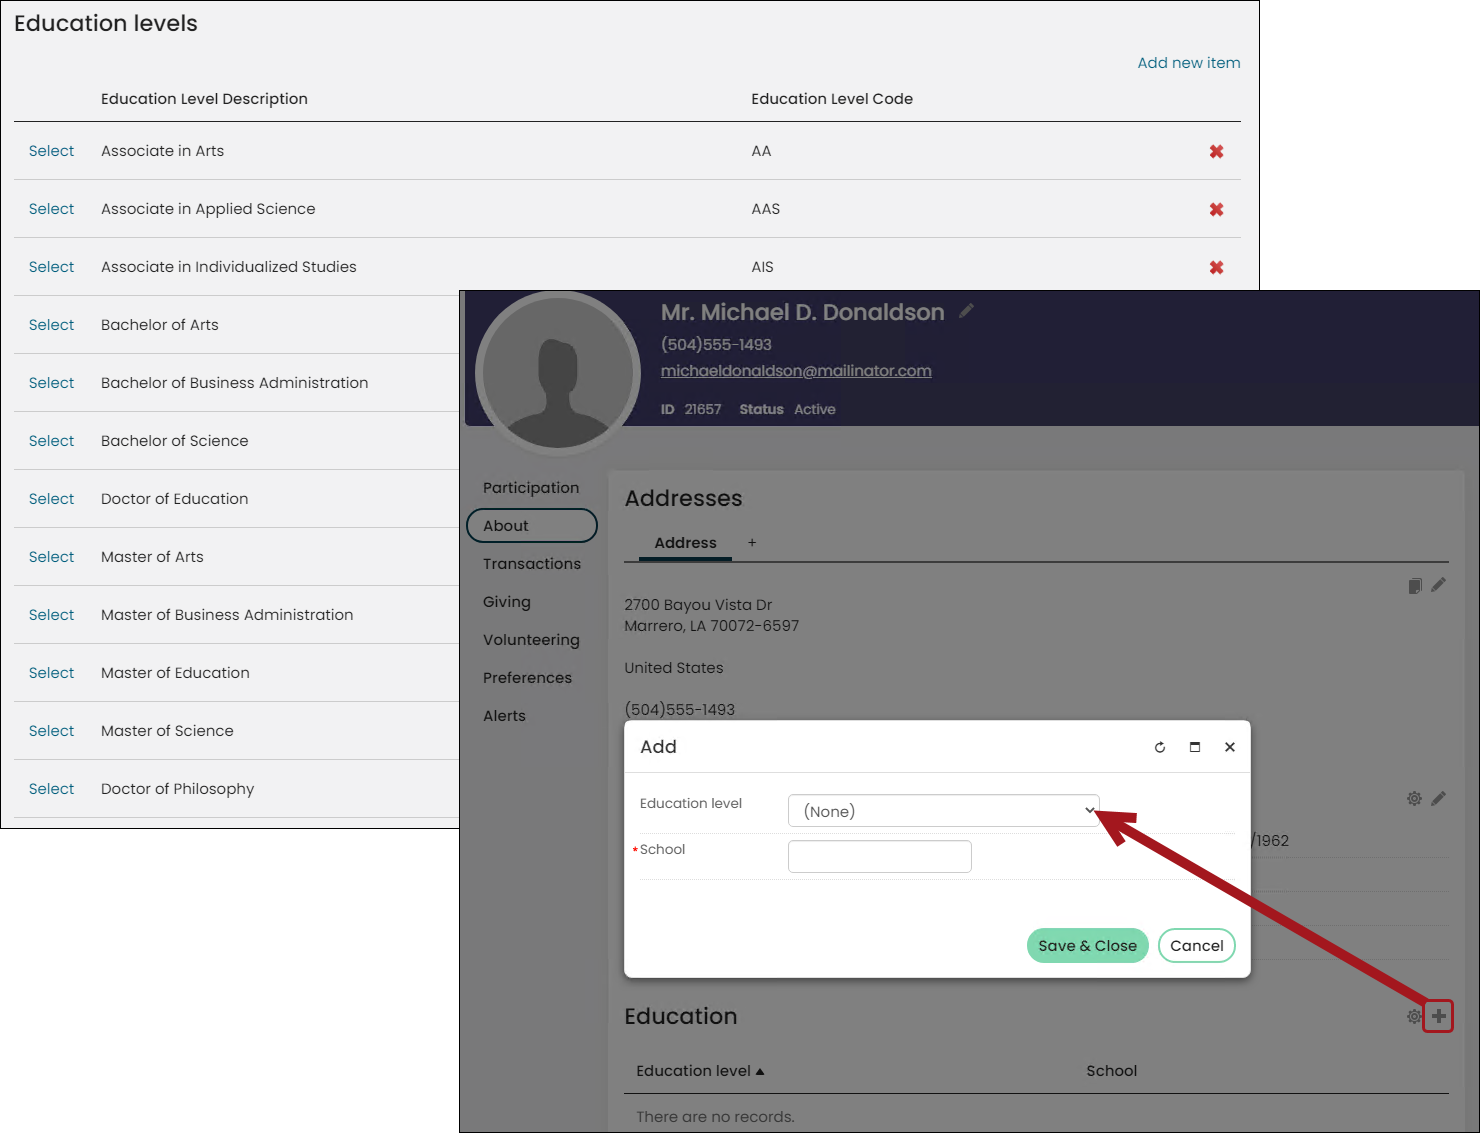
Specify Education Levels for contacts to select from. For example, the Education level drop-down appears on a contact account page.
Communication preferences
Staff users can configure the types of communications that can be sent by your organization. This enables you to enforce the preferences of members who do not want to receive certain types of communications.
From the Staff site, go to Settings > Contacts > Communication preferences. You can add a new communication type or edit a selected communication type.
To add a new communication type:
- Click Add new.
- Enter the name of the new communication type.
- (optional) Provide a description of the communication type.
- Define the default subscription properties of the communication type:
- Subscribe by default (Opt-out) — Users will receive communications until they choose explicitly to no longer receive communications.
- Users must subscribe (Opt-in) — Users will not receive communications unless they subscribe.
- Select the status of the communication type:
- Active — the subscription properties for the communication type are applied.
- Inactive — the subscription properties for the communication type are not applied. The inactive communication status cannot be assigned to communication templates or documents.
- Save.
📘 Note
System-defined communication types (Primary, Shipping, and Billing) cannot be edited.
Staff users can also configure the User messages that are used to offer communication preferences to users.
To configure the User messages, edit the Prompt to choose communication types and the Additional Information fields. As these fields are edited, you can review the changes in real-time to verify how the User messages appear. Click Refresh Preview to see updated messages in the Preview of communication preferences area.
📘 Note
Changes to the Prompt to choose communication types and the Additional Information fields can be seen when you click Refresh Preview, but the edits are not saved unless you click Save. If you do not Save your edits, they will not be available if you leave this page and return.
Social media
You can allow website users to sign in to your website using their Facebook and LinkedIn accounts. Social media integration creates a seamless user experience that increases convenience and satisfaction for your users. Users’ social media accounts are linked to their existing iMIS accounts, and when a new user signs in with a social media account, a new iMIS account is automatically created and linked. Eliminating the need for users to keep track of multiple usernames and passwords will result in more visits to the essential content on your website!
See Logging in with social media for more information.
Client applications
See Single Sign On (SSO).
Open ID Connect
Demographic options
To define Demographic options, go to Settings > Contacts > Demographic options.
From the Demographic options window, you can enter and update demographic options that appear in the Club Staff site on the out-of-the-box membership wizards and account pages.
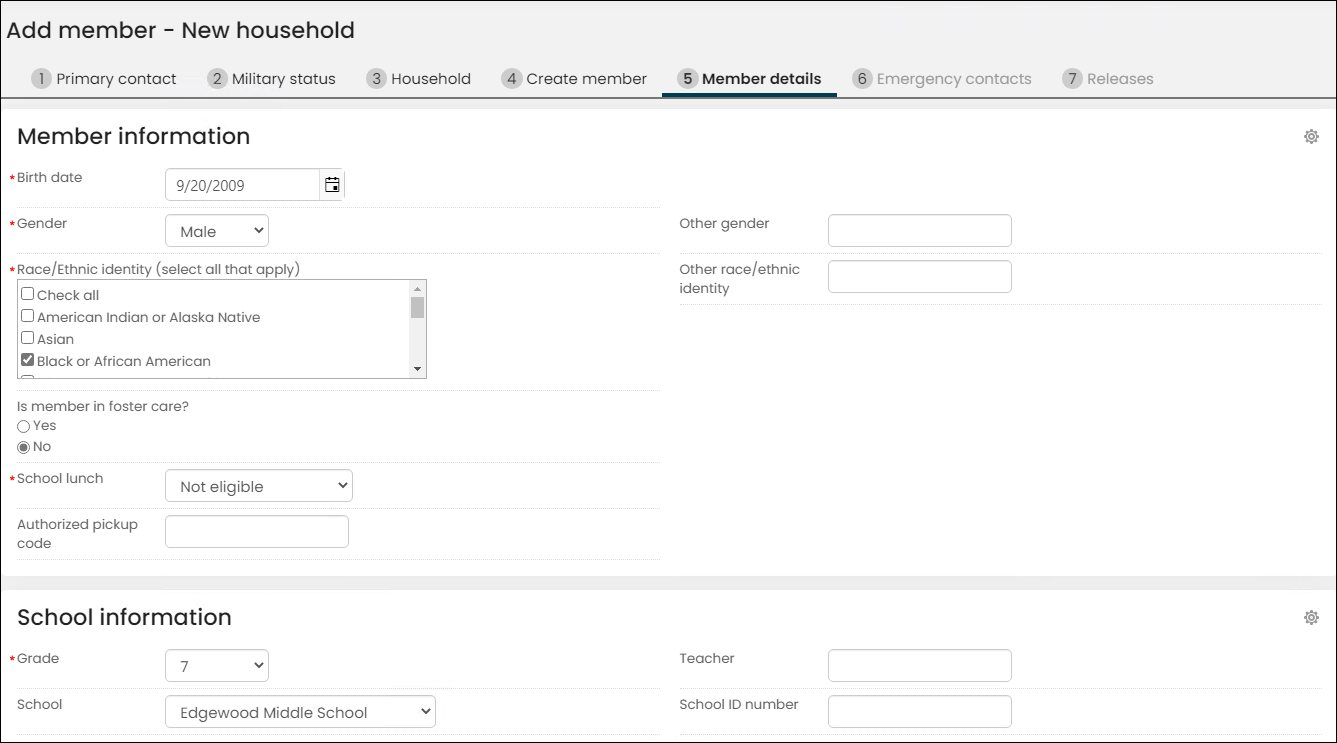
From the Demographic options window, you can define the following:
- Genders
- Military branches
- Races
- School grades
- School lunch options
📘 Note
You must be licensed for Clubs to use the School grades or School lunch options ref tables.
To add a new demographic option, do the following:
- From the Staff site, go to Settings > Contacts > Demographic options.
- Click the tab you want to add new items to.
- Select Add new item:
- Enter a Code. The maximum Code length is 20.
- Enter a Description. This is the value that displays in the membership wizard and account page. The maximum Description length is 80.
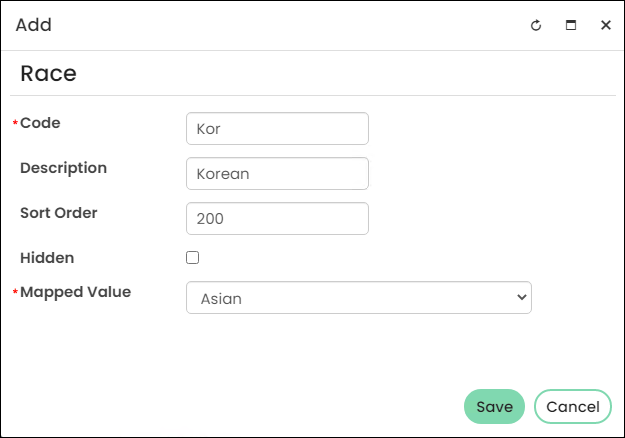
- Enter a numerical value in the Sort Order field. The Sort Order designates the organization of the items, with lower numbers appearing closer to the top of the list.
- Enable Is Hidden if you want the item to be hidden from the panel field dropdowns that use the references table. Disable this option to allow the item to show.
- Select a value from the Mapped value drop-down to map your demographic option to. Only the values that have System enabled will appear in the drop-down.
- Click Save.
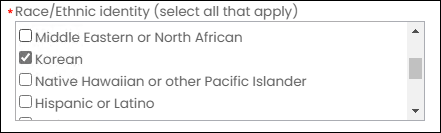
The added or edited demographic options automatically appear in the membership wizard and contact account pages.
Group demographic options
📘 Note
You must be licensed for Clubs to use a club-related functionality. Contact ASI for more information.
To define Group demographic options, go to Settings > Contacts > Group demographic options.
From the Group demographic options window, you can enter and update group demographic options that appear in the Club Staff site on the out-of-the-box Household group landing page.
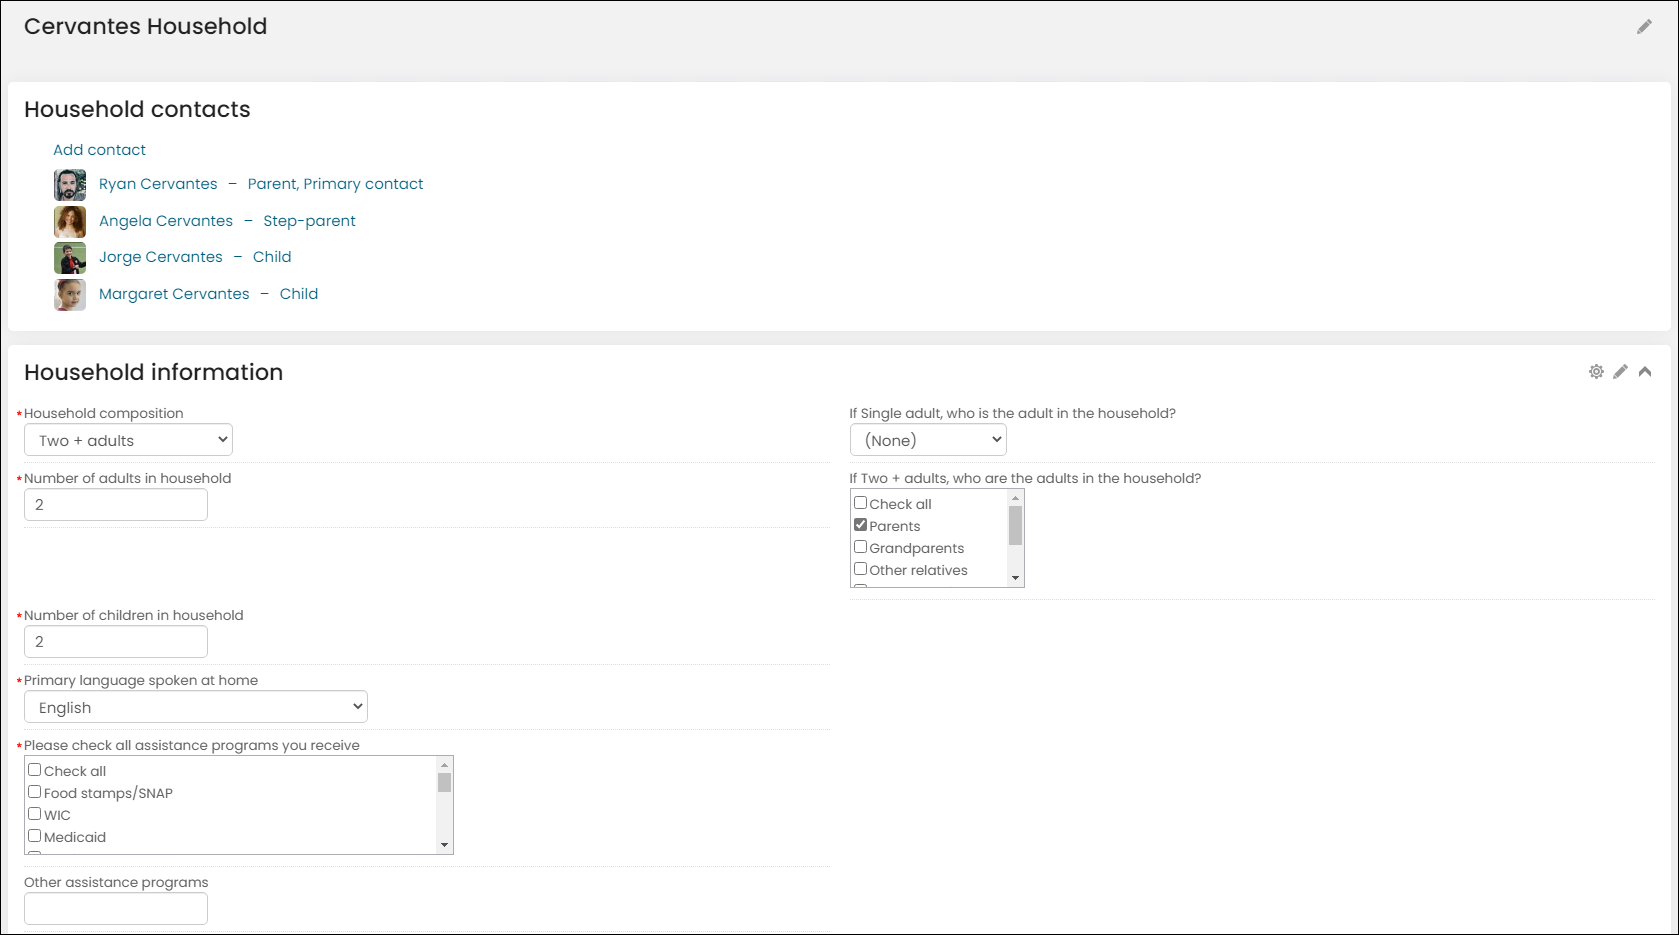
From the Group demographic options window, you can define the following:
- Household composition
- Household single adult
- Household multiple adult
- Hosing type
- Assistance program
- Income range
- Primary language
To add a new Group demographic option, do the following:
- From the Staff site, go to Settings > Contacts > Group demographic options.
- Click the tab you want to add new items to.
- Select Add new item:
- Enter a Code. The maximum Code length is 20.
- Enter a Description. This is the value that displays in the membership wizard and account page. The maximum Description length is 80.
- Enter a numerical value in the Sort Order field. The Sort Order designates the organization of the items, with lower numbers appearing closer to the top of the list.
- Enable Is Hidden if you want the item to be hidden from the panel field dropdowns that use the references table. Disable this option to allow the item to show.
- Select a value from the Mapped value drop-down to map your demographic option to. Only the values that have System enabled will appear in the drop-down.
- Click Save.
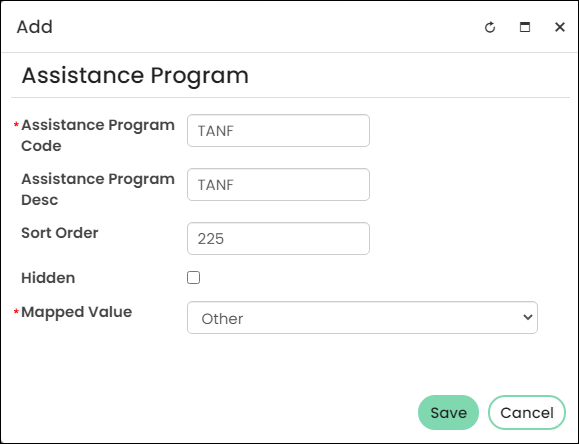
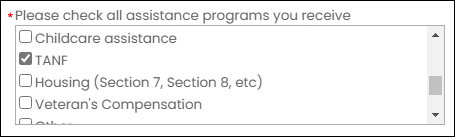
The added or edited group demographic options automatically appear in the panels which use the related properties.
Document types
Defining document types enables your organization to stay organized when members upload different types of documents.
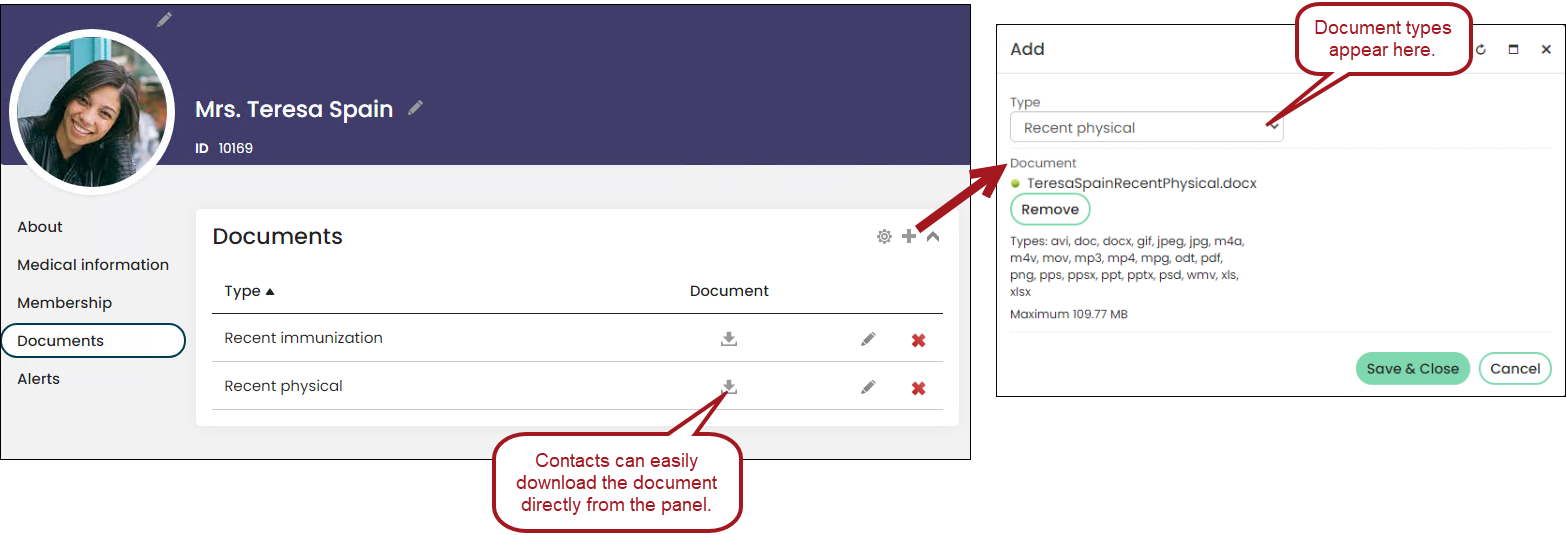
The out-of-the-box Documents panel is already configured to use the document types defined in the Document types window. To use the Documents panel, add it to the contact account page.
To add a new document type, do the following:
- From the Staff site, go to Settings > Contacts > Document types.
- Select Add new item:
- Enter a Code. The maximum Code length is 20.
- Enter a Description. This is the value that appears in the Type drop-down. The maximum Description length is 80.
- Enter a numerical value in the Sort Order field. The Sort Order designates the organization of the items, with lower numbers appearing closer to the top of the drop-down.
- Enable Is Hidden if you want the item to be hidden from the panel field dropdowns that use the references table. Disable this option to allow the item to show.
- Select a value from the Mapped value drop-down to map your demographic option to. Only the values that have System enabled will appear in the drop-down.
- Click Save.
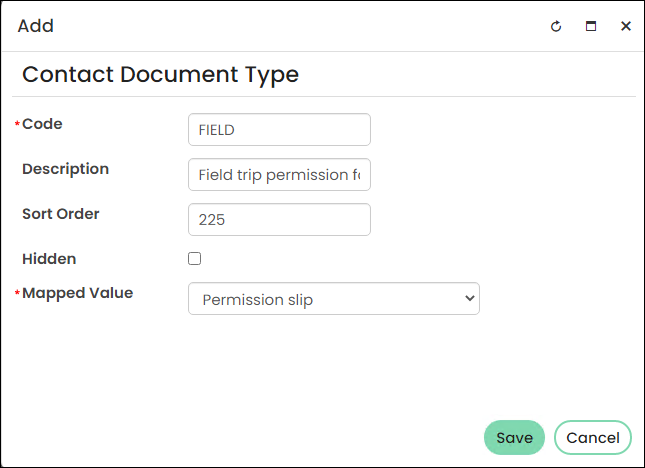
The added or edited document type automatically appears in the drop-down list of document types.
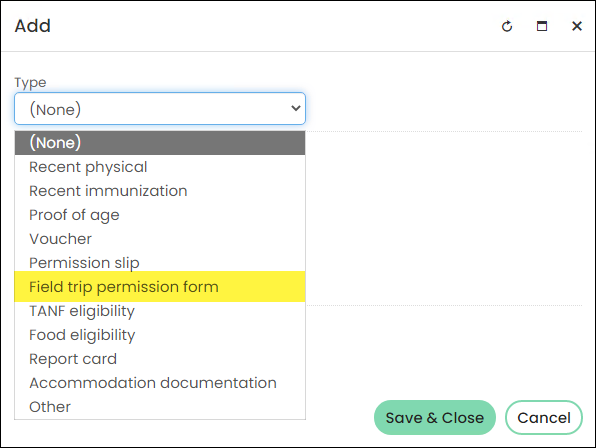
If you are licensed for Clubs, the document types defined in the Document types window appear on the out-of-the-box membership wizard.
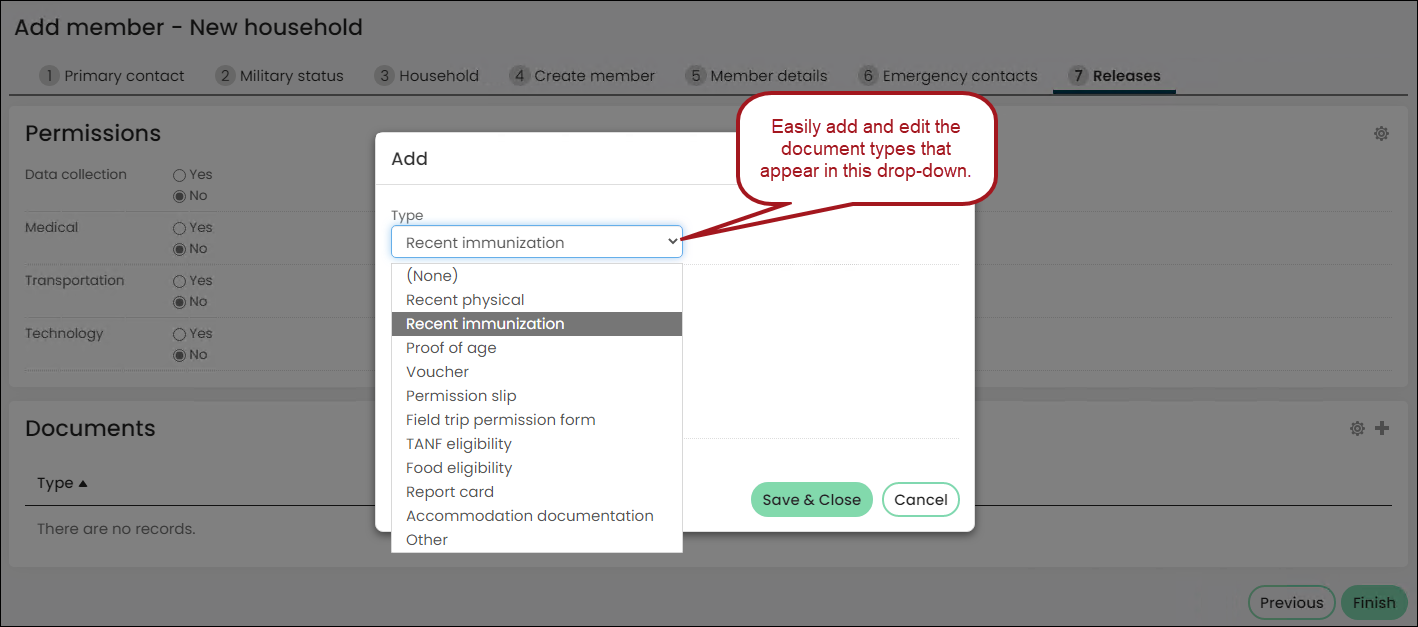
Medical options
📘 Note
You must be licensed for Clubs to use a club-related functionality. Contact ASI for more information.
To define Medical options, go to Settings > Contacts > Medical options.
From the Medical options window, you can enter and update medical options that appear in the Club Staff site on the out-of-the-box membership wizards and account pages.
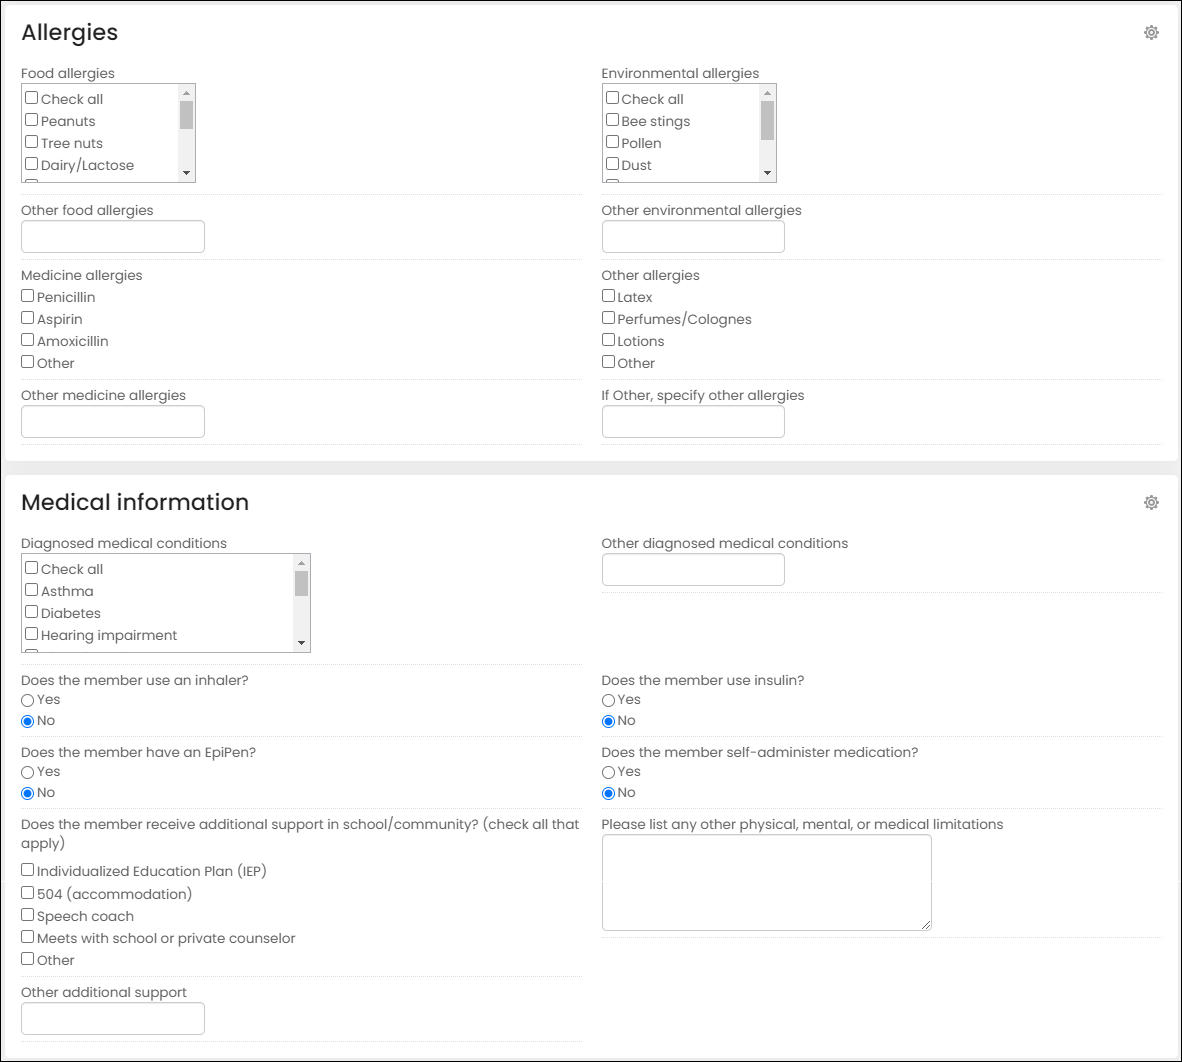
From the Medical options window, you can define the following:
- Additional support
- Environmental allergies
- Food allergies
- Medical conditionals
- Medicine allergies
- Other allergies
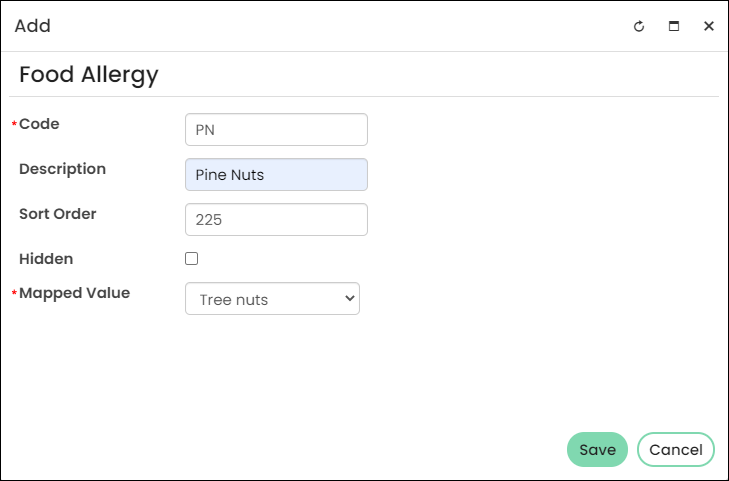
To add a new medical option, do the following:
- From the Staff site, go to Settings > Contacts > Medical options.
- Click the tab you want to add new items to.
- Select Add new item:
- Enter a Code. The maximum Code length is 20.
- Enter a Description. This is the value that appears in the membership wizard. The maximum Description length is 80.
- Enter a numerical value in the Sort Order field. The Sort Order designates the organization of the items, with lower numbers appearing closer to the top of the list.
- Enable Is Hidden if you want the item to be hidden from the panel field dropdowns that use the references table. Disable this option to allow the item to show.
- Select a value from the Mapped value drop-down to map your demographic option to. Only the values that have System enabled will appear in the drop-down.
- Click Save.
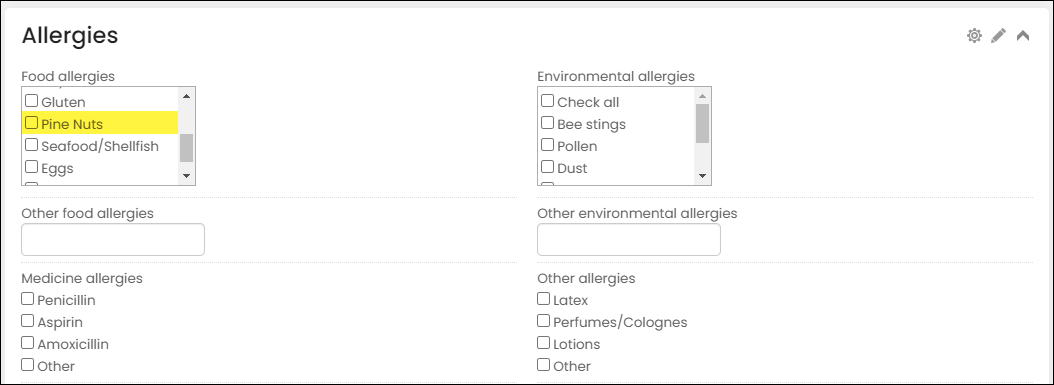
The added or edited medical options automatically appear in the correlating membership wizard and contact account pages.
Updated 2 months ago