

Setting up groups
Groups are an integral concept in iMIS. This powerful function allows you to categorize your contacts in a way that is meaningful to your organization. Some of the ways to harness the power of groups is to:
- Organize contacts into committees, chapters, regions, or industries.
- Group contacts by membership type, interests, or other criteria.
- Add all event registrants to a group that receives event promotions and updates.
- Offer discount pricing to certain member levels or volume purchasers.
- Add purchasers of a certain item to a group for targeted marketing.
- Allow members of a group, such as staff, access to areas that are not displayed to other users.
In addition, you can assign each contact a role in the group for administrative or marketing needs.
The process for setting up groups includes:
- Defining group types
- Defining group member roles
Note
Review the information about the Group Administrator and the Group Member Administrator roles.
- Adding member roles to group types
- Creating the group
Use the communications features of groups to help your organization efficiently connect internal and external people. The group home page can be the center for a group's communications. For example, lists of group members, descriptions of related groups, links to events, areas for user input, and other pertinent information are just some of the items you can add to a group home page.
Establishing the group's parts
Defining group types
Use group types to classify broad categories in order to speed up data entry for group setup, and to facilitate search filtering. You can use the system default types and you can add other types.
📘 Note
If you make a change to a group type, it will not necessarily affect groups of that type that have already been created. You must review the groups of that type and update their settings accordingly.
Do the following to define a group type:
- From the Staff site, go to Settings > Groups > Types.
- Click a group Name to edit, or Add a new group. The Details page is displayed.
- You can edit or define the following:
- Default Group Status - Select the status to display by default when a user defines a new group. The user can overwrite this value.
- Simple Group - Select this option if no roles will be assigned to this group.
- Relationship Group - Select this option to indicate that the group represents a two-way relationship between contacts. This option was created specifically for groups displayed in the Group List Editor content item, so that you can define and view relationships between contacts. For example, if you want to record family relationships between contacts, create a Family group type with roles such as Father, Mother, and Child.
- Date Limited - Select this option to set a monthly billing term for a subscription or membership.
- Single Role - Select this option to allow only one role per group member. A single role per member is the typical setting, but you can deselect this option if, for example, an officer of the committee is allowed to serve another role in the same committee.
📘 Note
If your group contains members with more than one role, do not enable the Single Role option. - Extend Active Membership Term - Select this option to allow purchasers to extend their access to the product and post-purchase information and content (purchase the product again) before their current term span (defined when the product is created) is expired.
- Group Home Page - A default page is provided for display as the group home page. If you prefer to display a different page, Select the content record to be displayed as the home page for this group type.
📘 Note
If your group has a Product-driven membership term basis, the option to Extend Active Membership Term does not apply. - Click Save.
- Click the Member statuses tab.
- Select Add.
- From the Group Member Status drop-down, select an available group member status.
- Select the Active option if this type of status is considered an active status in the group.
- Define a Priority for the status. For example, 0, 1, 2, and so forth. A status of 0 is the default status for the role.
- Click OK, then click Save.
Defining group member roles
Group roles define the way that a group member participates in the group. Simple groups do not have member roles. However, complex groups might require that one or more group members be assigned an appropriate role within the group, including:
- Traditional office roles, such as Chapter President or Department Manager
- Association-specific roles, such as Member/Non-Member or Donor
- Participation roles, such as Event Registrant or Product Purchaser
- Custom roles tailored for your organization's needs
- From the Staff site, go to Settings > Groups > Roles.
- Select a role to edit, or select Add to add a new role.
- Enter information for the role, including:
- Name of Role – Give the role a name.
- Description – Give the role a description.
- System – (optional) Select this option if you do not want this role to display to the end user. This setting is usually selected for administrative roles.
- Active – (optional) Select this option if the group role is ready for use.
- Click Save. This role will display in a drop-down for a user to select from when adding or editing a group that includes roles.
Do the following to assign a group role:
- Log in to the Staff site as a Staff user or System Administrator.
- Go to Community > Find groups.
- Enter a search criteria, then click Find.
- Select the group the contact is a member of.
- Select the member's linked role to open the Group member detail window.
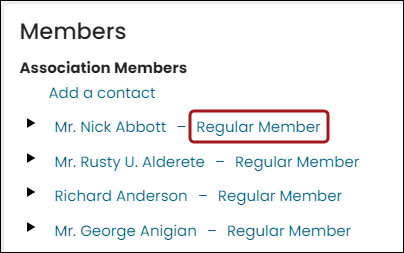
- Select Add to add the role you want to assign to the member, then click Save & Close.
Understanding the Administrator roles
There are two group administrator roles that have permission over group information and its members: Group Administrator and Group Member Administrator.
While these roles are similar, the Group Member Administrator can view and update contact information that is usually restricted to just that contact and iMIS staff users. This role was designed for organizations that typically do not provide logins for each individual contact within the database, and instead rely on a designated group administrator to maintain each contact's profile information (for example, Trade Associations).
📘 Note
Do not associate both the Group Administrator and Group Member Administrator roles with the same group type. If a contact has both roles, they could give themselves edit permissions for many different contacts in the system. Instead, choose how much access you want to give to the administrators of a group type and add only the appropriate role.
Group Administrator
The Group Administrator can do the following:
- View and update group information.
- View and update group membership details.
- Remove members from the group.
- For groups with a parent contact, the Group Administrator can view and update the parent contact record for the group, for example, the Company group.
- Add existing contacts to the group.
📘 Note
Group Administrators must have Read permissions for the existing contact in order to add them to the group.
Group Member Administrator
The Group Member Administrator role can do the following:
- Add new or inactive members to the group.
- View and update account and contact information for all of the group members
- Make purchases which are billed to the organization, review past orders and invoices, and pay outstanding invoices
- Register members of their organizations for events
- For groups with a parent contact, the Group Administrator can view and update the parent contact record for the group, for example, the Company group.
- View and update group information.
- View and update group membership details.
- Remove members from the group.
📘 Note
Group Member Administrators cannot add existing contacts to groups like the Group Administrator can. Group Member administrators have edit permissions and having the ability to add existing contacts would give themselves permission to see the full details of anyone in the database, which is a huge vulnerability.
Group Member Administrators have the ability to update contact and profile information for members of their organization. When they view the profile page for a contact who is a member of the organization which they administer, they see options to edit this information, including name, title, organization, addresses, and public profile details. They can also view participation information for the contact, such as billing history.
Group Member Administrators can make purchases which are billed to the organization, review past orders and invoices, and pay outstanding invoices. When making a purchase, the administrators have the option to choose their organization as the Bill To contact for the order. If they choose to pay later, an open invoice will be created which is billed to the organization. When viewing the profile record for their organization, the Group Member Administrator can review past orders and invoices which have been billed to the organization.
They can also view any open invoices for the organization, and choose to pay them. For organizations that are members of the association, when their membership renewals are billed, the Group Member Administrator can pay for the renewal using the Renew Now button on the profile page.
Group Member Administrators can register members of their organization for events. When viewing an event, they choose Register Someone Else and can then choose a member of their organization. They complete the registration options and select program items, and can then purchase the registration.
📘 Note
This feature is also available to any member of the organization, not just the Group Member Administrator. The registration can be billed to the organization during purchase if desired.
Adding member roles to a group type
Group roles define the way a group member participates in the group. You can add any role defined under Group Roles to a group type.
Adding a group type role
Do the following to add roles to a group type:
- From the Staff site, go to Settings > Groups > Types.
- Select a group type to edit.
- Click the Roles tab, then select Add.
- Select a Role from the drop-down.
- Select the Default Member Status from the list of member statuses previously added to the group type. When a member’s role is changed, the default status for the new role is assigned to that group membership record.
- (optional) Select if the role for this group type has Administrator privileges:
- None
- Group Administrator - Group members with this role can update group information.
- Group Member Administrator - Group members with this role can update information for the group and for all members of the group.
📘 Note
See Understanding the Administrator roles for more information. - (optional) Enter the Sort Rank.
- (optional) Enable the Unique option if the role is unique to the member status.
- (optional) Enable the Default option if this is the default role for the group.
- Click OK.
📘 Note
Ensure the Default Member Status selected matches one of the values defined in the Member statuses tab to avoid errors when a contact is added to a group. See Defining group types for more information.
Deleting a group type role
To delete a group type role, do the following:
- From the Staff site, go to Settings > Groups > Types.
- Select a group type to edit.
- Click the Roles tab.
- Locate the role, then click the red X.
- From the pop-up window, click OK.
🚧 Warning
Deleting a Role from the Household group type is not permanent. After the next iMIS upgrade, the deleted Roles are added back to the Household group type.
Creating the group
An important feature of groups is the concept of ownership. A group, department, or organization can own another group. If an owner is specified, its title will display at the top of the group landing page. If no owner is specified, the default organization (set by your administrator) is displayed as the owner.
The ability to add and edit groups might not be available, depending on how the group is set up.
From the Staff site, go to Community > Add group to add a group.
You can also create groups owned by other groups, for example Sub-committees of a Committee group. Do the following to add a new group owned by another group:
- Select the owner group (from Community, search for and select the desired group).
- Under Chapters, Committees & Other Related Groups, click the + icon, if available. Note that not all groups are configured to allow for the addition of sub-groups.
Do the following to edit a group:
- From the Staff site, go to Community > Find groups to display a list of groups.
- Select the desired group.
- Click the pencil icon. This opens the Edit Group window.
- Edit information about the group as necessary, including:
- Name – You can edit the name of the group.
- Group Status – Select the status for this group as a whole. An Active status means the group will be ready for use upon save. Note that individual members will have separate status settings for their participation in the group.
- Priority – Select the order to assign group membership if a contact belongs to other groups.
- Is Member – Select this option if you want to provide discount pricing to members of this group. If this option is selected, all members of this group will see the discount pricing on the item display page and in their shopping cart. The discount price is set during product definition.
- (optional, displays if group type includes roles) Enter information on Roles for the group, including:
- Single Role per Member – Select this option to allow only one role (in this group) to be assigned to a group member.
- Use Type Roles – Select this option to use the default roles defined by the group type.
- Click Save. If membership in this group is date-limited and will be renewed, be sure to edit the group to add renewal policy options.
Do the following to define the group membership renewal policy, if applicable:
- Select Community > Find groups and open the group.
- Click the pencil icon.
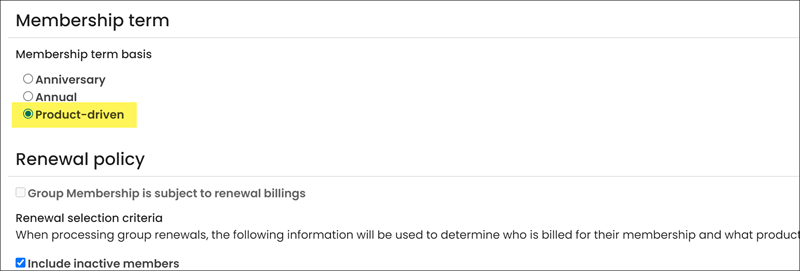
- (optional) Select the Membership Term Basis to control the start and end time of a customer or product term:
- Anniversary - Individual renewal date that fluctuates based on each customer's Join Date. For example, if a customer joins on July 1, his or her term would be from July 1 to June 30 of the following year. If you select an anniversary billing time, terms will initially default to a year (or other specified billing interval) from the Join Date, if it exists, or the Effective Date you specified during billing.
- Annual - Fixed annual customer term. All customers have the same billing term. The customer membership term begins with the selected first month in the fixed term (begin in any month). Annual fees are commonly prorated for new customers. Staff users can select Prorate fees when defining or editing an annual membership billing item:
- Do not prorate - Same dues regardless of when customer joins.
- Standard monthly prorating - Prorating for the current year (depends on the billing interval). For example, if a customer joins in month 7 and annual dues are $200, the calculated dues would be one half of the total dues, or $100 (six months out of twelve).
- Use a custom schedule - User-defined prorating rules, depending upon the needs of the organization. If the Use a custom schedule option is enabled, proration rules are created from prorating schedules on the Staff site (Commerce > Prorating schedules).
- Product-driven - (This option is only available when the Group type has Date Limited selected) Individual membership term based on specific begin and end dates per product. When Product-driven is selected as the membership term, the option to enable Group Membership is subject to renewal billings will be disabled. When a customer purchases a product associated with a group with a term basis of Product-driven, the customer will be added to the group with a group member detail row for the start and end dates that are specified. Please see Adding products for more information.
-
(optional) Enter information about the Start Policy for the group. This area is displayed if group type is date-limited.
- Specify whether the Start Date equals the actual date the member was added to the group, or the first day of the month the member was added to the group.
- In the After day field, specify a cutoff to roll the start date to the first day of the next month. This is useful to accommodate contacts who join late in the month. This field is optional, and is enabled if the Start Date equals the first day of the month the member was added to the group.
- (optional) Enable Grant membership benefits immediately upon joining. This option only applies when you are using the Set Start Date equal to first day of the month member was added to the group Start Policy and have the start date equal to the first day of the next month after a specific day.
-
Click Save.
- Select the Group Membership is subject to renewal billings option.
- Enable Include inactive members to also include inactive members when processing renewals. If this is not enabled, only active members of this group will be processed for renewal.
- In the Include members expiring within field, enter the amount of time to run the renewal process before a contact’s Expiration Date. For example, if Joan Martinez’s subscription ends on December 31 (the Expiration Date) and you want to process her renewal two months in advance, enter 2 Months.
-
Leave Sync term dates to primary group dates when added at renewal time enabled to sync the term dates for products added during renewal with the primary membership fee dates. Synchronizing term dates ensures all items are billed together in future renewals rather than billed separately. It is not recommended that this option is disabled; however, this option may need to be disabled if any of the products have varying start date policy rules.
👍 Example
The member clicks Renew Now and is reviewing the additional products listed in the itemized renewal. They notice two journals they are interested in, so they add the two journal subscription products to their invoice. Upon purchase, the term dates for the two additional products are automatically synced with the primary membership's term dates. When next year's renewals are generated, all three products are picked up and added to the renewal invoice with the same term dates. - In the Roles to be renewed area, if renewal billings apply only to specific roles within the group, add or select the applicable roles. This area is enabled if the Group Membership is subject to renewal billings option is selected.
- Click Save.

If the option for the start date is set to the first day of the next month after a member joins, then the membership would be inactive between the time that they actually joined and the first day of the next month. When Grant membership benefits immediately upon joining is enabled, the member will receive a small active membership term starting on the day they joined until the first of the month, receiving discounted pricing and other membership benefits.
📘 Note
The person who runs the renewal process can overwrite the Expiration Date, if necessary.
The system checks for duplicate records and displays a message if this is a duplicate. Choose whether to cancel or to add this group.
The system inserts the group into the database and enters the insertion in the change log.
Managing groups
Viewing Groups
Do the following to find a group or committee:
- From the Staff site, go to Community > Find groups.
- Enter search criteria, then click Find.
- Click select for a result to select the desired group. The system displays the group’s home page, which typically contains a list of group members, a list of related groups, and other relevant information.
- If you are authorized, click the + icon to enter new events, announcements, or related groups.
📘 Note
To search for dynamic groups or organization groups, select Yes from the System Group and Auto-generated drop-downs.
Adding or Deleting a Group Member
You can manually add an individual or organization to a group. In addition, if a commerce item is created with the related option, any purchaser of that item is added to the designated group.
Do the following to add an individual or organization to a group:
- Go to the group page.
- In the Members area, select Add a contact.
- Find and select the contact to add. The system displays the Group member detail page.
- Select a Role for the new group member.
- (optional) Enter the group membership Begin date, and group membership End date.
- Click Save & Close.
The system adds the contact to the group and adds the group membership to the contact record. The contact status is Active if the selected role is active and the current date is between the Begin date and the End date.
Do the following to delete a member from a group:
- Go to the group page.
- In the Members area, select the role of the contact you wish to remove from the group. The system displays the Group member detail page.
- Select delete or the Delete membership button (for Simple Groups). The member is deleted from the group and the contact name no longer displays in the group roster. If the member has more than one group role, you must delete each role for the member to be completely deleted from the group.
Editing group member details
You can manually edit an individual or organization group member record to change the Begin and End dates, roles, status and Join date. You must have the Allow editing option enabled in the Group List Editor configuration options to be able to edit membership information about a group member. Please see the Group List Editor documentation for more information.
Do the following to edit an individual or organization group member:
- Go to the group page.
- In the Members area, find the contact you want to make changes to.
- Select the current role for that member to open the Group member details page.
- From the Group member details window, click the Edit icon. This allows you to change the member's role, Begin date and End date.
- The Join date field is also editable. This field is only editable for staff users and Group Administrators/Group Member Administrators.
- Save any changes.
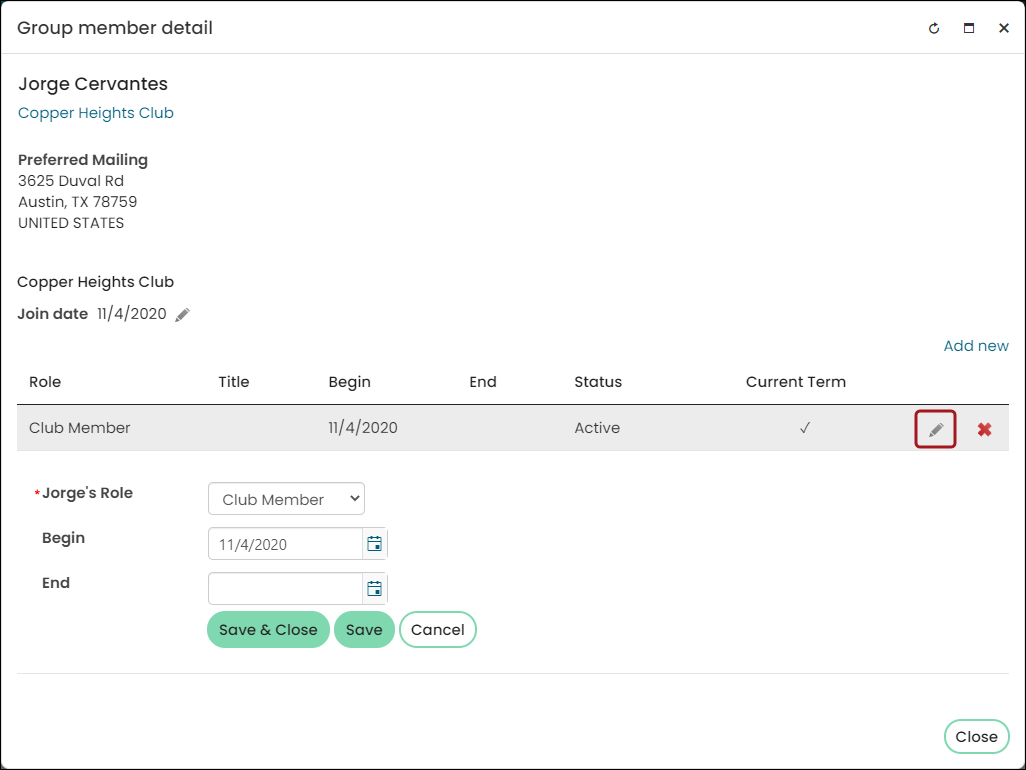
The Join date field is either the date the member joined or the date that was populated in the Workbook Converter.
When an individual joins a membership, the transaction date will be the Join date that is populated. The Begin date is simply the date that the membership term starts and is not the same as the Join date. After the Join date is populated, it does not change unless you manually make an update to the field. This field will not appear if Simple Group is selected.
Updated 5 months ago