

Entering gifts
Entering multiple gifts from a single window will save valuable time for your company. The Enter gifts window allows your staff to quickly enter gifts or donations from any donor in a single location.
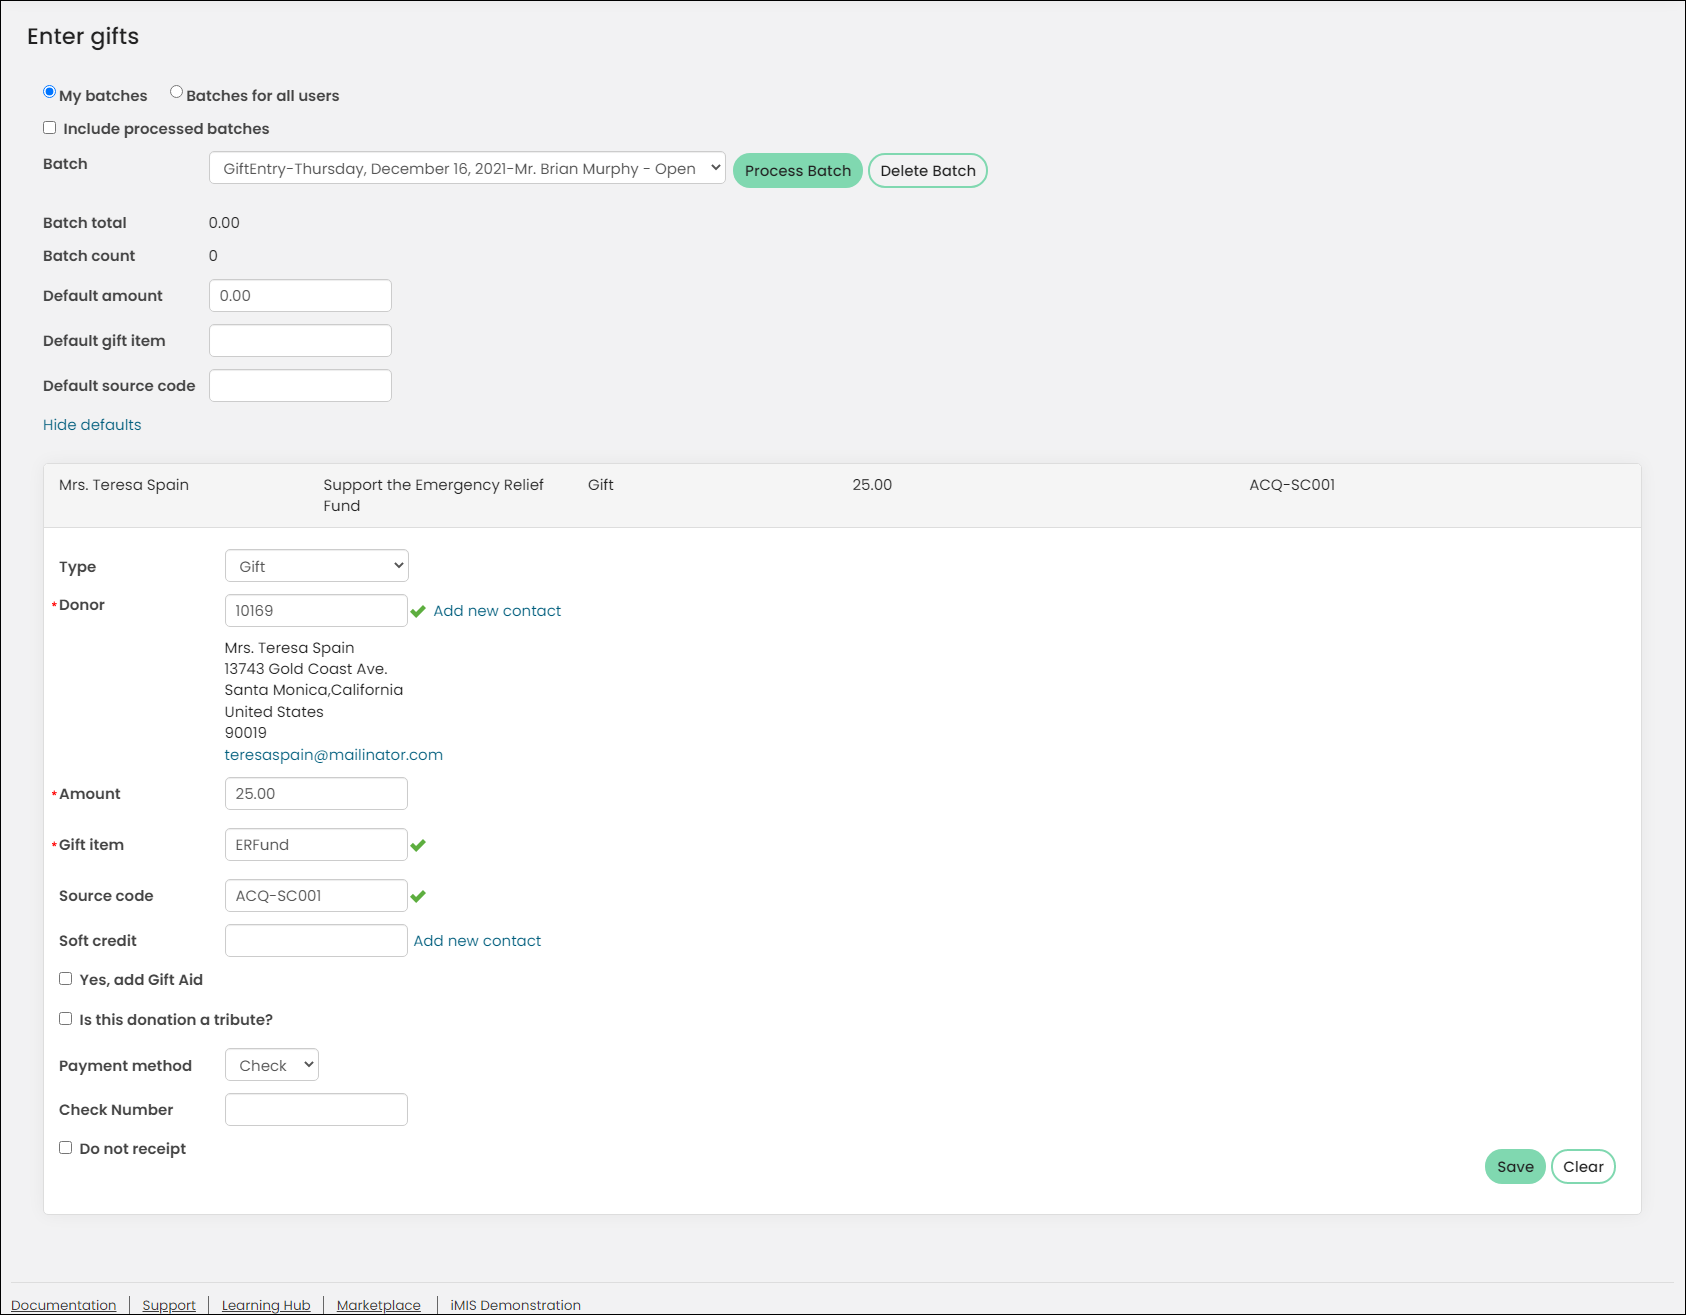
The types of donations that can be entered through the Enter gifts window include the following:
- Gifts (paid at time of entry)
- Pledges (unpaid gifts)
- Installment pledges (pledges paid by scheduled installments)
- Payments toward open pledge or installment pledge invoices
Only gifts entered through this window are accessible here. If a gift was entered through a public website, it cannot be accessed from this window.
Entering the gifts and pledges
Selecting a batch in the Enter gifts window
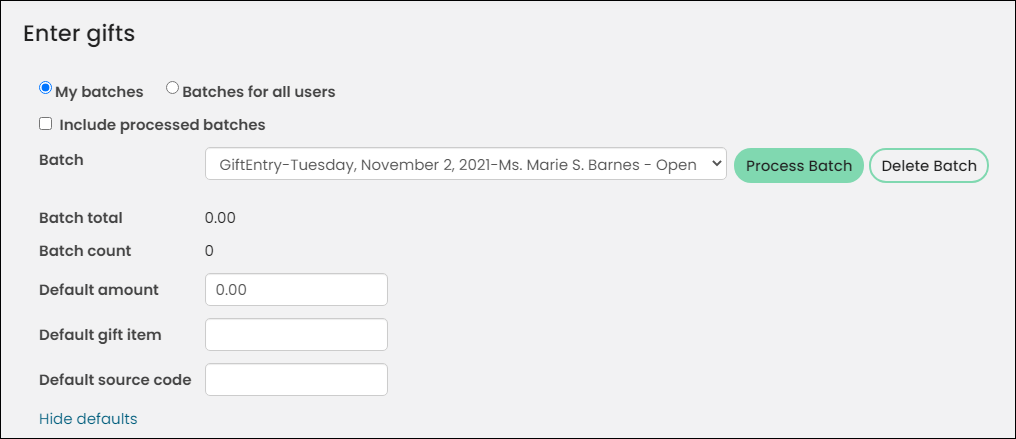
Go to Fundraising > Enter gifts. Before you can enter gifts, you must select a batch:
Gift batches
- Create a new gift batch - Click Create Batch. This creates a new batch using today's date. From the Batch drop-down, leave New gift batch selected, then click Create Batch. This creates a new gift entry batch using today's date. The batch date can be adjusted if needed so that the gifts and pledges have the correct date.
- Select an existing gift batch - From the Batch drop-down, choose an existing batch already created by you.
- Modify an existing gift batch - Enable Include processed batches, then choose a batch that has already been processed by you from the Batch drop-down. Select a gift in that batch for editing, and make changes as necessary. Save your edited gift, or Delete your gift. If you move on from entering a gift without saving your changes, a Not Saved icon is displayed.
- Choose a batch opened by someone else - Select Batches for all users, then expand the Batch drop-down to display a list of open batches created by other users. Enable Include processed batches to display open and processed batches by other users.
📘 Note
If a manual accounting batch is selected, then the date of the accounting batch will be used as the gift or pledge date.
Adjustment batches
Adjustment batches enable staff users to adjust gifts and pledges that have already been entered. See Adjusting gift and pledge details.
Notes
- Only batches created in the Enter gifts window will appear in the Batch drop-down.
- Although gift entry batches are separate from accounting batches, transactions from gift entry batches may end up in an accounting batch (Finance > Batches) if the gift entry and accounting batches are for the same date. The transactions remain separate in the gift entry batches when you return to the Enter gifts window (Fundraising > Enter gifts).
- If you perform a contact merge before the batch containing the entered gift is processed , you will encounter an error. The party for the gift can no longer be found in the database. It is recommended that you review your open batches to ensure they do not contain any merged contacts. These contacts could cause a partial failure for those gifts with the missing contacts.
- If the batch processes with errors, the batch remains in the batch list, and the list of displayed items shows only those items that have errors. You will need to enter any transactions with errors into a new batch and submit the batch. To view processed donations, go to Finance > Invoices to see the gift or pledge, or go to Finance > Payments > Find payments to view details for a payment.
Entering gifts
There are many different options when entering gifts, but you do not need to add data for each option.
Go to Fundraising > Enter gifts and choose a batch. When you are ready to enter gifts, enter the following information:
Specify default values
(optional) Set up default values to prepopulate the Amount, Gift item and Source code fields. This can help streamline your gift-entry process:
- Select Show defaults.
- Enter the following values as needed:
- Default amount
- Default gift item
- Default source code
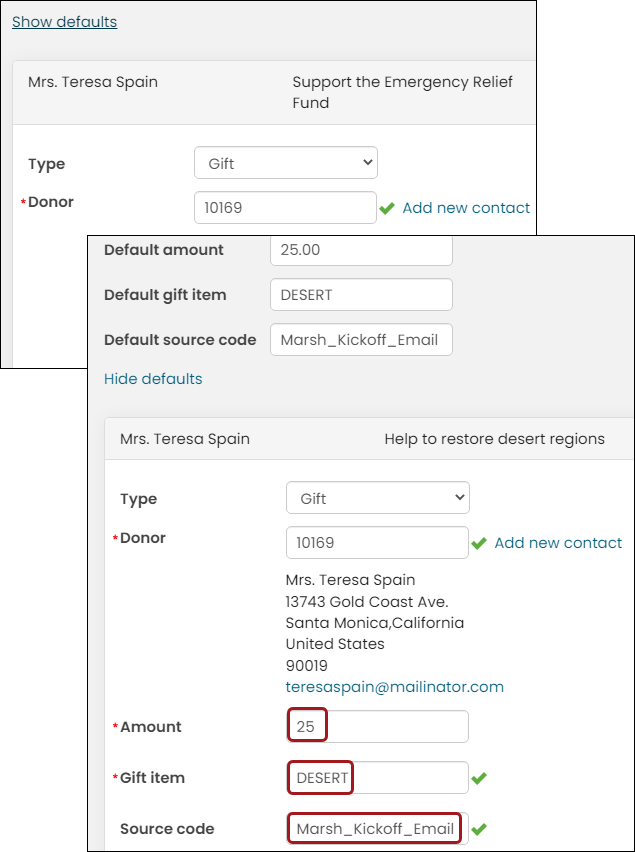
You can select Hide defaults to hide these fields, but the default values will persist until you erase the values in these fields.
Select a gift type
Choose one of the following gift types:
-
Gift - Select this option to create a one-time donation with payment or to record In-Kind donations.
When you define your gift items, you can elect to Allow purchaser to enter details. This option allows staff users to add specific Details about an item. For example, when a charity accepts merchandise or services as In-Kind gifts, a staff user can specify details about the items or services received from the donor. For more information, refer to Defining gift items.
- Pledge - Select this option to create a single donation to be invoiced and paid in the future.
-
Installment Pledge - Select this option to create a donation split into multiple invoices:
- Frequency - Select an option from the drop-down to indicate how often you want to make an installment payment on your donation.
- Number of installments - Enter the number of payments over which the donation amount will be paid. The maximum number allowed is 99, but it is not recommended to go above 36.
- First installment - Enter the date on which the first payment is due.
- Pledge Payment - Select this option to enter payments for open pledge invoices or for one or more installments of an installment pledge invoice. You must specify a donor in order to view pledge payments, then select one or more invoices.
A schedule of installment pledge payments is displayed. This provides the payment date and the amount to be paid.
Required fields
The following fields are required, depending on the Type of gift:
- Donor - Enter the user ID of the Donor placing the donation, or begin typing their name to review a filtered list of contacts. If the donor does not have a user ID, select Add new contact. This does not create an account for the contact, and the address is not verified by the Address Verification Service.
- Amount - Enter the gift or pledge Amount. If you set a Default amount, this value will be prepopulated, but can be overwritten.
- Gift item - Enter the Gift item code. As you type in the Gift item field, the field acts as a drop-down and you can select a Gift item.
- (Gift and Pledge Payment) Payment method - Enter the payment information. If you do not see a payment method you need, review the Gift Entrypayment method set.
- (Installment Pledge) If this gift is an Installment Pledge, provide the following to create a donation split into multiple installments:
- Frequency - Select Monthly, Quarterly, or Annually to indicate how often the installment payment is to be taken.
- Number of installments - Enter the number of payments over which the donation amount will be paid. The maximum number allowed is 99, but it is not recommended to go above 36.
- First installment - Enter the date of the first payment.
📘 Note
When you select multiple installments to be paid, the payment will always be applied to the oldest installments first.
🚧 Warning
Direct debits/ACH and Open Credit payments are not supported in Gift Entry.
Optional fields
The following fields are optional:
Source code
If this gift is a Gift, Pledge, or Installment Pledge, select the Source code for the transaction. The Source code lets you track the campaign or other source that motivated the donation, which can then be used for analysis or targeted search results. The source code is retained in the activity records generated from the transaction. As you type in the Source code field, the field will act as a drop-down and you will be able to select a Source code.
Soft credit
You can apply a Soft credit to the gift. Enter the user ID of the contact to which you want to apply the soft credit, or begin typing their name to review a filtered list of contacts.
Gift Aid
If you are submitting a Gift Aid donation, enable Yes, add Gift Aid. If the current donor already has an active Gift Aid declaration, this option is already enabled. Uncheck the Yes, add Gift Aid option if this gift is not eligible for Gift Aid claims.
Enabling the Yes, add Gift Aid option will reveal the following configuration options:
- Choose the Gift Aid declaration method:
- Written - Used when a donor has filled out a form requesting Gift Aid for a donation and mailed it to the organization.
- Verbal - Used when a donor has communicated with the organization over the phone or in person.
📘 Note
See Gift Aid declarations for more information about these methods. -
Include this gift and:
- If Past donations is selected, then the new declaration applies to the current gift as well as past gifts. If a donor does not have a Gift Aid declaration and the Yes, add Gift Aid option is not selected, the donation can still be claimed later if a past donations Gift Aid declaration is created.
- If Future donations is selected, the Gift Aid declaration applies to the current gift as well all gifts going forward. The next time a staff user makes a donation on behalf of the donor, the staff user will not have an option to create a new Gift Aid declaration. The previous Gift Aid declaration will cover this gift and all gifts going forward.
📘 Note
If both Past donations and Future donations remain unselected, the Gift Aid declaration only applies to the current gift. - In the Declarations received field, enter the date the declaration was received.
- In the Note field, enter additional notes associated with the Gift Aid declaration.
Gift details
If the selected type is Gift and the gift item is configured properly, you can enter Details about the gift. To enter gift Details, the Allow purchaser to enter details option must be enabled for the specified gift item. Open the gift item for edit to enable this option. For more information, refer to Defining gift items.
Tribute donation
If this gift is a tribute, enable Is this donation a tribute? See Managing tribute notification communications for more information.
Enter the following tribute details:
- Tribute type - Specify whether the tribute is In Honor Of or In Memory Of.
- Tributee name - Enter the name of the tributee. As you type in the Tributee name field, the field will act as a drop-down and you will be able to select a Tributee name. This list reflects any contacts that have been added by staff to the Memorial Tribute Honoree group.
- Tribute message - Add special notes about this tribute.
- Notify contact - Begin typing and select the contact you wish to notify about the tribute. This can be anyone in the iMIS database. To add a new contact, select Add new contact. This does not create an account username or login for the new contact. Tribute notifications will not be sent until they are issued from Fundraising > Tribute notifications > Issue notifications.
Do not receipt
The Do not receipt option only applies if the payment method is check (cash). When enabled, the associated gift entry is not picked up for receipting.
Processing and reviewing credit card payments
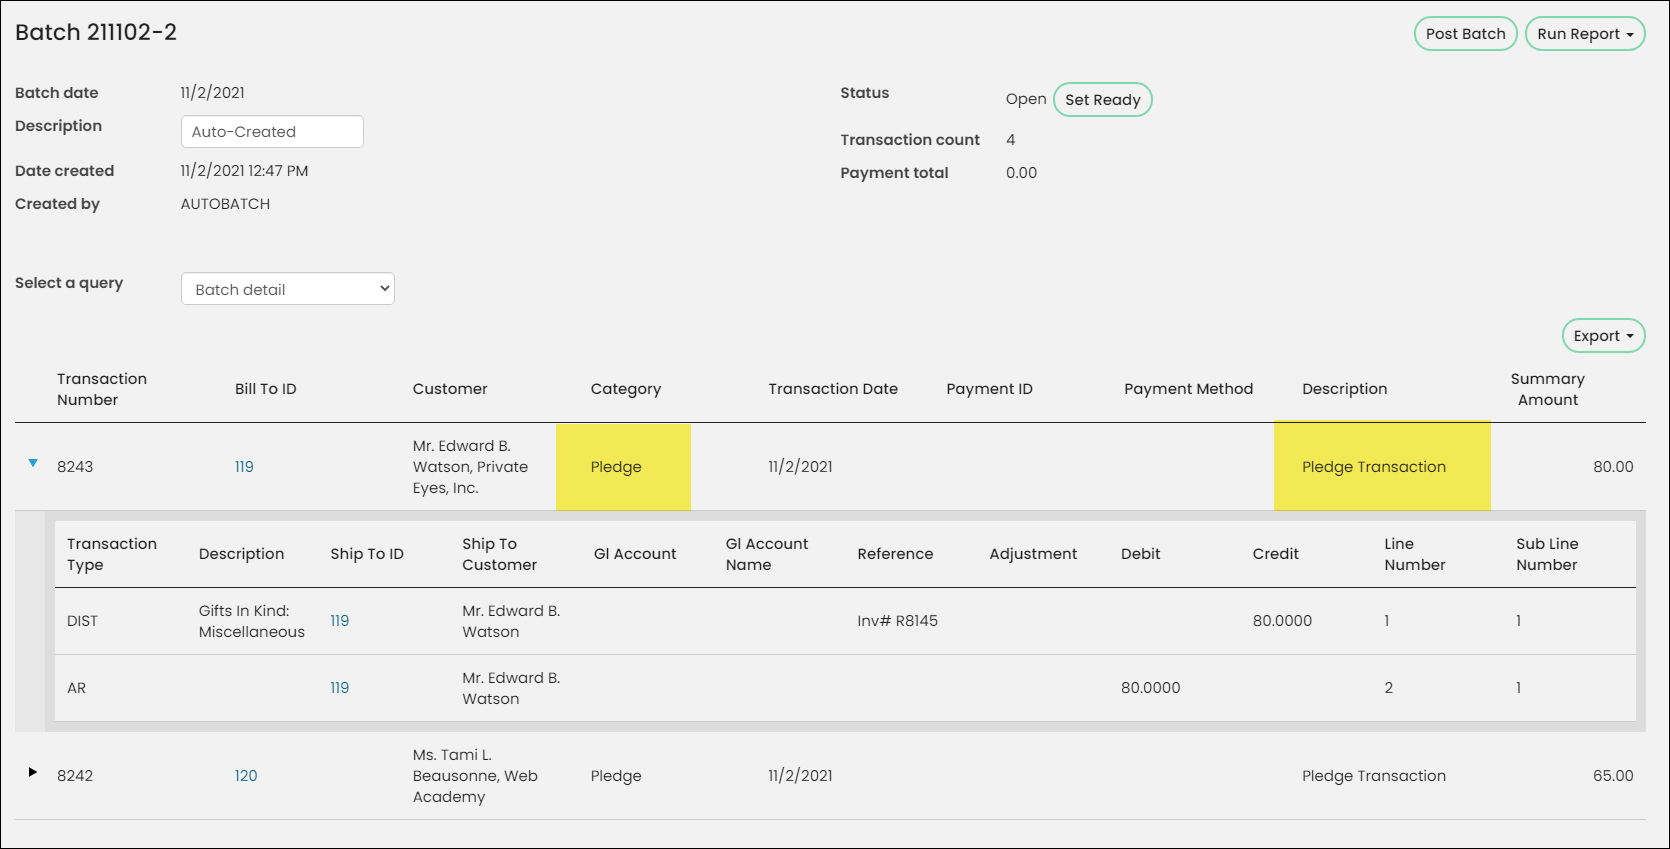
If the batch contained credit card payments, the credit card entries will appear as Pledges in the batch details window until the payment is taken. Schedule the payment to be taken automatically (recommended) or manually process payments each time a credit card batch is entered.
Processing credit card payments
Credit card entries appear as Pledges in the batch details window until the payment is taken.
You must schedule the Retrieve processed payments from Pay Central task to automatically retrieve the payments and apply them, or run this task manually:
- Automatic method - This is the recommended method. If you choose this method, then you must only perform the configuration process below a single time. Once the task is enabled and configured correctly, the payments are automatically processed on the schedule you define.
- Manual method - If you choose this method, the process outlined below must be performed each time after a batch with credit card payments is processed.
Scheduling the task to run automatically
This task is not automatically enabled out-of-the-box, but it is recommended that this task is enabled before you begin entering credit card payments from the Enter gifts window.
Do the following to enable the task:
- Go to RiSE > Process automation.
- Locate the Retrieve processed payments from Pay Central task.
- Select the task to open it.
- Select the Enabled checkbox.
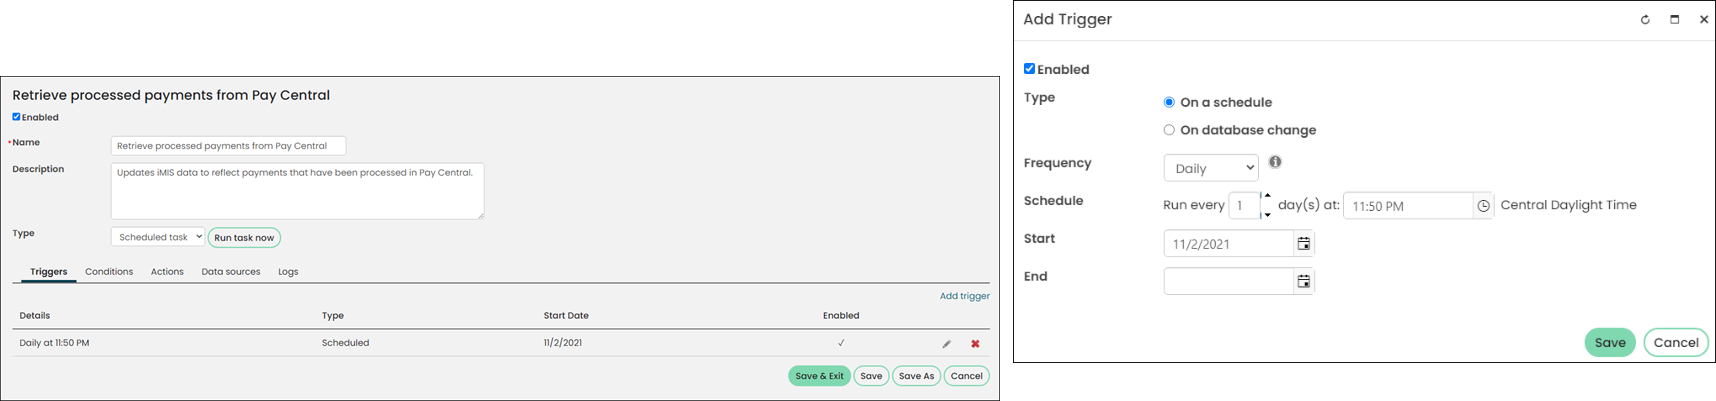
- From the Triggers tab, select Add trigger:
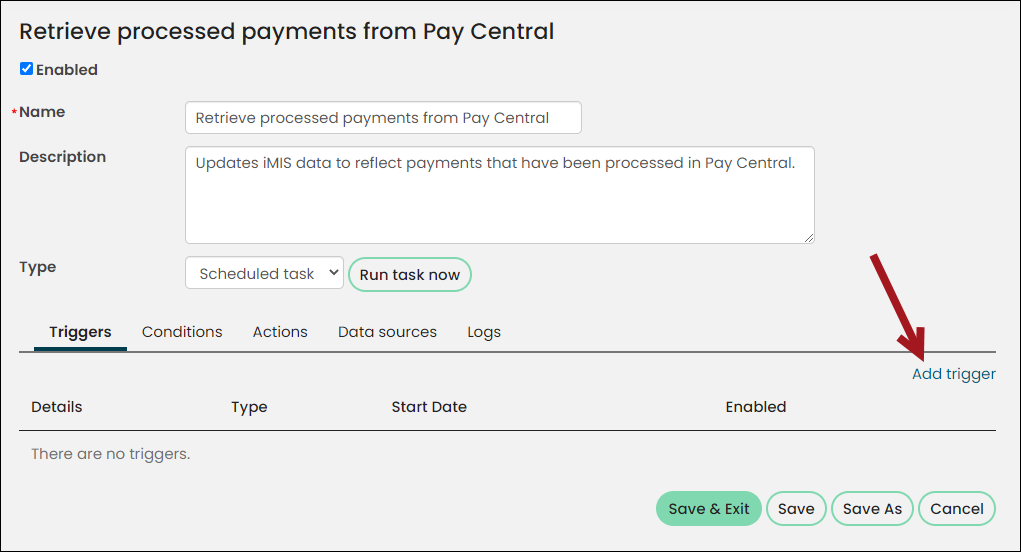
- Select the Enabled checkbox.
- Leave the Type as On a schedule.
- From the Frequency drop-down, choose how often you need the task to run. It is recommended that this option is set to Daily.
- From the Start date and time fields, leave the date set to today, but update the time. The task should be scheduled during a time of low website traffic, such as late at night.
- Click Save.
- Click Save & Exit.
- When the task executes, any transaction awaiting payment is processed.
Running the task manually
If you choose not to enable the task to run automatically, you must run the task manually.
Do the following to run the task manually:
- Go to RiSE > Process automation.
- Locate the Retrieve processed payments from Pay Central task.
- Select the task to open it.
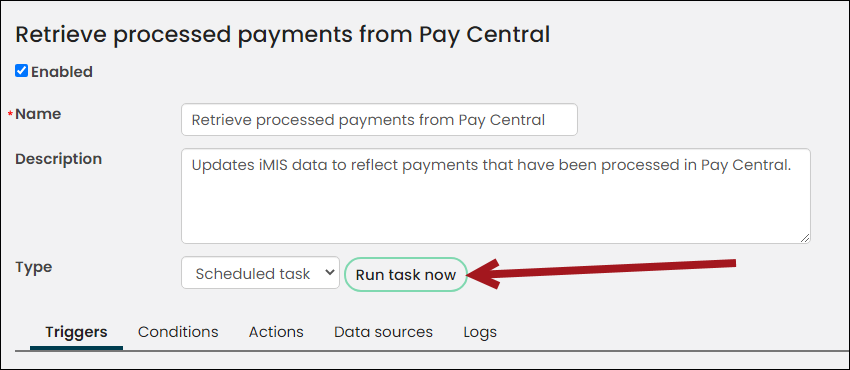
- Click Run task now.
- When the task executes, any transaction awaiting payment is processed.
Reviewing the results of a credit card payment
After the credit card payments are processed, staff users can review the results of credit card payments made through the Enter gifts window:
- Go to Finance > Pay Central > Automatic payment transactions.
- Search for and review the payments you entered through the Enter gifts window.
- For any payment for which the Result is not Completed, you must intervene to complete the transaction. Contact the donor for updated payment information, and pay the open unpaid invoice.
📘 Note
If the failed payment is for a pledge of any kind, you can enter updated payment information in the Enter gifts window.
Overview of the payment-retrieval process
The following is an overview of how Enter gift credit card payments are processed:
- From iMIS, you process a batch from the Enter gifts window that contains credit card payments by clicking Process Batch.
- You view the batch from Finance > Batches, and see the credit card transactions appear as pledge transactions, with a debit to the clearing account.
- You retrieve the processed payment:
- Manually retrieving the payment: When you click Run task now, iMIS contacts Pay Central to retrieve the processed payments.
- Scheduling the payment: When the Retrieve processed payments from Pay Central scheduled task is enabled, the payments will be taken on a date and time specified by you. Scheduling the task eliminates an extra manual step in this process.
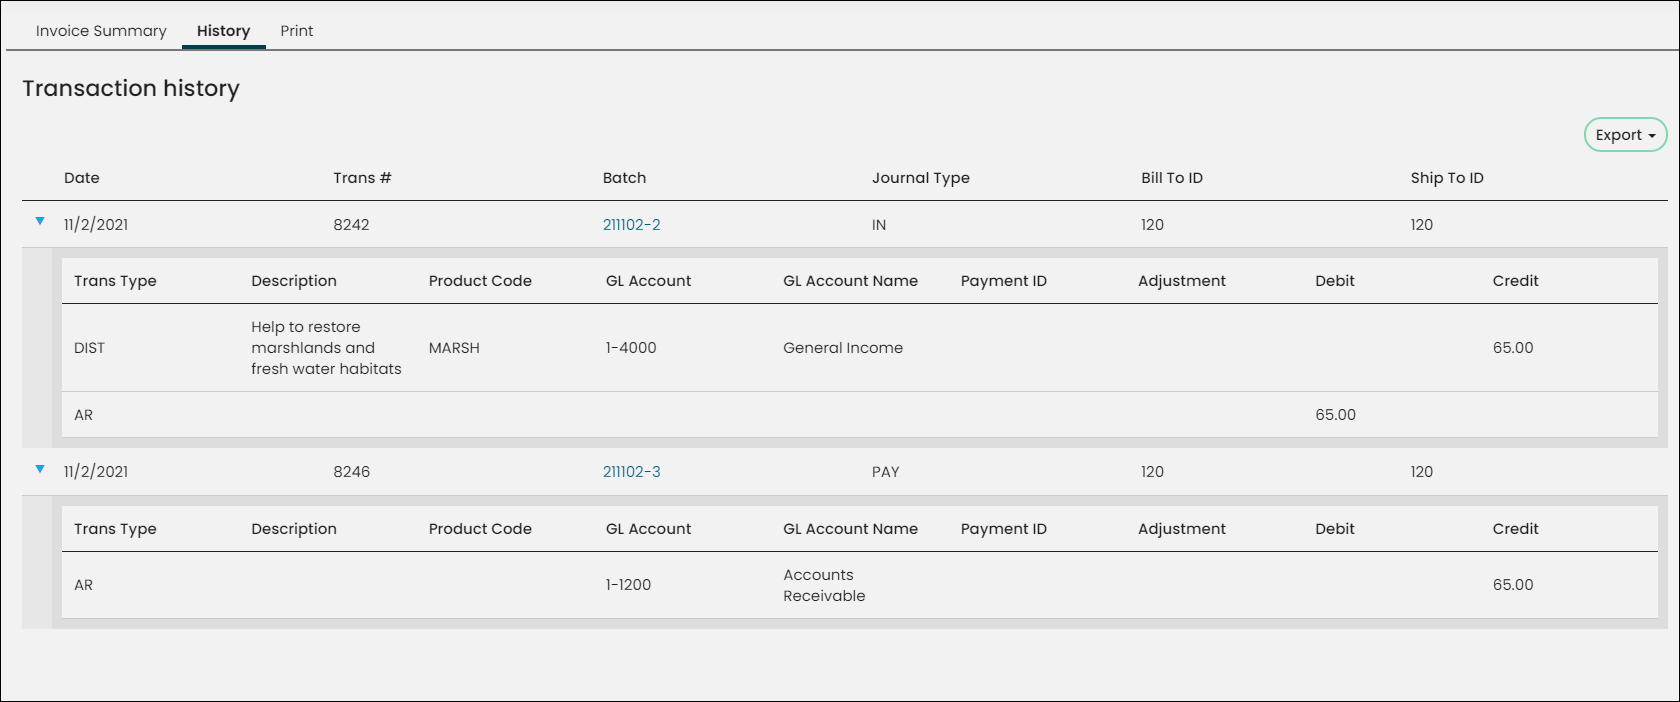
- You go to Finance > Invoices, and find the invoice. Click the History tab to see iMIS has updated the transaction history to display a new transaction row for the associated payment.
📘 Note
For full steps on this process, see Processing credit card payments.
Updated 5 months ago